-
Hi Guest!
We have posted a new VaM2 dev log on Patreon, starting a monthly cadence of written progress updates between Beta releases. Highlights include the new Gizmos System, Selection Carousel, and Modes System with Context-Specific Editing. Beta1.2 is 15 of 21 items complete.
Read the full post on Patreon, or follow progress on the public Trello roadmap.
You are using an out of date browser. It may not display this or other websites correctly.
You should upgrade or use an alternative browser.
You should upgrade or use an alternative browser.
Plugins + Scripts Timeline
- Thread starter Acid Bubbles
- Start date
Wow this is an incredible plugin! Thank you for making it, I'm having a lot of fun with it.
I have a couple of suggestions, if I may, regarding keyframes. They would improve my experience with the plugin greatly:
- Remove the requirement to have a keyframe on time 0.
- Have the option to split all keys of a target into transform and rotation separately.
- Add "bumper" buttons that will bump the selected keyframes left or right by the snapping amount. This should wrap the keys around the start/end of the animation, so if I'm on the last section and bump to the right the keyframe goes to the first section and vice versa. What if there is already a keyframe at the intended position? Preferably search for the next free position and put it there. Or simply don't allow the operation.
- Button to select all keyframes of a target (maybe clicking the target in the list?)
Thanks again for a great plugin and for considering my suggestions
@AngelCutebXtch FYI I didn't forget you!!!
@Tex it was supposed to be compatible with VaM 1.19 but I don't test against 1.19 so maybe not. If you have an error send it to me and I'll take a look!
@legit4978 thanks for the suggestions! Comments:
- Remove the requirement to have a keyframe on time 0.
> There _has_ to be at least two keyframes, otherwise there's no curve. However the last keyframe by default is "copy last", which makes it the same as if it wasn't there until you set it, and the first one will update if you move the target; why would you want that? What are you trying to do?
- Have the option to split all keys of a target into transform and rotation separately.
> That would be nice, except it would require additional tools so I know when you move a control whether to update the position and/or rotation (the same can be said for each individual curve). I agree that it would be nice, but by lack of time that's not something I'm considering right now (I'll accept a pull request if we agree on the final behavior)
- Add "bumper" buttons that will bump the selected keyframes left or right by the snapping amount. This should wrap the keys around the start/end of the animation, so if I'm on the last section and bump to the right the keyframe goes to the first section and vice versa. What if there is already a keyframe at the intended position? Preferably search for the next free position and put it there. Or simply don't allow the operation.
> Do you mean like moving the keyframe? Right now you can cut & paste it wherever you want. It's two actions instead of one, but I'd like to avoid too many buttons due to the cramped space!
- Button to select all keyframes of a target (maybe clicking the target in the list?)
> You can do that in the Bulk screen (in More), unless there's something you want to do that's not there?
Always love ideas and feedback, thanks!
@Acid Bubbles Thanks for such a swift response!
To elaborate:
- Remove the requirement to have a keyframe on time 0.
> There _has_ to be at least two keyframes, otherwise there's no curve. However the last keyframe by default is "copy last", which makes it the same as if it wasn't there until you set it, and the first one will update if you move the target; why would you want that? What are you trying to do?
I understand. What is problematic for me is to have offset curves without disruption. What I mean is I'd like to be able to do this:
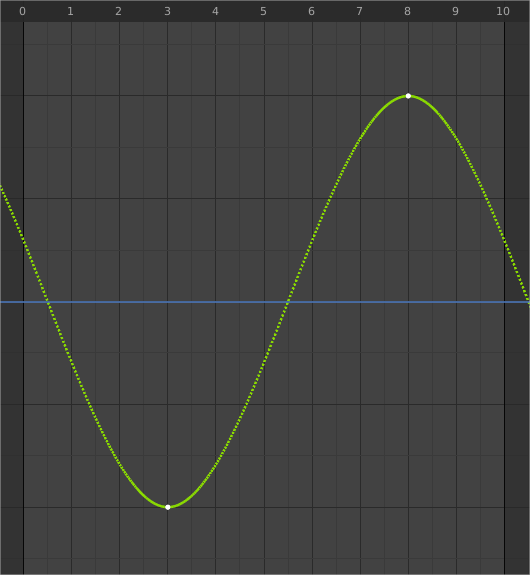
To replicate this right now I need to have a keyframe on time 0 and find a good position for it to not mess up the curve.
- Have the option to split all keys of a target into transform and rotation separately.
> That would be nice, except it would require additional tools so I know when you move a control whether to update the position and/or rotation (the same can be said for each individual curve). I agree that it would be nice, but by lack of time that's not something I'm considering right now (I'll accept a pull request if we agree on the final behavior)
I suspected it wouldn't be trivial, and I didn't expect anything, I just thought I'd suggest it.
- Add "bumper" buttons that will bump the selected keyframes left or right by the snapping amount. This should wrap the keys around the start/end of the animation, so if I'm on the last section and bump to the right the keyframe goes to the first section and vice versa. What if there is already a keyframe at the intended position? Preferably search for the next free position and put it there. Or simply don't allow the operation.
> Do you mean like moving the keyframe? Right now you can cut & paste it wherever you want. It's two actions instead of one, but I'd like to avoid too many buttons due to the cramped space!
Yes, a faster way to move keyframes, right now it's very tedious. I understand the UI space is an issue. I imagine bumping keys could be done while the animation is playing, which would be great for trying out timings.
- Button to select all keyframes of a target (maybe clicking the target in the list?)
> You can do that in the Bulk screen (in More), unless there's something you want to do that's not there?
I've missed that, I'll check it out!
Again, thanks for responding! ?
To elaborate:
- Remove the requirement to have a keyframe on time 0.
> There _has_ to be at least two keyframes, otherwise there's no curve. However the last keyframe by default is "copy last", which makes it the same as if it wasn't there until you set it, and the first one will update if you move the target; why would you want that? What are you trying to do?
I understand.
To replicate this right now I need to have a keyframe on time 0 and find a good position for it to not mess up the curve.
- Have the option to split all keys of a target into transform and rotation separately.
> That would be nice, except it would require additional tools so I know when you move a control whether to update the position and/or rotation (the same can be said for each individual curve). I agree that it would be nice, but by lack of time that's not something I'm considering right now (I'll accept a pull request if we agree on the final behavior)
I suspected it wouldn't be trivial, and I didn't expect anything, I just thought I'd suggest it.
- Add "bumper" buttons that will bump the selected keyframes left or right by the snapping amount. This should wrap the keys around the start/end of the animation, so if I'm on the last section and bump to the right the keyframe goes to the first section and vice versa. What if there is already a keyframe at the intended position? Preferably search for the next free position and put it there. Or simply don't allow the operation.
> Do you mean like moving the keyframe? Right now you can cut & paste it wherever you want. It's two actions instead of one, but I'd like to avoid too many buttons due to the cramped space!
Yes, a faster way to move keyframes, right now it's very tedious. I understand the UI space is an issue. I imagine bumping keys could be done while the animation is playing, which would be great for trying out timings.
- Button to select all keyframes of a target (maybe clicking the target in the list?)
> You can do that in the Bulk screen (in More), unless there's something you want to do that's not there?
I've missed that, I'll check it out!
Again, thanks for responding! ?
Thanks@AngelCutebXtch FYI I didn't forget you!!!
@Tex it was supposed to be compatible with VaM 1.19 but I don't test against 1.19 so maybe not. If you have an error send it to me and I'll take a look!
@legit4978 thanks for the suggestions! Comments:
- Remove the requirement to have a keyframe on time 0.
> There _has_ to be at least two keyframes, otherwise there's no curve. However the last keyframe by default is "copy last", which makes it the same as if it wasn't there until you set it, and the first one will update if you move the target; why would you want that? What are you trying to do?
- Have the option to split all keys of a target into transform and rotation separately.
> That would be nice, except it would require additional tools so I know when you move a control whether to update the position and/or rotation (the same can be said for each individual curve). I agree that it would be nice, but by lack of time that's not something I'm considering right now (I'll accept a pull request if we agree on the final behavior)
- Add "bumper" buttons that will bump the selected keyframes left or right by the snapping amount. This should wrap the keys around the start/end of the animation, so if I'm on the last section and bump to the right the keyframe goes to the first section and vice versa. What if there is already a keyframe at the intended position? Preferably search for the next free position and put it there. Or simply don't allow the operation.
> Do you mean like moving the keyframe? Right now you can cut & paste it wherever you want. It's two actions instead of one, but I'd like to avoid too many buttons due to the cramped space!
- Button to select all keyframes of a target (maybe clicking the target in the list?)
> You can do that in the Bulk screen (in More), unless there's something you want to do that's not there?
Always love ideas and feedback, thanks!
@AngelCutebXtch in a nutshell:
Let's say that you already have an audio source (e.g. a person's head audio source or an audio source atom), and a Timeline instance. To auto-play the animation and audio:
First, go to the "Add Targets" screen, and click on "Add triggers track"
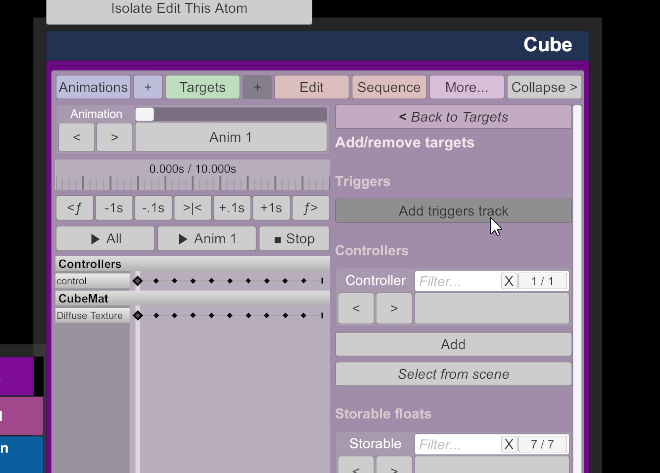
Now go back to Targets, and select Edit Triggers (make sure you're at 0 seconds, but you can add a trigger at any time if you want)
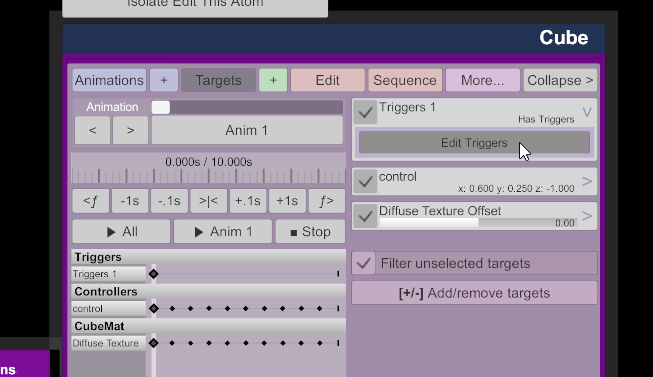
Now add a Start Action, and click on Settings:
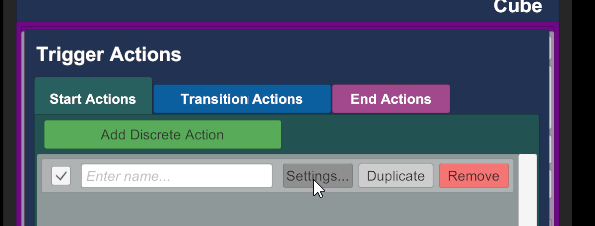
You can select the clip you loaded in Scene Audio:
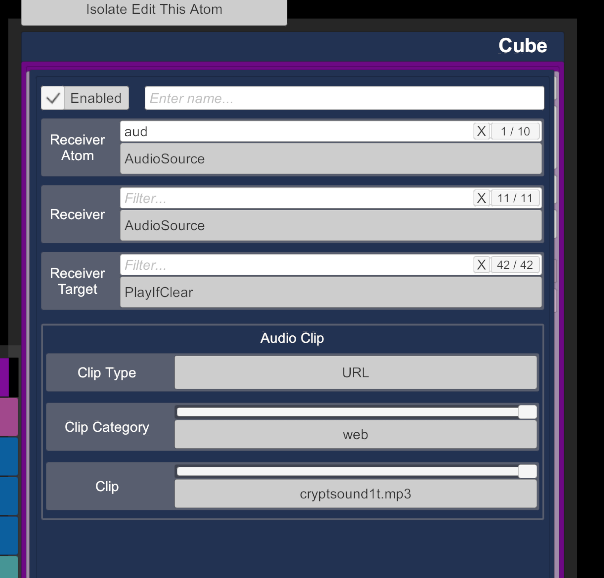
And now whenever you play the Timeline animation, the audio will play too.
If you want it to play automatically when you load the scene, you can toggle Auto play on load in the Sequence tab:

Let's say that you already have an audio source (e.g. a person's head audio source or an audio source atom), and a Timeline instance. To auto-play the animation and audio:
First, go to the "Add Targets" screen, and click on "Add triggers track"
Now go back to Targets, and select Edit Triggers (make sure you're at 0 seconds, but you can add a trigger at any time if you want)
Now add a Start Action, and click on Settings:
You can select the clip you loaded in Scene Audio:
And now whenever you play the Timeline animation, the audio will play too.
If you want it to play automatically when you load the scene, you can toggle Auto play on load in the Sequence tab:
@legit4978 oh yeah I undestand for the curves, you'd need "negative keyframes" (in the image you have shown, there is an effective keyframe that replicates the one near the end for it to work). There's not much chance of it happening due to me doing this on part time, but it's absolutely feasible; when I'll release the pan & zoom feature for the scrubber, this will be easier to make.
Hi, I am creating mocap animations. I import them as a BVH using BVH player. Can I use Timeline to edit the mocap animations? How would this be done. Would I created a layer for the edits and one for the main animation?Acid Bubbles submitted a new resource:
Timeline - An animation timeline with keyframe and controllable curves
Read more about this resource...
Hi, I have an animation I have created (BVH file) that is 500 seconds long baked to the main scene timeline. In the animation I would like to add animations i.e., edit part of the original animation foot position or arm/hand positions at various points during the main animation. So for instance at 150 seconds in the animation I want to move the arm to a different position and then at 250 second change the arm again. What would be the best way to do this? I have tried using the triggers in the main scene timeline. But, I would like to be able to bake all the animations down to one scene animation.
I answered on Discord, however if someone has a solution to share here feel free too 
Hu guys,
quite a newbie here but learning fast. I just went thru the wiki of this pluggin (amazing by the way) and I was able to create animations. However, I feel bad for asking but google was not my friend here ...
Simple question:
1. I created a small animation where a person raise its arm. I name the animation "Anim 1" directly in its pluggin window.
How could I start the animation if I touch the person face? Its probably around collision trigger but again, if you could point me out where to look at, it would help a LOT!
I am able to start the animation thru a UIButton ... I am simply missing the path to the face collision here.
Thanks guys! Great work on that plugin! It is awesome!
Last edited:
I can't give the exact steps now but join my discord and look at this discussion : https://discord.com/channels/732305996956958740/732305996956958743/862134846902370344
Except the triggers are on the person atom
Except the triggers are on the person atom
Acid Bubbles updated Timeline with a new update entry:
Timeline v4.4.3
Read the rest of this update entry...
Timeline v4.4.3
- Fix NaN crash when using a blend in time of zero
- Fix incorrect adjustment of non-looping play next in when blend in is changed
- Automatically reduce non-looping animation length in transitions to include next blend
- Assign a correct default "play next in" that doesn't reduce the current animation's blend in time for non-looping clips
Read the rest of this update entry...
Acid Bubbles updated Timeline with a new update entry:
Timeline v4.4.3
Read the rest of this update entry...
Hi, on the 2 + 1 scene from Nicho that uses timeline, and my computer just isn't keeping up so everything moves at about half speed. Normally with animation I can just speed it up by changing animation speed to 2 for example. Is there any way to do anything similar in Timeline? I watch the clock moving inside timeline and it's taking roughly 2.5 seconds per 1 second of animation.
Thanks in advance!
Hi @Bob Nothing ! Yeah in the next version of Timeline there will be a setting to use "clock time" instead of "physics time". Unity will "slow down" the game when it cannot keep up, hence the result you see. You can adjust the speed in Timeline but you'll have to do this on all instances; in the Edit tab there's the Global Speed, this will affect all animations for that instance.
Hope that helps! <3
Hope that helps! <3
Thank you very much for the update and the help! I'll try that out in the meantime. I appreciate the reply!Hi @Bob Nothing ! Yeah in the next version of Timeline there will be a setting to use "clock time" instead of "physics time". Unity will "slow down" the game when it cannot keep up, hence the result you see. You can adjust the speed in Timeline but you'll have to do this on all instances; in the Edit tab there's the Global Speed, this will affect all animations for that instance.
Hope that helps! <3
I seem to have issues where the 'skeleton' gets disconnected from the texture. The figure appears frozen while an invisible mesh pushes around the clothes if it is in the proximity. Is this a physics setting issue? I have it at Rate 60hz and Cap 2.
Also, it would be fantastic to export BVH format. Is there a way to do that?
Also, it would be fantastic to export BVH format. Is there a way to do that?
Last edited:
@romans715 uh no that's not telling me anything, I'd say it's a weird shader memory corruption (Unity, maybe VaM's shader, unrelated to Timeline) but then the clothing wouldn't work either. So, I have no idea...
As for BVH, I knoooow but no it's not supported. It's technically possible but a challenge, since BVH animates bones and Timeline animates controls.
As for BVH, I knoooow but no it's not supported. It's technically possible but a challenge, since BVH animates bones and Timeline animates controls.
Changing the global speed worked, thanks!Hi @Bob Nothing ! Yeah in the next version of Timeline there will be a setting to use "clock time" instead of "physics time". Unity will "slow down" the game when it cannot keep up, hence the result you see. You can adjust the speed in Timeline but you'll have to do this on all instances; in the Edit tab there's the Global Speed, this will affect all animations for that instance.
Hope that helps! <3
Acid Bubbles updated Timeline with a new update entry:
Timeline v4.4.4
Read the rest of this update entry...
Timeline v4.4.4
- Fix trigger timers not working (thanks @VeeRifter)
- Fix "Keyframe all selected at once" not working
- Reset animation options when resetting Timeline instead of only clearing the animation themselves
- Show an error message when loading a Timeline 5 animation that uses clip poses
Read the rest of this update entry...
Hey, love your work !
Just a question, is there a way to filter animations in the animation list?
Oh and another thing, if you have 2 layers, body and expressions for exemple, with animations as follow:
[Body]Main
[Body]OtherAnim
[Expressions]Main
[Expressions]OtherAnim
[Expressions]OtherAnimSecondary
The goal is to play OtherAnim, and switch the expressions layer anims. When playing, it works perfectly, the main anim layer plays [Body]OtherAnim, and i can switch between the two expressions anim.
The problem is editing [Expressions]OtherAnimSecondary. When selecting it, as i understand it, it will try to find anim with the same name in other layers, and if it doesn't find one it will select another one (Not sure how it choose wich one, thought it was the first of the layer, but it doesn't seem to be the case. Would love to know that, is it name based ?)
It makes it impossible to edit [Expressions]OtherAnimSecondary synced with [Body]OtherAnim, because the [Body] layer will play [Body]Main.
It would be cool that if it doesn't find an anim with the same name in another layer, it just doesn't play that layer at all (?), or the ability to toggle layers on/off, to edit one layer with the others staying as they are(?).
Last edited:
Thanks @JaxZoa , I love yours too!
Currently there's no way to deal with large animations sets other than the drop down, I plan on making something better sometime in the future though; maybe not filtering but at least making it much easier to navigate animations.
As for your comment it sounds like a bug; if the animation is playing, it shouldn't mess with other layers if there's nothing with a matching name, and if it's not playing it shouldn't switch other layers either. So either there's a bug, or there's something playing Main (either Timeline, a trigger, etc).
If you have time to make a simple scene to reproduce the problem (with instructions on what to do) I might be able to take a look soon-ish, otherwise it's going to be in a few weeks, but in any case I'll take a look! Also let me know which version of Timeline you used, just in case.
I have a scene which uses timeline on a "SimpleSign" atom. It shows a window in-game with the controls.
But when I click on "Custom UI", it opens a windows with just: re-sync... , autoplay,hide and enable keyboard shortcuts.
If I add timeline to scene plugin, it just shows it with default blank options.
How can I fix it?
But when I click on "Custom UI", it opens a windows with just: re-sync... , autoplay,hide and enable keyboard shortcuts.
If I add timeline to scene plugin, it just shows it with default blank options.
How can I fix it?


