The definitive asset creation tutorial for VaM
Introduction
This guide is a set of information, tips, tricks and suggestions to easily build new Custom Unity Assets for VaM and also, first and foremost, avoid mistakes and optimize your content.
It is the result of years of creating content for VaM, so if you dig in my old content, you will most likely realize that not all my content follows these guidelines… because I improved my workflow over time.
This is the definitive version of (to me) an optimal way of creating content for VaM.
I will not go into details when it comes to basic knowledge of Unity. This tutorial assumes that you already know your way around Unity’s editor and functionalities. And that you already have a project working for creating assets for VaM.
If not, you have excellent tutorials by MacGruber or VaMTastic to help you out with the basics :
1 - Building a good file structure
For any bundle, create a new directory. We’re gonna use “VAMAssetsTutorial”. It doesn’t need to be at the root of your Unity folder, it can be placed anywhere you want (depending on the way you organize your content).
Depending on your needs, immediately create subfolders for every type of resource you’re gonna use : Cubemaps, meshes, prefabs… etc.
On folder is mandatory tho : “prefabs” (we’re always gonna use prefabs since we’re talking about custom assets, and we're gonna save them here)
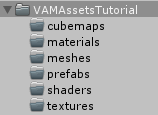
Create and order your different assets in these folders.
If you have a huge project with dozens of assets, you might want to create subfolders to ease the navigation. Like this :
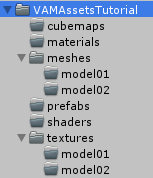
You are now ready to work.
This type of file structure is really helpful when it comes to scripting / coding. Your paths are obvious and you don’t have to think about where your assets are stored.
To avoid any future problem when you create bundles, if you're doing two different bundles, and one of them needs to use assets from another. Do not reference assets in another folder. Duplicate your content in your target folder.
Textures, shaders, materials... duplicate everything in each of your releases. This will save you time :
One last thing, your naming convention :
2 - Making optimized prefabs
Prefabs can be done pretty much with a simple gameobject and dragged into your prefab folder. But what happens if you want to rescale it at some point ? if you want to fix an orientation ? If you want to rename sub-objects or add more ?
You could argue that it’s not important… but if you’re planning on making plugins to control the assets, this will soon become a problem. An excellent way of doing of preventing any future problem is to create your prefabs like this :

You have to ensure that the root of the prefab vamat_prop_name is always completely resetted on the position, rotation and scale, like this :
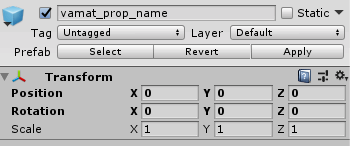
root_prop, can be renamed. I always use root_something. It is extremely useful to catch sub-objects with scripts. For instance, when I want several assets to work with a VaM plugin, all the compatible assets for this plugin will have the same root_xxxx name.
The rest of the geometry contained in root_prop is free. You can put whatever you want, name it however you want. You can put particles, audio sources, whatever you want.
Of course it goes without saying that you can’t put components that are not Unity native on these (custom scripts). Assetbundle do not allow scripts when they are built.
Again, same thing as your files, your naming convention :
Now, to size or resize your object properly, use a proper reference.
You can export a character from VaM.
The best situation possible is to have a female and male character.
Launch VaM, create an empty scene with a female character, be sure to have it at 0,0,0, open the edit tab and look in the Control & Physics 1 tab. Ensure that the scale is set to 1 ( 1 on the screenshot below ), and click on export OBJ and MTL files (2 on the screenshot below). Do the same for a male character.
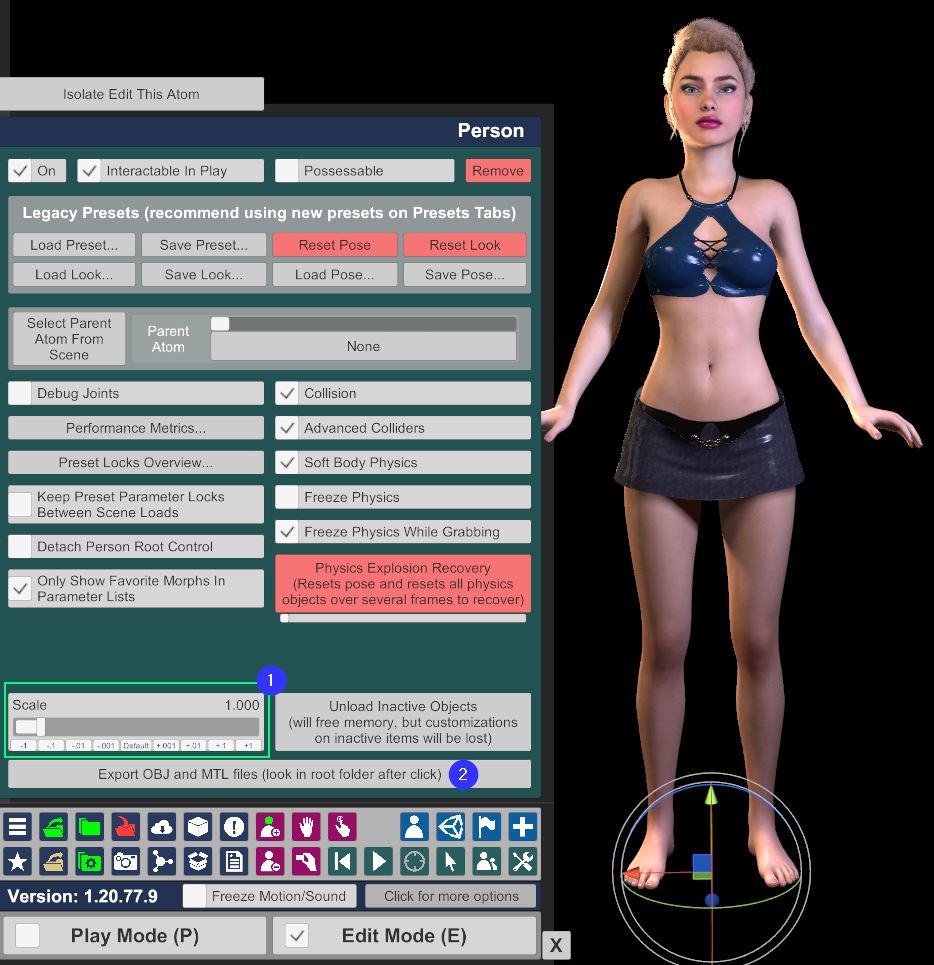
You will find the obj files at the root folder of your VaM installation. Delete the mtl file, move both obj files of your female and male character to your Unity project and keep them in an obvious folder. You will use them all the time.
All your scaling tweaks should be done based on these two references.
3 - Handling collisions of your prefabs
A - Choose your collision system wisely
Collisions are important if you want some interaction in your scene. Don’t overdo it.
If you are working with simple objects, having a perfect collision does not matter. A glass ? Use a capsule and two box colliders :
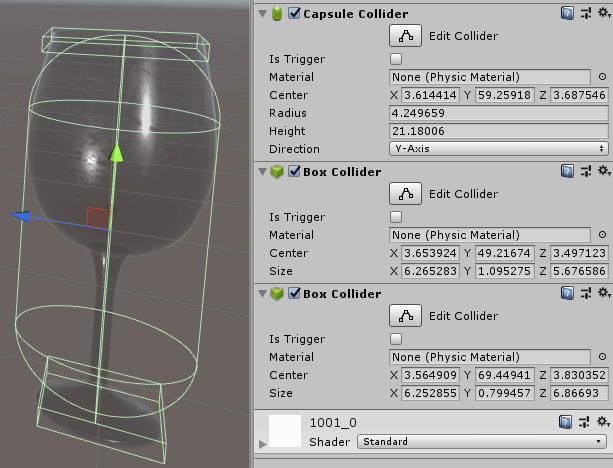
You only need to use a mesh collider when the object is complex and you want a perfect collision. Mesh collision is expensive. It won’t impact your framerate a lot if you don't put useless collisions everywhere. Extremely tiny details do not need collisions… no one will care.
B - Create sub-colliders if you want to use prefabs as physical objects.
No matter how hard you will try (with scripting/coding) : physical objects with mesh colliders only will pass through objects if the velocity of the object is a bit fast. This is due to the fact that mesh colliders are not as precise as basic colliders. ( The ContinuousDynamic collision mode of Unity does not work with mesh colliders )
So, for physical objects that can be used by the player (grabbed, thrown). You can combine both types of colliders.
In Icicles 101, the dildos have two colliders :
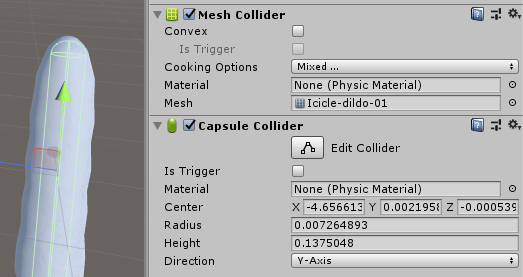
This is not enough to ensure that the object does not go through objects. You will need a script. You can find this script in The Hideout (yes you can copy it and put it in your project if you want).
C - Creating a mesh collider
I don’t know why so much people struggle with that (I had the question a lot on discord)... so I prefer to address it :
You don’t need to change any of the options : the collision should work directly in VaM. If not, there is potentially a problem with your mesh.
4 - Optimizing your textures
A - Sizing (and resizing) your textures
I often see huge assetbundles released on the hub. And when I try the assets, they are just a couple of items with a few textures.
To give you an idea : you can still have a really good texture at 512x512 or even 256x256 depending on the level of detail if the object can be held in the hand of your character.
It is a thing to aim for the “perfect quality possible”... but keep in mind that your var file will be ignored by people if it is way too heavy for the content it offers. For instance, I’ve seen bundles over 50mb for a couple of jewelry items… This was an immediate delete on my end.
VaM is extremely hard on the VRAM/RAM, and you should think about that when creating an asset. It is insane to think that you will load a 38mb texture for the diffuse of a tiny nose piercing. So, use the appropriate size for your textures.
If you are lazy… you can even just change the maximum resolution in the texture inspector instead of resizing the source file :

B - Enabling crunch compression
To quote Unity’s documentation :
Crunch is a compression format that works on top of DXT or ETC compression, by providing additional variable bit rate compression. [...] Crunch compression helps the texture use the lowest possible amount of disk space, but has no effect on runtime memory usage. Crunch textures can take a long time to compress, but decompression at runtime is fairly fast. You can adjust how lossy Crunch compression is, to strike a balance between file size and quality.
I have put this simple 2048x2048 texture coming from Painter into the package :
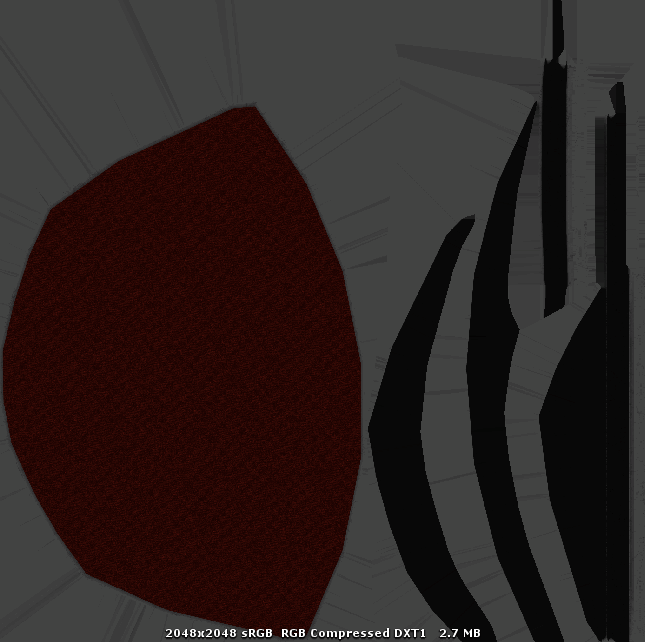
The resulting package without crunch compression enabled is 1150kb
The resulting package with crunch compression enabled at 50 quality is 479kb
On this single texture, it is a 59% size reduction of the final package. And the visual difference between the original one and the crunched one is almost invisible.
Depending on the texture, the overall size reduction might be less. But this is extremely powerful to get a really tiny var file.
As an example : I’m working on a big project for VaM at the moment… The bundle is not finished and counts at the moment over 80 different assets, props and enviros, with dozens of 4K, 2K, 512 and 256 textures… the beta version of the var file is 120mb.
To enable crunch compression. Select your texture, check Use Crunch Compression, and select the quality.
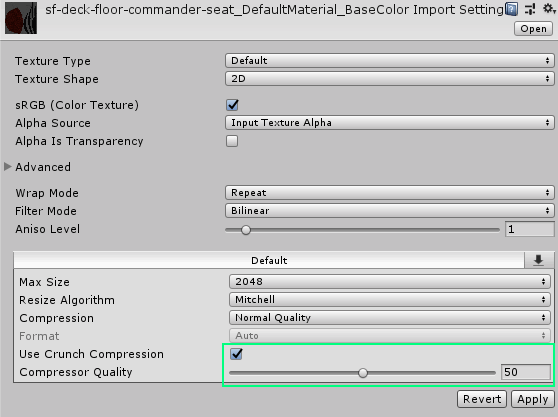
I have extensively tested the compressor quality. In the case of VaM :
Also, if you’re doing “realistic” textures. Don’t forget to swap the filter mode to trilinear and the aniso level to 16.
As a final note, I’ll insist on the fact that crunch compression does not save runtime memory. Do not use crunch compression thinking that it will lower the memory usage in VaM. It is only meant to optimize the size on the disk. You will still have to choose the adequate size for all your textures.
5 - Making clean materials
You have made your awesome new material. You’re testing different shaders and different textures of each type : diffuse, spec and normals. Then, being happy with your last version… you put it on your model, make your prefab and build your assetbundle.
You don’t really notice the result… but you build your var and publish it on the hub.
Did you know that you just bundled several useless textures ?
Select your material, right click on the Inspector tab, and select Debug.
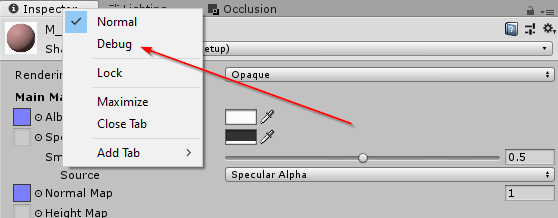
You will now have an inspector like this, and the important part is the Saved properties array :
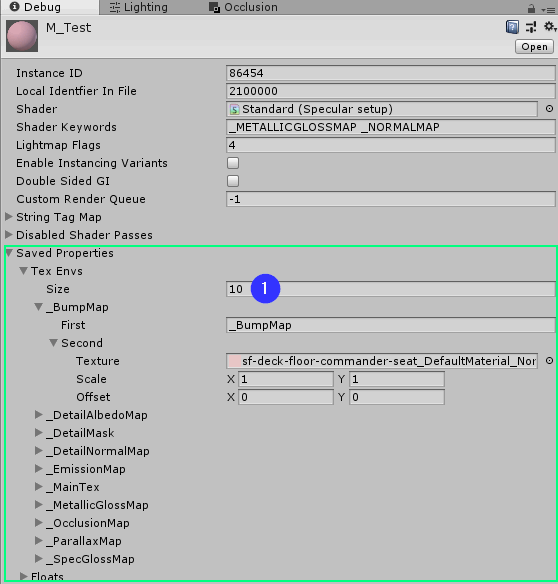
You will see every texture you tested during the creation of your material in the list. And the problem is : the assetbundle explorer thinks it has to be included with your bundle. (Yes you can say that Unity’s code is kinda crappy)
There are two ways to fix that :
So, before you build, always ensure that your materials are clean.
6 - Fixing the shadows
By default, Unity will produce assets with it's own shadow system. These shadows will be different from the ones in VaM. This could be compensated by the plugin VAMifier. But using the plugin would break your potential cool materials with reflections or more advanced rendering processes.
There is a way to fix that by adding a shadow library based on the same one used by VaM.
Since you've added the include is added to the editor, cleared the GI cache, you are good to go for any new project using this version of Unity. Which also means any new asset, material, texture... etc... inside a single project. This is a procedure you only do once.
7 - Building the package
Since we have seen every important aspect before building, we are pretty much done.
First, save everything. Close Unity completely and restart it.
Why ? The assetbundle browser has a strange behavior sometimes. It tries to include files out of nowhere… or fails to refresh properly all dependencies.
Restarting Unity fixes this issue.
This is something you are not forced to do while working on the bundle (the alpha / beta version). But for the final version, the one you’re gonna add to your var file. Be sure to do it.
Now… the way we’re working eases our assetbundle creation / update process.
We Just have to grab our main folder VAMAssetsTutorial and drag it to the configure tab.
Rename it and add a suffix. I’m generally using “_asset”, but it can be anything. This will avoid build errors if any assets also contain the keyword vamassetstutorial.

This technique is cool to avoid thinking about what you should include in your package. But it also includes everything in the folder.
So be sure to only have assets you’re using in the prefabs in your final folder.
8 - The finishing touch
Your bundle is ready, if you still haven’t you can either :
If your bundle is meant to be loaded for custom assets. Put in your final folder before packing it inside your .var file. And create a custom jpg in the same folder that represents a preview of your bundle.
At the end you will have this in the folder :
You’re ready to create your var. Your asset bundle is done.
9 - Final words
I might update and add several tips & tricks in the future. But in the meantime, if you have any trouble during the creation process of custom assets for VaM. Do not hesitate to ask, I will gladly answer and add some more details in this tutorial.
Do not hesitate to check the discussion, I will take the time to answer questions that might not fit the tutorial, or more specific requests.
Bonus chapters
These chapters will cover additional tips & tricks to create custom content. They are not mandatory in the whole process of creating custom content, but might be helpful to some of you.
10 - Importing and creating a prefab from Sketchfab
A - Installing sketchfab plugin
First, you will need the Sketchfab Unity plugin. This plugin will allow you to download immediately free assets from sketchfab with an (almost) guaranteed working asset. (rarely, import is not working).
Go here, download and install the plugin.
This is a unitypackage. So you can just double click on it with your VaM project opened (Unity project). Or simply do "Assets" > "Import Package" > "Custom Package".
Before you start, you will need a Sketchfab account. Create one and login at the top left of the plugin when you have opened the window using "browse sketchfab" (you will see a menu "Sketchfab" in the main menu of Unity after installation).
B - Downloading your model
Browse Sketchfab, find your model, download it. Don't forget to uncheck "Staff picked" to see all models. Let's use this chair as an example.
To do it properly in our current workflow, we're gonna change our target folder.
Create a new folder called _sketchfab, and a subfolder named dining_chair. In the case of our tutorial we're gonna have this folder structure :
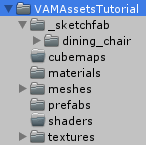
Note: If you're adding several assets in your assetbundle from Sketchfab, create a folder for each asset downloaded from the website.
Find the chair in the plugin. Click on the image. The download window will open :
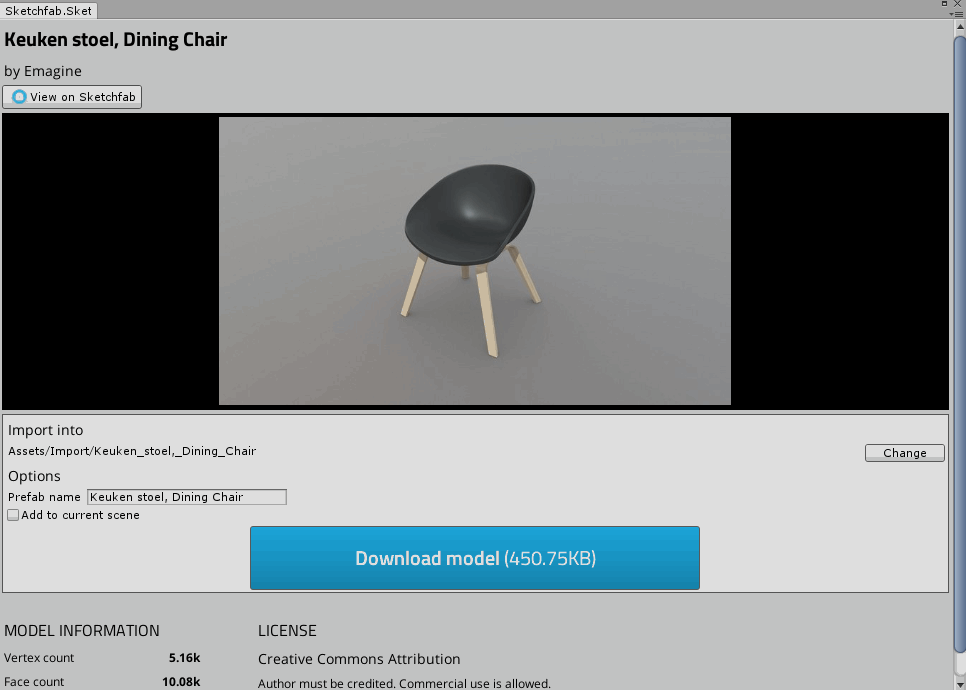
Click on the button "Change", and select your dining_chair folder. Eventually rename the prefab name... it doesn't really matter since we're gonna rename it afterwards.
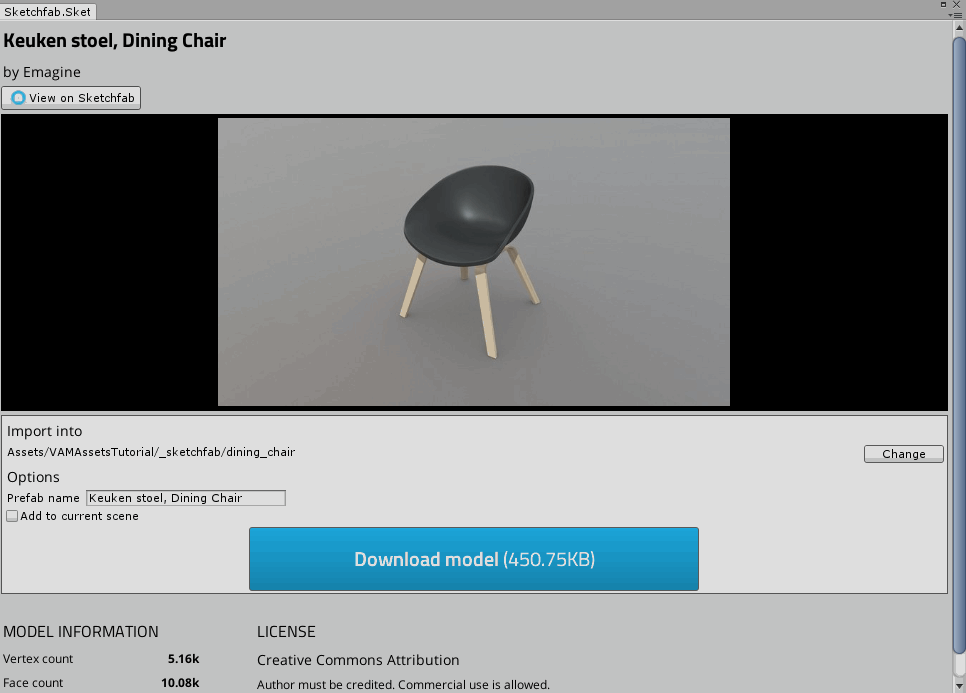
You can click on download model.
Wait for the download to finish.
C - Creating our own prefab.
Our model is downloaded. Let's create an empty scene and add the prefab to it.
The prefab done by Sketchfab is messy...
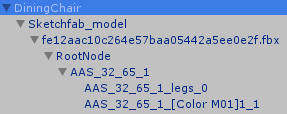
Let's clean that up, move RootNode to be a direct child of DiningChair (a warning will popup, say continue), and remove the rest. Let's rename them like this tutorial explains in Chapter 2.

This chair is a bit tiny compared to our accurate size. So if you followed this tutorial you now know how to fix that. Resize it using the root_prop child. Create your colliders, adjust whatever you want to have a chair you'll like in VaM.
Your prefab is done. Drag it to your prefabs folder to save it.
The final step is to go into your _sketchfab/dining_chair folder, and to do the final usual steps : tweak your materials to your liking, add new textures, remove useless textures, optimize them (resizing), enable crunch compression.
When all your tweaks on your materials and textures are done. You're good! Your first import from Sketchfab is ready.
Delete the original prefab in your dining_chair folder. The one created by the Sketchfab plugin. Then, you can export your assetbundle and test it in Unity.
One final note: Be careful with Sketchfab licenses. The plugin does not tell you everything. Use the view on sketchfab button to check the full licence and comments on the model to ensure you can use it.
11 - Make clean releases.
When creating custom assets, you'd be tempted to bundle everything in your var file. For instance, if your assets are made to go with a cool and complete scene, you'd think that it would be better to bundle everything into a single .var : your new custom assets, your looks, your clothes, your scenes.
But in truth, it is way better to extract heavy content from the scenes themselves :
You could argue that it will add more dependencies to your content. But dependencies are not bad as long as it is done properly. Better having a couple more dependencies well done, than less dependencies and no one wanting to use them because they are too heavy and badly organized.
So to summarize :
12 - Ease your demos / scenes creation process : avoid the dependencies fixing nightmare
I know, I know. You've just built your .assetbundle, and you want to jump right in and start your scene. Don't.
As explained in the previous chapter. Think beforehand how you're gonna release your scene, how you're gonna split up your assets in different unique resources on the hub.
When you know all your different .vars, create immediately your releases of your superb unique custom environment, props, etc... for your scene. You will have your creatorname.myenviro.1.var ready to use.
Then, only after that, start creating your scene.
If at some point, you update your assets, simply update the .var by using the New version of Exiting feature when creating a package :

When you do that, you will end up with creatorname.myenviro.2.var. Go in your AddonPackages folder, remove the version 1 of the var, and rename creatorname.myenviro.2.var to creatorname.myenviro.1.var.
Either restart VaM or use the Hard Reset button to properly reload all the var packages. Open your scene and continue working with your new content.
All this for only one simple reason : there is no tool or perfect way to handle the references to the assets properly in VaM unless you bundle everything in the same var file. If you work with your "local" assets without them being in .var files upfront, you will end up smashing your head on your desk because you will need to fix all the dependencies in the json files manually.
So work directly with .var files for all your dependencies at the beginning, you will avoid nerve racking fixes at the end. It might be a bit longer to update the .var files during the creation process, but it will save you a lot of headhaches in the long run.
Introduction
This guide is a set of information, tips, tricks and suggestions to easily build new Custom Unity Assets for VaM and also, first and foremost, avoid mistakes and optimize your content.
It is the result of years of creating content for VaM, so if you dig in my old content, you will most likely realize that not all my content follows these guidelines… because I improved my workflow over time.
This is the definitive version of (to me) an optimal way of creating content for VaM.
I will not go into details when it comes to basic knowledge of Unity. This tutorial assumes that you already know your way around Unity’s editor and functionalities. And that you already have a project working for creating assets for VaM.
If not, you have excellent tutorials by MacGruber or VaMTastic to help you out with the basics :
- @VamTastic - Creating prefabs in Unity https://hub.virtamate.com/resources/creating-prefabs-in-unity.8688/
- @MacGruber - Assetbundles for VaM 1.x
https://hub.virtamate.com/resources/unity-assetbundles-for-vam-1-xx.167/
1 - Building a good file structure
For any bundle, create a new directory. We’re gonna use “VAMAssetsTutorial”. It doesn’t need to be at the root of your Unity folder, it can be placed anywhere you want (depending on the way you organize your content).
Depending on your needs, immediately create subfolders for every type of resource you’re gonna use : Cubemaps, meshes, prefabs… etc.
On folder is mandatory tho : “prefabs” (we’re always gonna use prefabs since we’re talking about custom assets, and we're gonna save them here)
Create and order your different assets in these folders.
If you have a huge project with dozens of assets, you might want to create subfolders to ease the navigation. Like this :
You are now ready to work.
This type of file structure is really helpful when it comes to scripting / coding. Your paths are obvious and you don’t have to think about where your assets are stored.
To avoid any future problem when you create bundles, if you're doing two different bundles, and one of them needs to use assets from another. Do not reference assets in another folder. Duplicate your content in your target folder.
Textures, shaders, materials... duplicate everything in each of your releases. This will save you time :
- If you have to update a bundle after release, you can freely update your textures, materials or anything, without fearing to create side effects on other assets in your Unity project.
- If you include the same paths in two different assetbundles, you might have issues with the assetbundle loader (because of the unique hash of assets).
One last thing, your naming convention :
- Never use special characters. No white space, no accented characters, no brackets, parenthesis etc..
- Unless you code a bit and are really used to CamelCase. Avoid uppercase and put everything in lower case. At least, you will have no doubt of how are your name written.
- As a separator, use - or _ if you want something to replace your white spaces.
2 - Making optimized prefabs
Prefabs can be done pretty much with a simple gameobject and dragged into your prefab folder. But what happens if you want to rescale it at some point ? if you want to fix an orientation ? If you want to rename sub-objects or add more ?
You could argue that it’s not important… but if you’re planning on making plugins to control the assets, this will soon become a problem. An excellent way of doing of preventing any future problem is to create your prefabs like this :
- vamat_prop_name
The parent, the name people will see when selecting the asset in VaM- root_prop
a secondary parent allowing you to tweak rotation, scale or position of all your geometry- Cube, Sphere…
You children and all the geometry for your asset. ( Cube and Sphere are just examples )
- Cube, Sphere…
- root_prop
You have to ensure that the root of the prefab vamat_prop_name is always completely resetted on the position, rotation and scale, like this :
root_prop, can be renamed. I always use root_something. It is extremely useful to catch sub-objects with scripts. For instance, when I want several assets to work with a VaM plugin, all the compatible assets for this plugin will have the same root_xxxx name.
The rest of the geometry contained in root_prop is free. You can put whatever you want, name it however you want. You can put particles, audio sources, whatever you want.
Of course it goes without saying that you can’t put components that are not Unity native on these (custom scripts). Assetbundle do not allow scripts when they are built.
Again, same thing as your files, your naming convention :
- Never use special characters. No white space, no accented characters, no brackets, parenthesis etc..
- Unless you code a bit and are really used to CamelCase. Avoid uppercase and put everything in lower case. At least, you will have no doubt of how are your name written.
- As a separator, use - or _ if you want something to replace your white spaces.
Now, to size or resize your object properly, use a proper reference.
You can export a character from VaM.
The best situation possible is to have a female and male character.
Launch VaM, create an empty scene with a female character, be sure to have it at 0,0,0, open the edit tab and look in the Control & Physics 1 tab. Ensure that the scale is set to 1 ( 1 on the screenshot below ), and click on export OBJ and MTL files (2 on the screenshot below). Do the same for a male character.
You will find the obj files at the root folder of your VaM installation. Delete the mtl file, move both obj files of your female and male character to your Unity project and keep them in an obvious folder. You will use them all the time.
All your scaling tweaks should be done based on these two references.
3 - Handling collisions of your prefabs
A - Choose your collision system wisely
Collisions are important if you want some interaction in your scene. Don’t overdo it.
If you are working with simple objects, having a perfect collision does not matter. A glass ? Use a capsule and two box colliders :
You only need to use a mesh collider when the object is complex and you want a perfect collision. Mesh collision is expensive. It won’t impact your framerate a lot if you don't put useless collisions everywhere. Extremely tiny details do not need collisions… no one will care.
B - Create sub-colliders if you want to use prefabs as physical objects.
No matter how hard you will try (with scripting/coding) : physical objects with mesh colliders only will pass through objects if the velocity of the object is a bit fast. This is due to the fact that mesh colliders are not as precise as basic colliders. ( The ContinuousDynamic collision mode of Unity does not work with mesh colliders )
So, for physical objects that can be used by the player (grabbed, thrown). You can combine both types of colliders.
In Icicles 101, the dildos have two colliders :
- The base mesh collider, which ensures a good “visual” collision when you use them on characters.
- A sub-collider, a capsule, to ensure that the object is not going through walls or floors when having fun with it.
This is not enough to ensure that the object does not go through objects. You will need a script. You can find this script in The Hideout (yes you can copy it and put it in your project if you want).
C - Creating a mesh collider
I don’t know why so much people struggle with that (I had the question a lot on discord)... so I prefer to address it :
- Select your object with your mesh
- Click on add component
- Select mesh collider
- The end.
You don’t need to change any of the options : the collision should work directly in VaM. If not, there is potentially a problem with your mesh.
4 - Optimizing your textures
A - Sizing (and resizing) your textures
I often see huge assetbundles released on the hub. And when I try the assets, they are just a couple of items with a few textures.
- You don’t need 4K textures for tiny objects
- You don’t need 4K textures if the asset is not meant to be used for extremely high definition beauty shots
- You don’t need 4K textures for elements that will not be a main point of interest or cover a huge area.
To give you an idea : you can still have a really good texture at 512x512 or even 256x256 depending on the level of detail if the object can be held in the hand of your character.
It is a thing to aim for the “perfect quality possible”... but keep in mind that your var file will be ignored by people if it is way too heavy for the content it offers. For instance, I’ve seen bundles over 50mb for a couple of jewelry items… This was an immediate delete on my end.
VaM is extremely hard on the VRAM/RAM, and you should think about that when creating an asset. It is insane to think that you will load a 38mb texture for the diffuse of a tiny nose piercing. So, use the appropriate size for your textures.
If you are lazy… you can even just change the maximum resolution in the texture inspector instead of resizing the source file :
B - Enabling crunch compression
To quote Unity’s documentation :
Crunch is a compression format that works on top of DXT or ETC compression, by providing additional variable bit rate compression. [...] Crunch compression helps the texture use the lowest possible amount of disk space, but has no effect on runtime memory usage. Crunch textures can take a long time to compress, but decompression at runtime is fairly fast. You can adjust how lossy Crunch compression is, to strike a balance between file size and quality.
I have put this simple 2048x2048 texture coming from Painter into the package :
The resulting package without crunch compression enabled is 1150kb
The resulting package with crunch compression enabled at 50 quality is 479kb
On this single texture, it is a 59% size reduction of the final package. And the visual difference between the original one and the crunched one is almost invisible.
Depending on the texture, the overall size reduction might be less. But this is extremely powerful to get a really tiny var file.
As an example : I’m working on a big project for VaM at the moment… The bundle is not finished and counts at the moment over 80 different assets, props and enviros, with dozens of 4K, 2K, 512 and 256 textures… the beta version of the var file is 120mb.
To enable crunch compression. Select your texture, check Use Crunch Compression, and select the quality.
I have extensively tested the compressor quality. In the case of VaM :
- The size gain compared to the visual quality gain between 50 and 100 is almost unnoticeable. So in my case, I generally go for 50. I enable it for every base textures (diffuse, spec, metallic, occlusion)
- The compression might produce heavy artifacts on some normal maps. If the artifacts are really noticeable, boosting the quality might not change a lot. So disable Crunch compression on your sensitive and important normal maps.
Also, if you’re doing “realistic” textures. Don’t forget to swap the filter mode to trilinear and the aniso level to 16.
As a final note, I’ll insist on the fact that crunch compression does not save runtime memory. Do not use crunch compression thinking that it will lower the memory usage in VaM. It is only meant to optimize the size on the disk. You will still have to choose the adequate size for all your textures.
5 - Making clean materials
You have made your awesome new material. You’re testing different shaders and different textures of each type : diffuse, spec and normals. Then, being happy with your last version… you put it on your model, make your prefab and build your assetbundle.
You don’t really notice the result… but you build your var and publish it on the hub.
Did you know that you just bundled several useless textures ?
Select your material, right click on the Inspector tab, and select Debug.
You will now have an inspector like this, and the important part is the Saved properties array :
You will see every texture you tested during the creation of your material in the list. And the problem is : the assetbundle explorer thinks it has to be included with your bundle. (Yes you can say that Unity’s code is kinda crappy)
There are two ways to fix that :
- Create a new material, immediately select the good shader and select your texture and settings. But you’ll have to re-apply the new material to every object using the previous one.
- Put every “Size” field at 0 in Tex Envs ( 1 ). It will reset your material, you just have to select the textures again when you switch the tab to normal (right click > normal).
So, before you build, always ensure that your materials are clean.
6 - Fixing the shadows
By default, Unity will produce assets with it's own shadow system. These shadows will be different from the ones in VaM. This could be compensated by the plugin VAMifier. But using the plugin would break your potential cool materials with reflections or more advanced rendering processes.
There is a way to fix that by adding a shadow library based on the same one used by VaM.
- Exit Unity
- Browse to your Unity Editor folder, and go in this sub-folder Unity2018.1.9f2\Editor\Data\CGIncludes
- Download this file ( UnityShadowLibrary.cginc )
- Backup your original file
- Replace it with the one you just download
- Launch Unity
- Click on "Edit" > "Preferences"
- In the popup window, select "GI Cache"
- On the right panel, click on "Clean cache"
Since you've added the include is added to the editor, cleared the GI cache, you are good to go for any new project using this version of Unity. Which also means any new asset, material, texture... etc... inside a single project. This is a procedure you only do once.
7 - Building the package
Since we have seen every important aspect before building, we are pretty much done.
- We got a good file structure
- We have nice prefabs
- Our textures are optimized
- Our materials are clean and avoid unwanted dependencies
First, save everything. Close Unity completely and restart it.
Why ? The assetbundle browser has a strange behavior sometimes. It tries to include files out of nowhere… or fails to refresh properly all dependencies.
Restarting Unity fixes this issue.
This is something you are not forced to do while working on the bundle (the alpha / beta version). But for the final version, the one you’re gonna add to your var file. Be sure to do it.
Now… the way we’re working eases our assetbundle creation / update process.
We Just have to grab our main folder VAMAssetsTutorial and drag it to the configure tab.
Rename it and add a suffix. I’m generally using “_asset”, but it can be anything. This will avoid build errors if any assets also contain the keyword vamassetstutorial.
This technique is cool to avoid thinking about what you should include in your package. But it also includes everything in the folder.
So be sure to only have assets you’re using in the prefabs in your final folder.
8 - The finishing touch
Your bundle is ready, if you still haven’t you can either :
- rename your final bundle to vamassetstutorial_assets.assetbundle so that VaM can see it when you use a Custom Unity Asset Atom.
- rename it with whatever extension you prefer if you’re gonna load it through code to avoid it being seen by VaM with a Custom Unity Asset Atom.
This technique is useful if you want to hide it inside the game.
For instance, VAMMoan uses .audiobundle as the file extension.
If your bundle is meant to be loaded for custom assets. Put in your final folder before packing it inside your .var file. And create a custom jpg in the same folder that represents a preview of your bundle.
At the end you will have this in the folder :
- vamassetstutorial_assets.assetbundle
- vamassetstutorial_assets.jpg
You’re ready to create your var. Your asset bundle is done.
9 - Final words
I might update and add several tips & tricks in the future. But in the meantime, if you have any trouble during the creation process of custom assets for VaM. Do not hesitate to ask, I will gladly answer and add some more details in this tutorial.
Do not hesitate to check the discussion, I will take the time to answer questions that might not fit the tutorial, or more specific requests.
Bonus chapters
These chapters will cover additional tips & tricks to create custom content. They are not mandatory in the whole process of creating custom content, but might be helpful to some of you.
10 - Importing and creating a prefab from Sketchfab
A - Installing sketchfab plugin
First, you will need the Sketchfab Unity plugin. This plugin will allow you to download immediately free assets from sketchfab with an (almost) guaranteed working asset. (rarely, import is not working).
Go here, download and install the plugin.
This is a unitypackage. So you can just double click on it with your VaM project opened (Unity project). Or simply do "Assets" > "Import Package" > "Custom Package".
Before you start, you will need a Sketchfab account. Create one and login at the top left of the plugin when you have opened the window using "browse sketchfab" (you will see a menu "Sketchfab" in the main menu of Unity after installation).
B - Downloading your model
Browse Sketchfab, find your model, download it. Don't forget to uncheck "Staff picked" to see all models. Let's use this chair as an example.
To do it properly in our current workflow, we're gonna change our target folder.
Create a new folder called _sketchfab, and a subfolder named dining_chair. In the case of our tutorial we're gonna have this folder structure :
Note: If you're adding several assets in your assetbundle from Sketchfab, create a folder for each asset downloaded from the website.
Find the chair in the plugin. Click on the image. The download window will open :
Click on the button "Change", and select your dining_chair folder. Eventually rename the prefab name... it doesn't really matter since we're gonna rename it afterwards.
You can click on download model.
Wait for the download to finish.
C - Creating our own prefab.
Our model is downloaded. Let's create an empty scene and add the prefab to it.
The prefab done by Sketchfab is messy...
Let's clean that up, move RootNode to be a direct child of DiningChair (a warning will popup, say continue), and remove the rest. Let's rename them like this tutorial explains in Chapter 2.
This chair is a bit tiny compared to our accurate size. So if you followed this tutorial you now know how to fix that. Resize it using the root_prop child. Create your colliders, adjust whatever you want to have a chair you'll like in VaM.
Your prefab is done. Drag it to your prefabs folder to save it.
The final step is to go into your _sketchfab/dining_chair folder, and to do the final usual steps : tweak your materials to your liking, add new textures, remove useless textures, optimize them (resizing), enable crunch compression.
When all your tweaks on your materials and textures are done. You're good! Your first import from Sketchfab is ready.
Delete the original prefab in your dining_chair folder. The one created by the Sketchfab plugin. Then, you can export your assetbundle and test it in Unity.
One final note: Be careful with Sketchfab licenses. The plugin does not tell you everything. Use the view on sketchfab button to check the full licence and comments on the model to ensure you can use it.
11 - Make clean releases.
When creating custom assets, you'd be tempted to bundle everything in your var file. For instance, if your assets are made to go with a cool and complete scene, you'd think that it would be better to bundle everything into a single .var : your new custom assets, your looks, your clothes, your scenes.
But in truth, it is way better to extract heavy content from the scenes themselves :
- If you have custom assets : release them as standalone assets
- If you have clothes : release them as standalone clothes
- If you want to update your scene, you can do it pretty fast. It will be extremely tiny, and you don't have to repack all the assets everytime. It will also reduce the download size for everyone updating your content. People enjoy having an ultra quick download for a scene, especially if none of the actual assets have been updated.
- People making dependencies to your assets will only make dependencies to the assets themselves. Not a scene, not a look/appearance.
- You can update independently the scene or the assets.
You could argue that it will add more dependencies to your content. But dependencies are not bad as long as it is done properly. Better having a couple more dependencies well done, than less dependencies and no one wanting to use them because they are too heavy and badly organized.
So to summarize :
- All your "singular" assets ( environments, props, clothes ) should be released as a unique .var
- All your demos should be released as a unique .var ( like HZMDemos )
- All your "lightweight" assets can be bundled with a big scene as a unique .var ( looks, appearances, presets, characters textures )... IF you do not thrive on looks/appearances releases. If you do, you can also release your appearances as unique .var.
12 - Ease your demos / scenes creation process : avoid the dependencies fixing nightmare
I know, I know. You've just built your .assetbundle, and you want to jump right in and start your scene. Don't.
As explained in the previous chapter. Think beforehand how you're gonna release your scene, how you're gonna split up your assets in different unique resources on the hub.
When you know all your different .vars, create immediately your releases of your superb unique custom environment, props, etc... for your scene. You will have your creatorname.myenviro.1.var ready to use.
Then, only after that, start creating your scene.
If at some point, you update your assets, simply update the .var by using the New version of Exiting feature when creating a package :
When you do that, you will end up with creatorname.myenviro.2.var. Go in your AddonPackages folder, remove the version 1 of the var, and rename creatorname.myenviro.2.var to creatorname.myenviro.1.var.
Either restart VaM or use the Hard Reset button to properly reload all the var packages. Open your scene and continue working with your new content.
All this for only one simple reason : there is no tool or perfect way to handle the references to the assets properly in VaM unless you bundle everything in the same var file. If you work with your "local" assets without them being in .var files upfront, you will end up smashing your head on your desk because you will need to fix all the dependencies in the json files manually.
So work directly with .var files for all your dependencies at the beginning, you will avoid nerve racking fixes at the end. It might be a bit longer to update the .var files during the creation process, but it will save you a lot of headhaches in the long run.


