


![[Project CRAFT] ASSET CUA STUDIO: Open Source Release](https://1424104733.rsc.cdn77.org/data/resource_icons/67/67353.jpg?1781153072)


Contains executable files or external scripts. Ensure you trust the creator and apply your own security measures.
Join the Shadow Venom's Workshop Discord Server!
Check out the Shadow Venom's Workshop community on Discord - hang out with 3239 other members and enjoy free voice and text chat.
| The ZIP and .exe files released on the Hub are precompiled, ready-to-use versions. If you prefer to build it yourself, modify it, or improve its features, Asset CUA Studio is free and fully open-source under the MIT license, and so is the engine that handles the actual baking. Everything is fully open on GitHub:  The app — https://github.com/R18SV/cua-asset-studio The app — https://github.com/R18SV/cua-asset-studio The conversion engine — https://github.com/R18SV/glb2cua The conversion engine — https://github.com/R18SV/glb2cua |
✦ Project CRAFT ✦
Creators Reclaiming Art From Tech
You have a vision. You shouldn't need to become an engineer to build it.
Technology should serve craft, not gatekeep it.
Instance #02 · a campaign by Shadow Venom
Creators Reclaiming Art From Tech
You have a vision. You shouldn't need to become an engineer to build it.
Technology should serve craft, not gatekeep it.
Instance #02 · a campaign by Shadow Venom
 ASSET CUA STUDIO
 V1.3
Bring any 3D model into VAM. No Unity. No FBX. Just drag, preview, and bake.
 Made for the VAM community
Somewhere along the way, "making" got buried under "building."
This is a campaign to dig it back out — one tool at a time.


This is a campaign to dig it back out — one tool at a time.
 Say goodbye to Unity 2018.
 You don't need to learn it. You don't even need to install it.
 Drag a .glb in → see it in 3D → tune it → bake your CUA.
  Whoever you are — this is for you.
 Never made anything for VAM? This might be where your creating starts. There's no scary toolchain to climb — drag a model in and watch it show up. You could honestly be "a person who makes things for VAM" about five minutes from now.
 A seasoned creator? Same result, in minutes instead of an evening. It quietly deletes the most tedious leg of your pipeline — call it a 100× on the boring part — so your hours go into the craft, not the conversion.
 You just wanted to hand your VAM sweetheart a banana. Maybe a comfy chair to sit on, a sword for the boss fight, a little robot sidekick. And somehow the answer was always: "sure... first go install Unity 2018, learn the AssetBundle pipeline, and wrestle export settings." Be honest. You closed that tab.
 Or maybe you're the seasoned one. You've built more assets than you can count — and lately you catch yourself just… not as fired-up as you used to be. The idea's there, the model's there. Then you picture the pipeline — export, Unity, bundle, import settings, that cryptic error at 1 AM — and before you've even started, something in you sighs ugh, had enough. You're not out of ideas. You're just done paying that tax every single time you want to make something.
 Because that really was the deal: export FBX → install Unity 2018 → wire up shaders → build an AssetBundle → fight import settings. Hours of engineering before your model ever showed up in a scene.
 Not anymore. Drop a .glb, see it rendered in 3D right in the app, tweak what you want, hit one button — out comes a ready-to-load CUA. Your banana is in VAM. That's the whole workflow.
 And yes — your anime models come through pixel-perfect.
Cel-shaded / toon / VRoid-style models that normally turn into a flat grey blob in VAM
now render exactly as the artist intended. This alone opens a door that's been shut for years.
 Animated assets? The part that hurt most in Unity — gone.
If you've ever tried to get an animated CUA into VAM the old way, you know the special kind of pain: avatars, Animator Controllers, clip setup, loop settings, the lot. Here you just drop a .glb that has animation — every clip is packed and switchable in VAM, no rig wrangling, no controller graph. And for clips that don't loop cleanly (the model snaps back to the start), one toggle gives you a seamless ping-pong loop — it plays forward, then reverse, so the end meets the beginning with no jump. The trick veterans used to wire up by hand, now a single checkbox.

 Why this matters
VAM scenes are full of CUAs — props, furniture, set pieces, stylized characters, animated objects. Until now, every single one had to pass through the Unity wall. This tool tears that wall down


 and replaces it with something you actually see while you work.
 And now — it's open-source.
"Creators Reclaiming Art From Tech" was never just a slogan on a poster.
Asset CUA Studio is free and fully open-source (MIT) — and so is the engine that does the actual baking. The whole thing is out in the open on GitHub:
- The app — https://github.com/R18SV/cua-asset-studio
- The conversion engine — https://github.com/R18SV/glb2cua
 No black box. See exactly how your models become CUAs. Nothing hidden, nothing phoning home.
 Yours to fork. Bend it to your pipeline, add what you need, learn from it. The engine is a clean CLI you can script into your own tools.
 It can't be taken away. No paywall, no account, no "sunset." The tool you rely on stays in your hands — for good.
Technology should serve craft, not gatekeep it. Open-source is how we mean it. 
The full kit No Unity, no FBX, no install — one self-contained app. Just run it.
 Live 3D preview — true WYSIWYG — a person stands in for scale, and what you see is what loads in VAM. No more bake-blind-and-pray.
- Full material editor — color, metallic, gloss, emission, transparency, two-sided… live, per material.
- Faithful anime / cel-shaded look — auto-detected vertex colors, no grey blobs.
- Animations packed & switchable — every clip, plus seamless ping-pong loops.
 Place & scale on the spot — grab the 3D gizmo and drag to move / rotate / scale, or set height, position, rotation by hand; auto front-facing, all against the person.
 Trim what you don't want — click a mesh in the viewport and press Delete (bye, ground plane); the prop re-floors and re-scales to what's left. Restore any time, and Ctrl+Z / Ctrl+Y undo / redo every edit.
- Collider generation — none / box / convex / mesh, with a perf heads-up.
 Texture slimming — shrink your .var by trimming the maps that won't show.
 Batch-convert or pack — turn a whole folder into a CUA each (batch), or bundle several into one switchable CUA. One toggle.
 Blender plugin included — File ▸ Export ▸ VAM CUA sends a model straight in. (more below)
 Projects + 4 languages — save your whole queue & settings; English / 한국어 / 日本語 / 繁體中文.
- Free & open-source (MIT) — the app and its engine are both on GitHub. Yours to read, fork, and build.
 Want the details? Keep reading.
  The full tour
Everything above, with the knobs and the why.
A real 3D preview, not a guess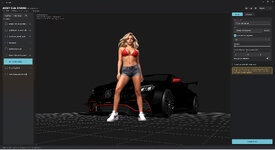
Drop a model and it renders in an interactive 3D view — orbit, zoom, frame it. A person reference stands at the origin so you can size and place your asset against a human on the spot. Every change you make below updates the preview live, and the preview is built to match what the engine bakes — so there are no surprises in VAM.
Vertex-colored / cel-shaded models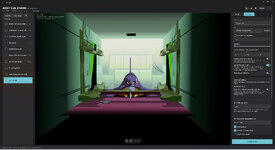
A lot of stylized and anime models (think VRoid exports, baked toon looks, 3D-scanned painterly meshes) store their color in vertex colors with no textures. VAM's Standard shader ignores those — so they come out flat grey. Asset CUA Studio detects this automatically and bakes an unlit vertex-color shader instead, so the model shows up with its real colors, exactly as authored. It's a toggle in Advanced if you ever want to override the auto-call.
Honest note: this restores the color faithfully (it's how baked toon models are meant to look). It does not re-create toon outlines or hard stepped shading — those are separate NPR shaders the CUA pipeline can't run.
Material editor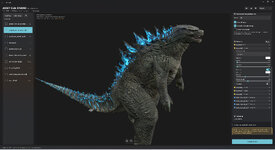
VAM's renderer isn't the engine your model was made in, so materials often want a nudge. Per material, live in the preview:
- Rendering mode — opaque / cutout / fade.
- Base color, metallic, smoothness (gloss), alpha cutoff.
- Emission — toggle it on/off, pick a color, set intensity.
- Normal strength and two-sided per material.
 One-click "Force opaque": tons of glbs mistakenly flag solid surfaces as transparent (you'll see see-through patches). One toggle tries to auto-fix the whole model; then fine-tune per material if needed. Animation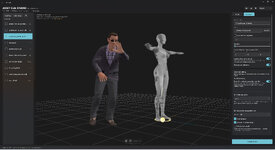
- All clips packed — if your model has multiple animations, they all go into the bundle and are switchable from VAM by name.
- Seamless loop (ping-pong) — for clips that don't loop cleanly (the model snaps back to the start), this plays it forward then reverse so the end meets the beginning — no jump. The same trick veteran creators did by hand, baked in for you.
Texture slimming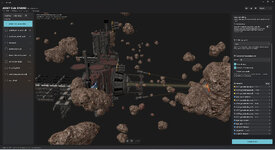
Big models with 2K/4K maps can bloat your package. Pick a max size and choose which kinds of maps to shrink — normal, metallic/specular, and (advanced) albedo — while the rest stay full-res. Albedo is off by default since shrinking transparent albedo can hurt cutout edges; it's there for distant/background props where you want every byte back.
Collider generation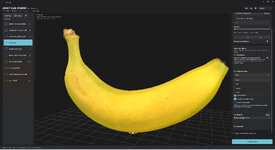
Add a collider on export: none (most props) · box (cheap) · convex · mesh (exact). VAM is physics-heavy, so the app warns you when a mesh collider would be a frame-rate killer — use the heavy options only when shape-accurate collision actually matters.
Placement & scale — now with a 3D gizmoNormalize to a target height, nudge position (X/Y/Z) and rotation, all against the person reference — or just grab the model in the preview and drag. The new on-canvas gizmo gives you handles to move, rotate, and scale directly: press W (move) / E (rotate) / R (scale), or click the Move / Rotate / Scale buttons. Drag a handle and the panel values follow live, so placing an asset against the human reference is hands-on instead of guess-and-type. Models are auto-corrected to face forward so they come into VAM the right way around.
Trim in the viewport — delete meshes, with undo/redoEver found the perfect prop… glued to a giant ground plane, a backdrop, or scan clutter you never asked for? Now you just click the part you don't want — it highlights — and press Delete. It's dropped from the export, and the prop instantly re-centers, re-floors and re-scales to what's left, so "just the nut, not the floor it shipped with" is one click. Deleted meshes are listed under Advanced, restorable one by one or all at once, and the choice is saved with your project. And because hands-on editing deserves a safety net: Ctrl+Z / Ctrl+Y (or the ↶ ↷ buttons in the viewport) undo and redo everything — gizmo moves, rotations, scales, and deletes — one clean step per action, per model.
Batch-convert or pack — one toggle, two power workflowsDrop a whole folder, tick the models you want, and a single toggle decides how they bake — this one quietly saves a lot of time:
- Separate (batch) — each ticked model becomes its own CUA, all in one click. Every model keeps its own name and settings (materials, collider, textures, animation). Convert an entire asset library in one go, instead of one… at… a… time.
- Pack into one CUA — several models bake into a single CUA holding multiple switchable prefabs (pick one by name in VAM). Perfect for a prop set, an outfit/variant kit, or a themed pack that belongs together.
Projects, recents & settingsSave your whole queue — every model with all its tweaks (orientation, materials, colliders, textures, animation) — as a project, and reopen it later (with a quick "recent projects" list). Set a default name prefix and output folder once and they stick.
Blender plugin (bonus, included)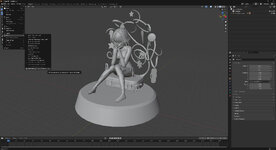
For people who build their own models, a tiny add-on closes the loop without ever leaving Blender:
- Install the included .py, point it at the app once.
- Select your model → File ▸ Export ▸ VAM CUA (.glb → Asset CUA Studio).
- The app opens with your model already loaded — tune it and bake.
If you run into export failures, missing materials, or similar issues when exporting directly from the Blender plugin, please refer to this Hub post:
https://hub.virtamate.com/threads/p...-studio-open-source-release.77319/post-238287
And this article:
https://medium.com/@joelmalone/how-...exporting-a-blender-file-to-gltf-3649cbaf87fb
Special thanks to @TheBlueBlood for the finding.
 How to use
 Run AssetCuaStudio.exe.
- Drag a .glb (or a folder of them) onto the left.
- Watch it preview in 3D. Switch to Advanced to tune materials, colliders, textures, animation.
 Hit Convert to CUA — your .assetbundle is ready to drop into VAM as a CustomUnityAsset.
 Supported input glTF Binary (.glb) — static meshes, skinned & animated models, multi-material, vertex-colored. (Almost every 3D app exports glb; Blender does it natively.)
 What's in the download
 AssetCuaStudio.exe + its engine folder — the app, everything bundled (no Python, no Unity).
- blender/ — the optional "Export to VAM CUA" add-on + its README.
 README.txt
 Just unzip and run — keep the files together!
 Requirements
 Windows 10/11 (64-bit). Microsoft Edge WebView2 runtime (already on most Windows installs). Nothing else.
  Known limitations & notes
Up front about the edges, so nothing surprises you.
- It lives inside Unity 2018 + VAM. The CUA is built for Unity 2018 and rendered by VAM, so the final look is bounded by what those two can actually do. Where the engine simply doesn't support something, the tool can't make magic happen.
- Results depend on your source model. You get out what you put in. Different 3D tools, exporter versions — and the occasional author oversight — mean models can arrive with quirks: mislabeled transparency, flipped normals, odd scale or orientation, missing data. That's exactly why there's a live preview and per-model controls — plan to glance and adjust, not just dump and forget.
 Failed, or way off? If a model won't convert, or the result is far from what you expected, drop a note in the discussion thread (describe it, or share the .glb) and we'll dig in.
The specifics:
It builds CUA assets — not VAM "Person" characters
- A converted character is a posable / animated mesh — it does not inherit VAM's soft-body physics, expression morphs, or clothing sim. Perfect for props, set pieces, statues, mascots, animated objects and background characters; it's not a drop-in replacement for a VAM Person.
Shaders & materials
- Output uses Unity Standard (PBR: albedo / normal / metallic / smoothness / emission) or an unlit vertex-color shader. Custom shaders and advanced glTF extensions (transmission, clearcoat, sheen, subsurface…) don't carry over.
- Cel-shaded: color is reproduced faithfully; toon outlines and hard stepped shading are not — those are separate NPR shaders the CUA pipeline can't run.
- Textures bake to DXT (DXT1/5) — fine for game assets, with the occasional faint banding on very smooth gradients.
- Only the first UV set (UV0) is used — a map (e.g. a normal map) bound to a second UV set will mis-map.
Geometry
- Triangle meshes only — point clouds, raw gaussian-splat (POINTS) and line primitives are skipped.
- Double-sided is a per-material toggle, on purpose (two-siding doubles geometry). Some splat/scan exports look holey until you switch it on.
Animation
- Skeletal + transform animation is baked (all clips, switchable in VAM). Blendshape / shape-key (morph) animation is not carried — a morph-only clip comes in static (so shape-key facial animation won't play).
- Clips are resampled at 30 fps; ping-pong doubles a clip's length.
Performance & platform
- Very large models (≈1 GB+) skip the live preview to keep the app stable, and are often impractical to bake into a single CUA anyway (the bundle gets huge and VAM may struggle to load it). The fix is to pre-process first: in Blender, decimate the mesh and trim oversized textures, or split the model into a few logical parts and convert each on its own, then assemble them in your scene. A 1 GB scene was almost never meant to be one asset.
- Mesh colliders on high-poly models can wreck VAM's physics framerate — the app warns you; prefer box / none for heavy meshes.
- Windows only (the converter is a Windows build); the 3D preview needs the WebView2 runtime.
Hit one that blocks you? Say so on the thread — several of these have clean workarounds, and the list gets shorter every release.
 What's new
Changelog
v1.3
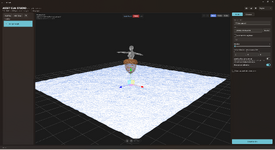
- Delete meshes right in the 3D view. Click any part of a model — a ground plane, a backdrop, scan clutter — and press Delete to drop it from the export. The prop re-centers, re-floors and re-scales to what's left, so "I only want the prop, not the floor it shipped with" is now one click. Deleted meshes are listed under Advanced, restorable one by one (or all at once), and saved with your project.
 Undo / redo in the viewport. Ctrl+Z / Ctrl+Y (plus ↶ ↷ toolbar buttons) step back through gizmo moves, rotations, scales and mesh deletes — one step per drag, per delete. Each model keeps its own history.
 Fix: multi-clip animation bundles now get a unique internal ID when you change yaw / position / loop settings, so re-converts always replace cleanly in VAM.
v1.2
 3D transform gizmo. Grab your model right in the preview and drag to move, rotate, and scale it — handles in the viewport, with W / E / R (or the Move / Rotate / Scale buttons) to switch. Every drag writes straight back to the panel and the bake, so placing an asset is hands-on now, not numbers-by-hand.
- Now open-source (MIT). Both the app and its conversion engine are public on GitHub — read it, fork it, build it, make it yours. (https://github.com/R18SV/cua-asset-studio · https://github.com/R18SV/glb2cua)
v1.1
 Familiar view controls. Wheel-press drag now pans the view (VAM / Blender style), the scroll wheel zooms, and F fits the model to view. Prefer your own layout? Remap each mouse button (orbit / pan / zoom) in Settings.
- Auto-reframe. Toggling height normalization re-centers the camera on the model's new size.
- Wider model compatibility. Models whose textures were referenced in an unusual way (common from some game asset and 3D-scan sites) now convert instead of erroring out.
 No more crashes on very large models. Huge .glb files that could overwhelm the live preview now show a friendly notice (you can still bake), and the preview recovers on its own instead of taking the app down with it.
Made so you can spend your time creating, not fighting the pipeline.
If it helps you bring something into VAM you couldn't before — that's the whole point.
✦ Project CRAFT · Instance #02 — Creators Reclaiming Art From Tech
If it helps you bring something into VAM you couldn't before — that's the whole point.
✦ Project CRAFT · Instance #02 — Creators Reclaiming Art From Tech
Contains executable files or external scripts. Ensure you trust the creator and apply your own security measures.











![[EasyProps] Tail Forge](https://1424104733.rsc.cdn77.org/data/resource_icons/68/68311.jpg?1785112307)

![[Project CRAFT] AUDIO CUA STUDIO](https://1424104733.rsc.cdn77.org/data/resource_icons/67/67256.jpg?1781146550)





At that point, all the materials, textures, and animations are already in place and ready to go.
That alone would probably save you 90% of the setup time.