


 CRITICAL WARNING
 IF YOU REMEMBER NOTHING ELSE FROM THIS CHAPTER:
 Do NOT replace the character on the Welcome screen. Do NOT add custom plugins on the Welcome screen. Do NOT modify Person atom state on the Welcome screen.
 You MUST load one track first to enter the game BEFORE doing any customization. (See Step 1.)
The Welcome screen looks like the scene is fully loaded. It is NOT. Customizing here is the #1 cause of every "tracks won't play" / "clicks don't respond" / "scene is broken" report we receive.
Chapter — Replacing the Character & Setting Up Custom Plugins
This chapter covers how to safely replace the in-scene character (Noelle / Elsa) with your own, and how to add your own VAM plugins on top. If you do either of these things outside of the procedure below, the scene WILL break: tracks won't launch when clicked, multi-variant tracks won't open the variant picker, and the UI may stop responding.
Follow the steps in order. There is no shortcut.
Step 0 —
DO NOT CUSTOMIZE ON THE WELCOME SCREEN THIS IS THE SINGLE MOST IMPORTANT RULE The Welcome screen is NOT the game.
You are NOT "in" the scene yet.
Customizing here WILL break everything.
What is the Welcome screen?
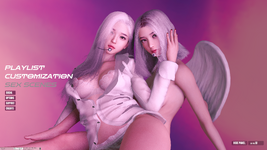
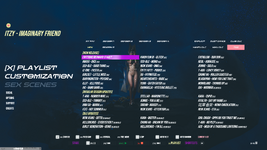
The page you see right after the scene loads — Noelle and Elsa sitting together, with the PLAYLIST / CUSTOMIZATION / SEX SCENES menu on the left side.
Why is it dangerous to customize here?
The Welcome screen looks ready, but it is only a landing page. The scene's loading chain — the sequence that initializes plugin slots, Director gates, and runtime state — has not run yet. Any customization you do here is applied to an incomplete, unstable state.
What WILL happen if you customize here:
 Tracks will appear to click but won't play.
- Multi-variant tracks will open the variant picker, but clicking variants will do nothing.
- The character may glitch, T-pose, or disappear.
- The whole UI may stop responding to clicks.
- The scene will need to be fully reloaded from a clean save to recover.
These are not occasional bugs. They are guaranteed consequences.
What to do instead:
 Go to Step 1 below. Play any track first. THEN customize. It takes 10 - 30 seconds and it is the only safe way to start.
There is no shortcut. Even if you're impatient, even if you've done it the wrong way before "and it seemed fine", DO NOT customize on the Welcome screen. The damage is silent and accumulates across scene saves — you may not notice until later, after you've saved a corrupted scene state.
Step 1 — Enter the Game
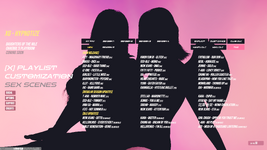
- From the Welcome screen, click PLAYLIST on the left menu to open the track list.
- Click any track to load it. Any track works — this is just a warmup run to initialize the scene state.
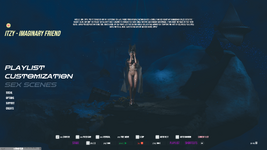
- Wait until the track fully loads. You will know you're now "in-game" when the playback controller bar appears at the bottom of the screen (CAMERA / FIXED CAM / PLAY / PAUSE controls).
From this point on, customization is safe.
Step 2 — Replace the Character
There are two ways to replace the character. Option A is strongly recommended.
Option A (Recommended): Built-in One-Click Replacement
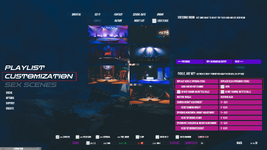
- Open the CUSTOMIZATION panel from the in-game UI.
- On the right side, you'll see REPLACE NOELLE (PERSON ATOM) and REPLACE ELSA (PERSON#2 ATOM) sections.
- Select your character preset from the popup browser.
- Check the LOCK box for that slot so subsequent track changes don't overwrite your character.
This is the cleanest path. It uses the scene's own replacement flow and handles all state transitions correctly.
Option B (Advanced): Manual Replacement via VAM Native UI
If you prefer to swap manually using VAM's native UI:
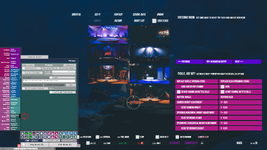
- Open the Person atom's panel. Switch to the Appearance Presets panel — ONLY this panel. Do not use Pose, Plugins, Clothing, Hair, or any other preset panel for character replacement.
- Load your custom appearance preset.
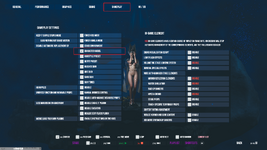
- Go to OPTIONS → GAMEPLAY. Under "DISABLE AUTOMATIC REPLACEMENT OF", check CHARACTER MODEL to lock your character against automatic restoration.
Step 3 — Set Up Custom Plugins
If you want to use your own VAM plugins (Naturalis, Alt-Futa, custom physics, etc.) on the character, follow all of the steps below in order. Skipping any step or reordering will break the chain.
Step 3.1 — Add Your Plugins to Person's Plugin List
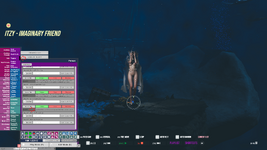
- Open the Person atom's Plugins panel.
- Do not modify or remove any existing plugins yet. Scroll to the bottom of the list.
- Add your custom plugins one by one at the end of the list. The first plugin you add should be at index #7.
Plugin order matters. Adding plugins anywhere other than the end of the list will break the scene's plugin index expectations.
Step 3.2 — Remove the Built-in Plugins
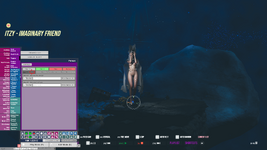
After all your custom plugins are added at the end:
- Delete the built-in plugins #0 through #6 one by one.
- Verify: your first custom plugin should still be at index #7 after the deletions (indices do not reshuffle in VAM). If it shifted to a lower number, restart this step.
Step 3.3 — Save Your Plugin Combination as a Preset
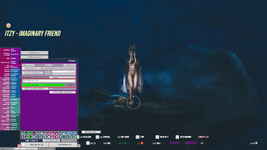
- Switch to the Plugin Presets panel on the Person atom.
- Save the current plugin set as a new preset. Give it any name you like.
This preset is what the scene's auto-loader will pull on every track load.
Step 3.4 — Wire the Preset Into the Scene's Custom Plugin Slot
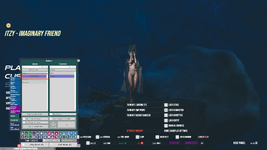
- Open the atom list (Select). Find and select the atom named ________Custom Plugin (eight underscores).
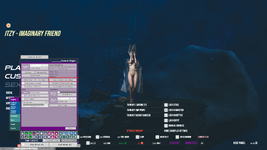
- Open its plugin panel. You'll see a single StateMachine plugin. Open the Actions / OnEnter section.
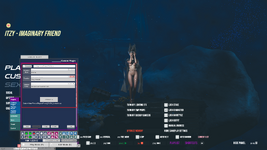
- Add a new action and configure it exactly as shown:
- Receiver Atom: Person
- Receiver: PluginPresets
- Target: MergeLoadPresetWithPath ← must be the MERGE LOAD variant
- Preset File Path: point to the preset you saved in Step 3.3
Step 3.5 — Enable Merge Load in Gameplay Settings
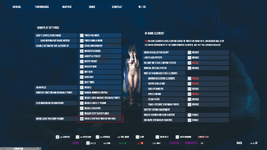
- Go to OPTIONS → GAMEPLAY.
- Find and check the "MERGE LOAD YOUR OWN PLUGINS" option (left column, near the bottom).
This tells the scene's chain to execute your Custom Plugin slot on every track load.
Step 4 — Initialize the Customization
- Open the PLAYLIST again.
- Click the currently playing track to reload it, or pick any other track.
This first track-play after configuration is your initialization run — it executes one full loading chain with your character and plugin settings, committing everything into the scene's runtime state.
After this run completes successfully, you are done.
Final Step — Save Your Scene
Once the initialization run finishes and the new track is playing normally, save the scene through VAM's File menu.
Your character, plugins, and Custom Plugin settings are now baked into the saved scene. For future sessions, you can simply load your saved scene file — you do not need to repeat any of the steps above unless the base scene version updates.
 REMINDER FOR FUTURE SESSIONS
 Even though your customization is now saved, the Welcome screen rule STILL APPLIES every time you load the scene:
- Do NOT customize on the Welcome screen.
- Always play one track first to initialize.
If you ever want to change your character or update your custom plugins:
- Load your saved scene.
- Play one track to fully enter the game.
- THEN make your changes.
- Run an initialization track again.
- Save.
Skipping Step 2 (playing a track first) WILL break the scene, every time, no exceptions.
Troubleshooting
Q: I customized on the Welcome screen and now tracks won't play.
A: Close the scene without saving. Reload a clean save (or the base scene), then follow this guide from Step 1.
Q: I clicked a multi-variant track but the variant picker doesn't respond to clicks.
A: This is the most common symptom of a broken customization chain. Reload from a clean save and follow this guide from Step 1.
Q: My custom plugin isn't loading after configuring it.
A: Verify:
- You used MergeLoadPresetWithPath (not regular load) in Step 3.4.
- MERGE LOAD YOUR OWN PLUGINS is checked in Gameplay settings (Step 3.5).
- You ran the initialization track in Step 4 after configuring.
Q: Can I just use VAM's main menu "Add Plugin" / customloadplugins to add my plugins?
A: No. Always use the ________Custom Plugin atom path described in Step 3. The main menu route bypasses the scene's initialization order and WILL break the chain — even if it appears to work initially, it will fail on subsequent track loads.
Q: Can I do customization while a track is still loading?
A: No. Always wait until the track has fully loaded (stage rendered, no loading indicators) before customizing anything.
Q: I saved my scene after customizing, and now even the clean reload breaks. What do I do?
A: Your saved scene captured the corrupted state. You'll need to start from the original base scene (re-download the .var if necessary), then re-customize following this guide from Step 1, then save fresh.
Chapter — Favorites (FAV)
The FAV system (Favorites / Recent / Most Played pools) works the way you'd expect — click the heart icon next to a track to favorite it, switch to the MY FAV / RECENT / MOST PLAYED tabs to browse those pools. Your favorites persist across scene saves. Use the import / export buttons in the MY FAV tab to share a .p69save favorites file with other devices or back it up.
Besides that, you can also use this online tool to create new playlists or edit your existing favorites list.
Detailed guide intentionally omitted — the UI is self-explanatory. Open an issue on the Hub thread if you run into something confusing.