This guide was made with Blender 3.3
I use Linux so some screenshots may differ slightly, I Apologize for any confusion caused by this. But it shouldn't be any different.
This assumes you already have Textures. If you want to convert a set of Female Textures to Male you should follow this guide by MrGiggly. It's what i use.
https://hub.virtamate.com/resources...4-m4-g2-3-8-8-1f-textures-to-g2f-or-g2m.4647/
It does require you to have an older version of blender however.
I'm also not going to go into great detail explaining Blender. You'll need to familiarize yourself with how it works.
First step is to get an OBJ file from VAM of our character.
I Create a new Atom. Change the Skin to Futa Kayla. I then go into the Male Morphs Tab and zero out all morphs except MVR_G2Female which is set to 1.0
Check the box that says "Use Female Morphs on Male". Also go into Female Morphs and set all to 0.
I also adjust the Scrotum morphs 'Castrate' to remove the Scrotum as it will get in the way when we're trying to blend the textures.
***UPDATE***
i recommend you make your character do the splits here, move the legs out 45 degrees so they're out of the way when you go to paint around the genitals area.
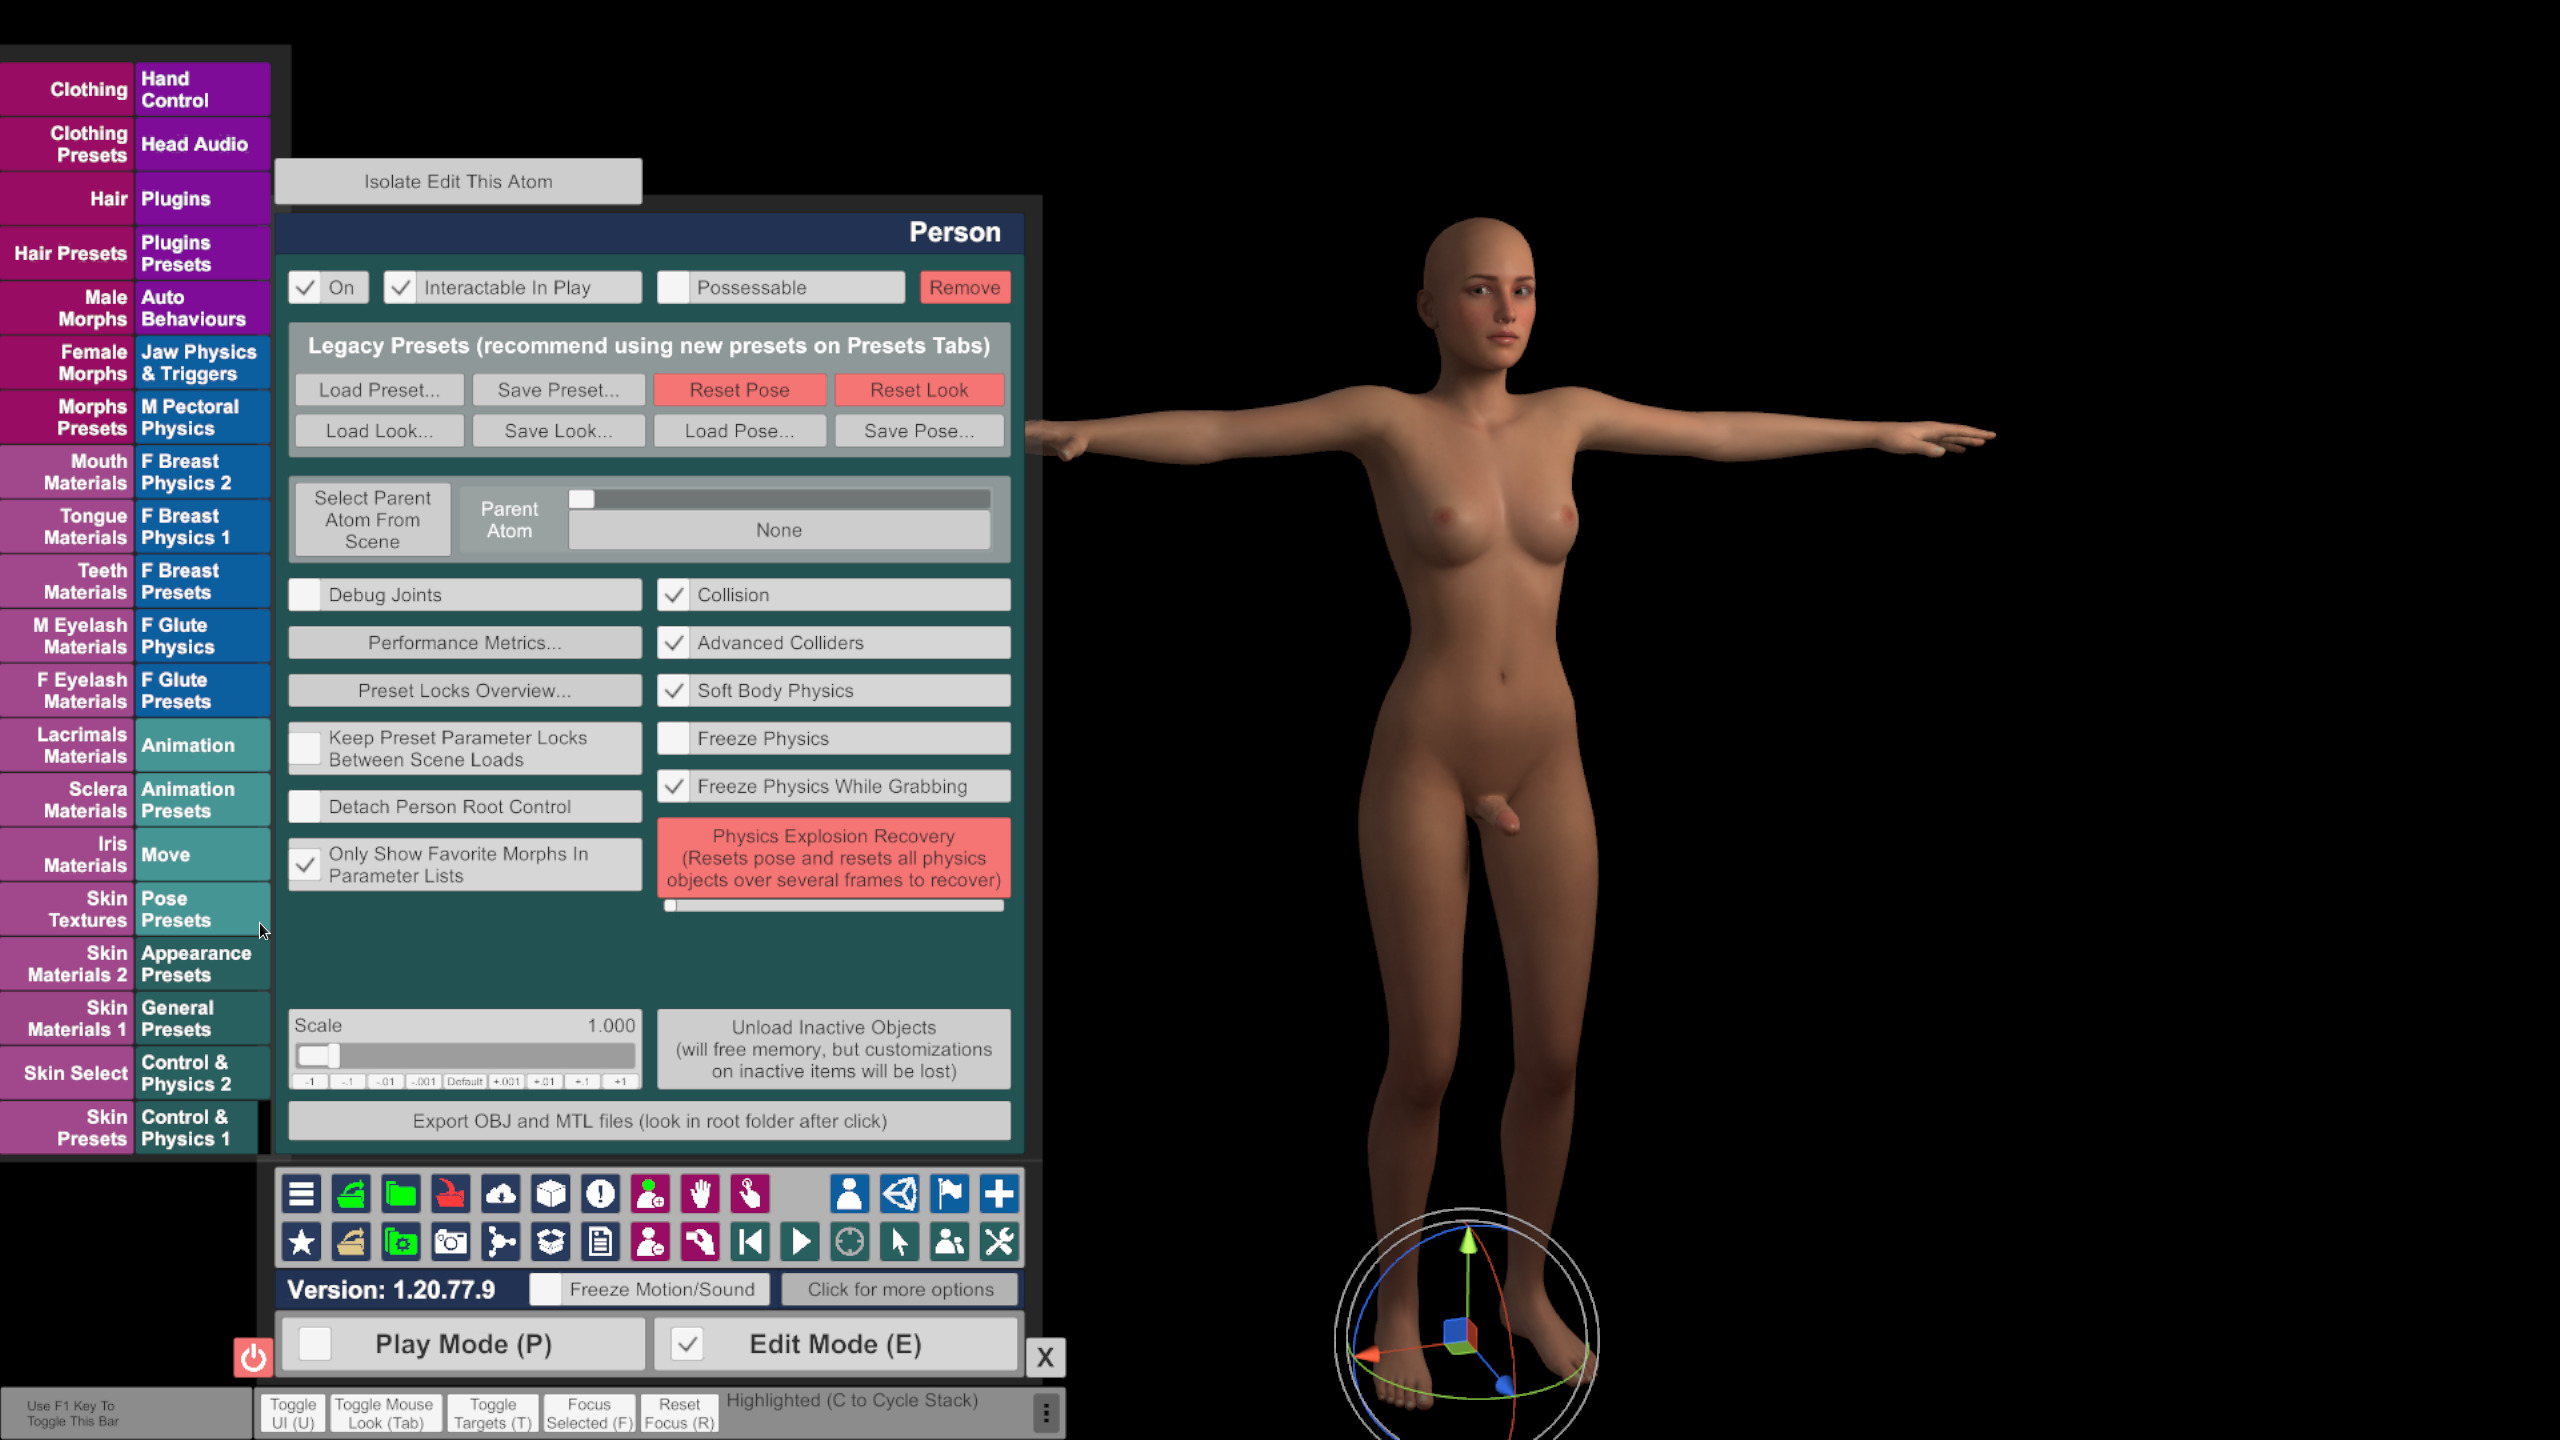
Now go into the Control & Physics 1 Tab and click Export OBJ and MTL files

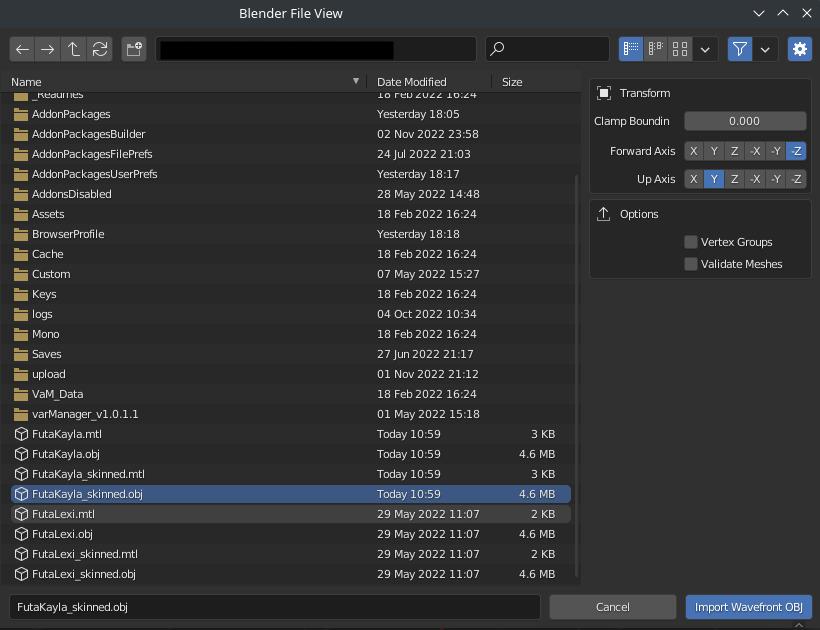
You will find FutaKayla_skinned.obj in the root VAM directory

Open Blender 3.3 and remove any existing objects by selecting them and hitting X to delete.
File > Import > Wavefront (.obj) and navigate to your VAM Root Directory, select FutaKayla_skinned.obj and hit Import
You should now have a character mesh in Blender in the Default T-Pose.
Swap to the UV Editing Mode on the top bar
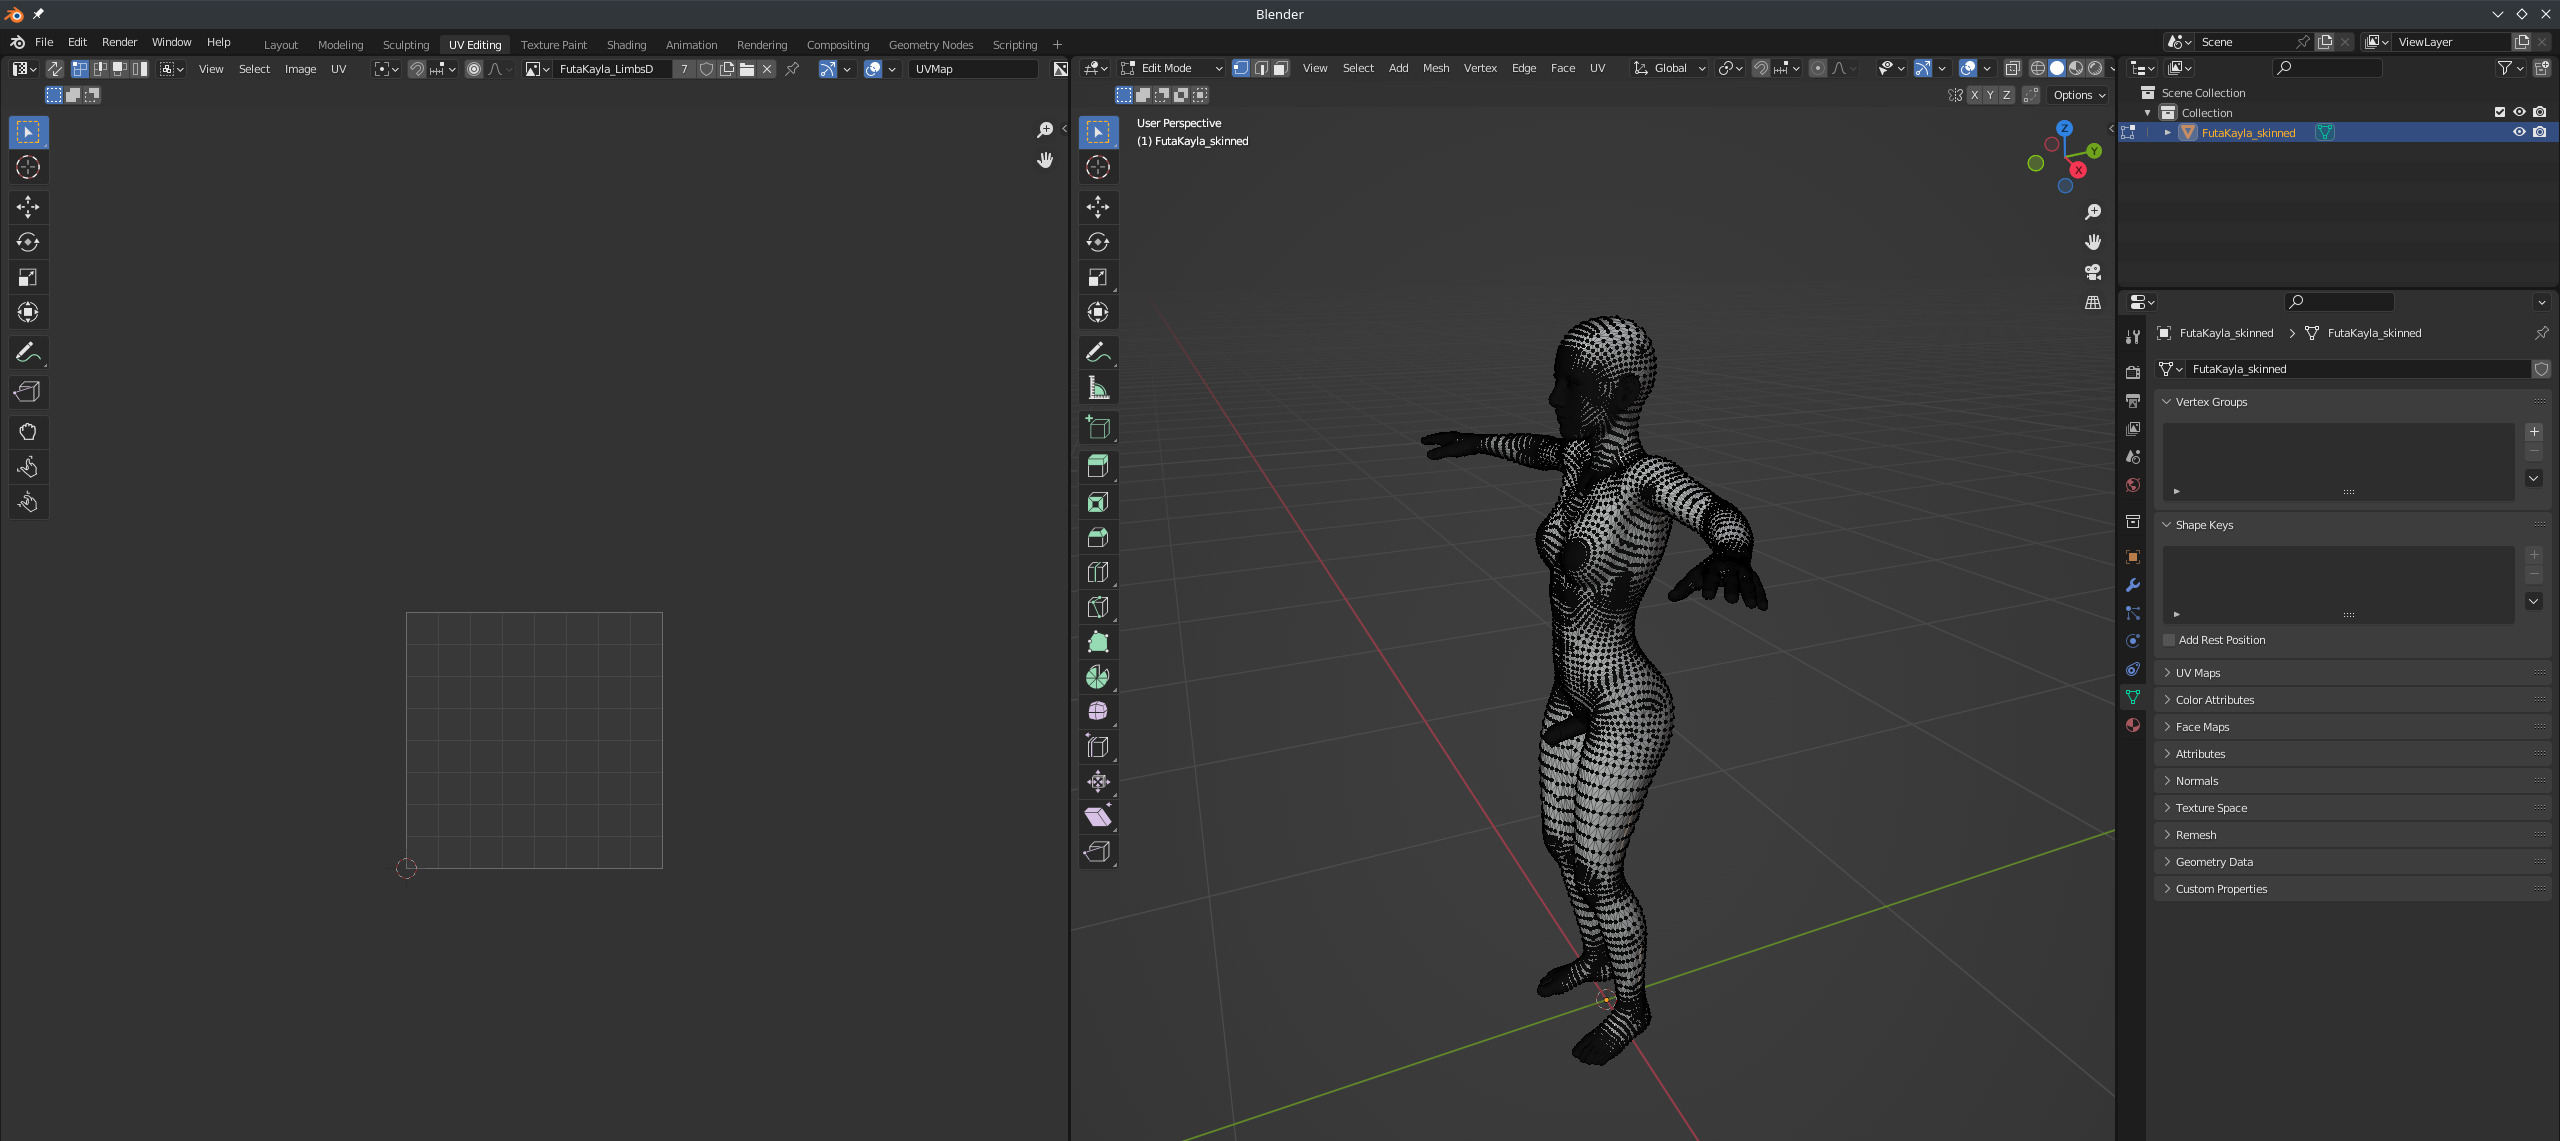
Press 'Home' on the keyboard to center and zoom into the mesh
If you're in Edit Mode by default swap to Object mode in the top left of the right window.
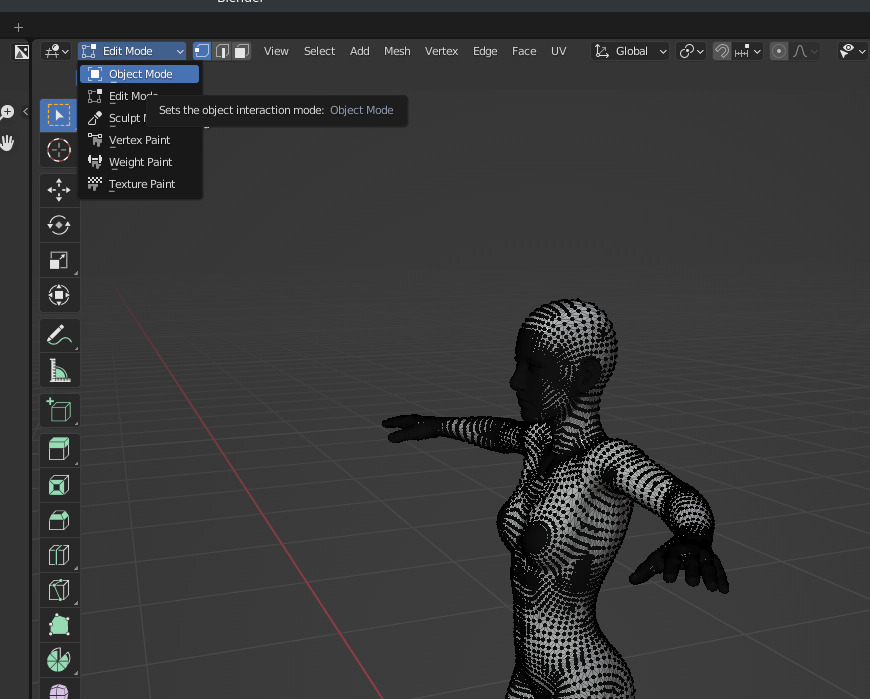
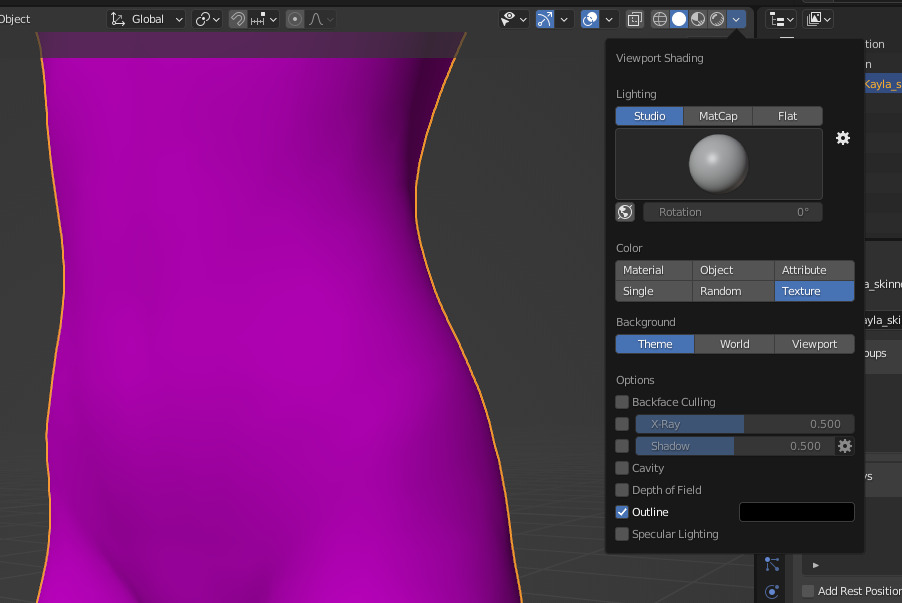
Change your render settings for the right panel using the interface in the top right of the panel.
You want to enable Texture and turn off Specular Lighting.
The Mesh will turn Pink which is a fallback color to indicate there's supposed to be a texture but blender can't find it.
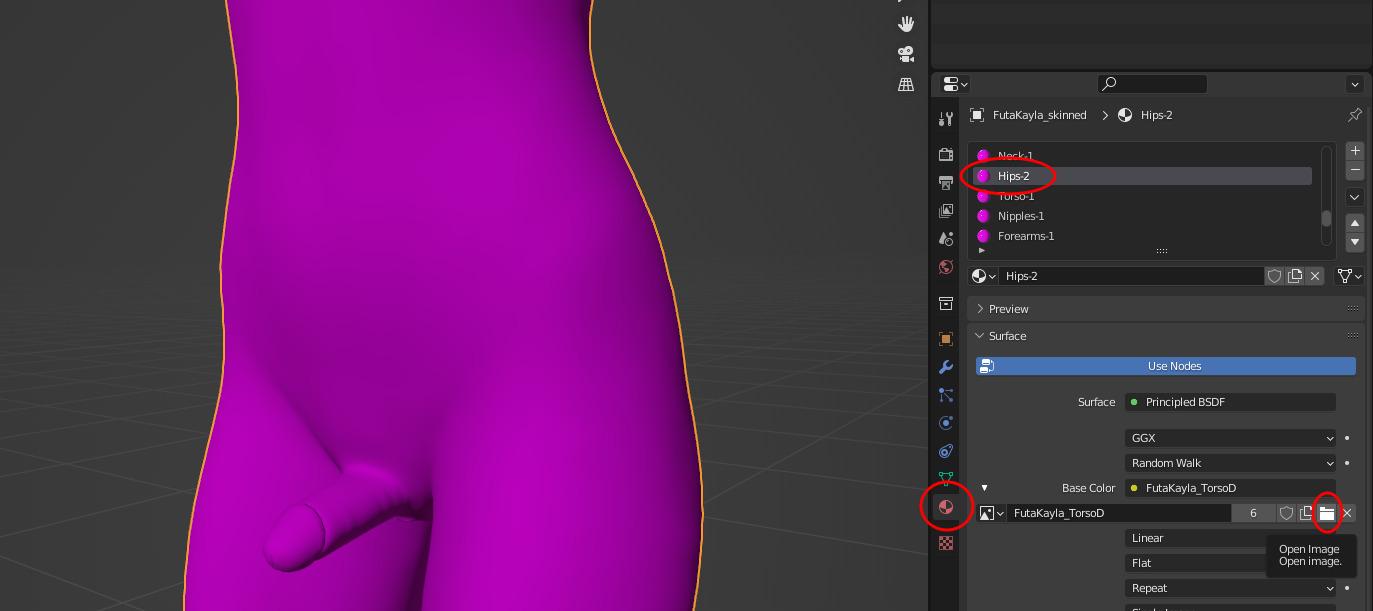
On the right most panel. Navigate to the Material Properties Panel by clicking on the small red circle, 2nd from the bottom.
Scroll down the list of Materials until you find Hips and select it. Expand Base Color and click the Open Image button.
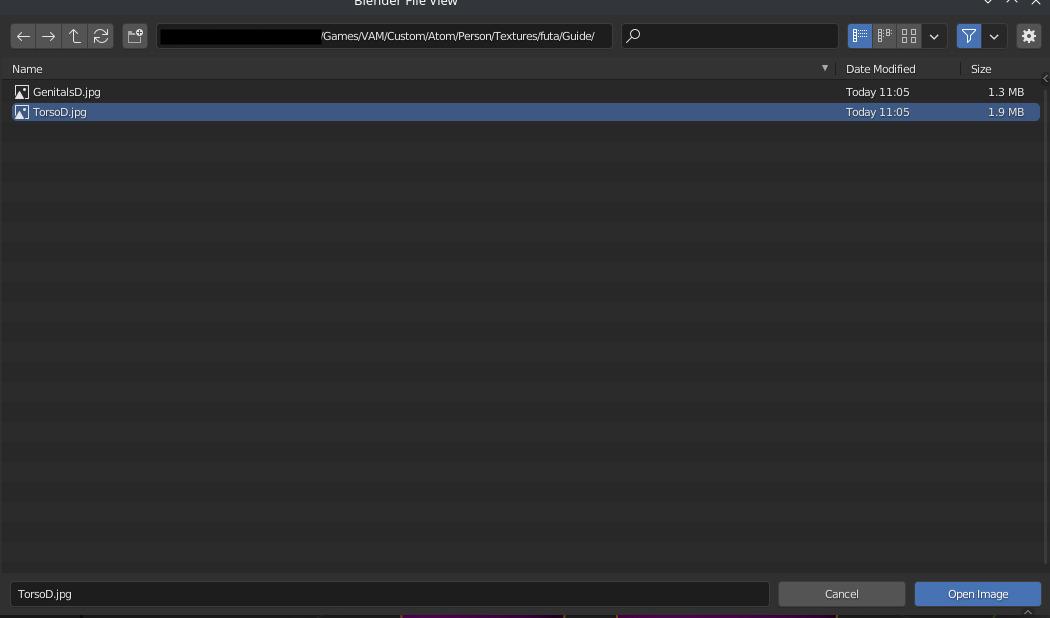
Find your Torso Texture and Open it.
Do the same with Genitals and you should have the following
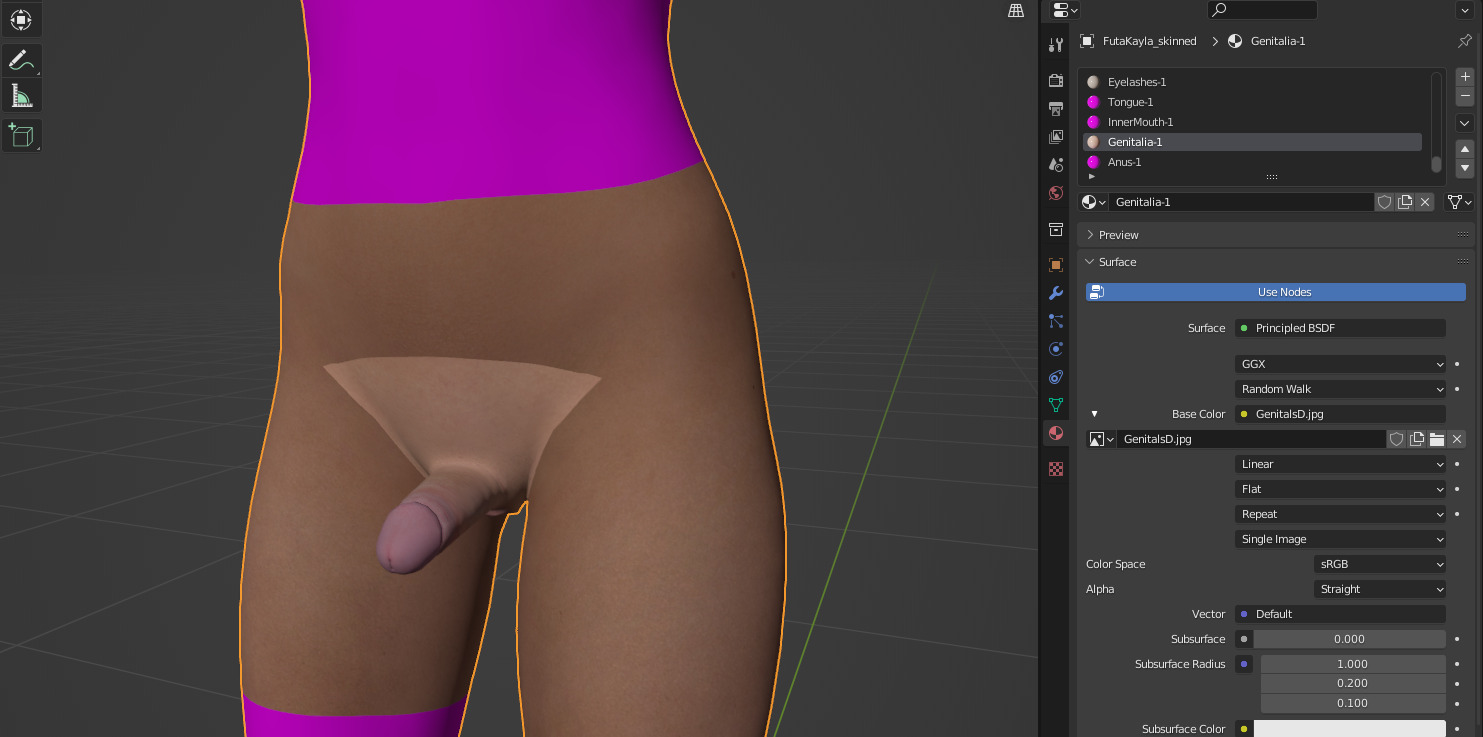
We can now begin blending the Textures. Swap to Texture Paint Mode in the top left of the right window.
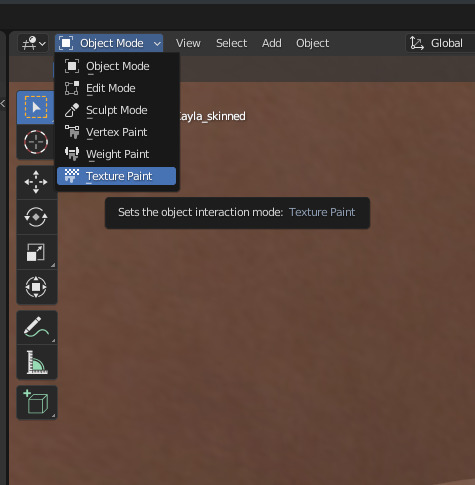
Now select the Clone tool on the left drop down button menu thing.
You can now setup the tool how you wish.
I will list some recommended settings i use.
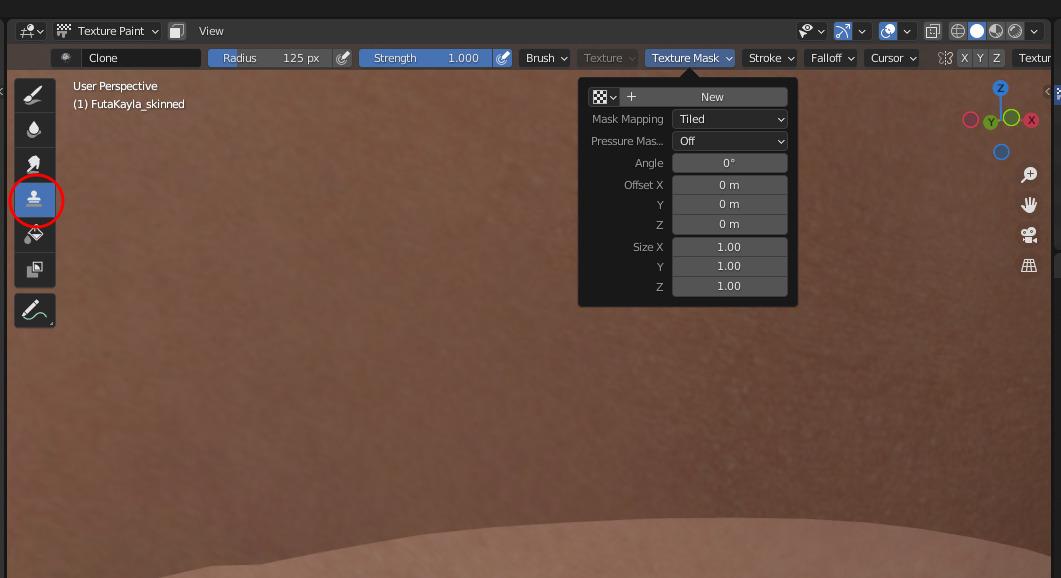
I like to have a Texture Mask. I use a skin pore texture i downloaded from https://pixologic.com/zbrush/downloadcenter/alpha/#prettyPhoto
Select Texture Mask, Hit New and make sure Mask Mapping is set to View Plane and not Tiled.
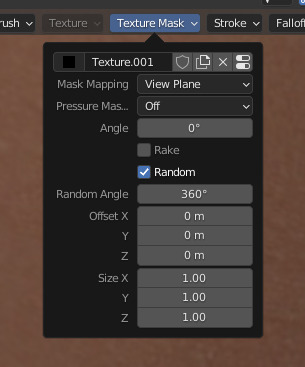
You can choose to Enable Random or not. It probably doesn't do much but i try to get as much variation as possible in the blend so i enable it.
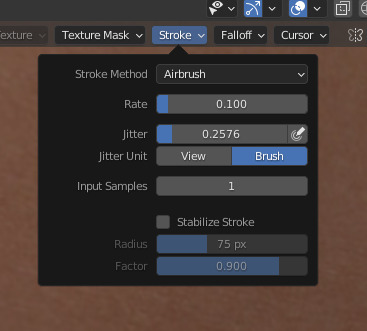
Stroke Settings. I use Airbrush and enable some Jitter. Play around with these settings to your liking. a lower rate will increase how quickly the 'brush paints'
You can also play around with the Falloff to make more gradual/harsh transitions
I Also enable X symmetry directly to the right of Cursor settings.
Then Navigate to the Texture Properties Panel and Open the Brush Mask Texture.
Open whatever brush you want to use. This whole Mask thing is optional but recommended.
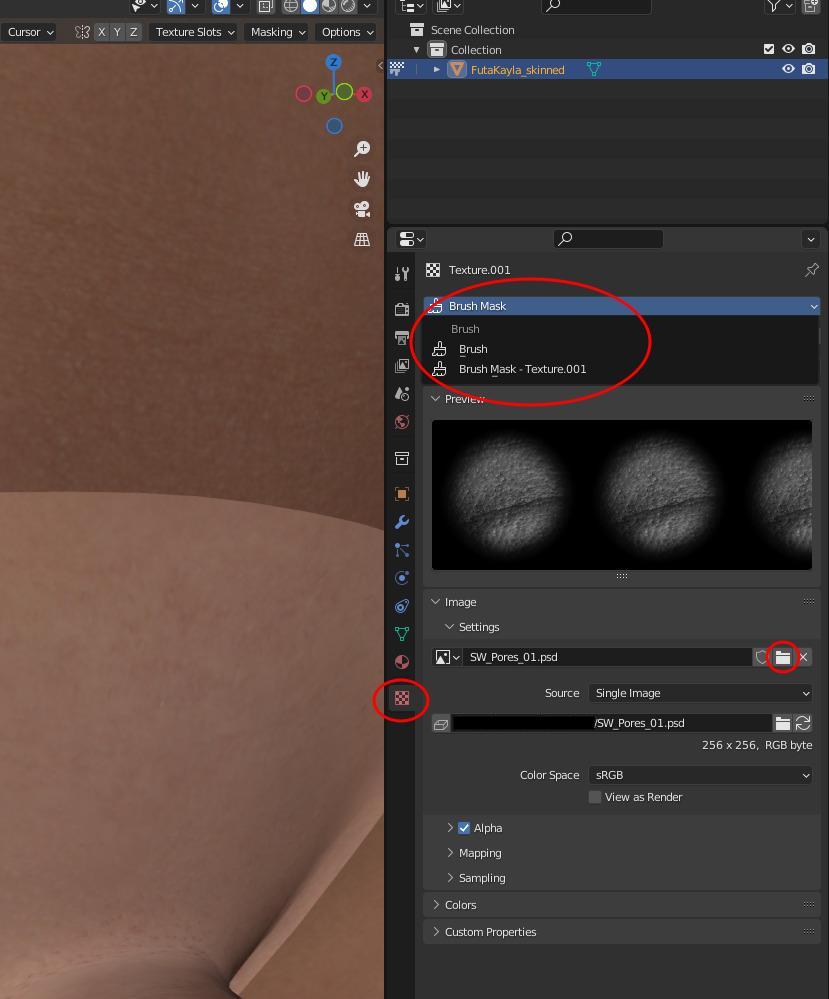
Now you can start painting.
With the Clone Tool Selected you can hold Shift and Right Click to set the Clone Source Point (Hopefully this keybind doesn't differ on Windows but it should be something similar)
You should see a small red/white dashed circle that indicates the source.
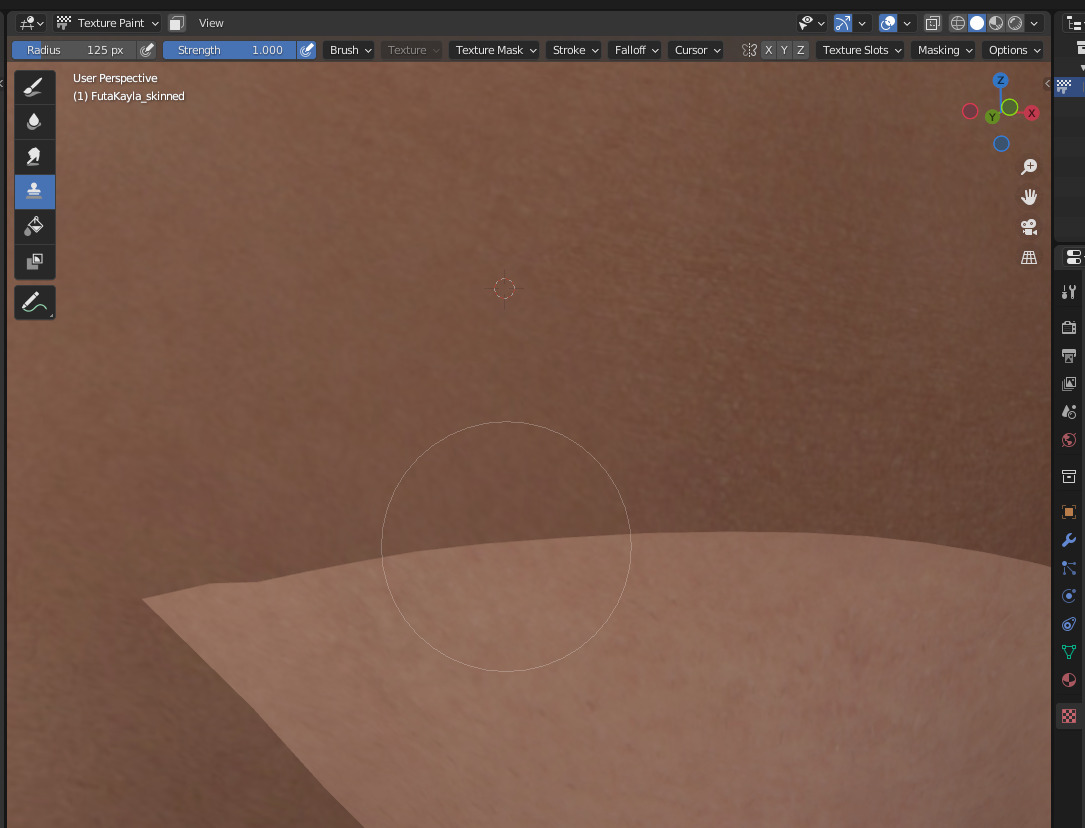
Then just start painting over the Seam. Experiment as much as you want here to create whatever transition you want. Play with the Brush Size and Strength settings. Increase/Decrease Jitter/Falloff, etc.
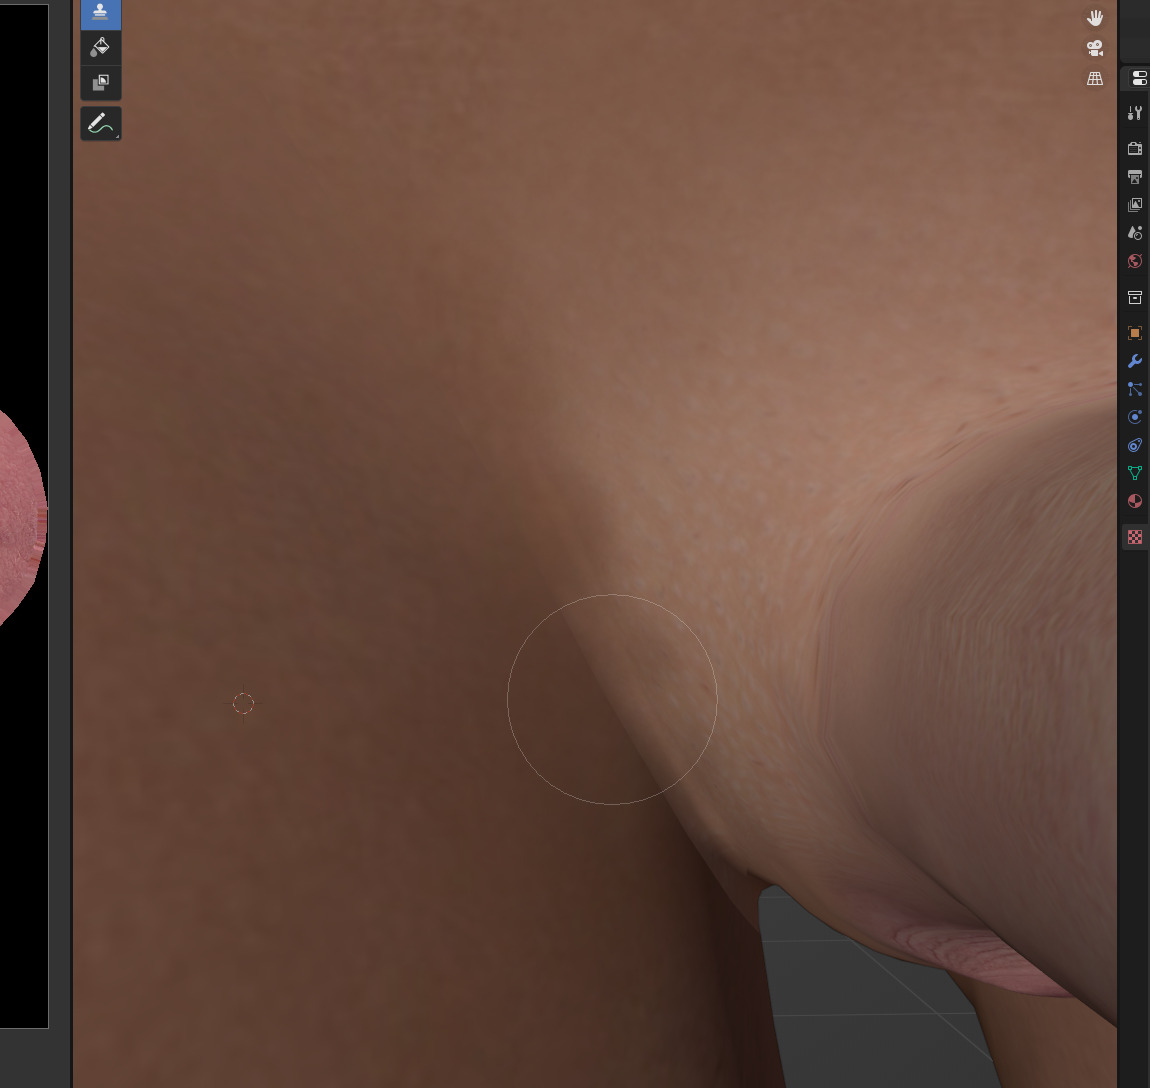
The most difficult parts are down around the Legs/Scrotum. do your best to match these areas. Make sure you get in between the Anus and Scrotum.
You may end up with some distortion here. I Suggest cleaning it up in GIMP/Photoshop later on.
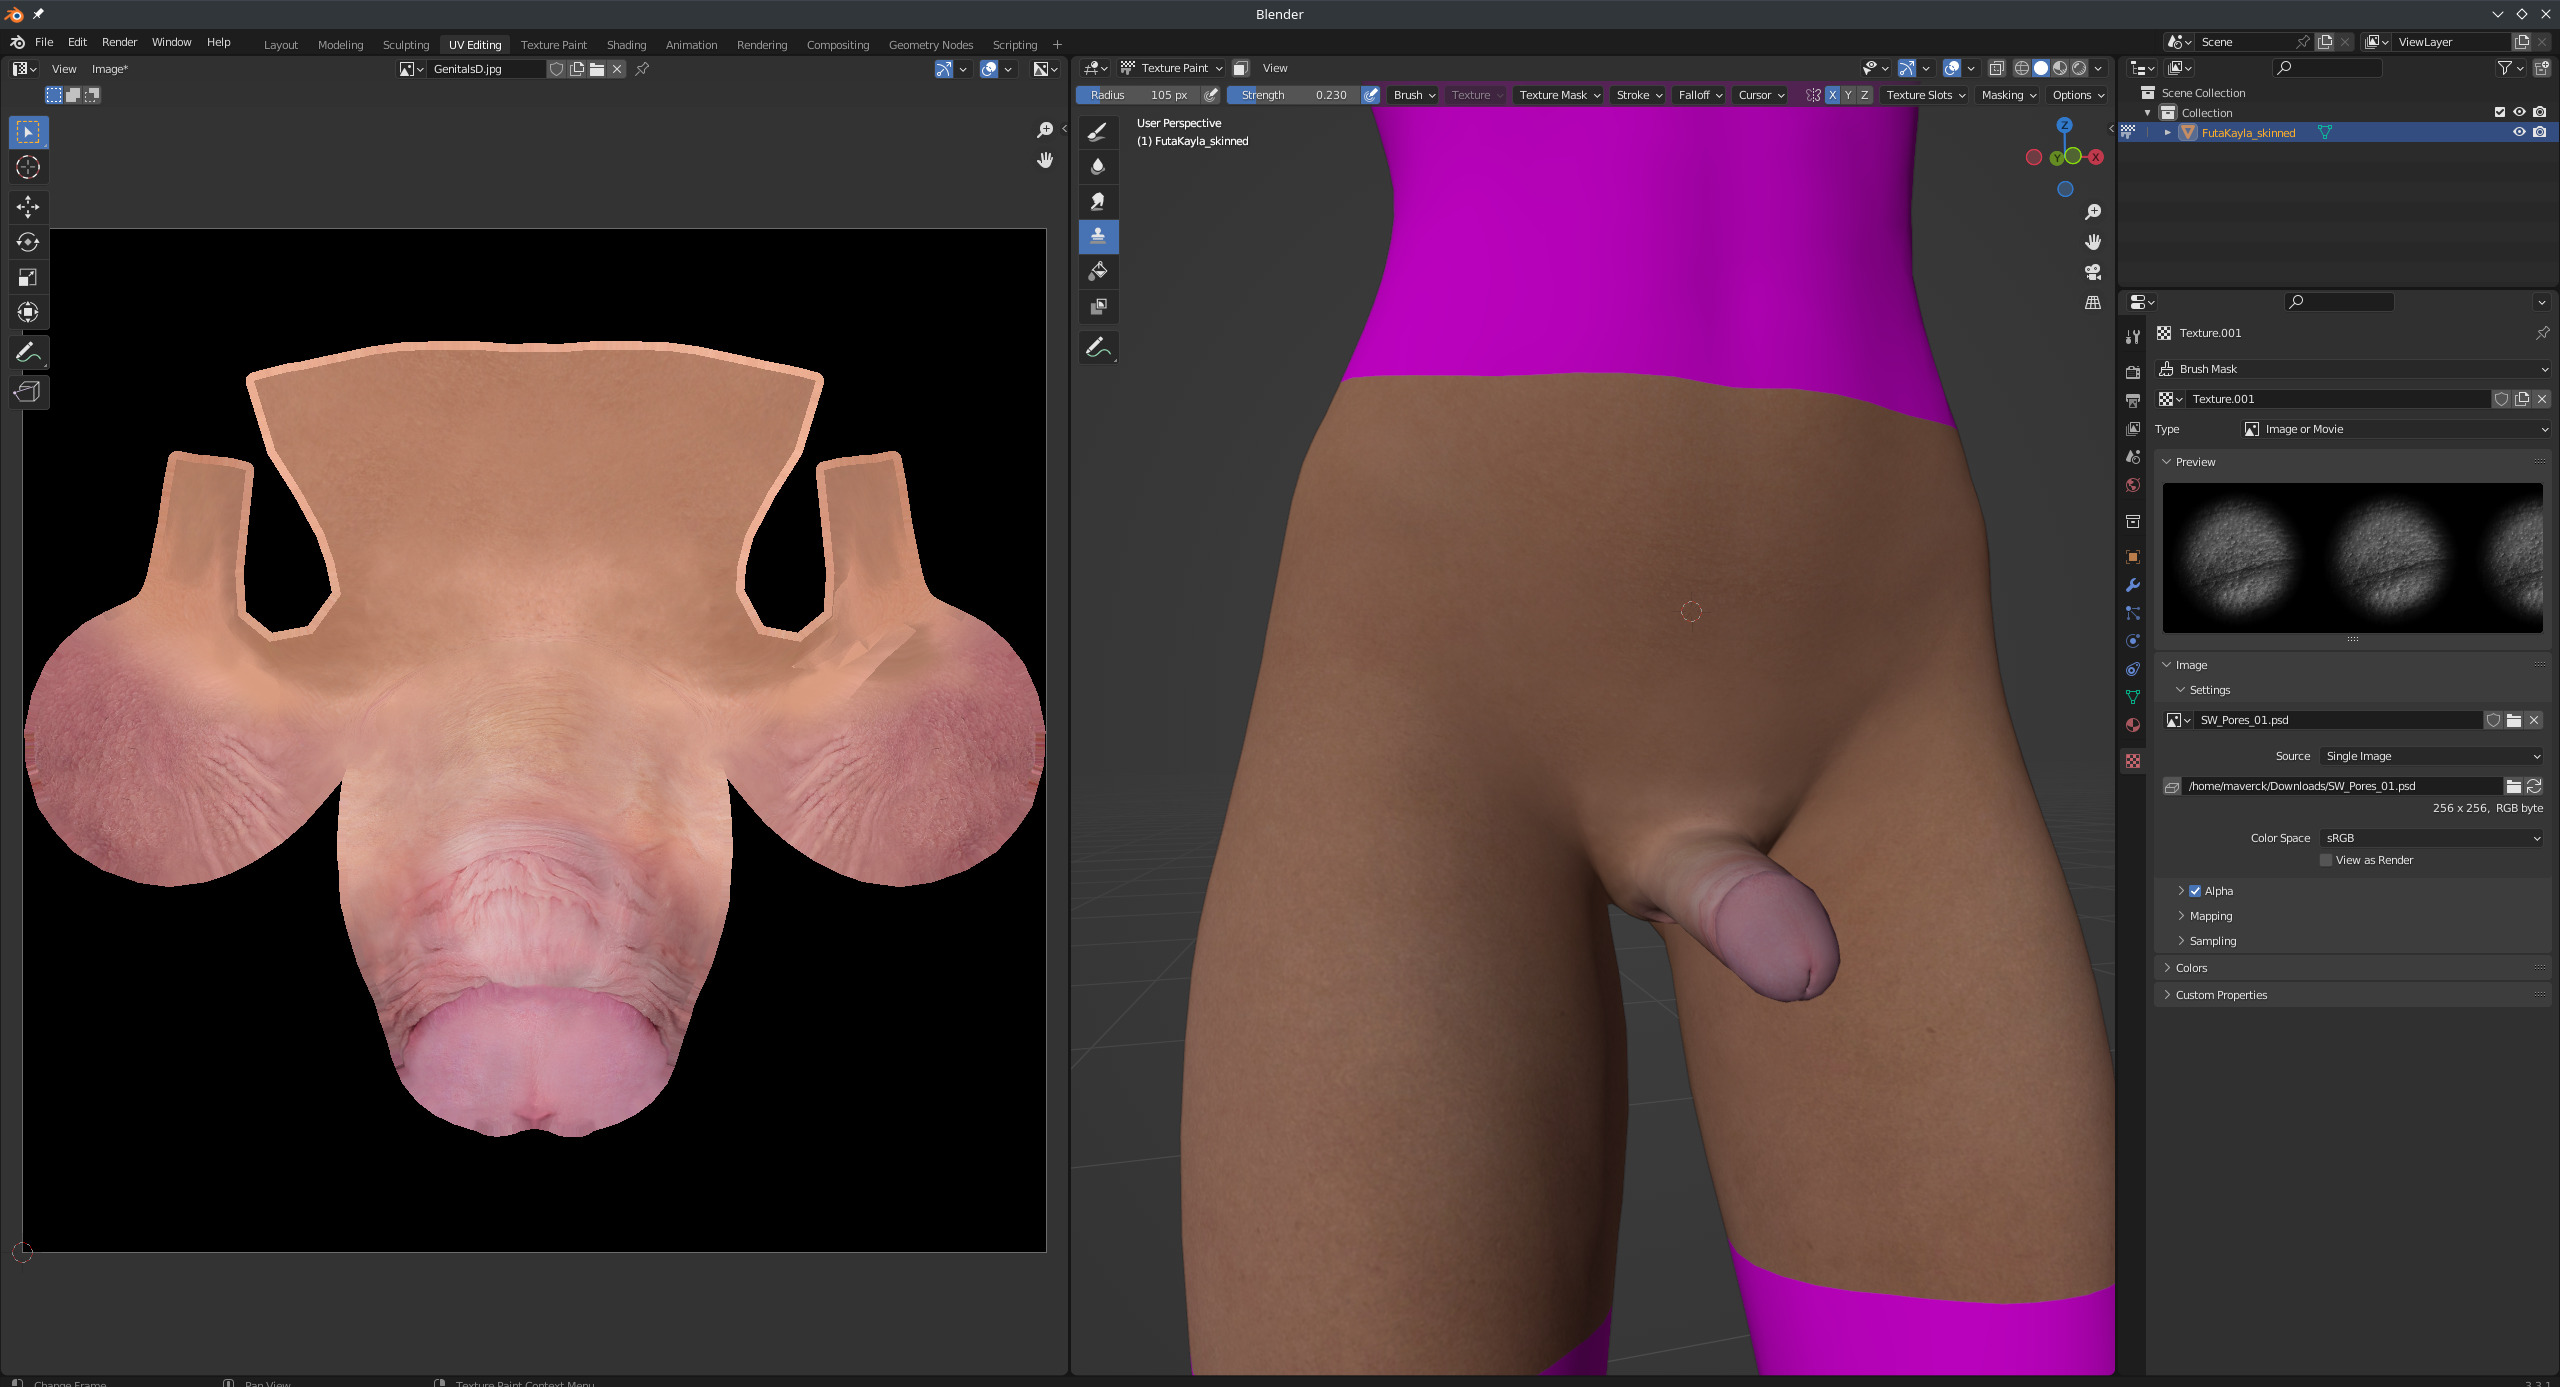
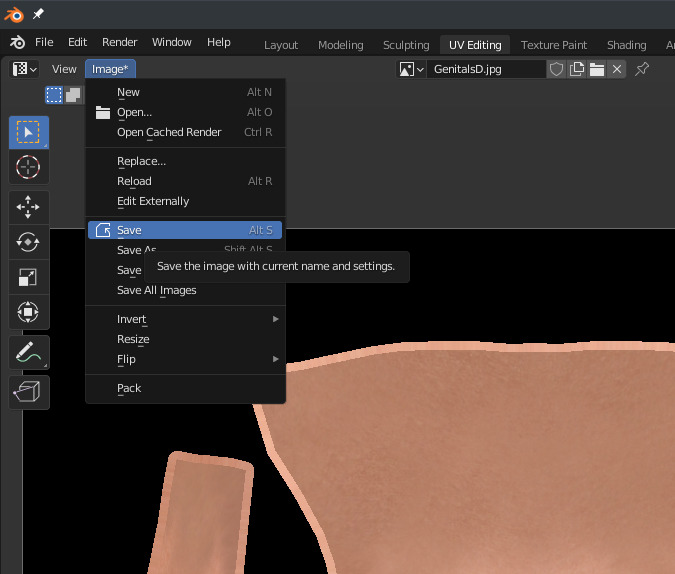
When you're happy with it you can 'Save Image" by Clicking Image drop down on the top of the left window and selecting 'Save'
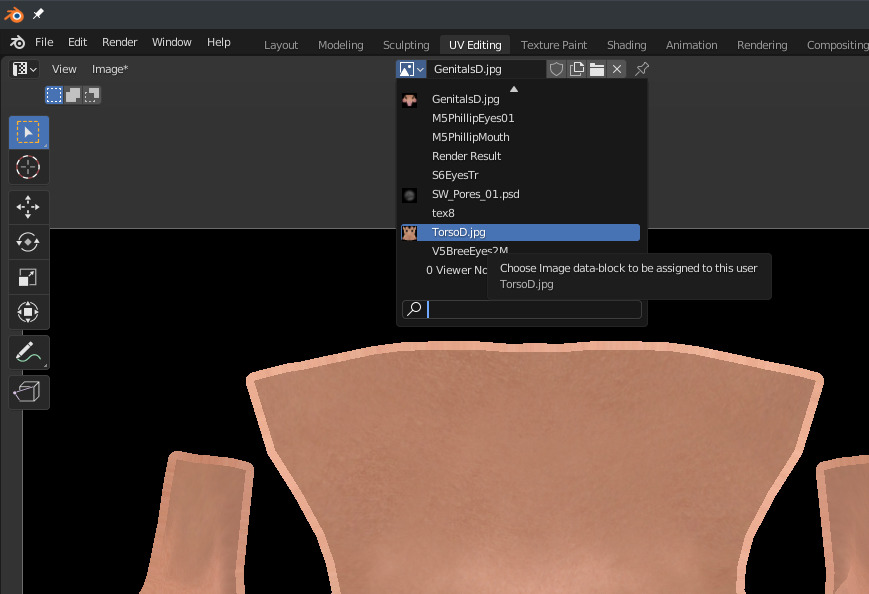
Do the same with the Torso Texture, select it using the menu to the right. Then save it once selected.
You can then go back into VAM and load these two textures onto your Atom.
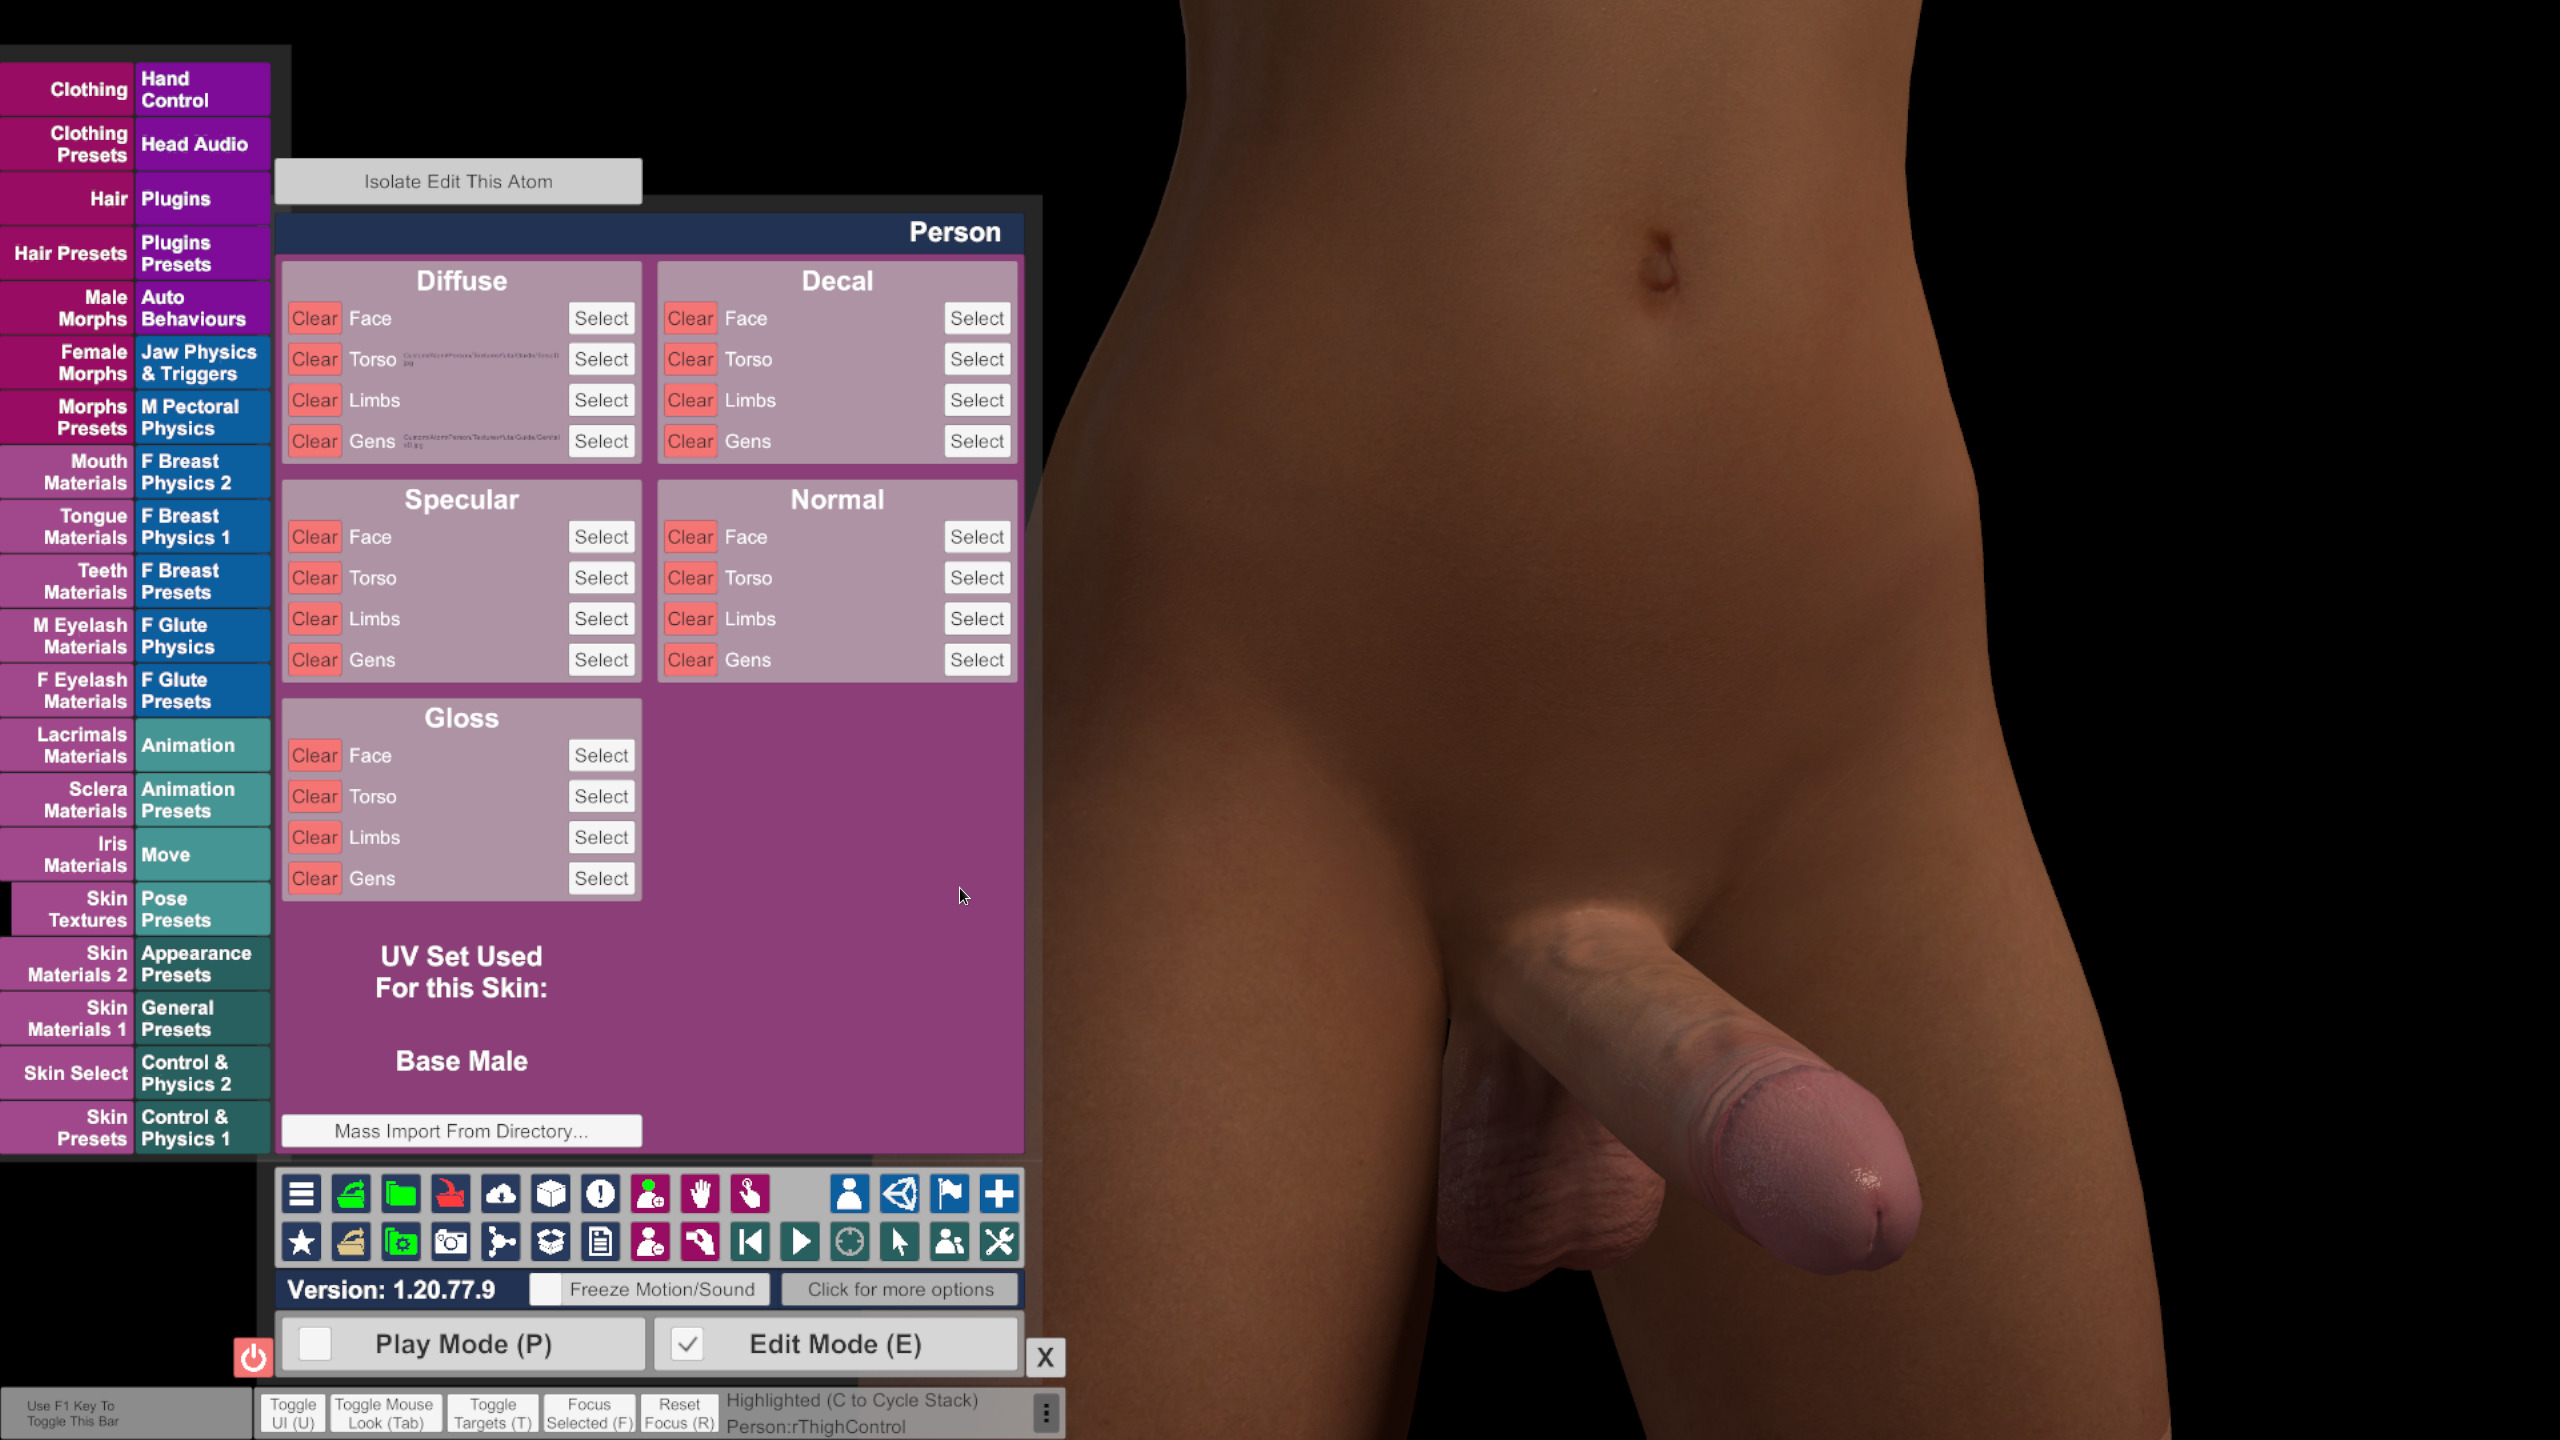
You can repeat this process for Normal/Spec/Gloss if you choose.
I use Linux so some screenshots may differ slightly, I Apologize for any confusion caused by this. But it shouldn't be any different.
This assumes you already have Textures. If you want to convert a set of Female Textures to Male you should follow this guide by MrGiggly. It's what i use.
https://hub.virtamate.com/resources...4-m4-g2-3-8-8-1f-textures-to-g2f-or-g2m.4647/
It does require you to have an older version of blender however.
I'm also not going to go into great detail explaining Blender. You'll need to familiarize yourself with how it works.
First step is to get an OBJ file from VAM of our character.
I Create a new Atom. Change the Skin to Futa Kayla. I then go into the Male Morphs Tab and zero out all morphs except MVR_G2Female which is set to 1.0
Check the box that says "Use Female Morphs on Male". Also go into Female Morphs and set all to 0.
I also adjust the Scrotum morphs 'Castrate' to remove the Scrotum as it will get in the way when we're trying to blend the textures.
***UPDATE***
i recommend you make your character do the splits here, move the legs out 45 degrees so they're out of the way when you go to paint around the genitals area.
Now go into the Control & Physics 1 Tab and click Export OBJ and MTL files
You will find FutaKayla_skinned.obj in the root VAM directory
Open Blender 3.3 and remove any existing objects by selecting them and hitting X to delete.
File > Import > Wavefront (.obj) and navigate to your VAM Root Directory, select FutaKayla_skinned.obj and hit Import
You should now have a character mesh in Blender in the Default T-Pose.
Swap to the UV Editing Mode on the top bar
Press 'Home' on the keyboard to center and zoom into the mesh
If you're in Edit Mode by default swap to Object mode in the top left of the right window.
Change your render settings for the right panel using the interface in the top right of the panel.
You want to enable Texture and turn off Specular Lighting.
The Mesh will turn Pink which is a fallback color to indicate there's supposed to be a texture but blender can't find it.
On the right most panel. Navigate to the Material Properties Panel by clicking on the small red circle, 2nd from the bottom.
Scroll down the list of Materials until you find Hips and select it. Expand Base Color and click the Open Image button.
Find your Torso Texture and Open it.
Do the same with Genitals and you should have the following
We can now begin blending the Textures. Swap to Texture Paint Mode in the top left of the right window.
Now select the Clone tool on the left drop down button menu thing.
You can now setup the tool how you wish.
I will list some recommended settings i use.
I like to have a Texture Mask. I use a skin pore texture i downloaded from https://pixologic.com/zbrush/downloadcenter/alpha/#prettyPhoto
Select Texture Mask, Hit New and make sure Mask Mapping is set to View Plane and not Tiled.
You can choose to Enable Random or not. It probably doesn't do much but i try to get as much variation as possible in the blend so i enable it.
Stroke Settings. I use Airbrush and enable some Jitter. Play around with these settings to your liking. a lower rate will increase how quickly the 'brush paints'
You can also play around with the Falloff to make more gradual/harsh transitions
I Also enable X symmetry directly to the right of Cursor settings.
Then Navigate to the Texture Properties Panel and Open the Brush Mask Texture.
Open whatever brush you want to use. This whole Mask thing is optional but recommended.
Now you can start painting.
With the Clone Tool Selected you can hold Shift and Right Click to set the Clone Source Point (Hopefully this keybind doesn't differ on Windows but it should be something similar)
You should see a small red/white dashed circle that indicates the source.
Then just start painting over the Seam. Experiment as much as you want here to create whatever transition you want. Play with the Brush Size and Strength settings. Increase/Decrease Jitter/Falloff, etc.
The most difficult parts are down around the Legs/Scrotum. do your best to match these areas. Make sure you get in between the Anus and Scrotum.
You may end up with some distortion here. I Suggest cleaning it up in GIMP/Photoshop later on.
When you're happy with it you can 'Save Image" by Clicking Image drop down on the top of the left window and selecting 'Save'
Do the same with the Torso Texture, select it using the menu to the right. Then save it once selected.
You can then go back into VAM and load these two textures onto your Atom.
You can repeat this process for Normal/Spec/Gloss if you choose.


