


Contains executable files or external scripts. Ensure you trust the creator and apply your own security measures.
This is a Blender Extension, developed in Blender 4.4 and tested in Blender 5.1
Daz Generations 2 Release of a plugin that I have been working on for Daz Studio but might be useful for VAM as well.
In Preparation for VAM 2.x and the need of Genesis 8 morphs, this Blender plugin that allows you to convert one Daz Genesis Generation's shape to another Generation's mesh.
So you can freely convert shapes between G2, G3, G8, G8.1, G9 using Blender.
What the tool currently does:
The program has been rewritten and the UI simplified. Supports Females with early support of Males (expect mesh issues)
1. Click Import OBJ
2. Select Output Model
3. Convert
4. Click on Converted model
5. Save Converted Model

This Screenshot shows a conversion of Original Gen 8 > Gen 9 > Gen 2

This version uses a direct barycentric placement which provides better detail transfer and the cost of loosing the proper pose.
It attempts to recreate and repose the model to match the default pose that generation of Daz model should have.
Issues:
Eyes, Eylashes and Mouth is still still needs fine tuning.
Tutorial
Step 1.
Open Daz Generations Menu.
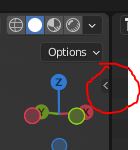
Click the small arrow [<] to open Blenders tool window if it is closed
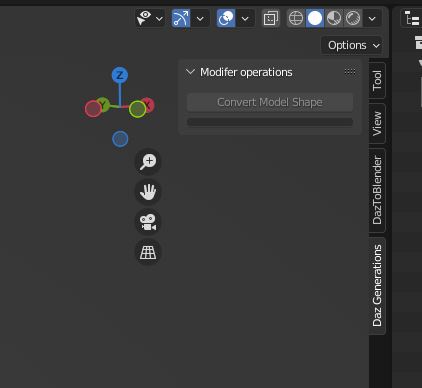
And Click the [Daz Generations] tab
Step 2:
Import a Daz figure in *.obj or *.fbx format with the Daz Generations tool

Step 3:
Select the imported figure
Step 4:
Select the figure and gender you want to convert to in target:

Step 5:
The figure will be created and added to a named group in the Scene Collection. Select the converted rig or mesh.
Step 6:
“Export to *.obj” and use Daz Studio to create morphs with morphloader
Step7: OPTIONAL
For G2 *obj files you can open any G2 fbx or obj file you have and use the
“Save to Vam” to export a vmi/vmb morph file without needing to pass through Daz Studio.
In the right side of the save dialog you can Change the Group and Region for the morph file.
Browse to your VAM \Custom\Atom\Person\Morphs\**GENDER** folder and enter the name you want the morph to have.
Make sure you use these export settings. Otherwise you will need to match your obj files scale and orientation manually.
A large portion of this guide is just the morph loader instructions so here are some video guides that you might find useful
https://renderguide.com/daz3d-create-custom-morph-tutorial/
STEP 1:
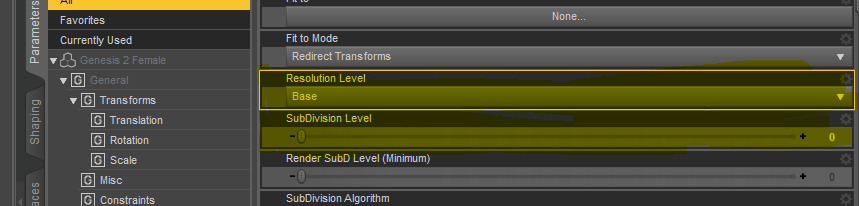
Before exporting models from Daz Studio Select [Parameters] tab and make sure that Resolution Level is set to Base and Subdivision Level is 0
Save one Mesh at a time by clicking File > Export and save as Wavefront Obj file
Change the Daz export and import to match the following:
[Scale] = 100%
Lateral (X): = X
Vertical(Y): = Y
Depth(Z): = Z

STEP 1:

In Daz Studio Load the Generation figure you converted to and use Daz’s Morphloader Pro utility to import and create the morph object.
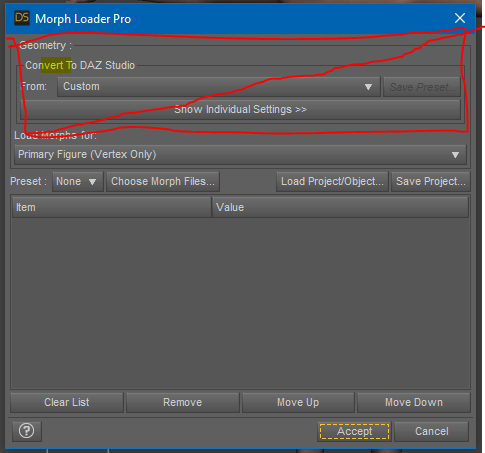
Important: In morph loader do not change the Obj import options in the red square. They need to be the same as what you used in the "Daz Export Tutorial " to export the original model
STEP 2:
In Morph Loader Pro make sure the [Load Morphs for:] dropdown has [Primary Figure (Vertex Only)] selected.
Click [Choose Morph File] and select the object you exported from blender in STEP 6.
Click the [>] to expand the options for renaming or re-importing a morph.
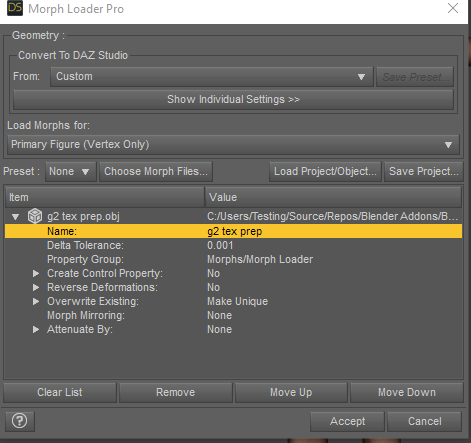
Change the name if desired.
Click [Accept]
If the morph imported successfully you should get this message
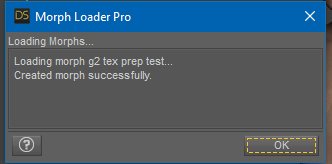
STEP 3:
Select the figure you just used morph loader on, in the [Parameters] tab click [All] then type the morph name in the search box.
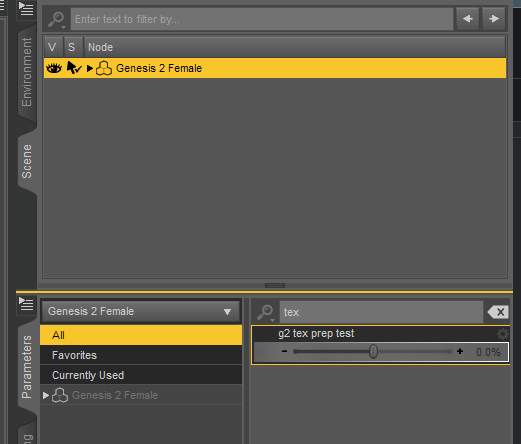
Test the slider to make sure the morph looks you expect. Move the slider to 100% for STEP 4
STEP 4:
On the top menu of Daz Click [Tools] and select [Joint Editor] this will show the bones on the daz figure. If the bones are not inside the body or look a little off the we need to adjust rigging.If the morph does not affect the shape you can skip to STEP 12 :
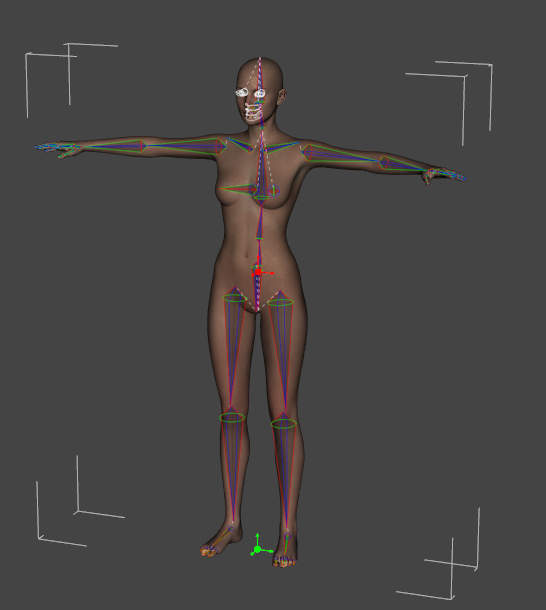
Step 5:
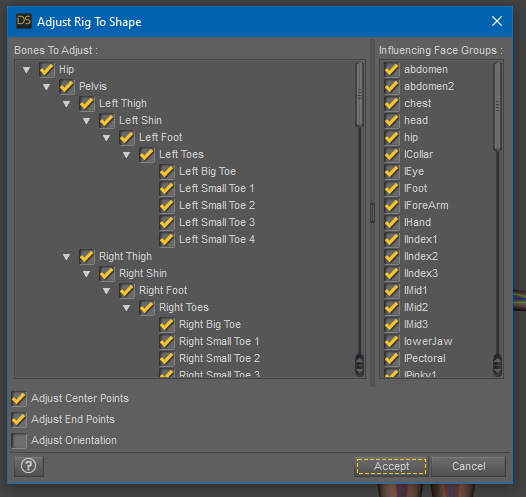
Click [Edit] > [Figure] > [Rigging] > [Adjust Rigging to Shape]

Make sure the only [Adjust Center Points] and [Adjust End Points] are checked. For most human morphs you do not want [Adjust Orientation] checked.
Click [Accept]. And the bones should adjust to the morph.
STEP 6
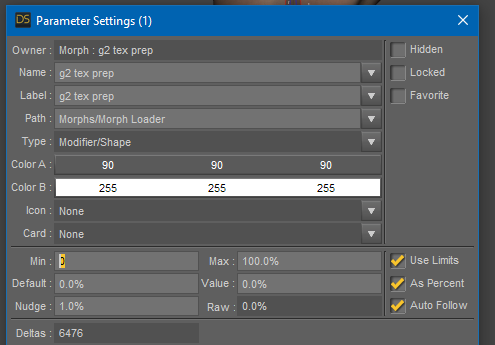
Click the [sprocket icon] on the far right of the morph to open the settings window then click [Parameter Settings]
Select the [Min:] box and set it to 0. This prevents you from applying a negative value to the morph. You can also change the name here.
Click [Accept]
Step 7:
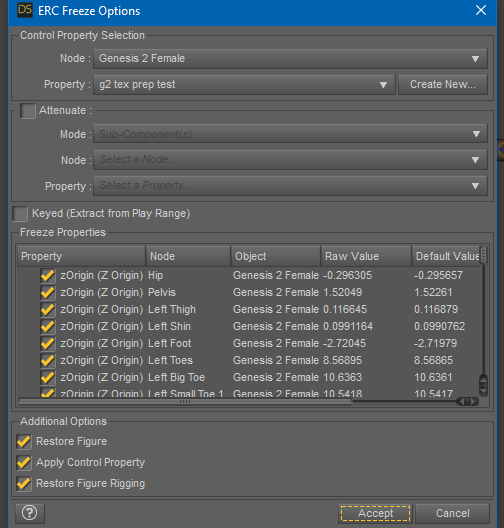
Right click on the morph and click [Edit Mode]

Right click the morph again and select [ERC Freeze]
Make sure the additional options [Restore Figure], [Apply Control Property] and [Restore Figure Rigging] are checked.Click [Accept]
STEP 8:
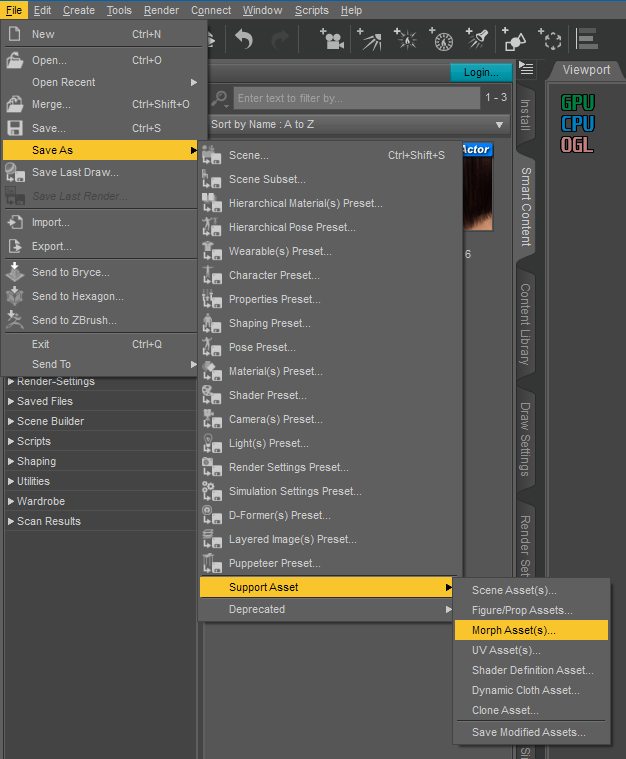
Click [File] > [Save as] > [Support Asset] > [Morph Asset(s)]
Step 9: FINAL STEP
Select [ Morphs] > [Morph Loader]> and check your Named Morph
Click [Accept]
You should now be able to see and use the morph in Daz.
Daz Generations 2 Release of a plugin that I have been working on for Daz Studio but might be useful for VAM as well.
In Preparation for VAM 2.x and the need of Genesis 8 morphs, this Blender plugin that allows you to convert one Daz Genesis Generation's shape to another Generation's mesh.
So you can freely convert shapes between G2, G3, G8, G8.1, G9 using Blender.
What the tool currently does:
- Dedicated Import and Export options that respect vertex order
- Convert Female meshes between G2, G3, G8, G8.1 and G9 with minimal distortion.
- The eyes and mouths will be moved and scaled but will be un-morphed (stay base mesh shaped
The program has been rewritten and the UI simplified. Supports Females with early support of Males (expect mesh issues)
1. Click Import OBJ
2. Select Output Model
3. Convert
4. Click on Converted model
5. Save Converted Model
This Screenshot shows a conversion of Original Gen 8 > Gen 9 > Gen 2
This version uses a direct barycentric placement which provides better detail transfer and the cost of loosing the proper pose.
It attempts to recreate and repose the model to match the default pose that generation of Daz model should have.
Issues:
Eyes, Eylashes and Mouth is still still needs fine tuning.
Tutorial
Step 1.
Open Daz Generations Menu.
Click the small arrow [<] to open Blenders tool window if it is closed
And Click the [Daz Generations] tab
Step 2:
Import a Daz figure in *.obj or *.fbx format with the Daz Generations tool
Step 3:
Select the imported figure
Step 4:
Select the figure and gender you want to convert to in target:
Step 5:
The figure will be created and added to a named group in the Scene Collection. Select the converted rig or mesh.
Step 6:
“Export to *.obj” and use Daz Studio to create morphs with morphloader
Step7: OPTIONAL
For G2 *obj files you can open any G2 fbx or obj file you have and use the
“Save to Vam” to export a vmi/vmb morph file without needing to pass through Daz Studio.
In the right side of the save dialog you can Change the Group and Region for the morph file.
Browse to your VAM \Custom\Atom\Person\Morphs\**GENDER** folder and enter the name you want the morph to have.
| Daz Export Tutorial |
A large portion of this guide is just the morph loader instructions so here are some video guides that you might find useful
STEP 1:
Before exporting models from Daz Studio Select [Parameters] tab and make sure that Resolution Level is set to Base and Subdivision Level is 0
Save one Mesh at a time by clicking File > Export and save as Wavefront Obj file
Change the Daz export and import to match the following:
[Scale] = 100%
Lateral (X): = X
Vertical(Y): = Y
Depth(Z): = Z
| Daz Import/Morph Loader Tutorial |
STEP 1:
In Daz Studio Load the Generation figure you converted to and use Daz’s Morphloader Pro utility to import and create the morph object.
Important: In morph loader do not change the Obj import options in the red square. They need to be the same as what you used in the "Daz Export Tutorial " to export the original model
STEP 2:
In Morph Loader Pro make sure the [Load Morphs for:] dropdown has [Primary Figure (Vertex Only)] selected.
Click [Choose Morph File] and select the object you exported from blender in STEP 6.
Click the [>] to expand the options for renaming or re-importing a morph.
Change the name if desired.
Click [Accept]
If the morph imported successfully you should get this message
STEP 3:
Select the figure you just used morph loader on, in the [Parameters] tab click [All] then type the morph name in the search box.
Test the slider to make sure the morph looks you expect. Move the slider to 100% for STEP 4
STEP 4:
On the top menu of Daz Click [Tools] and select [Joint Editor] this will show the bones on the daz figure. If the bones are not inside the body or look a little off the we need to adjust rigging.If the morph does not affect the shape you can skip to STEP 12 :
Step 5:
Click [Edit] > [Figure] > [Rigging] > [Adjust Rigging to Shape]
Make sure the only [Adjust Center Points] and [Adjust End Points] are checked. For most human morphs you do not want [Adjust Orientation] checked.
Click [Accept]. And the bones should adjust to the morph.
STEP 6
Click the [sprocket icon] on the far right of the morph to open the settings window then click [Parameter Settings]
Select the [Min:] box and set it to 0. This prevents you from applying a negative value to the morph. You can also change the name here.
Click [Accept]
Step 7:
Right click on the morph and click [Edit Mode]
Right click the morph again and select [ERC Freeze]
Make sure the additional options [Restore Figure], [Apply Control Property] and [Restore Figure Rigging] are checked.Click [Accept]
STEP 8:
Click [File] > [Save as] > [Support Asset] > [Morph Asset(s)]
Step 9: FINAL STEP
Select [ Morphs] > [Morph Loader]> and check your Named Morph
Click [Accept]
You should now be able to see and use the morph in Daz.
Contains executable files or external scripts. Ensure you trust the creator and apply your own security measures.


