
Table of Contents
- Introduction
- Section 1 - Download and Install MetaChat Plugin
- Section 1.1 - Autoloading MetaChat as a Session Plugin
- Section 2 (Optional) - How to BOOKMARK a custom LOOK / SCENE/ ATOM.
- Section 2.1 (Optional) - How to find the Hub URL of a scene you already had downloaded from the hub.
- Section 3 - The Preset Toolkit
- Section 4 - “Playing” in MetaChat
- 4.1 - How to PROERLY JOIN/DUPLICATE/CREATE a Lobby.
- 4.2 - How to chat in MetaChat.
- 4.3 - How to Add/Remove an atom (look, object, etc) to a MetaChat scene.
- 4.4 - How to see someone else’s imported LOOK.
- 4.5 - How to move, Thrust, Etc
- 4.6 - Understanding Desynchronization
- Section 5 - Something went wrong!
MetaChat is "Multiplayer" VAM, where you and other players can interact together. Here's a little video
")
https://spankbang.com/8429f/video/vam+full+ft+femma+miu+w+vammoose
Did I get your attention yet
?This Hub Resource is both a Guide for MetaChat and also includes a VAM Scene called the Toolkit
- This Guide explains how to get setup with and use MetaChat , great for you first-timers!
- The MetaChat Toolkit provides a scene with a standardized Plugin Preset and a Pose Preset. These are used to quickly get into the action by cutting down on a lot of tedious, repetitive setup you would have to do every time you wanted to play MetaChat. It also has some fun goodies you can bring with you into your MetaChat sessions!
!!!If you ever need help, please join the MetaChat Discord!!! https://discord.gg/D6nfVVtjGz
So what IS MetaChat ?
MetaChat is a Session Plugin for Virt-a-Mate that enables players to experience VAM simultaneously with other players in a shared scene. and no, it has nothing to do with Facebook. It is the closest thing we have to “multiplayer” in VAM, and while it does require a bit of technical know-how to enjoy a smooth experience, MetaChat is still a very worthwhile experience and can raise your enjoyment of VAM to the next level!
***
This guide will provide screenshots at the end of every list of instructions for your reference.
Section 1.0 - Download and Install MetaChat Plugin via the Hub Browser
It's recommended you follow this guide in the Desktop Mode as it will be easier to follow. First we'll need to make sure the basics are covered, which is enabling the Hub Browser and Plugins for Virt-a-mate.
- Launch "VaM (Desktop Mode).bat" located in where you installed Virt-a-Mate.
- Once Virt-a-mate Launches, click the Return to Scene View at the bottom, it'll be mostly black with a tiny bar at the bottom. If the Main Menu isn't showing yet, press the "U" key to Toggle the Main Menu UI.
- Click the Open Main UI Button that looks like 3 Lines
- Click User Preferences tab on the left.
- Click the Security tab on the top right.
- Enable ALL of the Checkboxes. (You might be required to restart VAM after this to enable the Hub)
- Click on the Hub Browser Button.
- On the left, under Creator type in MetaChat and select that Author Name from the list.
- There should only be one item that appears on the right, click it to open the details.
- Click the GREEN Download All button, and give it a moment to download and install. It may ask you if you want to run this plugin, click Yes.
- Click Return To Scene View at the bottom
Section 1.1 - Activating MetaChat as a Session Plugin
MetaChat as a SESSION plugin, this means that it works best when it runs when you start Virt-a-mate. Here's how to do that:
- Open the Main Menu (U) and click EDIT MODE (E)
- Click the Session Plugins Tab.
- Click the Add Plugins button at the top.
- Click Select File...
- Search for “Metachat.MetaChat” on the left side. You can filter for it by typing in "Meta" in the little textbox at the top of that column.
- Select “MetaChat.dll” from the right side which will add MetaChat as just THIS Session. We need to make sure it will load automatically in the future so you don't have to do this every time.
- Click the Session Plugin Preset Tab on the bottom left.
- Click Change User Defaults... near the top center.
- Click Set Current As User Defaults
Note: I also HIGHLY recommend getting the Give Me FPS Plugin (Install it the same way as MetaChat) because VAM is very performance hungry, but especially in MetaChat when you're probably going to be seeing many people at once.
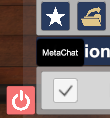
Once installed, you’ll notice a new small black button your your main menu, click on it to see the MetaChat UI.
When you open it for the first time, you'll be asked to create a MetaChat account and activate it via Email.
Remember to check your SPAM folder for the Activation Token
If you see this prompt at any point during this Tutorial, it is RECOMMENDED you press Cancel for now. There is still a lot of setup you should do, and you won’t want other players getting in your way while you work through this guide
***
Section 2 (Optional) - How to BOOKMARK a custom LOOK / SCENE / ATOM.
If you just want to make use of the Toolkit and learn the basics of MetaChat with a default male/female look, you can skip to Section 3. You can come back to this later. However, if you want other players to consistently see the appearance or outfit you like, then you’ll need to do this section, and looking sexy is part of the fun
.Please complete the following steps (Screenshots provided below)
NOTE: If you want everyone to see a custom look/scene etc. The resource MUST be FULLY hosted on the HUB and FREE.
- Click on the in-game Hub Browser
- Click the dropdown beside Hosted Option
- Select Hub and Dependencies
- Click the dropdown beside Pay Type
- Select Free.
- Select a look that you like from the list, and click the Green DOWNLOAD ALL Button. Here’s my personal look you can use an an example https://hub.virtamate.com/resources/the-huntress-remixed-look-for-metachat.26000/
- Press the COPY Button at the bottom right to get the HUB URL for that look.
PLEASE TAKE NOTE OF THE AUTHORS NAME, it'll be displayed in the thumbnail at the top left - Click the Return to Scene button at the bottom.
- Click small Black MetaChat button
- Click the Create Button at the top right
- Click the Create Scene button.
- Paste the URL in the top text field and REMOVE THE "overview-panel" text at the end of the URL.
- Enable the Select Scene from JSON to use atoms checkbox.
- Under Package, you need the VAR name. This VAR name is the file you downloaded earlier. “AuthorsName.ResouceTitle.Version.Number.var”. You can start typing the author name or the title of the look and a dropdown will show you a list of matching packages on your PC. Just make sure to choose the latest version which will be at the bottom.
- Most VARs will just have one scene, but some might have multiple, pick whichever one is relevant to you. You may have to load them up prior to confirm the scene name.
- Click Save when done.
- Click the My Scenes Tab, you should see your newly added item in a list like this. The most RECENTLY added item will be at the TOP LEFT of this list.
- Click the little BOOKMARK icon and now that item will be importable into a MetaChat scene! Anything not bookmarked will be hidden.
- If you want to permanently remove an item, click the 3 Blue Dots in the top right corner of the picture and select Delete
***
Section 2.1 (Optional) - How to find the Hub URL of a scene you already had downloaded from the hub.
If you already have a hub-hosted resource in your personal collection that you want to add to MetaChat and don’t want to have to search for it in the hub, then follow these quick Sections. Please complete the following steps (Screenshots provided below)
- Click the All Scenes Browser
- Click the Scene thumbnail to open the scene containing the look you want.
- Click on the Package Manager icon in the menu
- Click the thin grey button “Select Current Scene Package” at the top left, which will populate details on the right.
Take note of the details at the top, specially the Author, Resource Title, and Version Number - Click on the grey "Open on Hub" button. If the button is not there then this scene isn't hosted on the hub.
- Your URL will be located at the bottom right and you can press the Copy button
I HIGHLY recommend you finish going through this guide and get all the initial setup completed before trying to build your own custom look. Once you have a grasp of how everything works and want to make a personal look, then check out my second guide which covers this advanced topic in greater detail.
***
Section 3 - The Preset Toolkit
Now it's time to take advantage of the included VAM Scene with this guide! Please follow these steps to download and open the MetaChat Toolkit (Screenshots provided below)
- Click the Hub Browser button
- Search for "Metachat Toolkit"
- Click on the Metachat Toolkit item that comes up
- Click on the Download All Button
- Once you have it all downloaded, the Download All button will turn into a purple In Library Open Scene Button. Click it to load the scene.
***
Section 4 - “Playing” in Metachat
At this point, the MetaChat UI should already be open, an account created and logged in.
As a reminder, this is what the MetaChat button looks like, and below is how the button works.
- Clicking this will reveal MetaChat UI and move it in front of you.
- Clicking it again hide the MetaChat UI.
- You can move the MetaChat UI anywhere in EDIT Mode by moving the little "down arrow" icon on the left of the MetaChat UI.
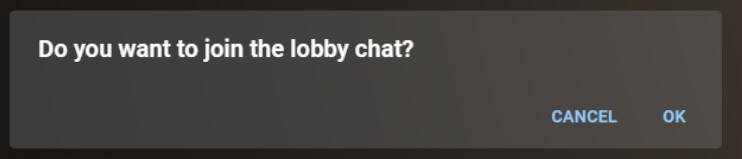
DON'T SKIP THIS DETAIL. At the time of writing, there's a bug where if you join the improper way, it might mess up the Lobby (see known bugs at the bottom of this tutorial for details) So what is the proper way?
If you want to JOIN an existing lobby
- Click JOIN button on the existing lobby
- Click OPEN HUB
- Click the DOWNLOAD ALL button.
Once it finishes downloading, the button will change into IN LIBRARY OPEN SCENE. Click it to join.
- Click CREATE button on the existing lobby
- Name the Lobby, add an optional password. Click OPEN HUB
- Click the DOWNLOAD ALL button.
Once it finishes downloading, the button will change into IN LIBRARY OPEN SCENE. Click it to join.
- Click CREATE button at the top right
- Click the MY SCENES tab.
- Click the CREATE button on the bookmarked scene
- Name the Lobby, add an optional password. Click OPEN HUB
- Click the DOWNLOAD ALL button.
Once it finishes downloading, the button will change into IN LIBRARY OPEN SCENE. Click it to join.
When you enter a lobby, the MetaChat UI will show a list of players, their looks, and a chatlog on the right.
Most things are pretty self explanatory, but one feature you should turn on is the BELL ICON at the top right, above the chat log. It'll play a little notification sound when someone leaves a message!
And of course, at the bottom right is the chat box, with the log above it. Click your pointer INSIDE THE BOX at the bottom right to begin typing.
In Desktop, just type on your keyboard normally. In VR, a virtual keyboard should automatically appear under your Main Menu, but if you don't see it, just bring up your Main Menu by pressing the (B) Button on any controller. Typing in VR will feel weird at first, but give it time and you'll get faster!
You might be prompted to join VOICE. This is completely optional and it is fine if you're shy, you can always mute your headset microphone, but joining the voice channel does have a cool text-to-speech feature that'll read out the chat to you while you play. Try it out!
To join the VOICE channel, click the VOICE Button at the top right and click the Open button which will open a new TAB in your default web browser to handle the voice and text-to-speech
To mute your microphone, you'll have to do that through your SteamVR Dashboard.
4.3 - How to Add/Remove an atom (look, object, etc) to a MetaChat scene.
- At the top center of the MetaChat UI, clicking on the Add Atom button.
- A sidebar will appear, you can select a default Male/Female from the MetaChat plugin. Below that will be your bookmarked looks (See Section 2 for how). It may take a few moments to load your look, please be patient.
Once your atom is loaded in, you can click anywhere on the right side of the UI to hide the sidebar. - A list of Green Buttons will appear under your name. Clicking on them will remove that atom.
- Go to the POSE PRESET Tab and select the "(MetaChatReady)" Preset from the top of the Favorite's Selection Dropdown
- Go to the PLUGIN PRESET TAB and double check that the Merge Load option is DISABLED.
- Select the Appropriate Gender Plugin Preset based on the gender of the character.
*For other players, you DON'T need to apply the POSE Preset
*(Optional) You can apply the Appropriate Gender Plugin Preset to all other characters to give them life and greatly enhancing your MetaChat Experience! - Go to the PLUGINS TAB > Embody > Custom UI > Activate Embody
Do a quick test drive. Check that you can move your head, hands, see your body, move around with the joysticks.
Here's how the entire process looks like including moving the MetaChat UI around and also testing for Collisions.
I am slow for presentation, but you can be so much faster with practice.
Toggling Collisions on a Person
Why can’t you touch anything or anyone?
Initially, once you spawn a new person atom, the collisions for it will be disabled, this is to prevent your character from exploding physics in the initial spawning area, so you’ll need to turn it on after moving away a little bit.
The easiest way is to press the Big Green button at the bottom left of the MetaChat UI. but make sure that your character isn’t overlapping anything before clicking or you might get stuck or cause a physics explosion!

If you don’t see this, you can click on the Person Atom in the world. Then click on Control & Physics 1 tab.

Then click the Collisions checkbox.

This is also a good way to troubleshoot someone else's person who's collisions got disabled due to a physics explosion.
4.4 - How to see someone else’s imported LOOK.
If someone else added an atom person to the MetaChat Lobby which has an look from the hub (like in Section 2) and you have not yet downloaded it yet. They may appear as a broken mix of things you do have or not load those individual parts.
- Assuming their look is properly hub hosted. To view their look as intended, bring up the MetaChat UI and Click on the RED ! (exclamation mark followed by a number of missing items)
- Click on EACH item listed which will bring you to the hub, and click the Download All button.
If the Hub says that it's "Not On Hub", skip it and let that player know. Hopefully they can correct it. - Let it download and install, your game might freeze while it installs so please be patient!
DO NOT CLICK ON IN LIBRARY OPEN SCENE, THIS WILL MAKE YOU IMPROERPLY LEAVE THE LOBBY, instead click the Return To Scene View at the bottom. - Repeat for all missing items.
- Click on the BLUE REFRESH button on the right of their name which will load their look
(If their body gets stuck on something, toggle their collisions off then back on again after a few seconds) - (Optional) You can click the VAR REFRESH button. This will re-check if the missing VARs have been downloaded and update the number and list accordingly.
You realize that you are now literally seeking advice on how to virtually have sex online from a stranger, right?
Relax! You’re in good hands, pun intended ! This section is going to cover the gameplay techniques to smooth out the learning curve, and make your performance more accurate and realistic for your partners.
! This section is going to cover the gameplay techniques to smooth out the learning curve, and make your performance more accurate and realistic for your partners.
Immersion is why we all love VR, and for something as intimate as VR Sex, it is often important to maintain immersion if we’re all to have a great time, especially when trying to reach an orgasm. It can be very distracting when player’s disregard the space around them, causing physics explosions, clipping into one another, letting their legs fly about unrealistically, and to a lesser degree, mid-air acrobatics.
It helps a LOT if you assume the poses in real life as your character is going to perform, this way it increases immersion for all partners and helps keep your movements within realistic restrictions. Just remember, you're controlling a puppet, and that puppet has a body with limbs that may not line up with your body, so just be aware where your puppet's parts are and keep them under control!
Use your KNEES, not your FEET!
Unless you have full body tracking, you’re going to find that trying to pose your character for sexy fun times while Embodied in VR is pretty hard. Naturally, we don’t think about how our legs are constantly keeping us upright. Sure you could ignore them and just have them flop around behind you, but then you wouldn’t be impressing the partner you’re playing with.
But with the Pose Preset you’ve saved from the Toolkit in Section 3 it is a lot easier, and more immersive! What you do is grab your KNEE nodes and turn your controllers in order to pivot the legs!
You can hold your knees from a long distance by pointing at them until you see a thin green line and pressing the TRIGGER buttons on your controllers, lifting them up like a puppet, and using your joysticks to travel long distances. It’s important to be aware of where your legs are while moving so you can avoid getting caught on geometry.
You can also reach close to your knees with your controllers and press the GRIP button on those nodes, thus giving you a greater degree of control because you know exactly where your knee pivots and it’s rotation through your hands. However, if your character’s legs are too far or large for you to reach, then this might not be the best choice.
This method of knee control (remote or close) is even more important when trying to position for sex, as you’ll be in very close proximity to another person who could move at any moment. In an effort to maintain immersion and prevent physics explosions, control the bend of your knees by twisting your controllers.
The Pose Preset in this Toolkit also sets the knees to COMPLY by default, this allows other players to be able to GENTLY push your legs when you’re not controlling them. This is great for making subtle pose changes that look natural, and this action will be seen by all players!
Again, to emphasize, always be aware of where your knees are, and by extension your legs.
Use your HIPS, not your HEAD!
Thrusting is where all the magic happens, and it is the main show everyone is looking forward to, so we need to make sure not to screw it up! If your thrusting game results in you shoving your partner away, or you pop out and lose contact, thus ruining a good session. True, it’s all in your imagination in the end but that’s why maintaining the illusion is the best part of any magic trick! If you or your partner are using VamMoan plugins on their characters, and they aren't getting any action, neither will you!
Much like the Knees, unless you have full body tracking with a hip tracker, thrusting in VR is challenging and no way near as intuitive as it is in real life. So we’re going to use a couple tricks to get you in-and-out, literally! There are some pros and cons to these two methods however.
Manually Thrusting
To thrust manually, it is recommended you use the method you used for your Knees, but on your hip. First, position yourself as close and accurately as possible to the point of insertion taking careful note of where your knees and hip nodes are. With the HIP and KNEES nodes till being on COMPLY, it is possible that your body will gradually get pushed away! Once you've gotten into position, you should set your KNEES and HIPS to ON so that it gives you your partner a stable platform for thrusting against. You'll have to turn these back to COMPLY if you change positions.
If you can’t find your hip, click the green select button
 on the menu, then select your Persons’ Atom name then Hip Control.
Then, just like you did with your knees, grip (close or remote) the hip control node with one of your hands and begin moving your hand in a thrusting motion. Thrusting this way will give you a great degree of control over the distance, speed and rotation. However, the downside is you now only have one free hand. I recommend grabbing from the side or back of your hips for immersion!
Also, “Did you know you can get a couple inches with this neat trick?” Yeah I know that sounds like the title to a spam email, but hear me out. If you’re playing as male or futa, it is often your legs, or the legs of your partner might get in the way of a good insertion. So, what you can do is rotate the hip node UPWARDS by about 45 to 90 degrees, therefore exposing more of the penis to use for insertion! The same applies for the female, but downward if you want to provide optimal access
AutoThruster
If you wanted hands free thrusting, this is where the AutoThruster plugin comes in! The downside, it takes a little bit of tweaking to get it just right and it won’t adapt to any sudden changes to its target's position.
If you set up the Presets from the Toolkit in Section 3, the plugin list will contain the AutoThruster plugin. It is assumed that your character is currently in a position to thrust right now and you have the Plugin Preset for that gender applied already. Let’s go over how to use this plugin.
The plugin has been pre-configured to have a horizontal thrust for Male/Futa and a vertical thrust for female. Do a quick test, and press the ACTIVE button at the top left to see how it affects your character.
Your person will begin to thrust from the hip, you can tweak the values and see the change in real time. However, you will notice that you cannot move the HIP node while it is thrusting. This is because the plugin now has exclusive control over it, and it bases it's thrusting off the HIPS current Position and Rotation. This is why it is recommended that you try to get the initial HIP position as accurate as possible BEFORE activating the thrust and saving you some setup time. Only after, can you tweak things like distance, speed, rotation, etc. Don’t forget to add some upward rotation if you need it!
Horizontal Auto Thrust Example (Z Axis):
Vertical Auto Thrust Example (Y Axis):
4.6 - Understanding Desynchronization
MetaChat achieves "Multiplayer" capability by synchronizing or mirroring certain things across players so they experience the same thing. However, at the time of writing, the only things that can be synchronized are LIMITED to the following:
- ONLY the Position & Rotation of Nodes a player controls.
- ONLY the ON & OFF Status of Clothing and Hair.
- Morphs and their values.
Performance Desync: The nodes on a person atom (head, hands, hips, etc) that a player controls are synced, however the physics of the body is simulated by your computer. So if there is an inconsistent collision as result of PC performance, you might experience some desynchronization. It is because of this, you want to try and make your movements slower than you think, and more telegraphed in order to maintain consistency between you and the people you are playing with.
Collision Desync: You are still technically playing VAM, which means you technically still possess the ability to manipulate other player's appearance and even their pose. However, they would not know or see that you've done this. If the difference in body physique is too extreme you’ll both experience different collisions, which might result in a physics explosion. It is recommended to not change the appearance of other players for this reason!
MetaChat grants Node Control to players over Atoms they spawn into a scene (typically the Person. Also Atoms already built into the shared scene can be moved by anyone. So Player 1 will control Person 1, Player 2 will control Person 2, etc.
However, because this is all happening within VAM at the end of the day, you can technically reposition another player's limbs or atoms they've imported. However, you will notice that the server will correct those changes after the TRUE OWNER of the atom begin to move it themselves. This can result in a lot of physics spazzing in on your end, possibly resulting in a physics explosion. Avoid moving other player's limbs, you may cause a collision issue on your end which may resonate back to them, the only exception is if you are trying to get their limbs unstuck from world geometry and you do so carefully.
Cosmetic Desync: As mentioned before MetaChat can sync the ON/OFF status of Clothing/Hair status to other players, so you can charge your clothes, hair, morphs on YOUR person and other players will see this. However, there are a few limitations.
- Other players must have that clothing/hair item already downloaded.
- They were present during the change. Players joining after the change was done will not see the changed current clothing/hair. Wou will either have to re-toggle the items or they will need to refresh your person.
- Any other properties of the clothing/hair, such as color, physics, texture, etc will NOT sync at all.
***
Section 5 - Something went wrong!
MetaChat isn’t without its jankyness, and at the time of writing not all bugs have been squashed. Most problems can be solved by closing and restarting VAM, but some issues are small enough that you can resolve them quickly.
Other issues can be resolved by following the PROPER (RE)JOIN METHOD see below:
- Do NOT use the Reconnect button, it doesn't do what you think it does.
- If you're in a lobby, press the Blue LEAVE or EXIT buttons first.
- Follow the "How to PROERLY JOIN/DUPLICATE/CREATE a Lobby." above.
If a person looks like this, then there's a easy fix.
Select the invisible person’s root control node, go to Physics and Control 1 tab.
Click the “ON” checkbox at the top left to disable their person, then turn it back on.
“People are Exploding!”
If someone’s body is wildly exploding all over the place, you can try to move your body out of the way and hope things settle down. If it doesn’t, try your best to select their person, go to the Physics and Control 1 tab, and press this big red button.
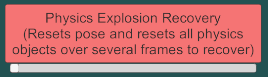
Keep in mind, that the person that was exploding on your end might not know they were exploding, so you need to try and fix this on your end quickly.
This will reset that person's nodes back to the initial position where they spawned. The body itself will try to slowly move back to where the person actually is. It is possible that the body might get caught behind an obstacle, preventing you from seeing their actual position. In this case, on that same tab, disable the COLLISION on their person and after a couple seconds, re-enable once the body is clear of any obstacles. (See Toggling Collisions on a Person above for screenshots)
“People are not Moving for me!”
There is the possibility that they simply haven’t moved yet. Just ask in chat if they are moving around.
If they say they are moving, but you don’t see it, first check the Metachat UI. If you see the other's player connection status says "FAILED" then you likely have a RECONNECTION bug.
This is often the result if you or they disconnect from the due to a game crash or internet outage.
While you can chat with them, it won't update their positions for you, here's a few things you can try to resolve it.
- See PROPER (RE)JOIN METHOD above.
- The person who appears to not be moving for you might also have to do the PROPER (RE)JOIN METHOD (Even if someone else sees them moving just fine), this will create a fresh connection between the two of you.
- Press the Reconnect Button, yes the one that I told you not to press earlier, this MIGHT re-stablish connection to the other players who were already in the lobby.
- If all the above fails, your group may just have to re-host a new lobby, which should almost definitely fix everything, but can be a hassle to ask everyone to do this.
This is a bug, the dev knows about it, but unfortunately, it's a little problematic to resolve.
It happens when someone joins the lobby who did not use the PROPER (RE)JOIN METHOD. Once it happens, the lobby is likely going to be stuck like that, it MIGHT be fixable if someone joins later who did use the PROPER (RE)JOIN METHOD, but they'd have to not have already been in that lobby before it broke.
*If all else fails, often just REHOSTING the lobby and having EVERYONE do the PROPER (RE)JOIN METHOD should resolve most issues that crop up.
Conclusion
That's it! That's all there is to know about using the MetaChat Plugin! I hope you found this guide helpful, please leave a review if you can so it can get the recognition it deserves. When you've played enough and want to explore how to create your own custom look. Please see Section 2.2 - How to Create and Optimize a Look for MetaChat
Thank you for reading! Don't forget to visit the official MetaChat Discord to find people to play with https://discord.gg/D6nfVVtjGz
Happy MetaChatting
Code:
AcidBubbles.ColliderEditor.38                 By: AcidBubbles          License: CC BY-SA        Link: https://github.com/acidbubbles/vam-collider-editor
AcidBubbles.Embody.58                         By: AcidBubbles          License: CC BY-SA        Link: https://github.com/acidbubbles/vam-embody
AcidBubbles.Glance.20                         By: AcidBubbles          License: CC BY-SA        Link: https://github.com/acidbubbles/vam-glance
Awas.AwasAutoJuice.1                          By: Awas                 License: CC BY-NC-ND     Link: https://www.patreon.com/awasxxx
CheesyFX.HeelAdjust2.14                       By: CheesyFX             License: CC BY-SA        Link: Be responsible with those spiky heels!
ClockwiseSilver.SilverExpressionTool.7        By: ClockwiseSilver      License: CC BY-SA        Link: https://www.patreon.com/ClockwiseSilver
hazmhox.vammoan.22                            By: hazmhox              License: CC BY-SA
MacGruber.LogicBricks.14                      By: MacGruber            License: PC EA           Link: https://hub.virtamate.com/resources/logicbricks.1975/
ToumeiHitsuji.DiviningRod.4                   By: ToumeiHitsuji        License: CC BY-SA
ToumeiHitsuji.SlapStuff.2                     By: ToumeiHitsuji        License: CC BY-SA
ToumeiHitsuji.SlapStuffAudioPack.2            By: ToumeiHitsuji        License: CC BY-SA
ToumeiHitsuji.SlapStuffAudioPack.latest       By: ToumeiHitsuji        License: CC BY-SA
Vinput.AutoThruster.16                        By: Vinput               License: CC BY-SA
VRmarth.OffControllerNotTargetable.1          By: VRmarth              License: CC BY-SA


