


Connect is a plugin package that allows you to control external applications and devices via network. This could be an audio-driven E-Stim devices, or now also the GPIO pins of a Raspberry PI, essentially pins you can turn on/off to control stuff. This kind of micro computer is often used for homemade "smart home" devices, like watering your plants, etc. Without any coding, just some soldering/electronics skills, you are now able control all kinds of toys/devices from VaM. At least those where you can access the electronics easily. Could be some vibrator you want to turn on/off or, for example, I modded a Suck-o-Mat some ages ago, since that box is just an air pump with two magnetic valves to create positive/negative air pressure inside a fleshlight. The package also includes VirtualLock, a plugin for virtual self-bondage in VR. In combination all that could theoretically mean you can rig a scene where, if you do not behave and try to escape that slow teasing fleshlight, your dominatrix will punish you with e-stim...in real life!
Screenshots / Images


Content
Usage instructions for the demo scenes
Demo 1:
Command Examples
You can send commands via VaM's build-in trigger system. Send whatever text up to 255 characters, the application on the other side interprets it. For my apps I'm using a simple format of command names, followed by parameters and values, separated by semicolons.
ConnectAudio:
Hardware Example: Controlling magnet valves of Suck-o-Mat sucking machine
An example circuit for amplifying the 3.3V/16mA pin output to something with more power, e.g. to switch the 12V magnet valves of the above mentioned sucking machine. Two Photocouplers (KB817) make sure circuits of both the Raspberry PI as well as the Suck-o-Mat are properly isolated, as both have their own power supply. As common Photocouplers can only handle low amounts of power, two MOSFETs (BS170 TO-92 350mA) are used to amplify the signal. Of course, this could also have been build using mechanical relays.

Hardware Example: Switching E-Stim channels, turn on/off devices
 hub.virtamate.com
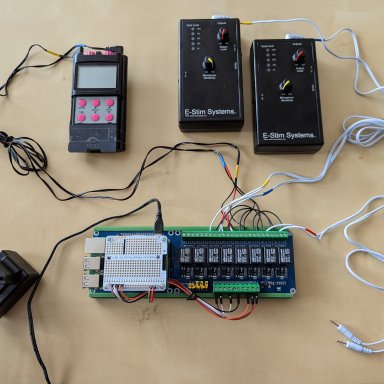
Hardware needed for GPIO
You need a Raspberry PI that has network capability. For example, I’m using a Raspberry PI 3B+ which has both wired as well as wireless network capability. Other models might be fine, too. Some of the newer 4B variants might actually be more powerful and cheaper. One of the way cheaper Raspberry Pi Zero variants with Wifi (e.g. W, WH and 2W) might also be already enough, depending on what you want to do with it.
In addition to the PI, you may want additional things:
Hardware needed for E-Stim
In order to try the E-Stim part of this you will need some stuff:
E-Stim Safety
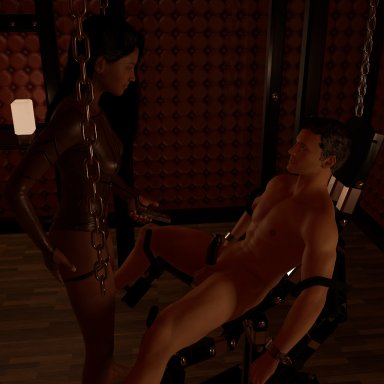
More elaborate scene example
 hub.virtamate.com
(Watch with sound!)
hub.virtamate.com
(Watch with sound!)
Credits
License

Screenshots / Images
Content
- Connect: VaM plugin that connects to one of the apps. Could also be your own app, just tell it a hostname and port to connect to. It allows you to send commands via VaM's build-in trigger system, for example from within a Timeline animation, from LogicBricks, from other plugins or just a UIButton atom.
- ConnectAudio.App: External Windows application that uses your soundcard to generate waveforms your E-Stim power box can interpret. Source code is included, you can use it as a basis for your own application.
- ConnectAudio Documentation: A 6 page PDF tutorial explaining the commands and how to use the app.
- ConnectGPIO.App: External Linux application, intended to run on any network capable Raspberry PI, e.g. the 3B+ model. Via commands you can set GPIO pins 17-26 however you like. Source code is included, you can use it as a basis for your own application.
- ConnectGPIO Documentation: A 5 page PDF tutorial showing how to use the app, how to compile it if needed and the supported commands.
- VirtualLock: VaM plugin tracks your hand and head position, and optionally ensures you are looking at one or more "FocusArea" plugins in the scene. In the first demo scene that means you HAVE to look the girls in the eyes or look at her upperbody. If you move too much, there is a warning first and at a larger distance a "breach" is triggered. Of course a breach is also trigger if you try to open the UI or quit the game. It is using the VaM trigger system, you can hook it up to all kinds of things. Essentially this is intended for virtual self-bondage in VR.
- FocusArea: These are essentially "capsule" shapes where you can define radius and height. E.g. put some "Empty" atoms in your scene and parent them to various bodyparts. The combined focus area formed by all the plugins in your scene can be drawn as transparent red area via a checkbox on the VirtualLock plugin. See screenshot.
- Demo scene 1: Simple scene where essentially the girl is whipping your dick randomly, which is replicated in E-Stim. And....if you try to escape her....it might hurt
")
- Demo scene 2: Another simple scene where a girl is applying a slow teasing fleshlight. See screenshot. Via sliders you can tweak the animation and also at which point in the animation the network command is send, so you can sync virtual world and the device in the real world.
Usage instructions for the demo scenes
Demo 1:
- Launch the ConnectAudio application and load the "DemoSceneProfile.json".
- Connect and calibrate your E-Stim setup. Essentially that means "get the volume right". See tutorial.
- Launch VaM in VR mode and load the demo scene.
- Possess the guy.
- Press the "VirtualLock" button, which starts a countdown and brings up a head-up display.
- Go into the pose you want to stay in during your virtual self-bondage, e.g. with spread arms or whatever. Look at the girl! The center of your headset has to point at her eyes.
- Have fun! The demo scene is setup to a lock time of 1 minute only.
- After the time is up "Unlocked" appears and you are free again.
- (Use the slider on the plugin to lock up to 30min, you can also tweak allowed movement range, etc.)
- Launch the ConnectGPIO application on your Raspberry PI. Make sure its connected to your local network/wifi.
- Launch VaM in VR mode and load the demo scene.
- Open the plugin UI of the Connect plugin on the ConnectGPIO atom in the scene. Its located below the text panel. Enter the hostname your Raspberry PI and press "Connect". There should be a log message that it connected.
- Possess the guy.
- Use the sliders on the right to adjust the animation in the virtual world as well as the timing of the suck/pump in the real world, so its all in sync nicely.
Command Examples
You can send commands via VaM's build-in trigger system. Send whatever text up to 255 characters, the application on the other side interprets it. For my apps I'm using a simple format of command names, followed by parameters and values, separated by semicolons.
ConnectAudio:
- BLIP;i=0.7;p=2
- Run behavior "BLIP" with intensity 0.7 and priority 2.
- WARN;p=3
- Run behavior "WARN" with priority 3.
- GPIO-ON;p=0
- Sets pin 0 to “on”.
- GPIO-ON;m=1001000000
- Sets pins 0 and 3 to “on”.
- GPIO-OFF;p=7
- Sets pin 7 to “off”.
- GPIO;m=1001;v=0001
- Sets pin 0 to “off” and pin 3 to “on”.
Hardware Example: Controlling magnet valves of Suck-o-Mat sucking machine
An example circuit for amplifying the 3.3V/16mA pin output to something with more power, e.g. to switch the 12V magnet valves of the above mentioned sucking machine. Two Photocouplers (KB817) make sure circuits of both the Raspberry PI as well as the Suck-o-Mat are properly isolated, as both have their own power supply. As common Photocouplers can only handle low amounts of power, two MOSFETs (BS170 TO-92 350mA) are used to amplify the signal. Of course, this could also have been build using mechanical relays.
Hardware Example: Switching E-Stim channels, turn on/off devices
Switching things with Raspberry PI + Relay Board - Guides -
This is a quick DIY guide how you could switch devices on/off or switch between E-Stim channels using a Raspberry PI, a Relay board and the Connect plugin directly from your VaM scene using triggers. No soldering needed. As this is just the...
Hardware needed for GPIO
You need a Raspberry PI that has network capability. For example, I’m using a Raspberry PI 3B+ which has both wired as well as wireless network capability. Other models might be fine, too. Some of the newer 4B variants might actually be more powerful and cheaper. One of the way cheaper Raspberry Pi Zero variants with Wifi (e.g. W, WH and 2W) might also be already enough, depending on what you want to do with it.
In addition to the PI, you may want additional things:
- Like USB power supply or battery.
- Some kind of case, as handling a raw circuit board can be annoying
- While not officially needed, I would recommend at least a passive cooler.
- During setup you need screen, keyboard and possibly mouse, but once your PI is installed, you can use for example RemoteDesktop to connect to it from your Windows PC.
- Possibly one of those starter kits containing things like an experimentation board, cables and a bunch of electric components like LEDs and resistors. Testing with LEDs instead of actual devices can help a lot when building a scene.
Hardware needed for E-Stim
In order to try the E-Stim part of this you will need some stuff:
- Obviously, you need an E-Stim power box that allows for direct audio input. I’m using two ABox devices by a UK based company called E-Stim Systems. These are available through various shops. The ABox pretty much directly takes the audio signal from your soundcard and just amplifies it.
- Potential alternatives might be the 2B power box by the same company as well as the more known Erostek ET312B. However, I don’t have those rather expensive boxes, so I can’t actually be sure they are compatible. If you happen to have one of those devices, please report back if it works.
- In addition to the power box you will need electrodes and potentially cables.
E-Stim Safety
- E-Stim is absolutely safe, if applied correctly!
- Prefer battery powered devices and devices build in countries that have reasonable safety standards.
- Read the fucking manual of your power box!
- Don’t apply E-Stim near anything vital like brain, heart and lungs. As rule of thumb, do not apply electrodes anywhere above waist area. Careful with readjusting electrodes while the power is on. Theoretically the current could flow through your hands and arms into your heart.
- Don’t use if you have a heart condition or similar.
- Always use water-based lubricant or specialized electrode gel.
- Use this software at your own risk! As in any software by “random people from the internet”, there might be bugs. When using this software, always stick to intensity levels you can handle.
More elaborate scene example
The New Remote - Scenes -
Your mistress has a mysterious new remote she would like to try...and that's just a condom, right? Maybe it isn't...o_O This is a small (but nice) femdom scene specifically made for real-life E-Stim integration and virtual self-bondage via...
Credits
- SecretRoom, SecretToys assets by MacGruber
- Essentials, IdlePoser, Life and LogicBricks plugins by MacGruber
- ImprovedPoV and Glance plugins by Acid Bubbles
- "Nat" Look by JoyBoy
- Morphs by kemenate and Vamtastic
- Bodysuit_A by VL_13
- Hair_Long_Side_3 by NoStage3
- Flashfuck asset by B3liar
License
This was an EarlyAccess release! Download is now available for free under CC BY-SA license. You are allowed to reference this package in your own VAR packages, even if they are paid or use a different license. Links to my Patreon are always appreciated.