When you attempt to create a video by rendering scene animations frame by frame, this guide is applicable to any animation scene created using the Timeline plugin.
Before we begin, you might want to understand the difference between Real Time and Game Time, which can help you better grasp the specific steps, although it's not strictly necessary.
When we render frame by frame, an important parameter that needs to be set by you is the target frame rate for rendering. For example, if your final output is at 120 FPS, then within the plugins or tools you are using, you need to set the target frame rate to 120 FPS. However, when you make such a setting, the timing standard mentioned earlier, Game Time, is also set to count every 120 frames as one second.
If we do nothing and render directly, then during the rendering process, Timeline will still follow Real Time for timing, while your plugin counts frames. The simultaneous use of these two different timing methods results in your animation appearing to be fast-forwarded many times. Therefore, when rendering frame by frame, we need to unify the timing method.
To use frame-by-frame rendering with a Timeline animation, you can follow these steps:
Assuming we have a scene with three Timeline copies, let's begin by opening Timeline 01.
If you’re scratching your head at this moment, not knowing where to find the atom in the scene that contains the Timeline, you can first scroll down to Step 4 and read through it, then come back to this step.
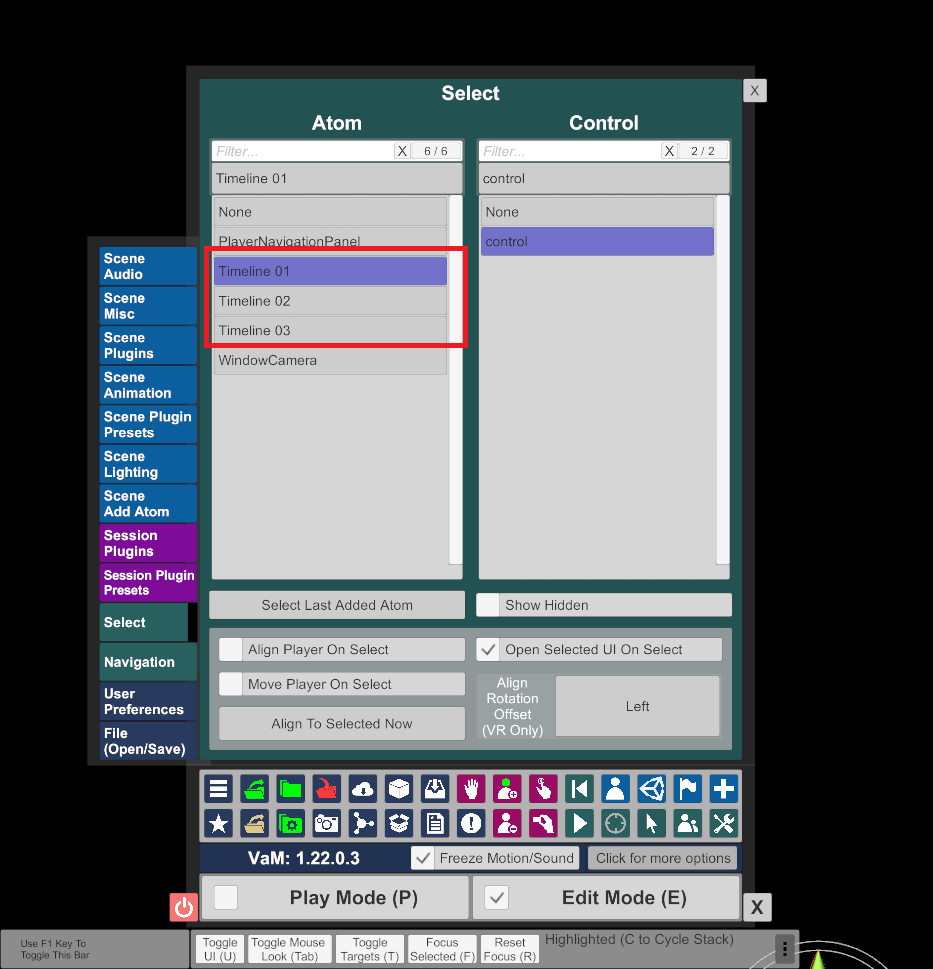
After opening the Timeline plugin interface, let's start by selecting "More," and then choose "Options."
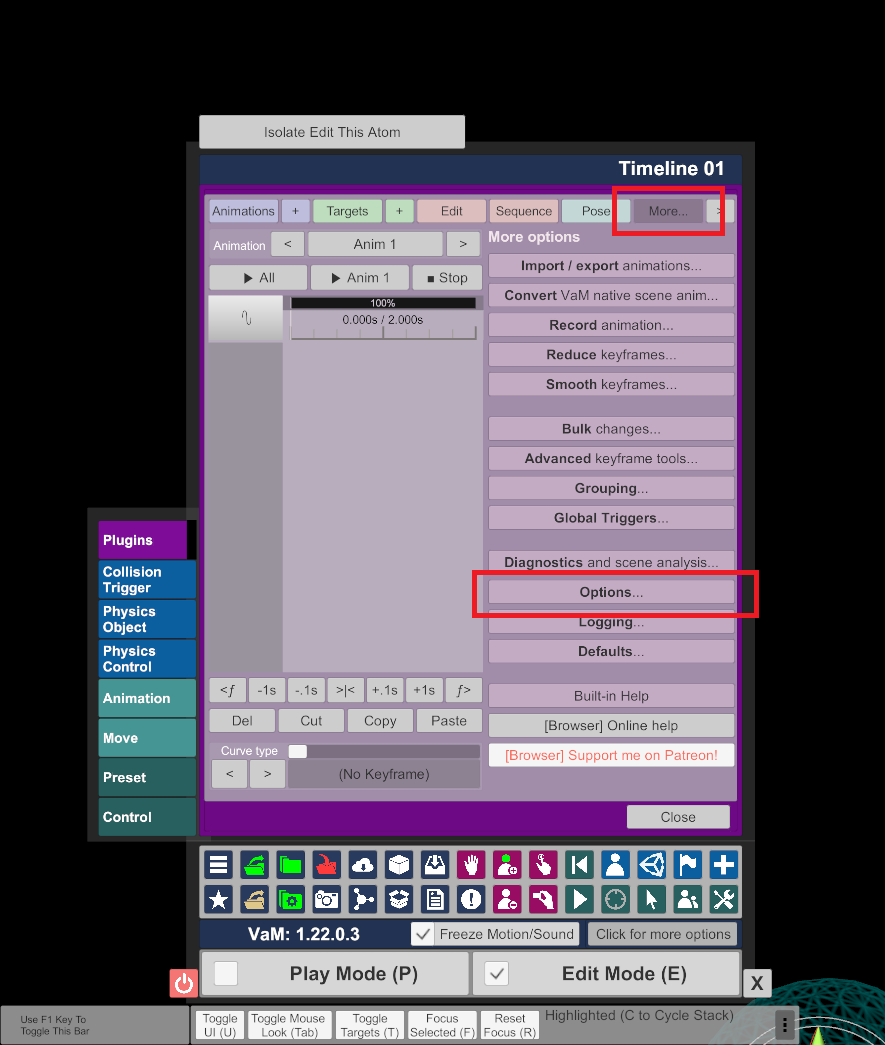
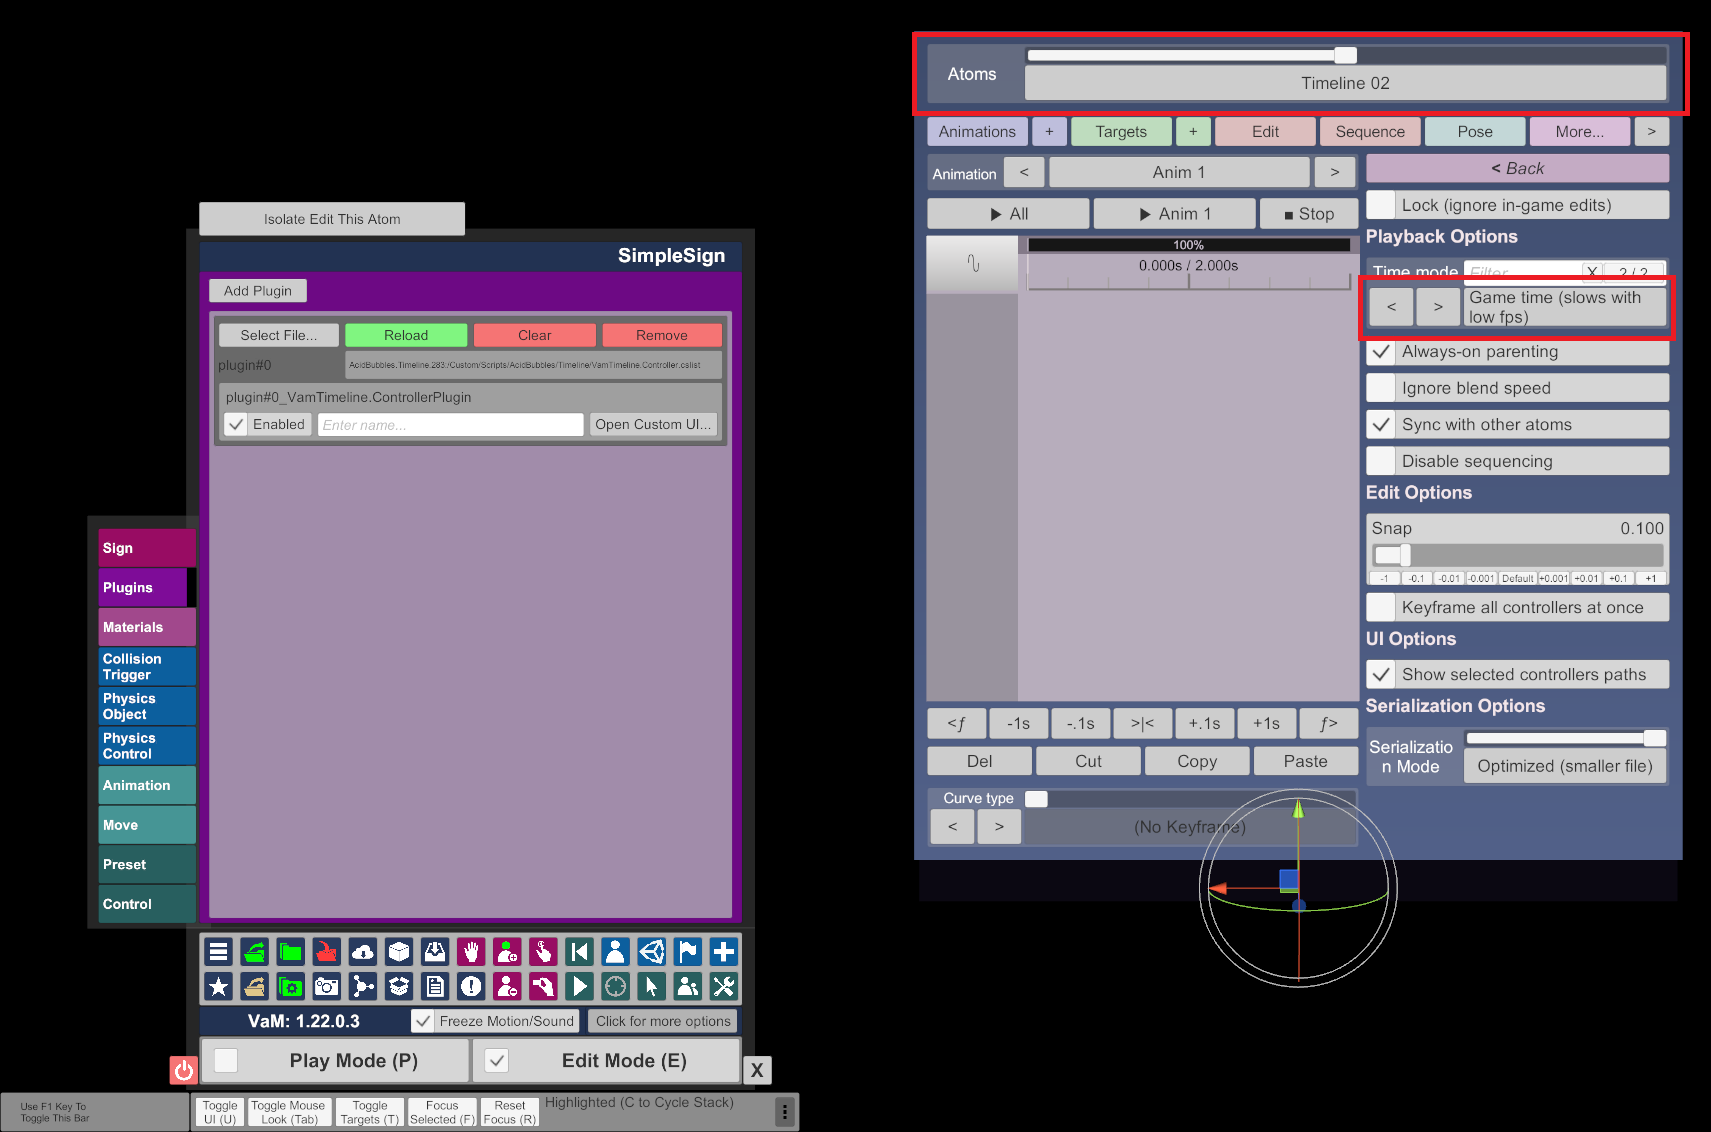
We will see a dropdown option labeled "Time Mode." There are two available time modes to choose from, Real Time and Game Time, which we discussed earlier. By default, Timeline is set to use Real Time mode.
When preparing for frame-by-frame rendering, simply change it to Game Time.
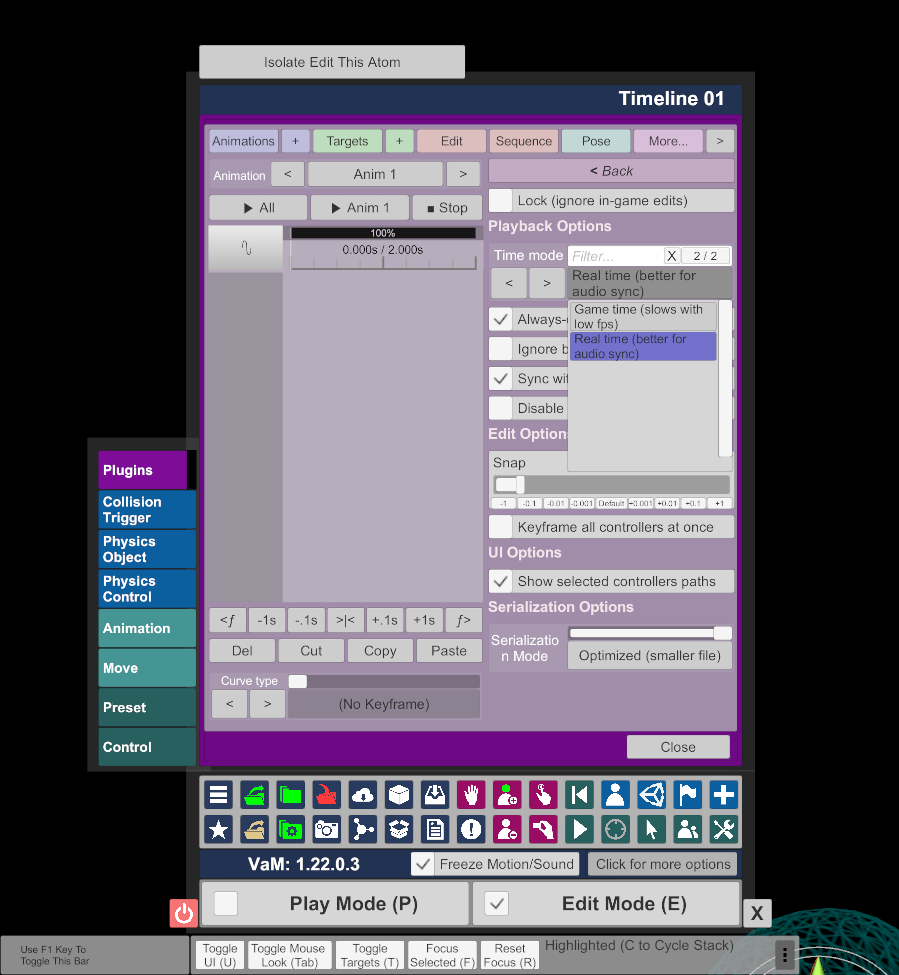
Please remember that if there are multiple Timeline copies in your scene, such as separate Timelines for controlling male and female characters, or like in my VaM Produce 69, where elements like camera, character dance movements, sharks in the deep sea, and stage lighting are controlled by different Timelines, you will need to find and change all of them to Game Time mode. So, how can you know how many Timeline copies there are and who is controlling them? Don't worry, there's a simple method for this:
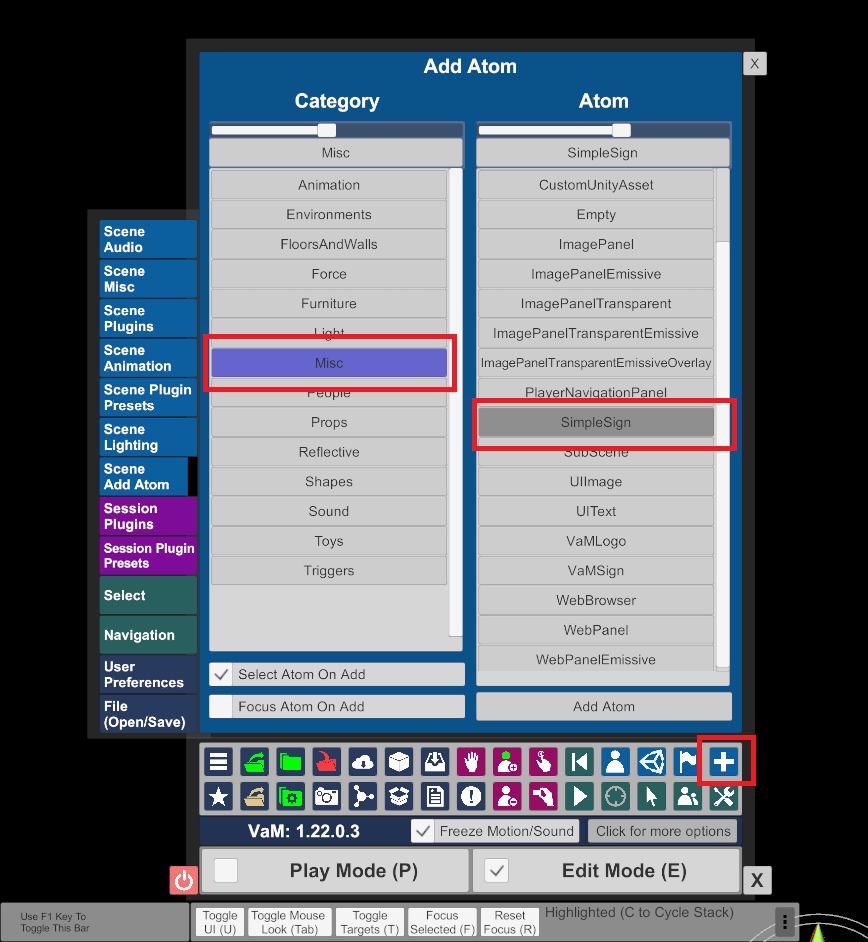
As shown in the image below, add a SimpleSign to the scene
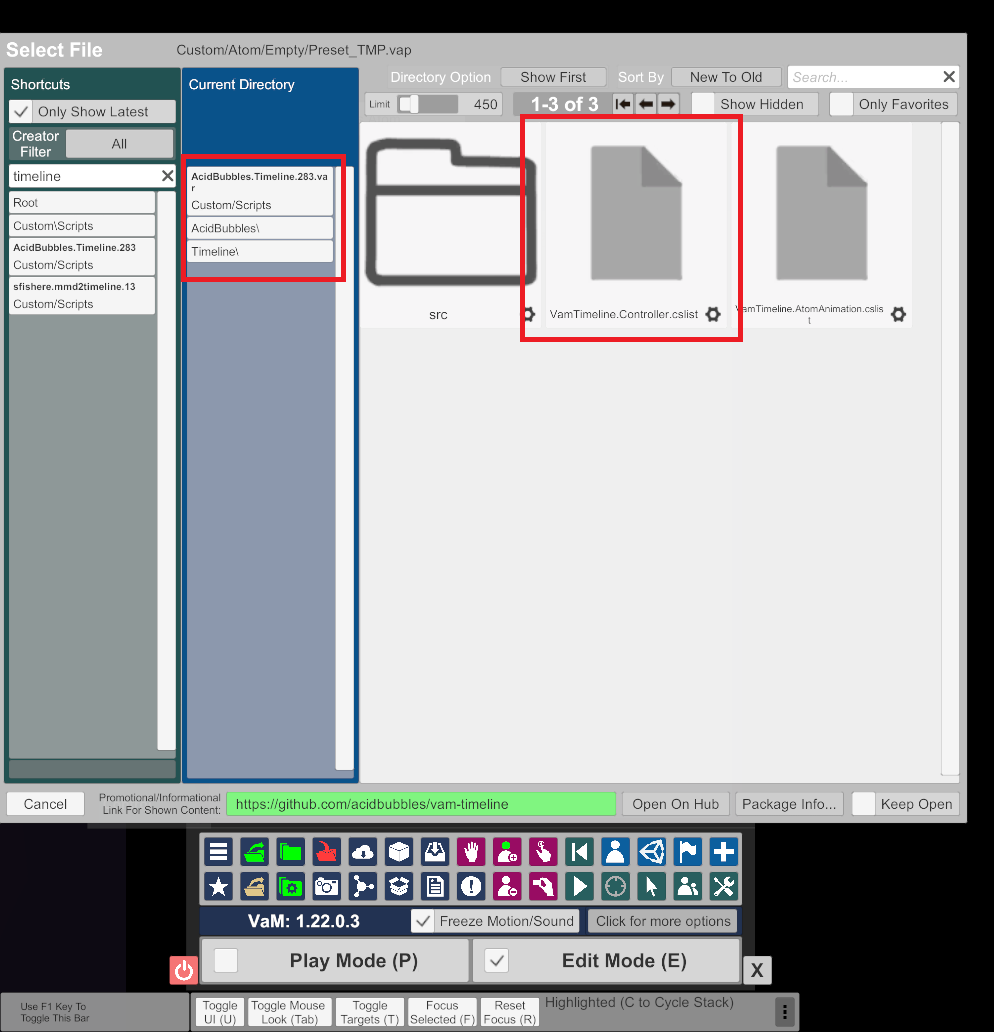
Load a very useful tool included in the Timeline package called "VamTimeline.Controller.cslist" for the SimpleSign:
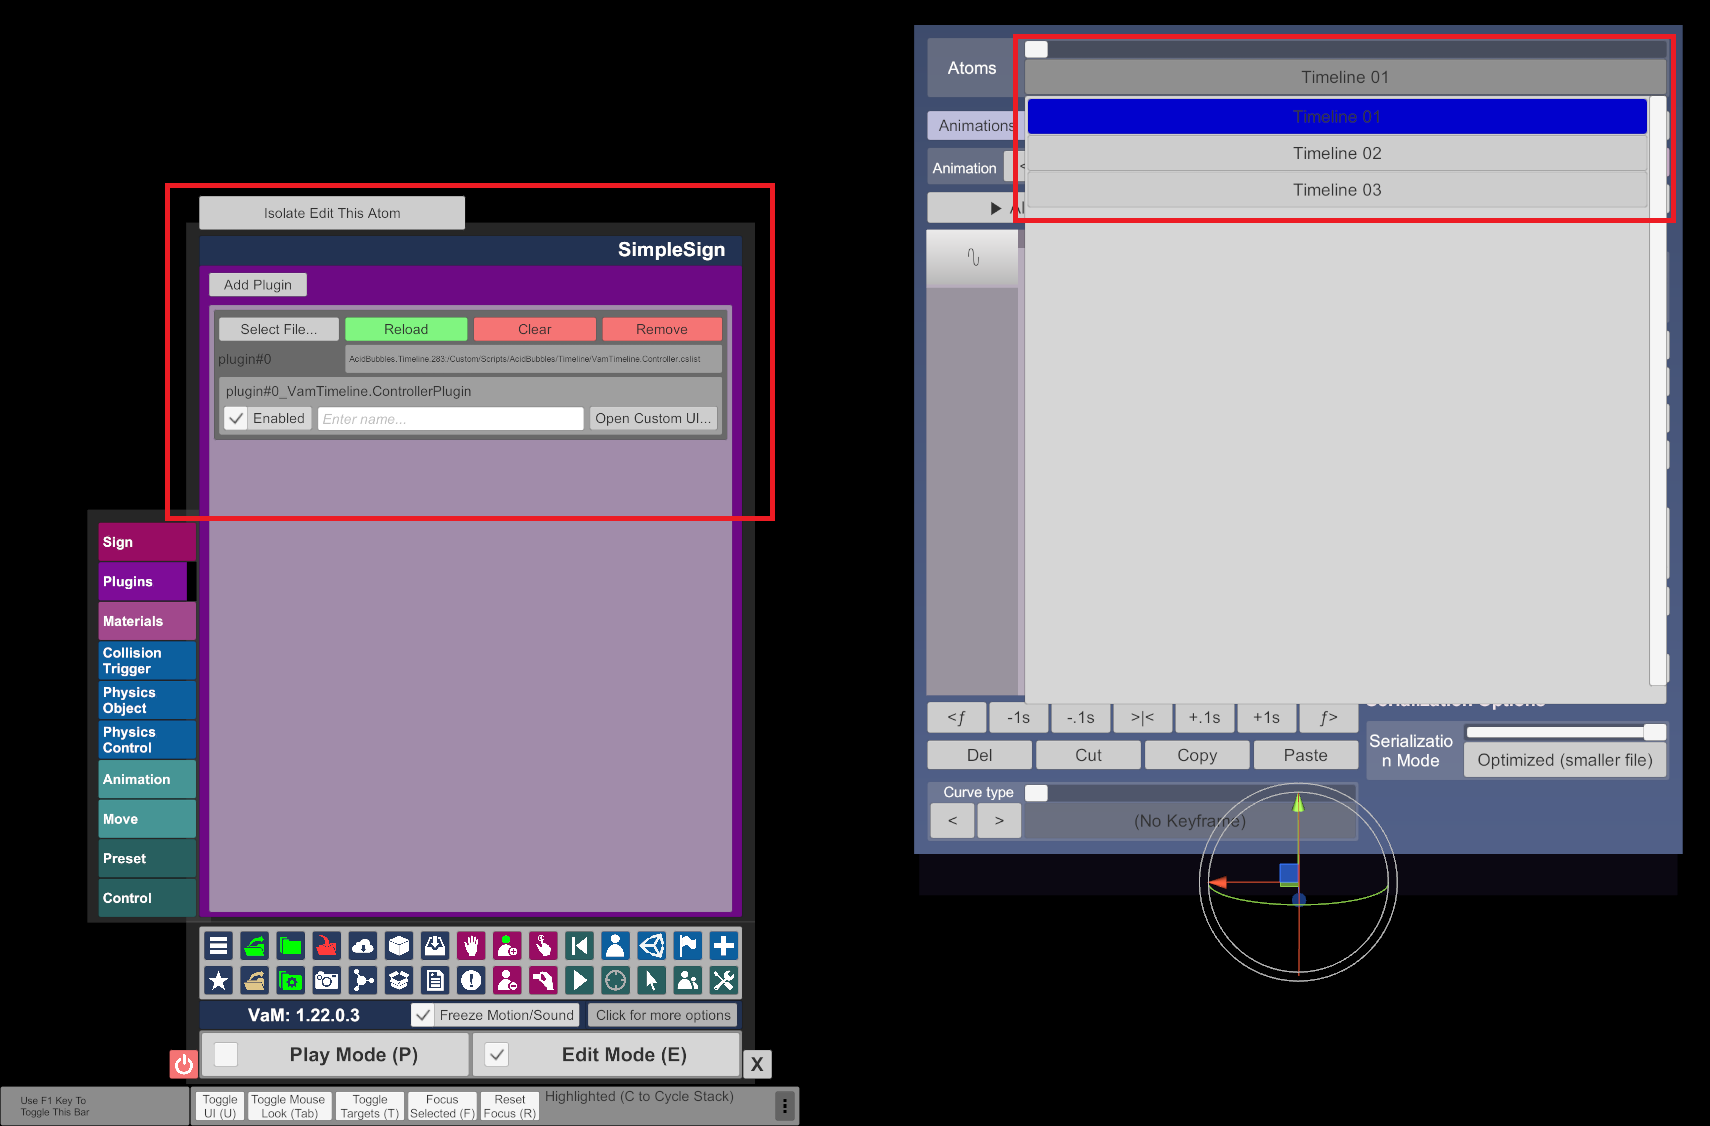
At this point, your SimpleSign will become a manager for all active Timeline copies in the scene, listing them in a dropdown menu for you.
Note: I emphasized "all active copies" because in certain scenarios, such as in my VaM Produce 69 scene, different Timeline copies may be active in different stage environments. Inactive Timeline copies in the OFF state will not be listed, so this list may vary each time you switch stage environments. It's essential to pay special attention to this when using it to create your own videos.
Repeat steps 1-3 for each of the Timeline copies listed.
With this, your preparation work is almost complete. Happy rendering!
Before we begin, you might want to understand the difference between Real Time and Game Time, which can help you better grasp the specific steps, although it's not strictly necessary.
- Real Time Mode: In Real Time mode, the timeline progresses at the same rate as the actual time in the real world. This means that if you have an animation element set to play for 2 seconds in Real Time mode, it will play exactly 2 seconds after you begin playing the animation, just like how time progresses in reality.
- Game Time Mode: Game Time mode, on the other hand, is an independent time system within the game (another term for it is "Unity Time"). It doesn't rely on the actual time in the real world; instead, it progresses based on the internal clock of the game. In our case, the calculation method is such that if you define the target frame rate for frame-by-frame rendering as 120 FPS, then every 120 frames will be calculated as 1 second.
When we render frame by frame, an important parameter that needs to be set by you is the target frame rate for rendering. For example, if your final output is at 120 FPS, then within the plugins or tools you are using, you need to set the target frame rate to 120 FPS. However, when you make such a setting, the timing standard mentioned earlier, Game Time, is also set to count every 120 frames as one second.
If we do nothing and render directly, then during the rendering process, Timeline will still follow Real Time for timing, while your plugin counts frames. The simultaneous use of these two different timing methods results in your animation appearing to be fast-forwarded many times. Therefore, when rendering frame by frame, we need to unify the timing method.
To use frame-by-frame rendering with a Timeline animation, you can follow these steps:
Step 1
Assuming we have a scene with three Timeline copies, let's begin by opening Timeline 01.
If you’re scratching your head at this moment, not knowing where to find the atom in the scene that contains the Timeline, you can first scroll down to Step 4 and read through it, then come back to this step.
Step 2
After opening the Timeline plugin interface, let's start by selecting "More," and then choose "Options."
Step 3
We will see a dropdown option labeled "Time Mode." There are two available time modes to choose from, Real Time and Game Time, which we discussed earlier. By default, Timeline is set to use Real Time mode.
When preparing for frame-by-frame rendering, simply change it to Game Time.
Step 4
Please remember that if there are multiple Timeline copies in your scene, such as separate Timelines for controlling male and female characters, or like in my VaM Produce 69, where elements like camera, character dance movements, sharks in the deep sea, and stage lighting are controlled by different Timelines, you will need to find and change all of them to Game Time mode. So, how can you know how many Timeline copies there are and who is controlling them? Don't worry, there's a simple method for this:
As shown in the image below, add a SimpleSign to the scene
Step 5
Load a very useful tool included in the Timeline package called "VamTimeline.Controller.cslist" for the SimpleSign:
Step 6
At this point, your SimpleSign will become a manager for all active Timeline copies in the scene, listing them in a dropdown menu for you.
Note: I emphasized "all active copies" because in certain scenarios, such as in my VaM Produce 69 scene, different Timeline copies may be active in different stage environments. Inactive Timeline copies in the OFF state will not be listed, so this list may vary each time you switch stage environments. It's essential to pay special attention to this when using it to create your own videos.
Step 7
Repeat steps 1-3 for each of the Timeline copies listed.
With this, your preparation work is almost complete. Happy rendering!

