New Features
Compatibility with CustomUnityAsset.
*The preset saving feature for Custom Unity Assets is currently WIP and unavailable untill next update.
Requires a standard VaM controller generation plugin, such as Stopper.CUAControllers.
Demo1 with Foost.DildoLanguage
Demo2 with Skynet.Tentacles Bundle
Step0.
Use a standard VaM controller generation plugin to generate the controllers first.
Do not load this plugin until the controllers have been generated. Otherwise, wierd errors may occur.
Step1.
Select the controllers to be affected by the curve.
The plugin works with a single controller, and the selected controllers do not have to be consecutive. Using more controllers may reduce FPS.
If an existing build for this object is found, the "Load" button will appear.
Directory : Saves/PluginData/HelicalPink/PenisPathAlignment/CUABuild/
Step2.
Set the Forward and Up axes using the displayed axis markers as a reference.
Step3.
Select the starting point of the curve. Choose the controller closest to the root from the list.
GrabController and CurveOrigin cannot be the same.
If you select all controllers and have no controller left to use as the GrabController, reload and try again.
Step4.
Set the Grab Controller's axes to match the axes configured in Step 2.
Step5.
Complete. If you are not satisfied with the result, reload and try again.

Some Custom Unity Assets may not work correctly from the beginning.
For example, the standard VaM Toy: Dildo is mostly impossible to test for me.
To support CUA, I had to change the internal processing related to the curve and penis alignment. I also struggled with the scene save/load process.
I had fixed all the errors that I was able to confirm, but if you find any errors related to these changes, or any unwanted behavior compared to previous versions, please leave a comment.
Planned Updates
Version 5 : Improve Preset & Marker save system.
Version 6 : Improvement and change "Use Trigger Mode" , "Use Scanning Mode".
Version 7 : Final code cleanup and polishing. Feature complete.
Version 8 and beyond : Development will remain focused on bug fixes, maintenance, and adding configuration options as needed.
Credits:
MacGruber
Compatibility with CustomUnityAsset.
*The preset saving feature for Custom Unity Assets is currently WIP and unavailable untill next update.
Requires a standard VaM controller generation plugin, such as Stopper.CUAControllers.
Demo1 with Foost.DildoLanguage
Demo2 with Skynet.Tentacles Bundle
Step0.
Use a standard VaM controller generation plugin to generate the controllers first.
Do not load this plugin until the controllers have been generated. Otherwise, wierd errors may occur.
Step1.
Select the controllers to be affected by the curve.
The plugin works with a single controller, and the selected controllers do not have to be consecutive. Using more controllers may reduce FPS.
If an existing build for this object is found, the "Load" button will appear.
Directory : Saves/PluginData/HelicalPink/PenisPathAlignment/CUABuild/
Step2.
Set the Forward and Up axes using the displayed axis markers as a reference.
Step3.
Select the starting point of the curve. Choose the controller closest to the root from the list.
GrabController and CurveOrigin cannot be the same.
If you select all controllers and have no controller left to use as the GrabController, reload and try again.
Step4.
Set the Grab Controller's axes to match the axes configured in Step 2.
Step5.
Complete. If you are not satisfied with the result, reload and try again.
Some Custom Unity Assets may not work correctly from the beginning.
For example, the standard VaM Toy: Dildo is mostly impossible to test for me.
To support CUA, I had to change the internal processing related to the curve and penis alignment. I also struggled with the scene save/load process.
I had fixed all the errors that I was able to confirm, but if you find any errors related to these changes, or any unwanted behavior compared to previous versions, please leave a comment.
Planned Updates
Version 5 : Improve Preset & Marker save system.
Version 6 : Improvement and change "Use Trigger Mode" , "Use Scanning Mode".
Version 7 : Final code cleanup and polishing. Feature complete.
Version 8 and beyond : Development will remain focused on bug fixes, maintenance, and adding configuration options as needed.
Credits:
MacGruber
Changes & Fixes
1. Renamed "Rotation Mid to Tip Blend" → "Mid Rotation Offset".
To prepare for the next update. Existing scenes and presets will be converted automatically when loaded. Only a name change, so everything will continue to work as before.
2. Added "Base Rotation Offset".
It works the same way as "Rotation Mid to Tip Blend", its "Base to Mid Blend". I found this way is the safest, easiest to manage, and most performance-friendly.
3. The Marker save format has been updated. The UI now shows which Atom type and Rigidbody the marker will be attached to.
4. "Use Trigger Mode" and "Use Scanning Mode" are put back into WIP for further improvements.
5. Various internal code improvements and optimizations.
Bonus : Added the very first demo scene that some people were curious about.
Planned Updates
Version 4 : Compatibility with CustomUnityAsset.
Version 5 : Improve Preset & Marker save system.
Version 6 : Complete "Use Trigger Mode" and "Use Scanning Mode".
Version 7 : Final code cleanup and polishing. Feature complete.
Version 8 and beyond : Development will remain focused on bug fixes, maintenance, and adding configuration options as needed.
Credits:
MacGruber
1. Renamed "Rotation Mid to Tip Blend" → "Mid Rotation Offset".
To prepare for the next update. Existing scenes and presets will be converted automatically when loaded. Only a name change, so everything will continue to work as before.
2. Added "Base Rotation Offset".
It works the same way as "Rotation Mid to Tip Blend", its "Base to Mid Blend". I found this way is the safest, easiest to manage, and most performance-friendly.
3. The Marker save format has been updated. The UI now shows which Atom type and Rigidbody the marker will be attached to.
4. "Use Trigger Mode" and "Use Scanning Mode" are put back into WIP for further improvements.
5. Various internal code improvements and optimizations.
Bonus : Added the very first demo scene that some people were curious about.
Planned Updates
Version 4 : Compatibility with CustomUnityAsset.
Version 5 : Improve Preset & Marker save system.
Version 6 : Complete "Use Trigger Mode" and "Use Scanning Mode".
Version 7 : Final code cleanup and polishing. Feature complete.
Version 8 and beyond : Development will remain focused on bug fixes, maintenance, and adding configuration options as needed.
Credits:
MacGruber
New Features & Changes
1. Allows you to Save settings as Presets and Load them across scenes. (Feature idea suggested by [SneakyOne])
2. Disable tracking beyond "Active Distance".
3. Discard "AutoCurveScale By Angle" and "AutoCurveScale By Distance". Added "Curve Falloff Power" Instead.
4. Added Advanced mode.
Advanced Mode Features
1. Supports unlimited marker creation.
2. Allows markers to be positioned freely.
3. Supports Saving and Loading markers across scenes.
4. "Use Trigger Mode"
Disables manual target selection and locks only onto targets that come into contact with the trigger.
Note: Due to the way Unity handles physics, the lower the FPS, the more likely it is that trigger collisions may occasionally be missed.
& "Use Scanning Mode" (Feature idea suggested by [redeyes])
Disables manual target selection and automatically locks onto the closest target within the search area.
Note: Performance may decrease as the number of markers increases.
Classic Mode
New Mode
Trigger mode & Scanning mode
Some features are still under development and will be released in Version 3, mainly additional offset settings for the penis.
Credits:
MacGruber
1. Allows you to Save settings as Presets and Load them across scenes. (Feature idea suggested by [SneakyOne])
2. Disable tracking beyond "Active Distance".
3. Discard "AutoCurveScale By Angle" and "AutoCurveScale By Distance". Added "Curve Falloff Power" Instead.
4. Added Advanced mode.
Advanced Mode Features
1. Supports unlimited marker creation.
2. Allows markers to be positioned freely.
3. Supports Saving and Loading markers across scenes.
4. "Use Trigger Mode"
Disables manual target selection and locks only onto targets that come into contact with the trigger.
Note: Due to the way Unity handles physics, the lower the FPS, the more likely it is that trigger collisions may occasionally be missed.
& "Use Scanning Mode" (Feature idea suggested by [redeyes])
Disables manual target selection and automatically locks onto the closest target within the search area.
Note: Performance may decrease as the number of markers increases.
Classic Mode
New Mode
Trigger mode & Scanning mode
Some features are still under development and will be released in Version 3, mainly additional offset settings for the penis.
Credits:
MacGruber
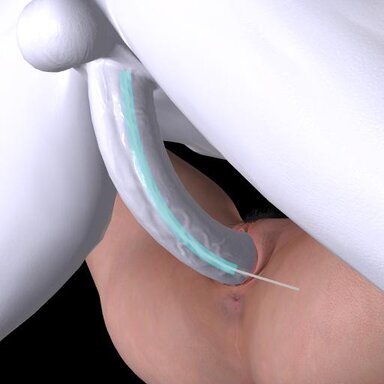
Generates a dynamic path between a penis and a target atom, then guides the penis controls along that path.
The path can be curved, rotated, and offset, and can automatically adjust based on distance or angle.
This plugin works only with Male or Alt-Futa. But the target can be a female, male, or any other atom.
Compatible with Vinput.AutoThruster | AutoGensThruster and Skynet.Orifice Dynamics.
Tip: In most cases, the "Rotation Mid to Tip Blend" slider alone is sufficient to handle penis curvature. If further adjustment is needed, adding a small amount of "Mid Position offset" and then fine-tuning with "Tip Position offset" will usually produce good results.
The path can be curved, rotated, and offset, and can automatically adjust based on distance or angle.
This plugin works only with Male or Alt-Futa. But the target can be a female, male, or any other atom.
Compatible with Vinput.AutoThruster | AutoGensThruster and Skynet.Orifice Dynamics.
Tip: In most cases, the "Rotation Mid to Tip Blend" slider alone is sufficient to handle penis curvature. If further adjustment is needed, adding a small amount of "Mid Position offset" and then fine-tuning with "Tip Position offset" will usually produce good results.