Answered Clothing Texture Set Naming Conventions

Tex

Member
Messages
35
Reactions
8
Points
8
Hello,

I'm new to creating clothing making slow but steady progress. I made a really basic mini skirt and textured it in Substance Painter. I'm trying to correlate the names VaM uses to the names Substance uses so I can get everything assigned properly. So far I think this is correct:

VaM names = Substance Painter names

_MainTex = BaseColor
_SpecTex = Metallic
_GlossTex =
_AlphaTex =
_BumpMap = Normal
_DecalTex =

If anyone can fill in the blanks or correct what I have wrong I'd really appreciate it.

Thank you.
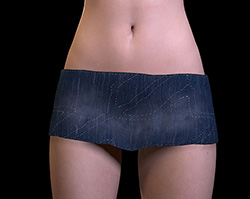

basic.JPG
 
I don't think the name correlate directly with different shaders. The gloss and specular are both black and white images with white as shiny and black as dull. A mirror shiney surface would be white on both, whereas a metal surface like an coin would but lighter on specular and duller on gloss.
The alpha map is black and white too, with white where you want the parts to show and black where you want it transparent.
The decal texture is a .png with a tranparent backgound used for tattoos or makeup where you want the skin or base texture to show through. For clothing this is good for faded text/designs or dirt, because the tranparancy lets it blend with the defuse base colour.
Remember you don't need all of the textures. You can control gloss and specular without the maps, it just effects the whole thing uniformly. Don't bloat your var with 6 4k png's if they don't add anything important. The most important bit is a detailed main texture and normal map.
The skirts looking good.
There is a useful addon for gimp that makes normal maps from greyscale images where lighter colours are higher points. It adds more texture to your models without having to make a high poly version and bake the textures. It's good for adding detail on cloth textures and stitching. The gozer suit i made is a good exaple. The suit itself is smooth, but the lines and bumps are from the normal map.
 
Last edited:
Upvote 0
The most important bit is a detailed main texture and normal map. Don't bloat your var with 6 4k png's if they don't add anything important.

Cool, now I don't have to worry about needing to have a texture plugged into every slot. I found that I did need the _SpecTex or what Substance Painter calls Metallic. Without that, the color of the skirt looked desaturated and not the color it was in Substance. Only after adding it did the skirt look the same as in Substance.

main-opt.jpg
mainSpec-opt.jpg
mainSpecBump-opt.jpg

Thank you for explaining the textures, that's super helpful to me. I've been trying to learn the clothing creation process for a very long time in my free time. It's been frustrating and I must have watched hundreds of YouTube tutorials over the past year, none of which related to creating clothing to use in VaM. I've cobbled together bits and pieces from everything I've watched and read, and with much trial and error (and banging my head off the wall) have finally gotten to this point.

It's nice to finally have something to show for it, although primitive, but it's something. I still have a lot to learn, my clothing meshes are super janky, you can see how uneven the edges of the skirt are. I think that has to do with the topology so I'm working out how to do retopology. I think that will help.

Thanks for the gimp tip. I'm all over the place with the programs I'm using. I have no idea what programs work best so I'm throwing everything at the wall to see what sticks and hopefully come up with a pared down workflow of programs I need to use. The simpler, the better.

Thanks again for the help, I really appreciate it.
 
Last edited:
Upvote 0
I do most of my stuff in blender and gimp. both free programs. I do the majority of the texture painting in blender with an image stencil brush and touch parts up in gimp.

That specular texture looks plain black, you can probably skip it and adjust the specular and gloss sliders in the perams tab at the top to get it to look how you want.

Your uv unwrap looks a little un-optimized (how the model is flattened out for the textures). For future reference if you make an item and uv unwrap it you want to use as much of the texture space as you can to get the highest resolution. This model is only using the bottom left corner at the moment, effectively loading a 4k texture but getting 2k resolution. That's fine if you want to add other items that share the same textures and fill in the space. It reduces the image loading time. I do this with some models that have multiple clothing items, so one material and image set can be used for all of them.

The other texture I forgot to mention is the sim texture. If you want something to be undressable or make items that you want to flow freely (longer dresses/sleeves etc.) , in the clothing creator there is a generate sim data button and sim texture option. It's underneath where you import and name your item. You can either set it as a uniform texture and adjust the slider to see how it behaves, or if you want parts to flow differently you would need to paint a red and black texture. Red parts stay stuck to the model, black parts are effected by physics and collisions. Don't go full red though, only about 95% or it won't be undressable.

Looking good so far. If you need help or advice feel free to ask.
 
Upvote 0
you want to use as much of the texture space as you can to get the highest resolution. This model is only using the bottom left corner at the moment, effectively loading a 4k texture but getting 2k resolution

I am so glad you said that. I had to think about it for a bit then I realized what I did wrong. I didn't know that it's okay to rescale in the UV Editor. I thought it had to stay the same size or it would mess something up. Now I know it's okay, thank you.

originalUVo.jpg
rescale.JPG


So I decided to start fresh and make a longer dress this time. Now I have a different issue. In Daz, the dress looks fine. But in VaM, the dress is getting sucked into the crotch area for some reason.

Is it because the sim texture you talked about? I did try generating sim data using every increment on the slider in the Creator but nothing changed. Not sure how to fix this.

dressDaz1.jpg
dressVaM.JPG

If you need help or advice feel free to ask.

Uh oh, you opened a can of worms there my friend because I have a million + 1 questions, lol. No seriously, I'll try to keep it to a minimum, I've figured out a lot so far and need to keep at it but I do have some basic questions that I may need to ask. Thanks.
 
Upvote 0
Happy to help. Yes the clothing creator tries to stick the clothing to the nearest part of the body which can deform the mesh in some areas, but I think I see another issue.

I can tell by the bellybutton that you are wrapping to the "default" girl, who annoyingly has morphs applied which will mess with the import.
When importing it's best to "reset look" in the main person tab to get a standard model without morphs, then click the "freeze physics" box and "reset pose". That way the model is standing in the standard T pose in the same position as DAZ and isn't being pulled down by gravity. Once you have imported you can un-freeze the physics before you save to see how sim's interact with the body.

A sim texture will fix most deformations and allow the dress to slide over the model when the legs are moved without stretching weirdly . You have to click the "sim enabled" check box under the sim texture to see it's effect. A standard mostly red slider sim should be fine for this as it's all the same denim material, and you don't need it to flow like silk, or behave differently in certain areas. When sim is enabled, sometimes the dress will push away from the body. You can control this in the physics settings tab with "collision radius".

Sometimes you need to make a morph to move parts of the model away so the verts aren't wrapped to it if you want to preserve it's shape, and select "wrap to morphed" when importing. I had to do this with a hood that I made. It was pinning to the eye lids as the closest vertex and every time my model blinked the hood would flap. I made a custom morph with the eye area jutting out about a meter in front of the model like a cartoon character seeing a beautiful lady and it fixed the issue when wrapping to it. You can do the same for hard surface things that you don't want to flex or distort when the model moves.

Like I said, happy to help. I hope you are enjoying yourself and learning new skills, ask all the questions you want.
 
Upvote 0
Oh dang, I reset the look, pose, and also went into the Female Morphs tab and Zeroed out all the morphs but the same thing still happened. Freeze Physics corrected the issue but once I turned it back on it went back to the way it was.

I made a custom morph with the eye area jutting out about a meter in front of the model like a cartoon character seeing a beautiful lady and it fixed the issue when wrapping to it.

I see what you mean. I found a couple of posts who did the same thing.

https://hub.virtamate.com/resources...d-clothing-imports-without-deformation.12708/
https://hub.virtamate.com/threads/position-mess-up-after-import-into-vam.22704/post-60311

Do you think that is what I need to do to fix this?

I hope you are enjoying yourself and learning new skills, ask all the questions you want.

I am, aside from problems like this and thank you.

freeze1.jpg
unfreeze.JPG
 
Upvote 0
I get the same wrap issue when i make tight dresses. Adding and enabling a sim texture fixed it for me, but i was going for a lighter stretchy fabric. If the sim looks wrong you could try the morph route.
 
Upvote 0
I get the same wrap issue when i make tight dresses. Adding and enabling a sim texture fixed it for me, but i was going for a lighter stretchy fabric. If the sim looks wrong you could try the morph route.


Weird that a sim texture works for you but not when I do it. VaM is VaM so I don't understand this.

Before I go the sculpting route, I'd like to create my own sim texture and try that, but I'm not sure how to start. Have you ever created a custom sim texture before?


Okay, got it all worked out now with help from the VaM Help discord channel. Checking 'Use Per Material Sim Texture' on the Creator Tab overrides the 'Select Sim Texture' button above it and the Sim Texture has to then be loaded on the Texture Tab at the bottom of the tab. Had I not checked 'Use Per Material Sim Texture' on the Creator Tab everything would have been okay when I selected the Sim Texture on the Creator Tab.

Thanks again @Origin69 for your help.
 
Last edited:
Upvote 0
It doesn't look like the sim is on the second image. On the importer there is the slider for uniform sim texture, set a value on that and click generate sim data on the left column, then make sure you check the sim enabled box and have physics enabled. You can move the slider to test different values to see how it effects the clothing. Higher (red) values stay put, lower (black) values slip and stretch. You should see the sim take effect on the model when you click 'sim enabled', a fully black texture will slide right off. Play with the value to get the material to move how you feel your denim material should.
Once you have worked out the right value you can paint a more unique sim texture with the red values you like. You can paint a new texture in blender/substance painter directly onto the model if you want. Start with a blanket 95% red and then paint the areas you want effected by sim with your lower red value. To get the colours right set the rgb colours to 0 green 0 blue and slide the red to the value you want (000 is fully black). I mainly just use an image editor open in the background though, and paint over the uv template the parts i want to sim so i can switch between that and vam saving new images with trial and error to get my sims to blend and look how i want them to. It often takes me a few tries to get it right, but it's definitely worth it.
 
Upvote 0
Weird that a sim texture works for you but not when I do it. VaM is VaM so I don't understand this.

Before I go the sculpting route, I'd like to create my own sim texture and try that, but I'm not sure how to start. Have you ever created a custom sim texture before?


Okay, got it all worked out now with help from the VaM Help discord channel. Checking 'Use Per Material Sim Texture' on the Creator Tab overrides the 'Select Sim Texture' button above it and the Sim Texture has to then be loaded on the Texture Tab at the bottom of the tab. Had I not checked 'Use Per Material Sim Texture' on the Creator Tab everything would have been okay when I selected the Sim Texture on the Creator Tab.

Thanks again @Origin69 for your help.
Didn't see this when i replied, glad you got it fixed. Good to know about per material, i was unaware of that. Thank you.
 
Upvote 0
Back
Top Bottom