


<v1.1 update: You no longer need to manually delete the _work folder!>
<v1.2 update: UV boundary restriction, R=253 pinning, finer brush precision, local Clothing Folder shortcut, multi-part clothing fixes.>
<v1.3 update: overlay follows the Person atom, plugin disable hides the overlay, "Apply to DecalTex" live preview toggle, "Fill with Slider Value" button, improved "Load Existing Textures.>
<v1.4 update: seamless painting across UV seams, "Paint Across Parts" toggle, Ctrl+C eyedropper, chest-controller-tracked overlay>
Hi there, I'm Mxx and this is my very first upload and very first plugin!
 Give them some breathing room!

What is SIMTexturePainter?
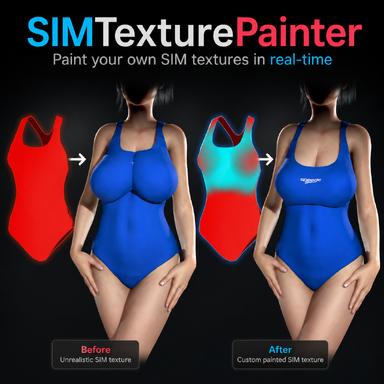
This plugin let's you paint SIM textures directly onto clothing meshes from inside VaM with no external image editor required. SIM textures control how cloth simulation behaves: black areas simulate freely and hang loose, red areas are pinned in place. By painting these values directly onto your clothing, you can fix clipping, shape how fabric drapes, and get realistic cloth behavior without ever leaving the game. A big use case (which was my main reason for making this plugin), is that often times clothing is designed for the base G2 model, and not models with larger breasts. This would lead to unrealistic wrapping of clothing around the breasts. Using SIMTexturePainter, you can easily make your own SIM textures for you models to give them more "breathing room"
Quick Start
NOTE: There are some clothing items for which the creator hasn't generated any Sim Data. Because of that, nothing will happen when you try to make a sim texture for it. I'm working on a way for the plugin to detect this, but what you essentially have to do is:
Open the clothing item in Clothing Creator → Generate Sim Data → Clear Package → enable Sim → Save → Load the newly created Clothing Item → Refresh Clothing List in the Plugin → Select the new Clothing Item
Keyboard Shortcuts:
In-Depth Plugin UI Explanation:

<v1.2 update: UV boundary restriction, R=253 pinning, finer brush precision, local Clothing Folder shortcut, multi-part clothing fixes.>
<v1.3 update: overlay follows the Person atom, plugin disable hides the overlay, "Apply to DecalTex" live preview toggle, "Fill with Slider Value" button, improved "Load Existing Textures.>
<v1.4 update: seamless painting across UV seams, "Paint Across Parts" toggle, Ctrl+C eyedropper, chest-controller-tracked overlay>
Hi there, I'm Mxx and this is my very first upload and very first plugin!
Give them some breathing room!What is SIMTexturePainter?
This plugin let's you paint SIM textures directly onto clothing meshes from inside VaM with no external image editor required. SIM textures control how cloth simulation behaves: black areas simulate freely and hang loose, red areas are pinned in place. By painting these values directly onto your clothing, you can fix clipping, shape how fabric drapes, and get realistic cloth behavior without ever leaving the game. A big use case (which was my main reason for making this plugin), is that often times clothing is designed for the base G2 model, and not models with larger breasts. This would lead to unrealistic wrapping of clothing around the breasts. Using SIMTexturePainter, you can easily make your own SIM textures for you models to give them more "breathing room"
Quick Start
- Add the plugin to a Person atom
- Select a clothing item from the dropdown and press New SIM Texture
- Enable Painting on the left panel, then hold Space while hovering over the clothing to paint
- When done, press Save Final Texture, then Save Clothing Preset
- Next time you load this clothing item, just add the CustomSimPaint preset from the clothing tab
NOTE: There are some clothing items for which the creator hasn't generated any Sim Data. Because of that, nothing will happen when you try to make a sim texture for it. I'm working on a way for the plugin to detect this, but what you essentially have to do is:
Open the clothing item in Clothing Creator → Generate Sim Data → Clear Package → enable Sim → Save → Load the newly created Clothing Item → Refresh Clothing List in the Plugin → Select the new Clothing Item
Keyboard Shortcuts:
| Key | Action |
| Space | Paint (active color) |
| CTRL + Space | Paint Black (full SIM / loose) |
| Shift + Space | Paint Red (fully pinned to skin) |
| [ / ] | Decrease / Increase brush size |
| Shift + [ / ] | Decrease / Increase brush opacity |
| Alt + [ / ] | Decrease / Increase brush hardness |
| CTRL + Z | Undo |
| CTRL + Shift + Z | Redo |
In-Depth Plugin UI Explanation:
| Left Side | Right Side |
| Clothing Item Selects which clothing item on the Person atom you want to work on. Press Refresh Clothing List if you've added or removed clothing after loading the plugin. | New SIM Texture Creates a blank SIM texture at the selected resolution and attaches it to the clothing. This is always your starting point for a fresh paint session. The button turns green once a texture has been created. |
| Texture Resolution Sets the resolution of the SIM texture that gets created. Lower values (256, 512) paint smoothly and are recommended for most clothing. Higher values give more detail but reduce painting performance. This setting only takes effect when creating a new texture — it has no effect on loaded textures. | Load Existing Loads a previously saved PNG as the starting point for your session. Useful if you want to continue working on a texture you saved earlier. The texture resolution is automatically matched to the loaded file. |
| Paint Color The color your brush applies when you paint. Black means full cloth simulation (loose, natural drape). Red means fully pinned (no simulation). The grey values in between give you partial simulation — useful for areas that should move slightly but not swing freely. | Save Final Texture Saves your painted texture to a permanent location under the clothing item's own folder in Saves/SIMTextures/. This is the clean, final version of your texture. The button label changes to Overwrite Existing once a final texture already exists for this clothing item, so you always know whether you're creating or replacing. |
| All Red / All Black Fills the entire texture instantly with either color. Useful as a starting point: fill all black first if you want mostly loose cloth and then pin specific areas red, or fill all red and paint black where you want movement. | Save as Separate Copy Same as Save Final Texture, but adds a timestamp to the filename so it never overwrites a previous version. Use this if you want to keep multiple variations of the same texture. |
| Enable Painting Activates the painting mode. When enabled, holding Space while your cursor hovers over the clothing will paint onto the mesh. The brush cursor appears on the clothing surface to show you exactly where you're painting. Painting is intentionally disabled by default so you don't accidentally paint while navigating the scene. | Save Clothing Preset Saves a .vap clothing preset that has your final SIM texture path embedded into it. Once you load this preset from the clothing tab, the SIM texture is permanently attached to that clothing item and will work in any scene. The button changes to Update Clothing Preset if a preset has already been saved, making it clear when you're updating versus creating for the first time. |
| Brush Size Controls the radius of the brush in UV space. Smaller values give precise control for edges and detail areas. Use the [ and ] keys to adjust on the fly while painting. | Open SIMTextures Folder Opens the Saves/SIMTextures/ folder directly so you can browse or clean up saved textures. After finishing a session, you can safely delete the _work subfolder inside — it contains temporary working files and will be recreated automatically next time. |
| Brush Opacity How strongly each brush stroke applies the paint color. Lower values let you build up gradually with multiple passes. Use Shift + [ / ] to adjust while painting. | Per-Part Panels (shown automatically for multi-material clothing) Some clothing items have multiple material zones (e.g. a separate body fabric and trim). The plugin detects these automatically and creates a separate SIM texture for each part. Each part panel has a toggle to enable or disable painting and overlay visibility for that part individually. |
| Brush Hardness Controls the falloff of the brush edge. At 0 the brush fades out softly from center to edge. At 1 the brush is a hard solid circle with no falloff. Use Alt + [ / ] to adjust while painting. | |
| Mirror Painting When enabled, every stroke is automatically mirrored to the opposite side of the UV map. Useful for symmetrical clothing like shirts or pants where both sides should have matching SIM behavior. | |
| Overlay Opacity Controls how visible the painted overlay is on top of the clothing in the viewport. The overlay is purely visual — it shows you what you've painted without affecting the actual texture. Reducing this can make it easier to judge how the cloth will look in-game. | |
| Undo / Redo Steps backward or forward through your painting history, one brush stroke at a time. Works across multiple clothing parts. You can also use Ctrl+Z and Ctrl+Shift+Z. |
The swimsuit used in the video and images is "AFVR_blue_swimsuit" from the amazing @AnythingFashionVR !
Where to find your custom Clothing Preset: