

You are using an out of date browser. It may not display this or other websites correctly.
You should upgrade or use an alternative browser.
You should upgrade or use an alternative browser.
This update is a big one: important stability fixes plus three new features that completely change what you can do with ProceduralMotion.
Fix — Pose Apply
I fixed the issue reported by PixelJelly, where applying a pose caused the male Person to disappear from the scene. Pose application is now much more stable.
Heads up: with very complex poses, loading may still show minor bugs. Your feedback is essential for me to make this version 100% stable — test it out and let me know how it goes!
What's new
1. Scene Export You can now export your work as a complete scene! Your ProceduralMotion creations can be shared on the Hub and downloaded by anyone. This is exactly where I always pictured the project going — we can finally build fuller, more complete scenes. And this is just the beginning: a lot more is coming for procedural scene creation.
2. PM PLAY (free plugin) PM PLAY is the player that runs your exported scenes. It's available on the Hub for everyone to download — meaning anyone can play your scenes, even without the full ProceduralMotion.

3. Appearance Swap Also built into PM PLAY. Normally VaM needs a .vap file (an appearance preset) to load a Person's look — but many creators don't share that file, leaving the appearance "locked" inside the scene. My plugin solves this: it pulls the appearance straight from the scene, bringing hair and accessories along too.

Thank you to everyone supporting the project. Your feedback is what drives all of this.

In this new version, I'm very happy to bring a feature that starts to give more body to our plugin! It finally enters the scope of what I imagined when I started this project: the creation of complete scenes. Of course, this new feature will still evolve a lot, but we already have its core running.
While I was developing the entire UI and the creation flow, I kept thinking about my own difficulties when trying to create scenes in VaM. The main one, for sure (both for me and for beginners), has always been the animation part. I personally am not good with keyframes (lol), although I really admire those who work with it, as it is indeed an incredible artistic work.
With that in mind, I created a flow that is easy and friendly for those who want to test and build their scenes with more options. It is still a Beta version, but I hope that next week the scene export part will already be 100% functional.
For now, you can already test:
Below, I will detail all the points of this new feature. I hope you like it!
- Scene creation with transitions;
- Camera creation;
- Interactive menu;
- Saving your work progress.
What is the Scene Builder?
The Scene Builder is the feature that transforms Procedural Motion from an animation plugin into a complete scene creation tool. With it, you assemble a 3-phase sequence — START → MID → END (CLIMAX) — each with its own character positioning, camera, and animation. The plugin takes care of everything: smooth transitions, automatic camera switching, and even the interactive menu during playback.
Accessing the Scene Builder
Click on the SCENE tab (green) at the top of the plugin. The interface is divided into two sides: on the left are the creation controls, on the right are the playback and camera controls.

PART 1 — Preparation: Cameras and Atoms
Before you start configuring the phases, you need to prepare the environment.
+ CREATE CAMERA
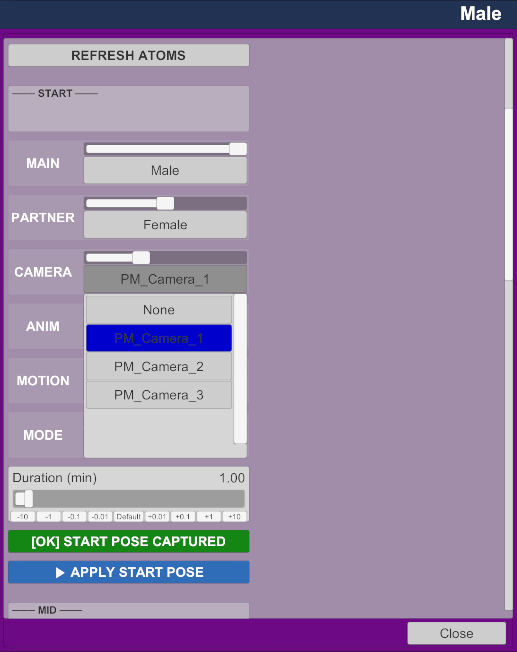
Creates a new camera in the scene (WindowCamera type atom with Embody already configured). Each created camera is automatically named PM_Camera_1, PM_Camera_2, etc.
Tip: Create one camera per phase before setting up the poses. This way, you can position each camera at the ideal angle while the characters are still in the correct pose.CAMERA TO DELETE + X DELETE SELECTED CAMERA
Select from the dropdown which camera you want to remove and click the red button. Useful for clearing out test cameras.
REFRESH ATOMS
Updates the list of available characters in the MAIN and PARTNER dropdowns. Use it whenever you add a new character to the scene after opening the plugin.
SAVE SCENE / LOAD SCENE
- SAVE SCENE (green): saves the entire Scene tab configuration in a JSON file in the VaM Saves folder (ProceduralMotion_Poses.json). It stores the captured poses, cameras, animations, and durations of all 3 phases.
- LOAD SCENE (orange): loads a previously saved configuration. Ideal for continuing work in another session or sharing configurations.
PART 2 — Configuring the Phases
The scene has 3 fixed phases in sequence. Each phase has the same parameters and is configured independently.
- — START —
The first phase. It's the scene's entrance, where the rhythm starts slow and builds up.

— MID —
The middle phase. Usually the longest, where the main action happens.

- — END (CLIMAX) —
The final phase. Maximum intensity, culminating in the orgasm.
- — END (CLIMAX) —
The final phase. Maximum intensity, culminating in the orgasm.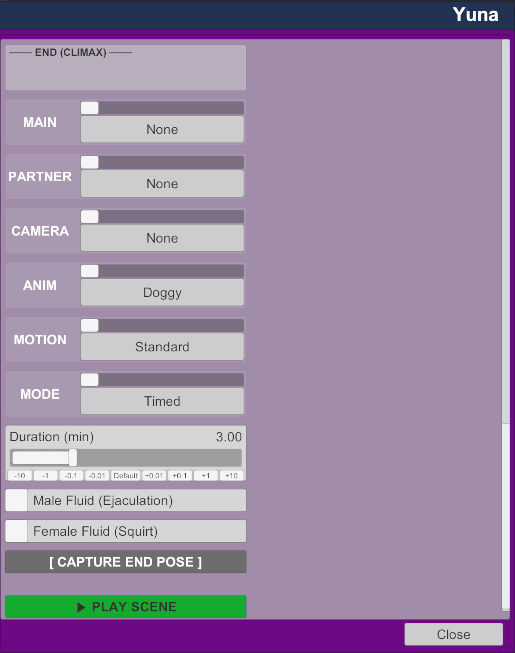
The parameters of each phase
All three blocks (START, MID, END) have the same fields:
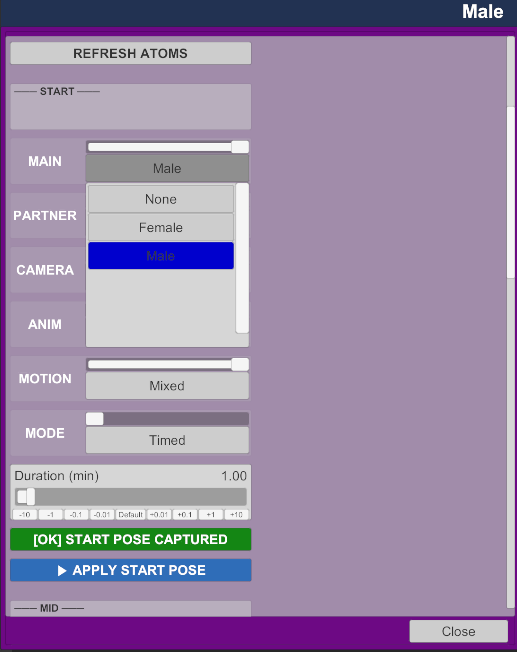
- MAIN
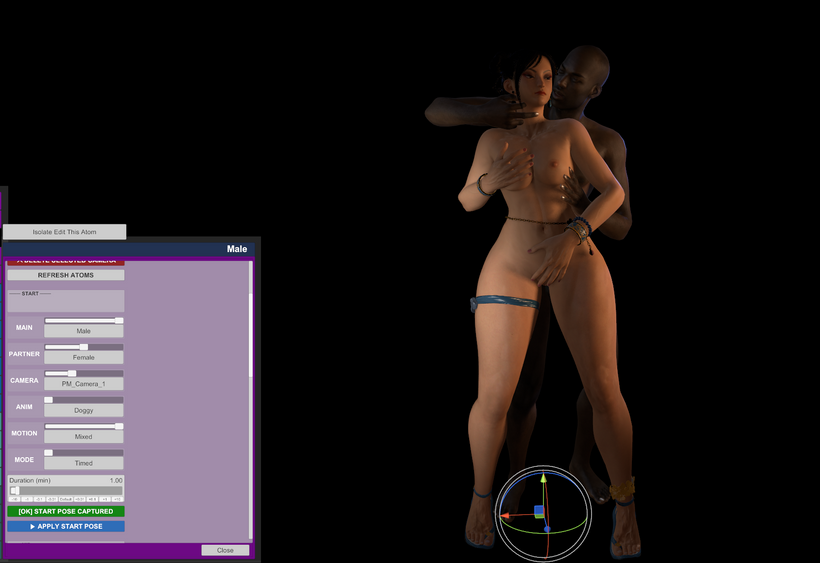
Selects which atom in the scene is the main character of this phase — the one that will receive the plugin's motion animations. Usually the Male in Doggy/Missionary, the Female in Cowgirl.
In the screenshot example: Male in START and MID, Female in END (Cowgirl).
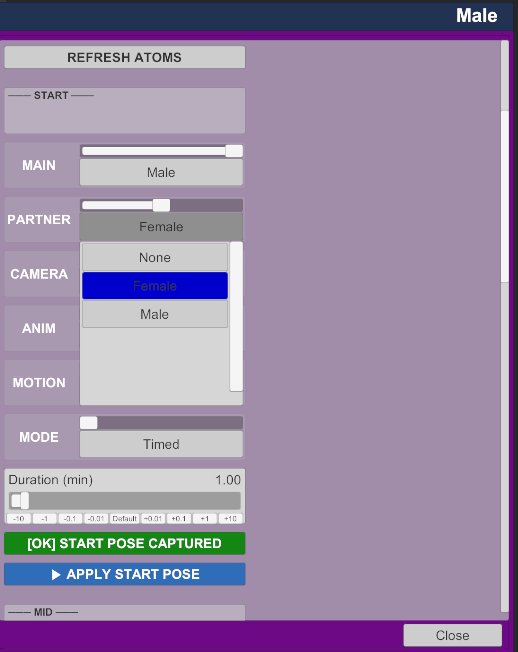
PARTNER
Selects the partner character for this phase. The plugin also animates the partner in coordination with the main character.
In the example: Female in START and MID, Male in END.
Attention: MAIN and PARTNER can be swapped between phases. If in phase 2 you do Cowgirl, the MAIN becomes the Female — the plugin recognizes this automatically.- CAMERA
Selects which camera (PM_Camera_1, PM_Camera_2, PM_Camera_3, or None) will be automatically activated when this phase starts during playback.
In the example: each phase used a different camera, providing three distinct angles throughout the scene.
If set to None, no camera is activated in that phase, and the user controls the view manually.
- ANIM
The type of animation for this phase. The available options are:
Doggy Penetration from behind
Missionary Lying down, face to face
Cowgirl Female on top
HandjobManual stimulation
Blowjob Oral
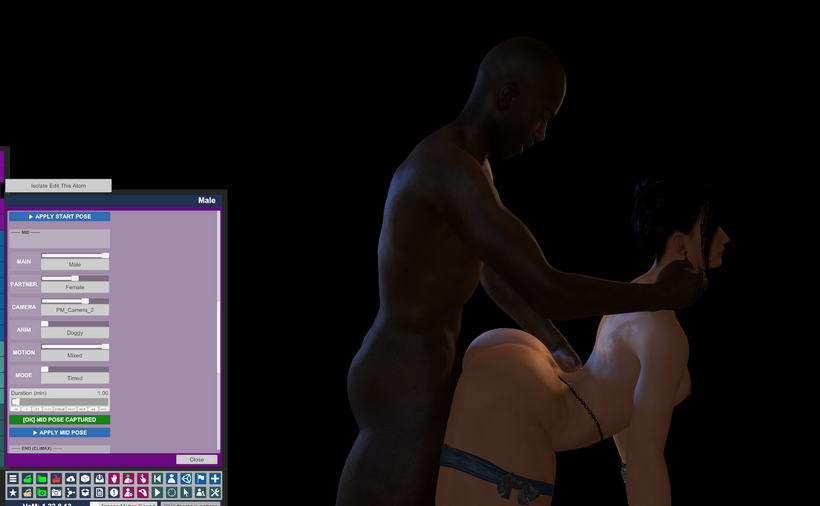
In the example: START and MID used Doggy, END used Cowgirl — creating a natural progression of poses.
OptionDescriptionStandardPaced and regular movementDeep ThrustingDeep and slow movementsLow Doggy (Elbows)Lower position, resting on elbowsMixedAutomatically varies between styles throughout the phase
- POSE (appears only in some animations)
Position sub-variation within the animation. In Cowgirl, for example, the Standard option (regular Cowgirl) appears. It is only displayed when the animation has more than one position option.- MOTION
Defines the movement style within the chosen animation. Options vary according to the selected ANIM. For Doggy, the options are:
In the example: Mixed was used in all 3 phases to vary the movement naturally.
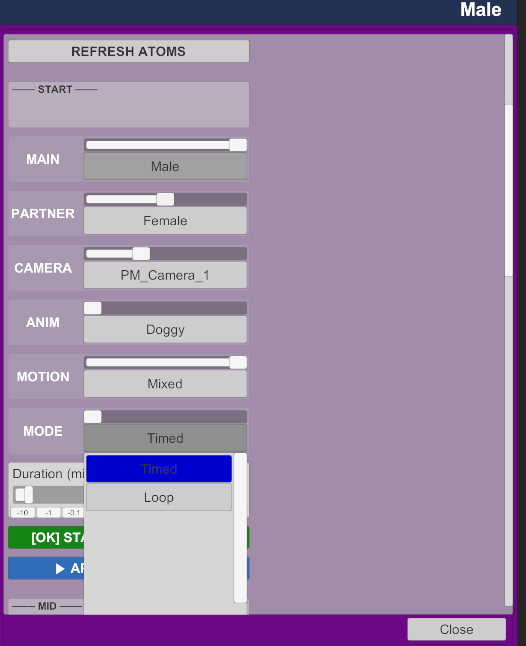
OptionDescriptionTimedThe phase lasts exactly the time defined in Duration and automatically advances to the nextLoopThe phase repeats indefinitely until the user decides to advance manually via the HUD
- MODE
Defines the phase's behavior regarding time:
When Loop is selected, the Duration slider disappears as it is not relevant.
When to use Loop: ideal for the START phase, leaving the user in control of when to advance. Creates a more interactive experience.
- Duration (min)
Visible only in Timed mode. Defines how many minutes the phase lasts before automatically transitioning to the next. The slider goes from 0.5 to 10 minutes.

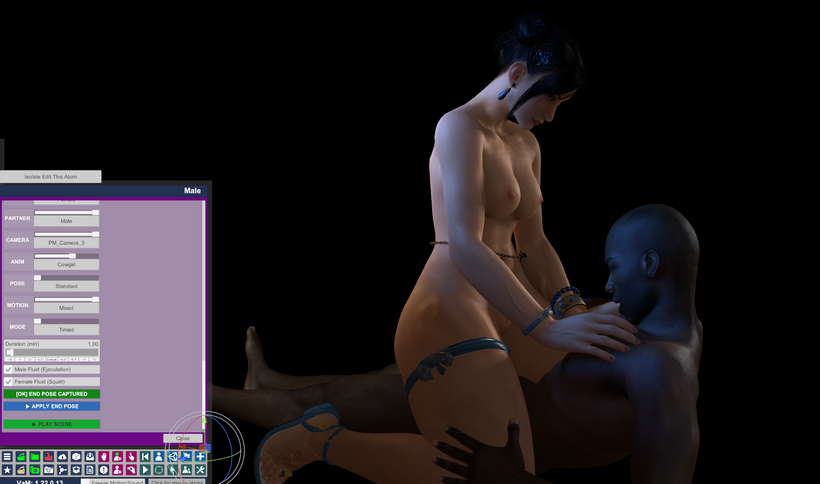
In the example: 1 minute per phase was used — enough to demonstrate the feature in testing.- Male Fluid (Ejaculation) / Female Fluid (Squirt)
(Visible only in the END phase)
Activates the fluid systems in the final phase. These are the visual effects that accompany the orgasm.PART 3 — Capturing the Poses
This is the most important step. Before playing the scene, you need to register the starting position of each phase.
How it works
For each phase:
- Manually position the characters in the VaM scene in the pose you want that phase to start in.
- Configure MAIN, PARTNER, ANIM, MOTION, MODE, and Duration for that phase.
- Click [ CAPTURE START/MID/END POSE ].

- The button changes from gray to green and displays [OK] START/MID/END POSE CAPTURED — confirming that the pose has been saved.

The plugin memorizes not only the position of the characters, but the entire scene configuration at that moment: bone angles, controller positions, physics adjustments.APPLY START/MID/END POSE
Appears just below the capture button after the pose is saved (blue button). When clicked, the plugin repositions the characters exactly as they were when you captured that phase.

What it's for: to visualize the saved pose, check if it's correct, or readjust the camera after you've already captured it.
Practical example of what was seen in the screenshots
PhasePositionANIMMOTIONCAMERADurationSTARTStanding CarryDoggyMixedPM_Camera_11 minMIDDoggy StyleDoggyMixedPM_Camera_21 minENDCowgirlCowgirlMixedPM_Camera_31 min
Each phase was captured with the characters already in the correct position, creating a natural progression: standing → on all fours → on top.
PART 4 — Playing the Scene
With all 3 poses captured, click ▶ PLAY SCENE (green, at the bottom of the tab).

What happens:
- The screen does a smooth fade to black.
- The characters reposition themselves in the START phase pose.
- Camera PM_Camera_1 is automatically activated (if configured).
- The animation starts with increasing intensity.
- After the configured time, a smooth transition to the MID occurs: the characters gradually slow down, fade, reposition, new camera.
- The same occurs in the MID → END transition.
- In the END phase, the orgasm is automatically triggered at the end of the time.
PART 5 — The Scene HUD (Interactive Menu)
During playback, the plugin displays a floating menu on the screen that allows you to control the scene in real-time, without needing to open the plugin.
How to activate
In the right panel of the SCENE tab, click ◉ SHOW SCENE HUD. The button changes to ✕ HIDE SCENE HUD to hide it.
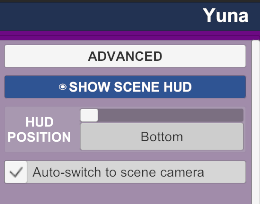
HUD POSITION
Defines where the HUD appears on the screen:
- Bottom
- Top
- Left
- Right (used in the screenshot example)
HUD Buttons

▶ Play Starts or resumes the scene
Stop Stops the scene and resets the characters
Back Goes back to the previous phase
Skip Skips to the next phase immediately, without waiting for the time to end
★ Climax Manually triggers the orgasm at any time, regardless of the current phase
● READY Status indicator — shows that the scene is ready to play
✕ Closes the HUD
Tip: the Skip button is especially useful with phases in Loop mode — you remain in control of when to advance the scene, creating a more interactive and personalized experience.Auto-switch to scene camera
Option in the right panel. When activated (default), the plugin automatically switches the camera at every phase transition. Disable it if you prefer to control the camera manually.
Summary flow to create your first scene
This is a beta version. In the next update, the full scene export feature will arrive, which will allow you to generate a Timeline file with the entire animation ready, without needing the plugin for playback.
- Create the cameras (+ CREATE CAMERA) — one per phase
- Position camera 1 at the START angle
- Position the characters in the START pose
- Configure MAIN, PARTNER, CAMERA, ANIM, MOTION, MODE
- Click [ CAPTURE START POSE ]
- Repeat steps 2-5 for MID and END
- Click SAVE SCENE to save your progress
- Click ▶ PLAY SCENE to watch
- Use the HUD to control playback
Hey everyone! V2.5 is here and it's a big one.
Gaze System — Now in Every Animation
The eye contact system introduced in previous updates has been expanded to all animations. Characters now react with their eyes and head throughout the entire experience — not just in one or two poses.
Here's what's covered:
Every animation now feels alive even when the bodies aren't moving dramatically. Small glances, held stares, and natural breaks make a huge difference.
- Doggy — both partners now have independent gaze behavior, with the female looking back and the male tracking her
- Missionary — mutual eye contact that reacts to intensity
- Handjob — the female shifts focus between eye contact and looking down; the male responds
- Blowjob — the female makes eye contact with the male; his gaze follows her naturally
- Standing Carry — full dual gaze for both characters
New Animation: Standing Carry
A brand new pose has been added — Standing Carry. The male lifts and holds the female while thrusting. Features include:
- Procedural hip and penisBase thrust movement
- Hand grip synchronized with motion intensity
- Full gaze system for both characters
New Animation Type: Seated Cowgirl: We are introducing a new "Seated" variant for the Cowgirl action, focusing on intimate lap-seated interactions. This pose features dedicated gaze logic and specialized "Grinding" motion patterns, providing a more sensual and controlled rhythm compared to the standard bouncing variants.
Stay tuned: we will soon be adding more pose types and variations for the remaining animations!
What's new in this version:
- Dynamic Gaze System: The eye-tracking system has been completely overhauled. The plugin now intelligently manages eye and head targets, creating a much more organic and "alive" behavior.
- Target Controls: We have implemented/validated the female:eyeTargetControl and male:eyeTargetControl controllers. These are now the focal points for eye and head tilt animations, allowing characters to focus on each other or look away naturally during climaxes or transition moments.
- New Head Animations for Cowgirl: The Cowgirl action now features new head movement patterns, providing enhanced realism and expressiveness during the animation.
- New Animation Type: Reverse Cowgirl: We are introducing initial support for reverse poses, starting with Reverse Cowgirl.
- This pose features dedicated Gaze and Head logic, simulating specific behaviors such as the character glancing back over her shoulder at the partner or looking down shyly, with smooth transitions and "overshoot" effects for a more cinematic feel.
- UI Simplification: The "Animate Partner Sync" checkbox has been removed. To streamline the workflow, simply selecting the partner atom in the SELECT PARTNER menu will now automatically activate their synchronized animation.


What's New in v2.2
Fluid System — Now in PRO! The fluid simulation (male fluids + squirt) is no longer exclusive to Beta. All PRO members now have full access to the fluid system, including intensity control, style selection (Creamy, Clear, Thick, Shiny), and the female squirt toggle.
Handjob — Hand Grip Reworked The grip system has been completely reworked. The hand no longer snaps shut automatically when you press Play. A new "Hand Grip (Open ↔ Closed)" slider gives you direct real-time control over how open or closed the hand is — from fully open (0) to fully gripped (1.0). Default is 0.8 for a natural grip. Adjust it freely while the animation is running.
Thank you to every member who supports this project — your support is what makes updates like this possible. PRO and Beta members get early access to every new feature, priority feedback, and help shape the direction of ProceduralMotion.
Already a member? Thank you — seriously.
Want to join and unlock the full experience?
patreon.com/posts/157213236
Hey guys!
This week I've been focused on getting the fluid system 100% working across all available animations. In the previous version, the system was limited only to the Handjob and the male character, but now the experience is complete.
In addition, I've added fluid for the female character (Squirt). You now have full control in the UI to independently enable or disable fluids for both male and female characters.
I hope you enjoy the results of this new beta version! I'm always available for your feedback and suggestions. New features are coming soon for the Beta, Pro, and Free versions alike!
Thanks for your continuous support!
VaM Hub (screenshots & changelog): https://hub.virtamate.com/resources/procedural-motion.64528/
ProceduralMotion v2.0 introduces a real-time fluid simulation system built directly into the plugin, available exclusively for Beta tier supporters.
Requirements
- ProceduralMotion Beta package (VelvixBr.ProceduralMotion_Beta.11.var)
SexyFluids is not required — the fluid renderer is bundled with ProceduralMotion
Credit: The fluid rendering engine is based on the SSF (Screen Space Fluids) technology originally developed by Foost for the SexyFluids plugin. ProceduralMotion adapts this system with its own procedural emission logic and animation integration.How to Use
- Load the plugin on your Person atom as usual
- Select Handjob as the animation type
- In the MAINtab, you will find:
- Enable Fluids toggle — turns the system on/off
- Fluid Style — choose between: Creamy, Clear, Thick, Shiny
- Intensity slider — controls emission amount at climax
- Press PLAY and let the scene progress — fluid emits automatically at the climax moment
No atom setup, no extra plugin, no manual trigger needed. It's fully automatic.Fluid Styles
Style Description Creamy Default — opaque, white, natural look Clear Watery, transparent, light blue tint Thick Maximum density and opacity Shiny High-gloss, strong specular, pearl tint
- Currently available in Handjob only. Other animations will be added in future updates.
- If you also have SexyFluids installed, both plugins can coexist without conflicts.
- This is a Beta feature — performance and visuals may be refined in future versions.
New update available with fixes and improved controls for the Handjob movement:
- Animation Alignment: Fixed handjob alignment issues across various character positions and stances.
- New Control: Added an alignment slider for the primary hand movement, allowing for precise manual adjustments during the animation.
New Release: Refined Handjob & Architectural Improvements
In this update, I’ve focused heavily on a complete overhaul of the Handjob animation, delivering enhanced realism and smoother transitions. I’ve also implemented core structural changes that lay the groundwork for exciting upcoming features.
Change Log:
- Handjob Overhaul:
- New Variations: Animations have been rebuilt from the ground up for consistent and natural motion.
- Facial Expressions: Fine-tuned facial reactions for a more lifelike experience.
- Hand Positioning: Fixed the initial hand "snapping" issue when starting the animation.
- Cowgirl Fixes:
- Improved head movement logic for both the partner and the target person, ensuring more immersive eye contact and positioning.
- Technical Enhancements:
- New Architecture: Optimized code for better performance and easier implementation of future features.
- General Bug Fixes: Purged several minor glitches reported by the community for a more stable experience.