Hi Guys,
I have got quite a lot of request to create a guide for how i am creating the wrap around seamless tattoos. I couldnt create a video tutorial, but here is a rough guide on how to do it.
Tools Used
- Gimp
- Photoshop
- Substance Painter 3D
Methodology
Get your tattoos (White background is a real necessity)
Convert the images to PNG
Use substance painter 3d for composite work.
Get Your Tattoos
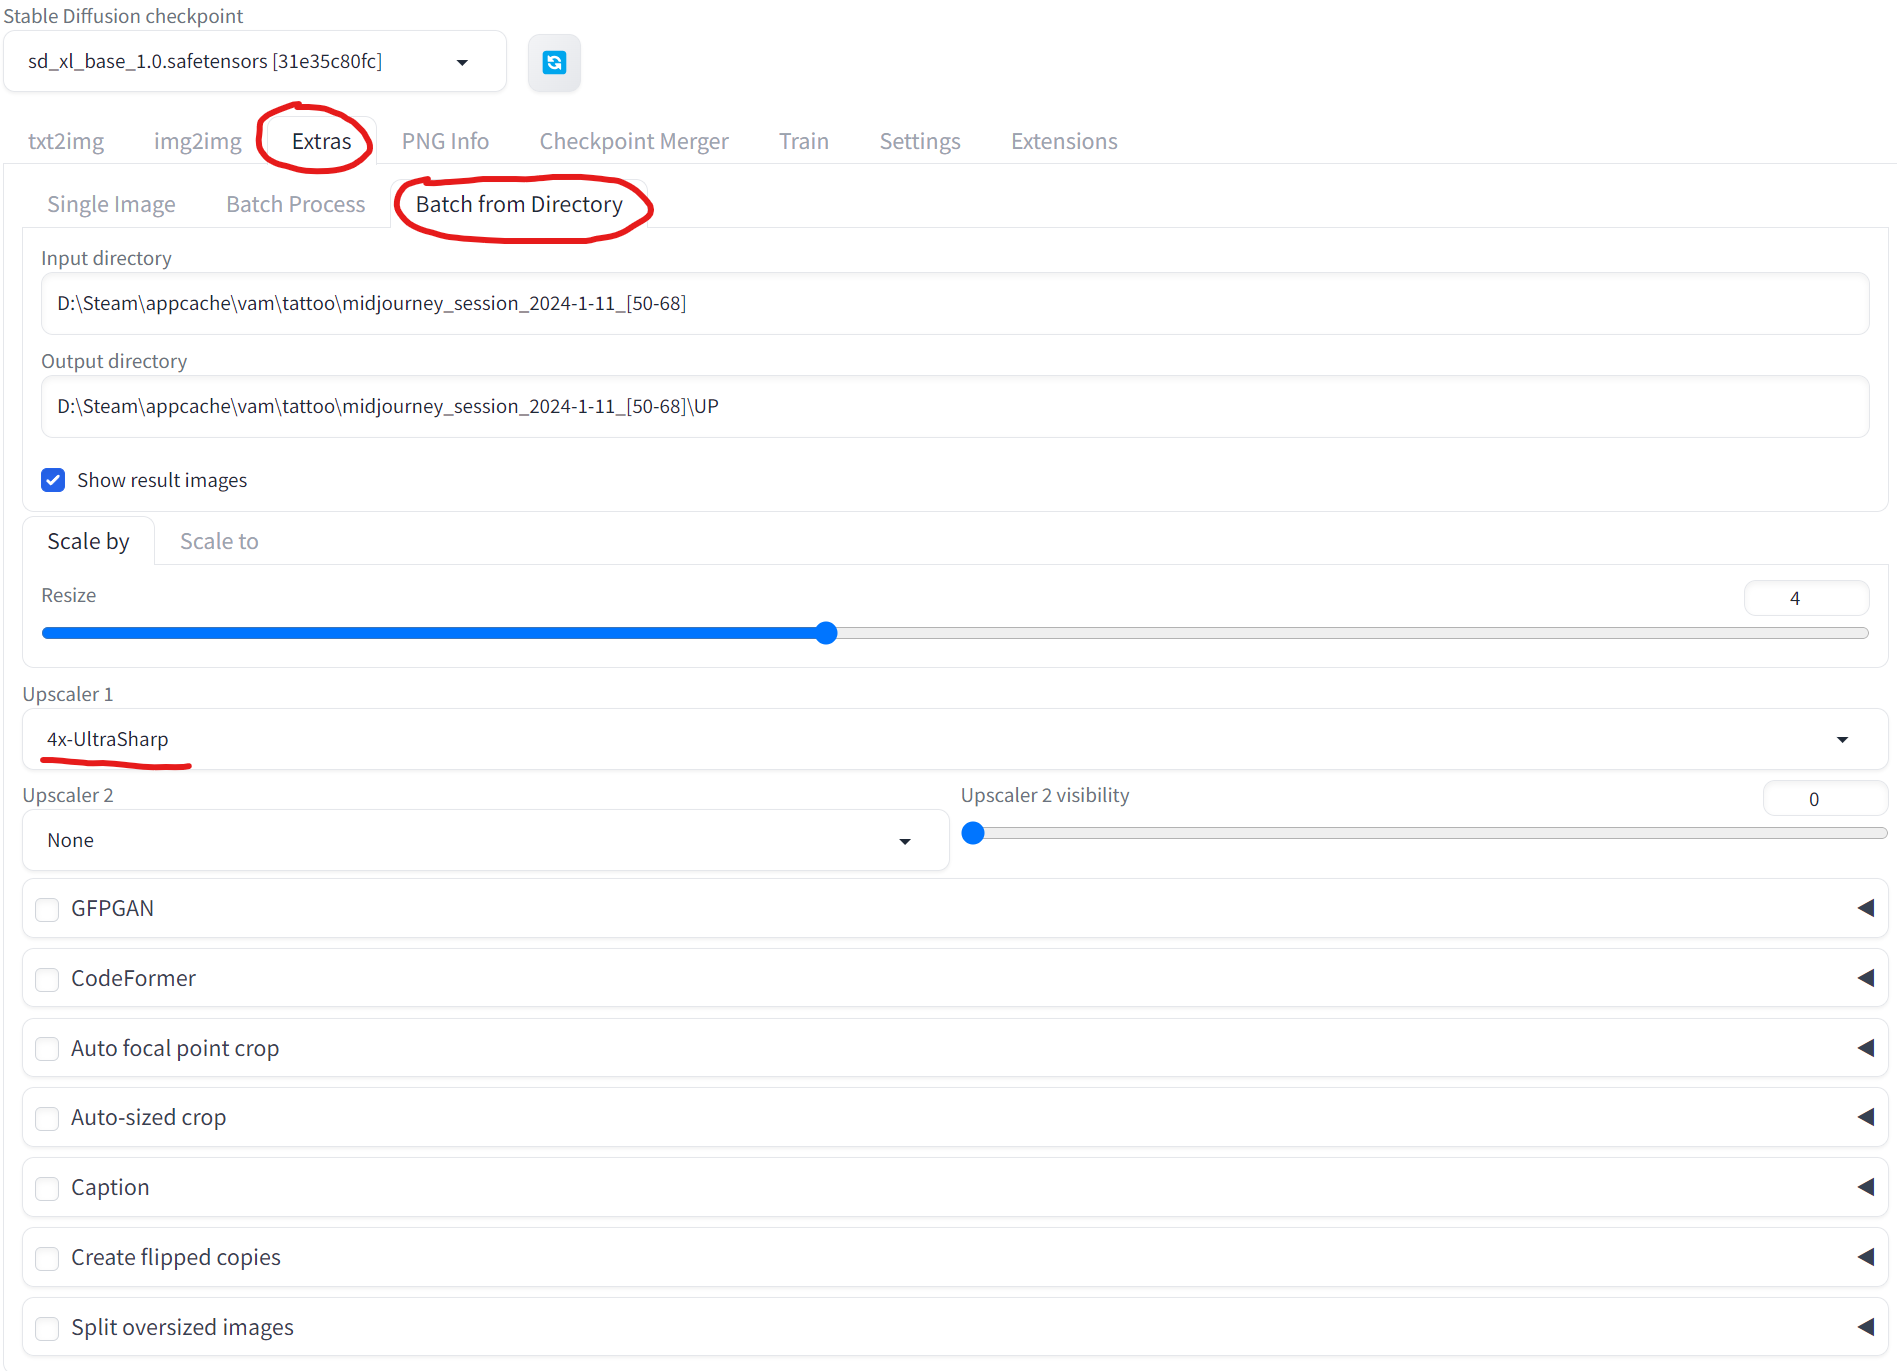
I use Midjourney to create my tattoos. Once I have my tattoos I upscale them using stable diffusion using 4x-UltraSharp upscaler. The higher the texture size then better for VR consumption(Just dont go crazy with the upscale )
)
Prepare the Image for PNG conversion
This step is not really necessary, but is important to create clean tattoos so i highly recommend you to not skip on it.
The way Gimp turn a photo into a PNG is by locking onto a particular gradient of a color and removing that from the picture. Since our goal is to remove anything white from the image, we need to turn everything in the image except for the tattoo to as near as pure white.
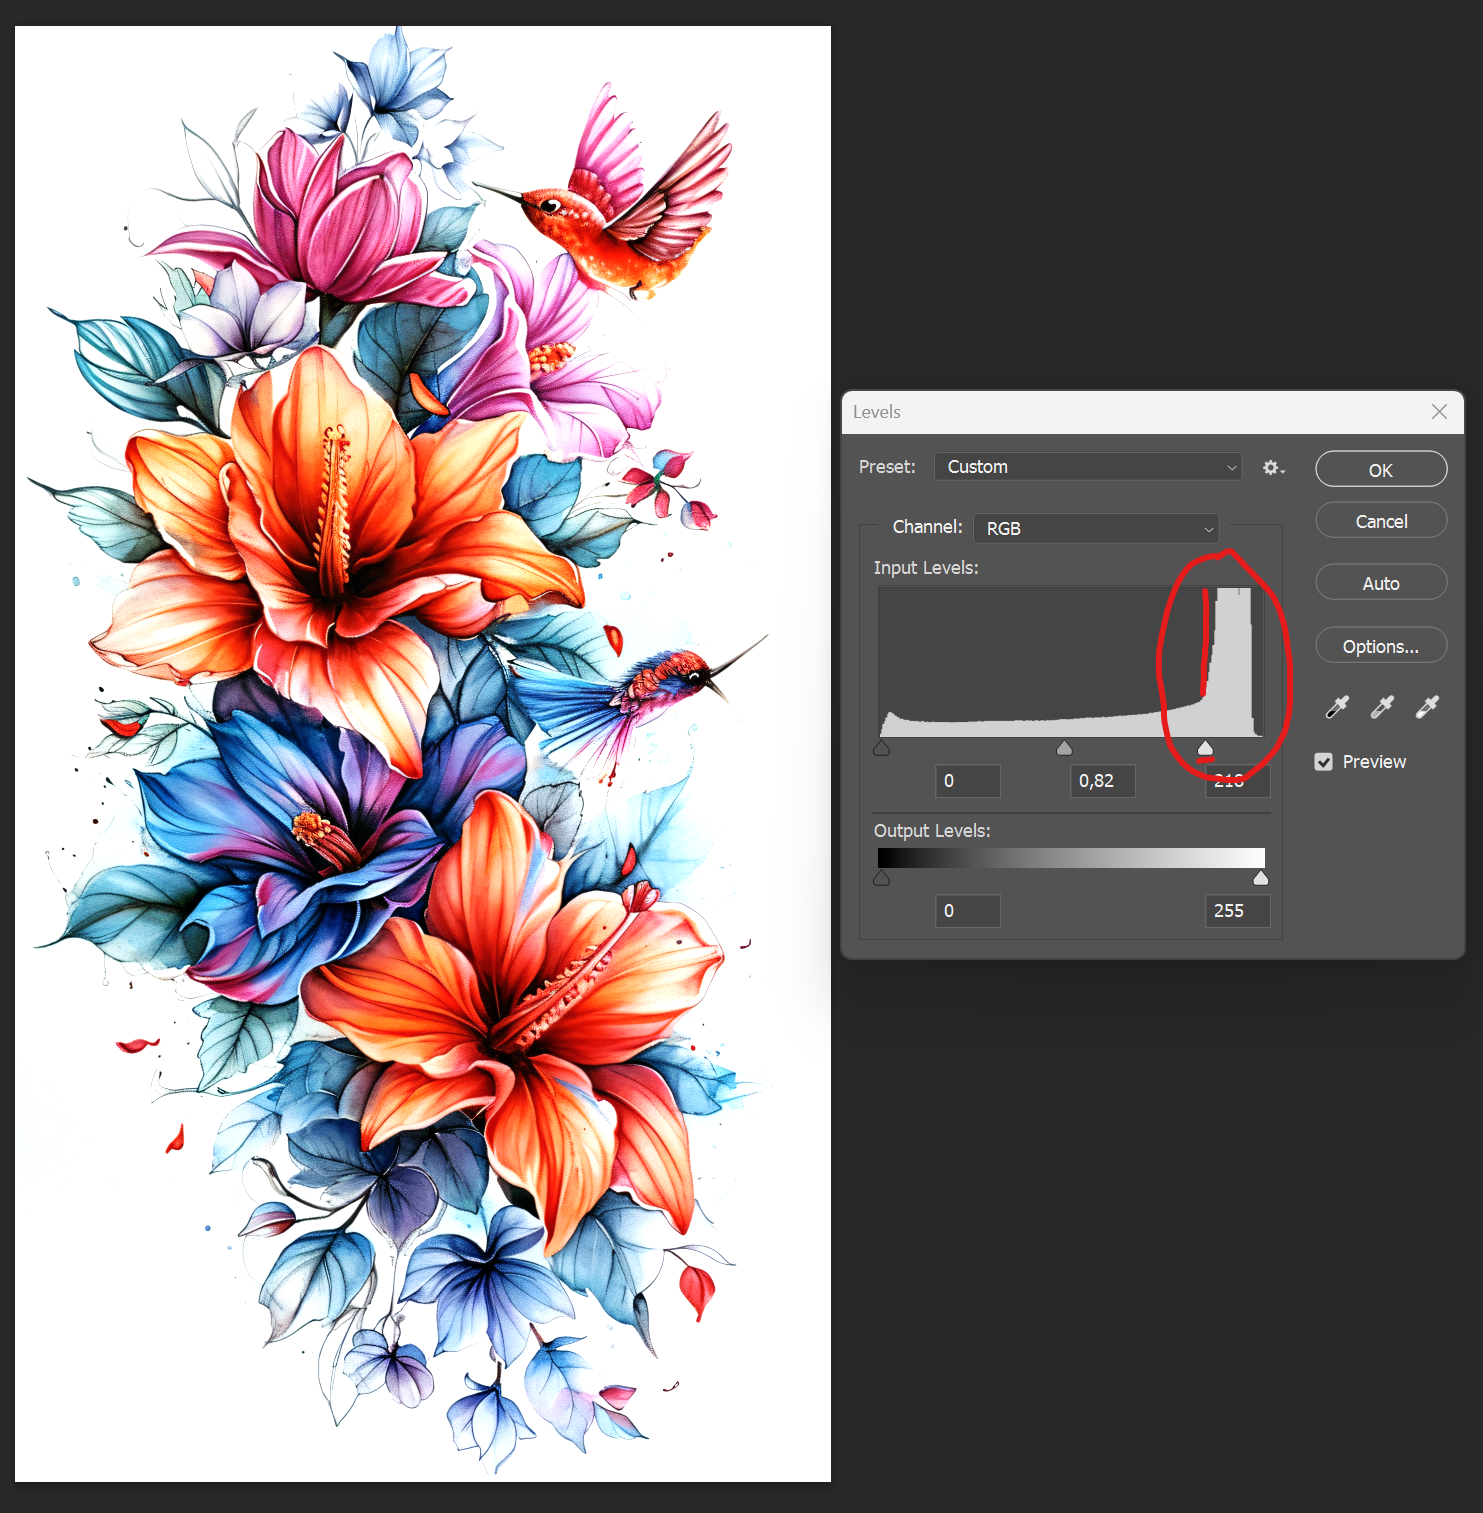
- Load up the tattoos into photoshop and press ctrl+L to bring up the level slider.
Slide the left most slider to just past the tallest light line. Essentially this will turn the gray gradient to pure white.
DONT OVER DO IT. It will screw up the exposure.
Convert The Image to PNG
Now we are ready to convert the image to PNG.
Open Gimp and load up the image.
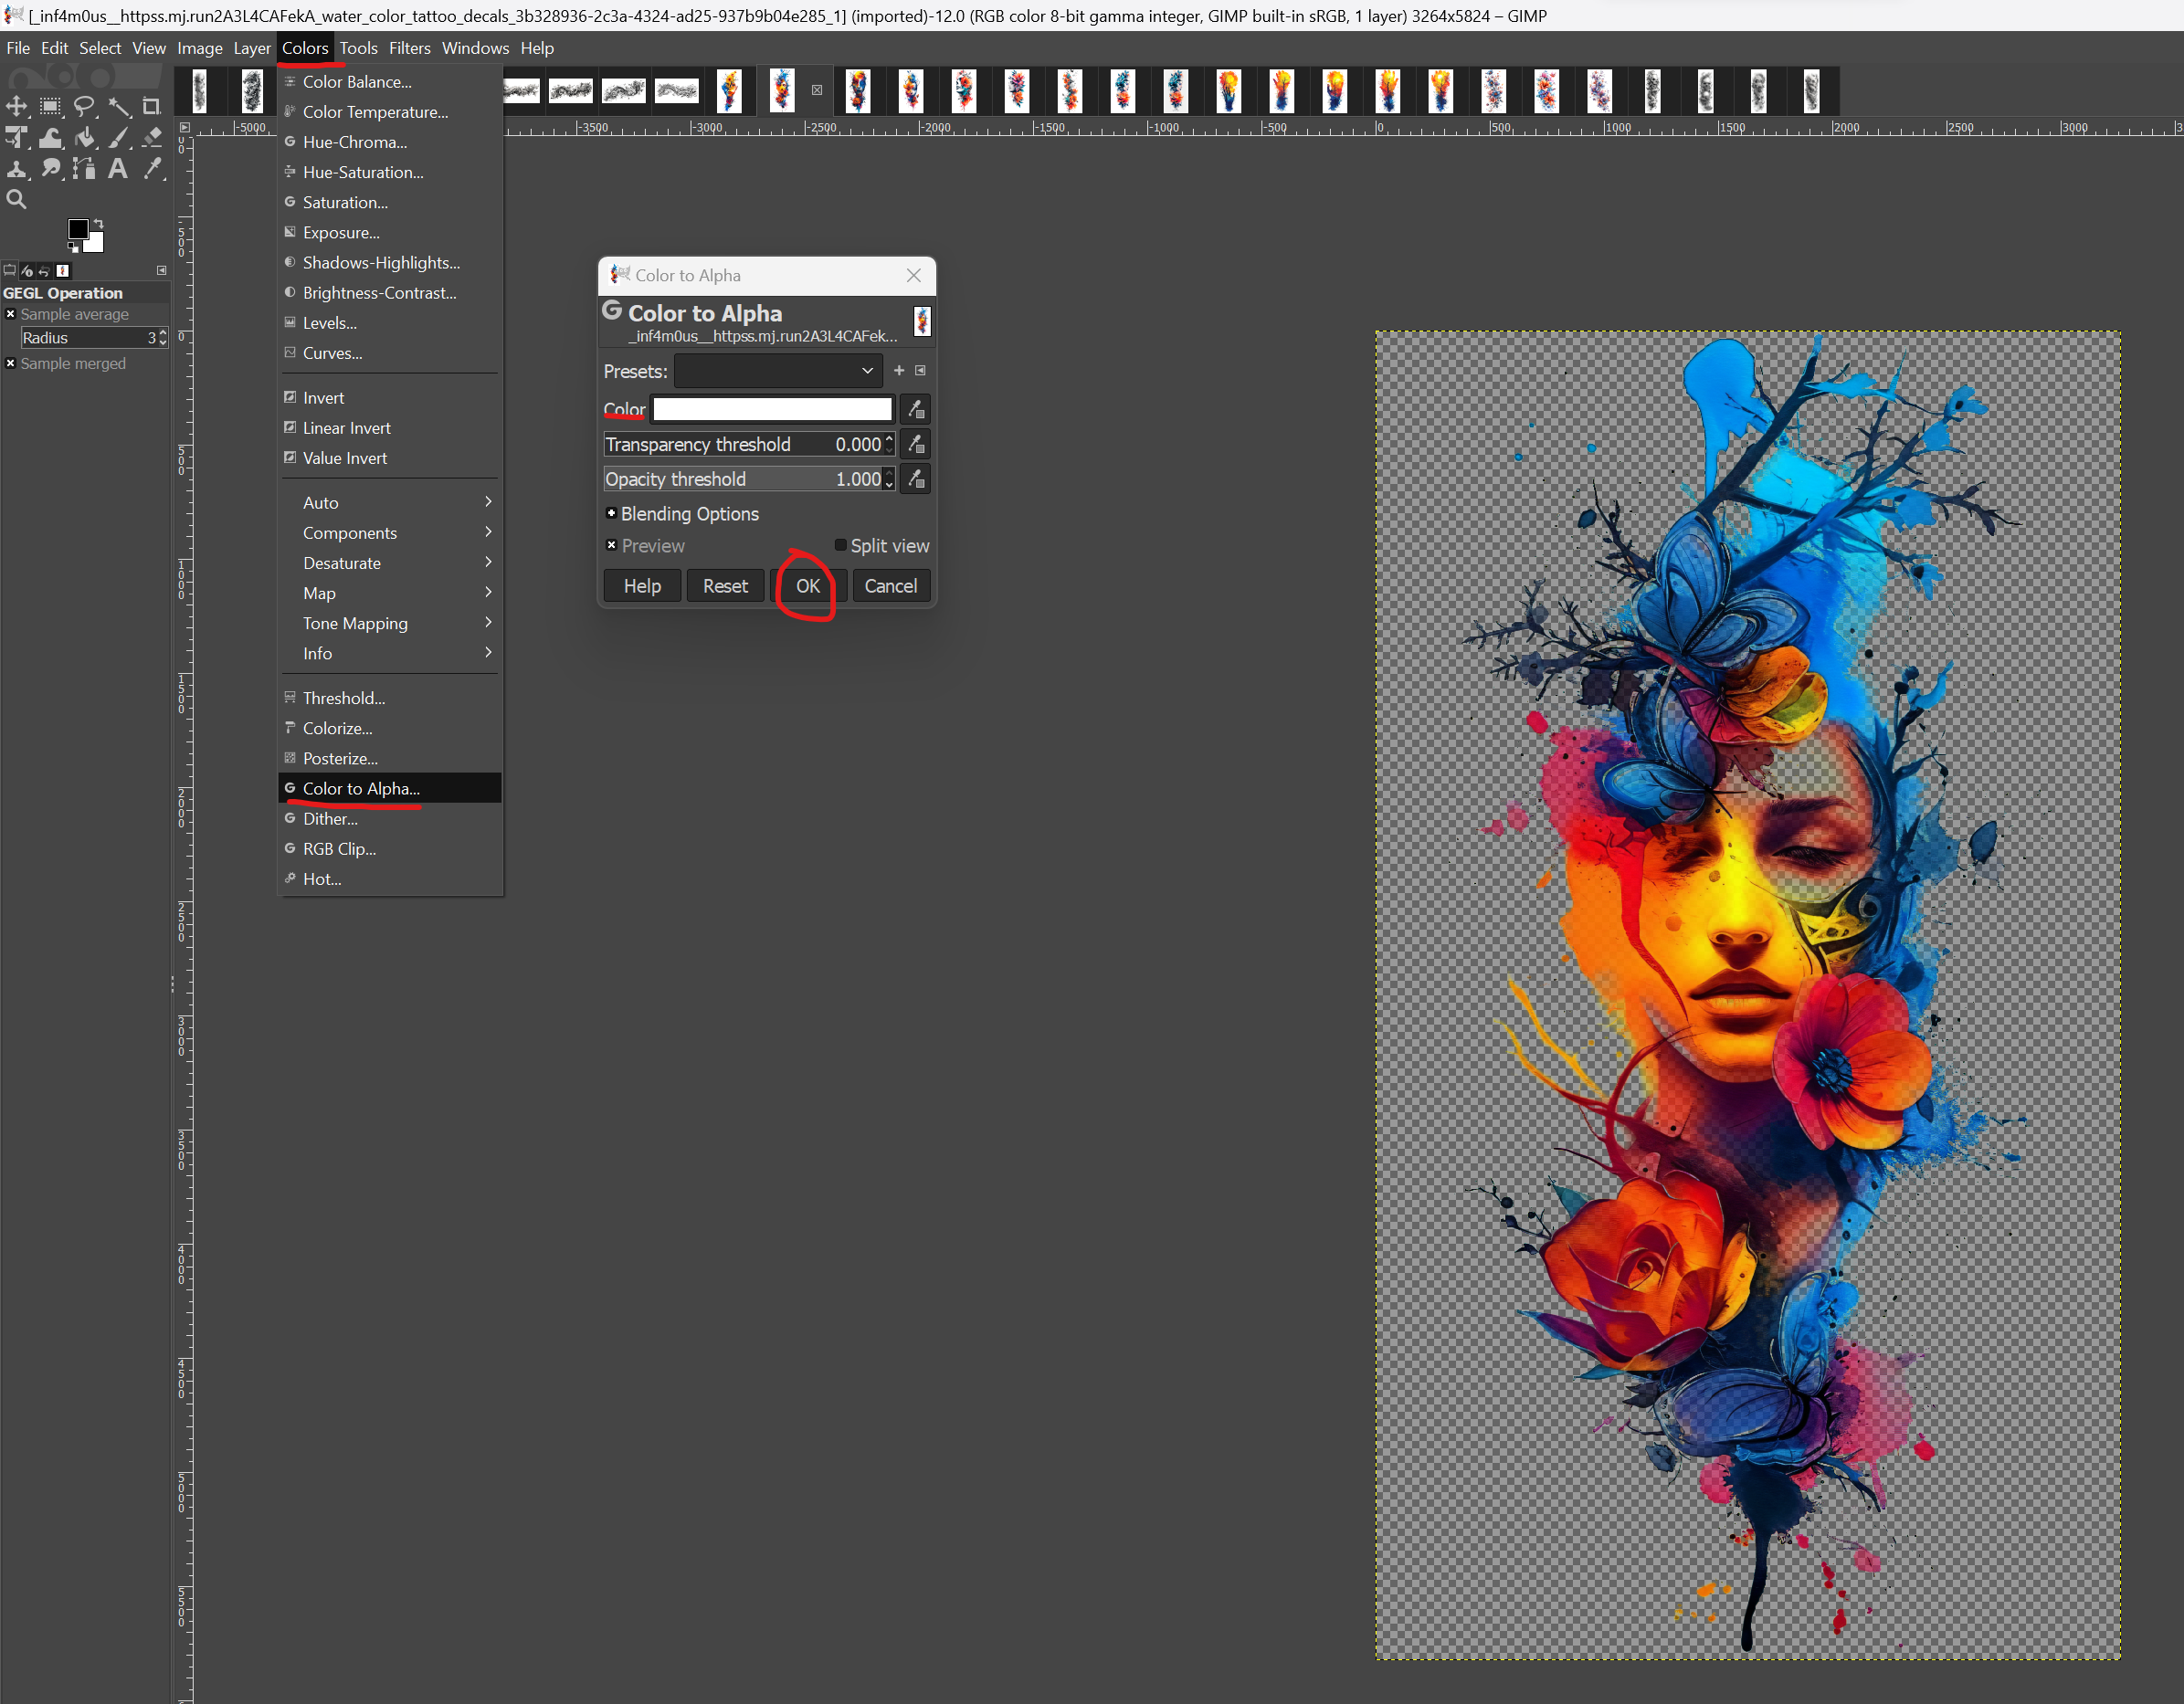
Select Colors -> Colors to Alpha -> Make sure the color is set to White and click on OK.
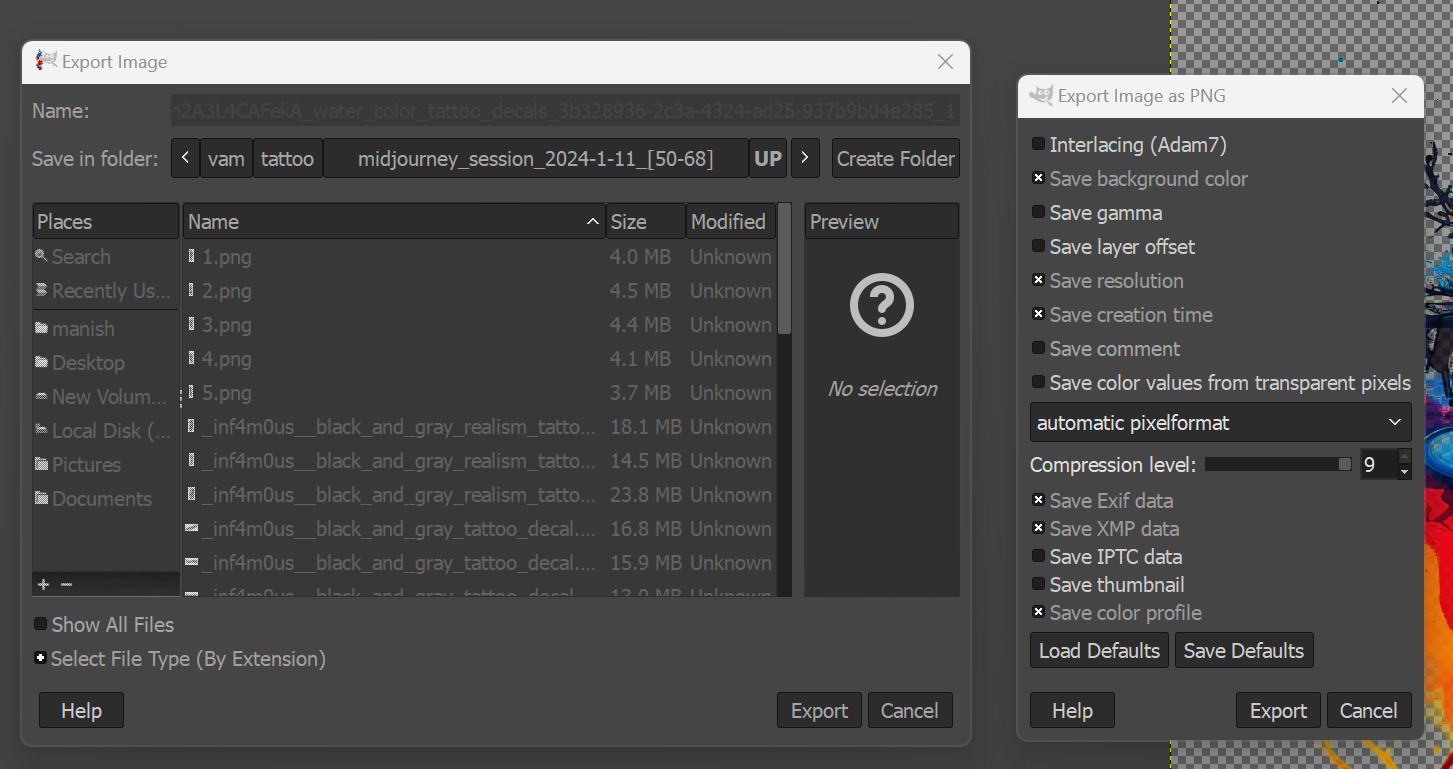
Press Ctrl+Shift+E or File-> Export As to export the image as PNG to a destination folder.
Now we are pretty much read to start the main process.
Composite in Substance Painter 3D
Disclaimer - I am a noob at substance painter. I only know what i need to know
Download the .spp model file from here
 hub.virtamate.com
Extract the file and load up the .spp file into substance painter(At this point i am assuming that you have some rudimentary knowledge in SP 3D like me or you are an expert!!)
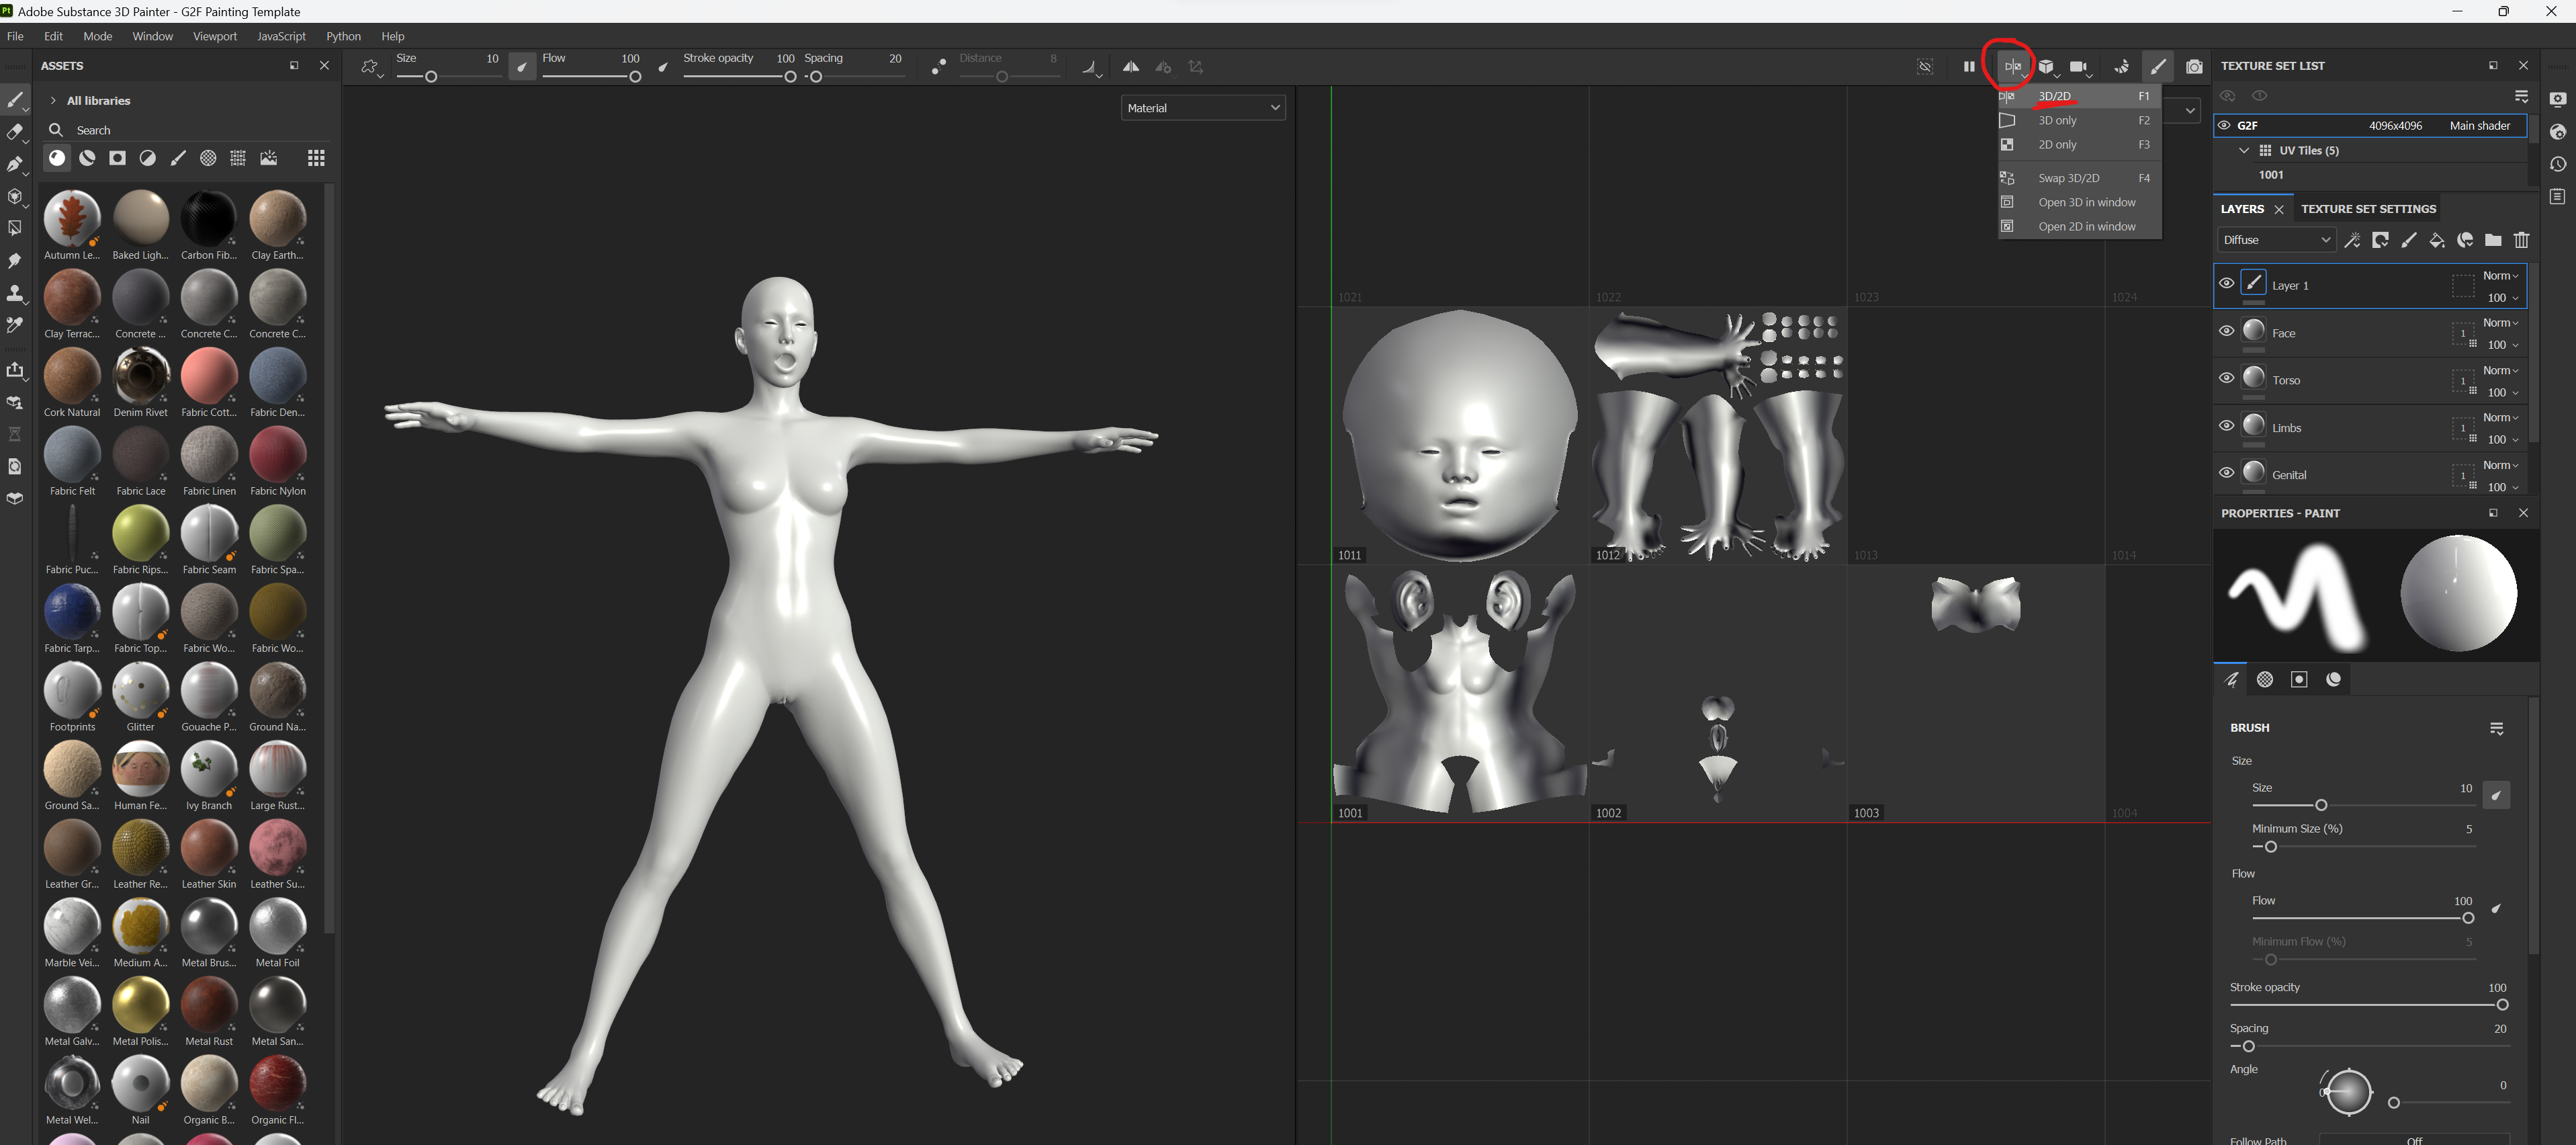
- Make sure the view port is set to 2D/3D view port as we will be mapping textures to the 2D view port.
- Take VaM default skin texture(custom/atom/person/texture/female or any of your fav skin texture from any of our awesome VaM creators) And import them as textures to the current session in SP.
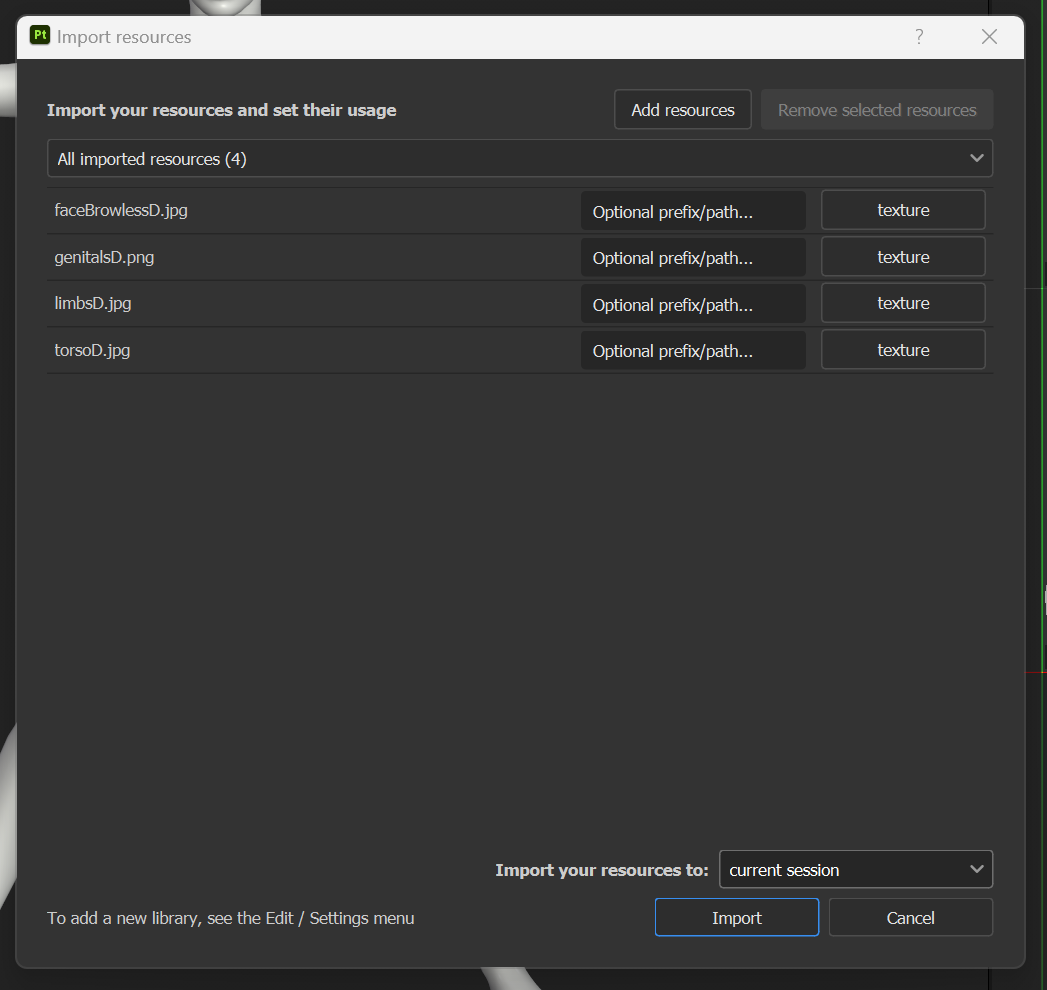
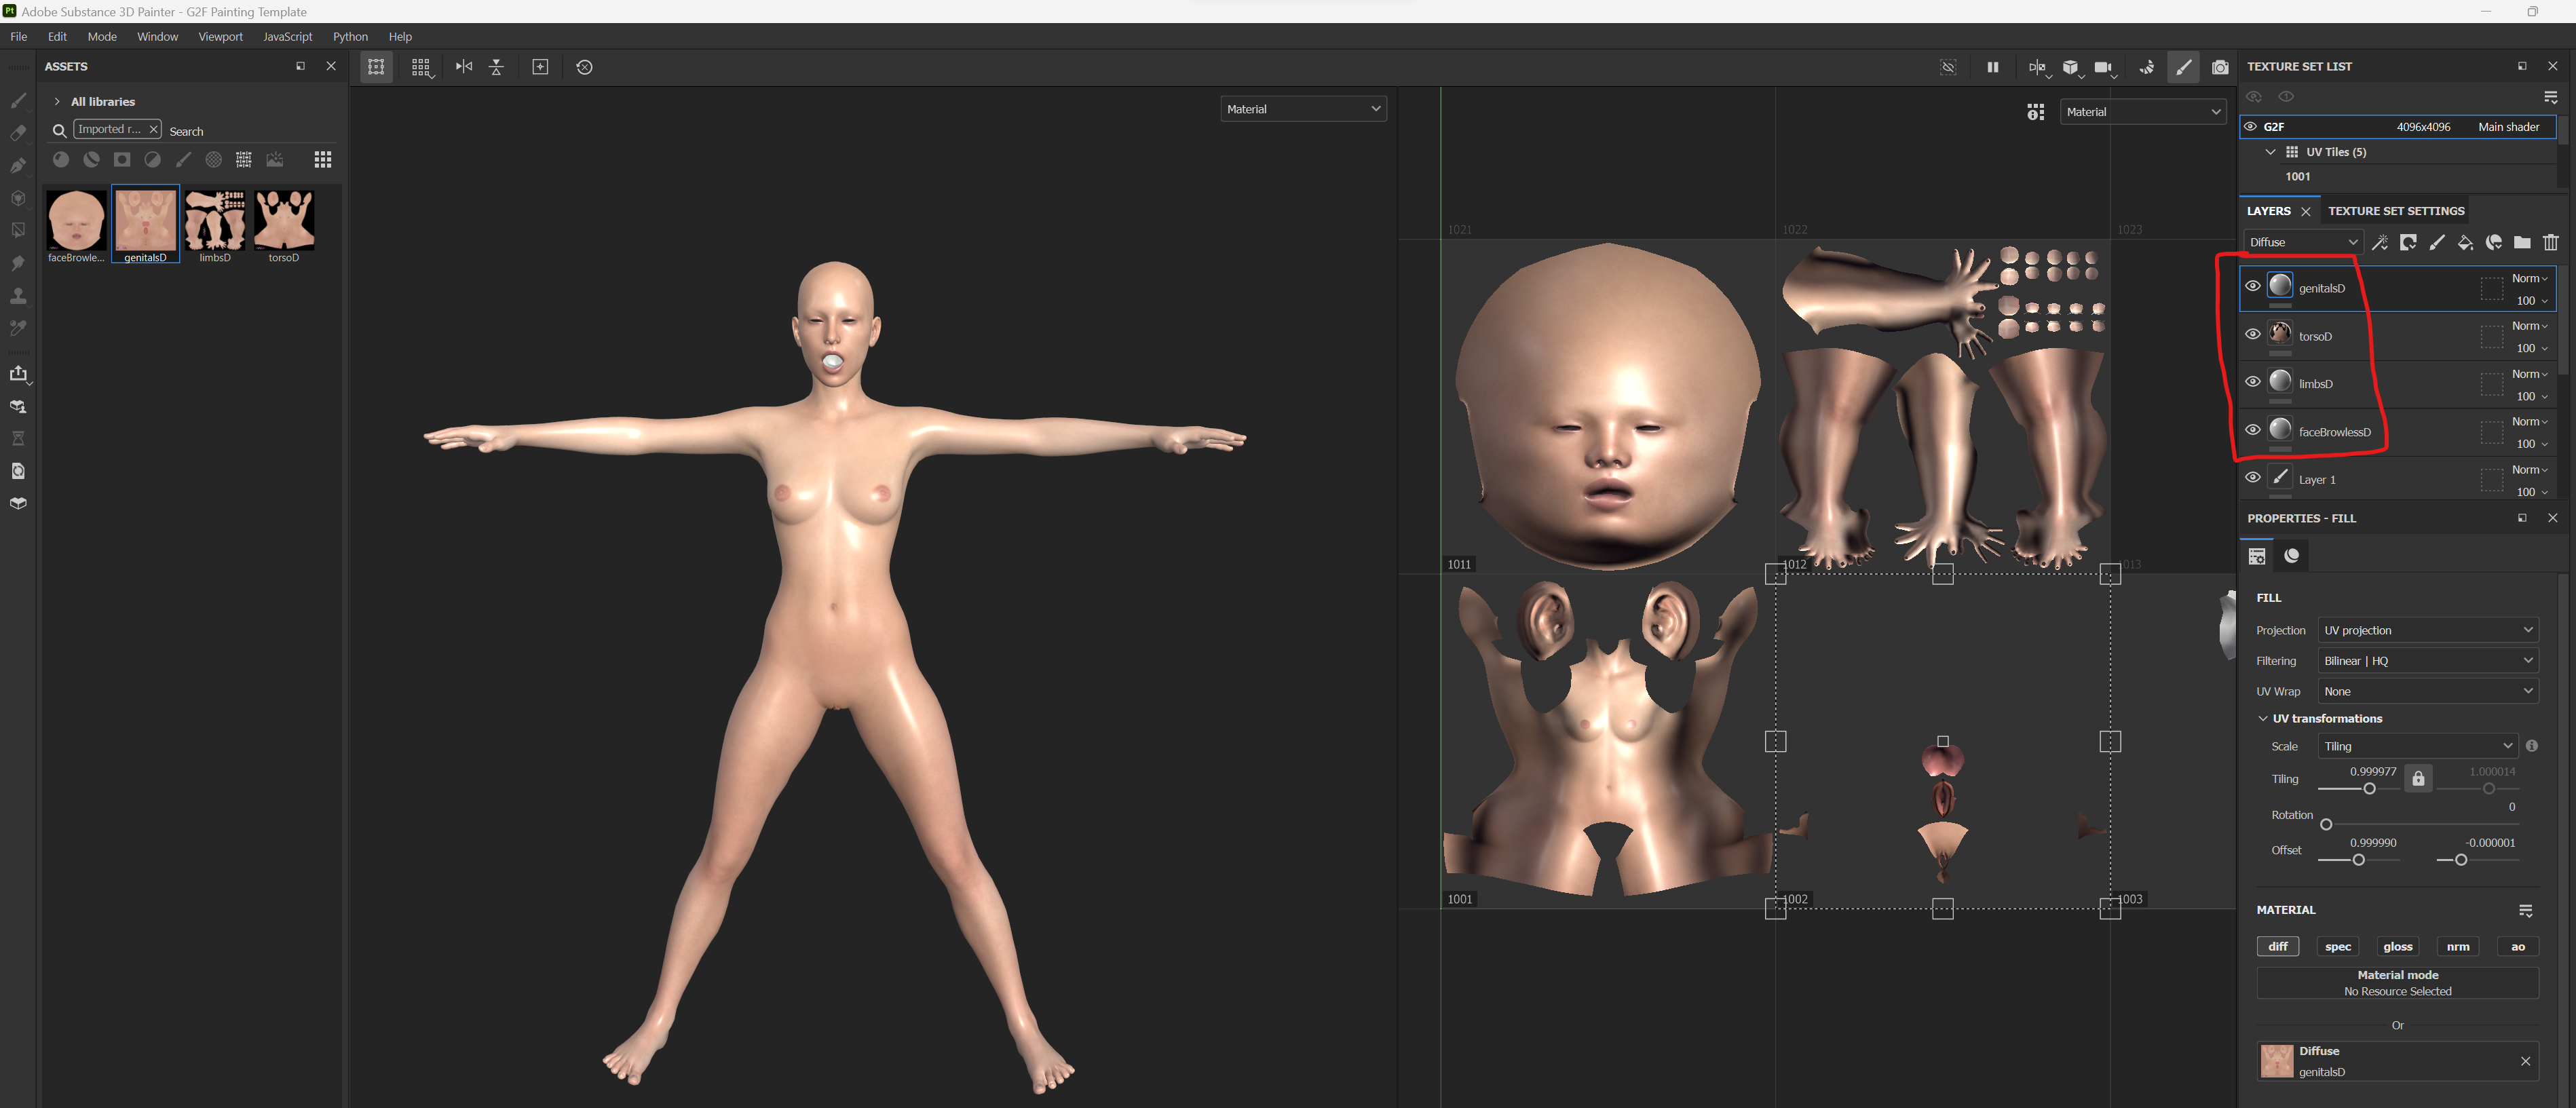
- Drag the corresponding texures from the Assets tab from the left to the 2D view port on the right to the corresponding part.(Head texture to UV tile, torso to torso and so on.. and put them as Diffuse.
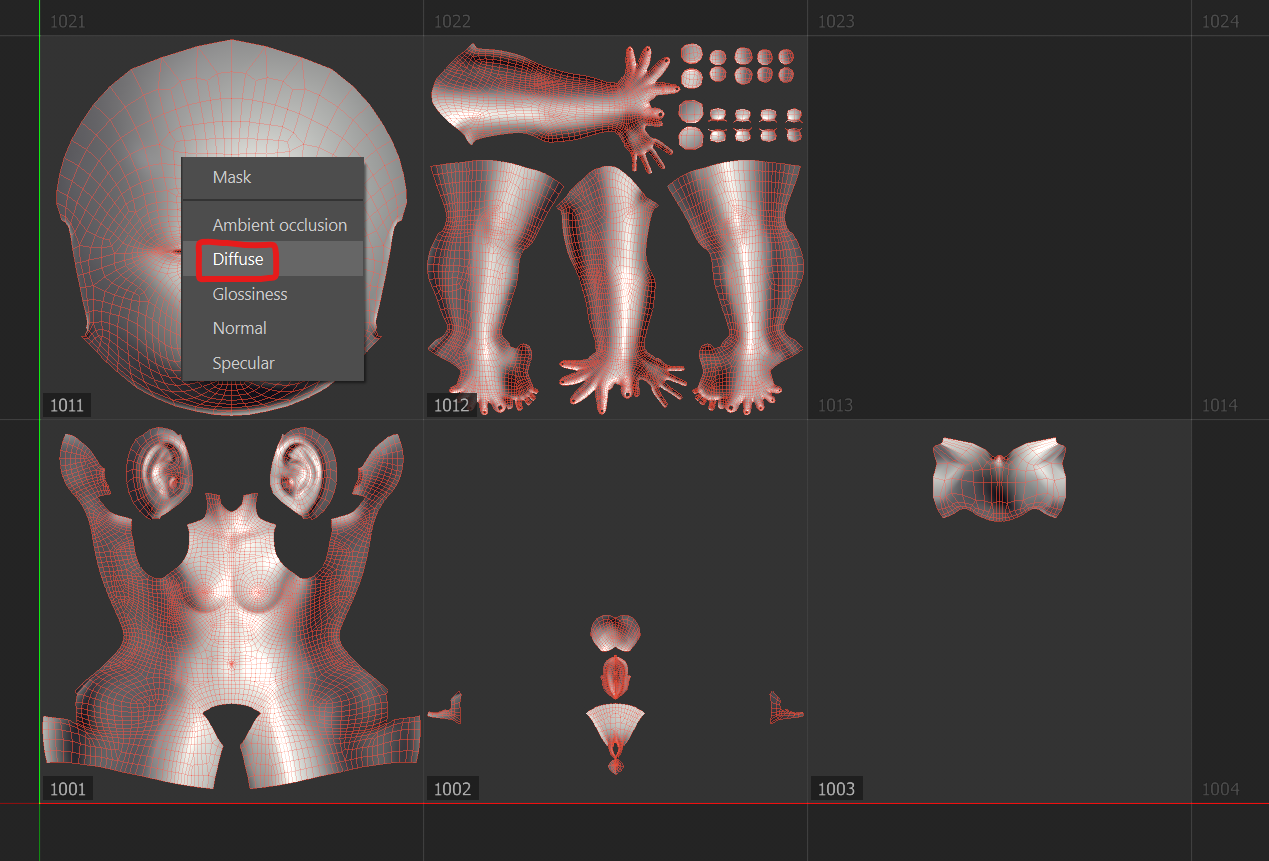
- Once thats done, stretch the textures to fill up the corresponding UV tile as precisely as you can. It should look something like this.
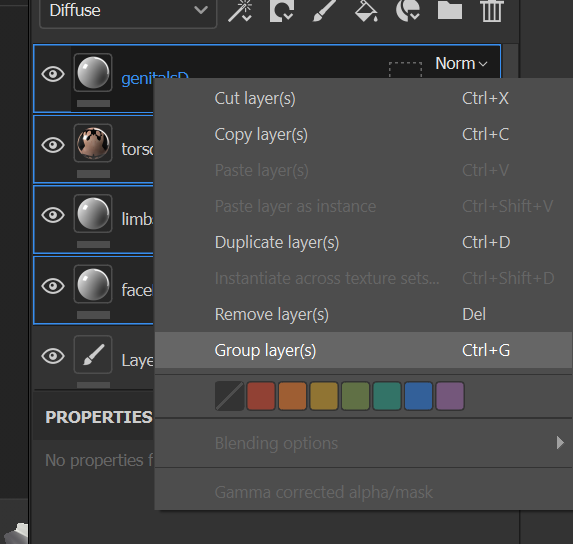
- At this point group the 4 texture layers into one group.
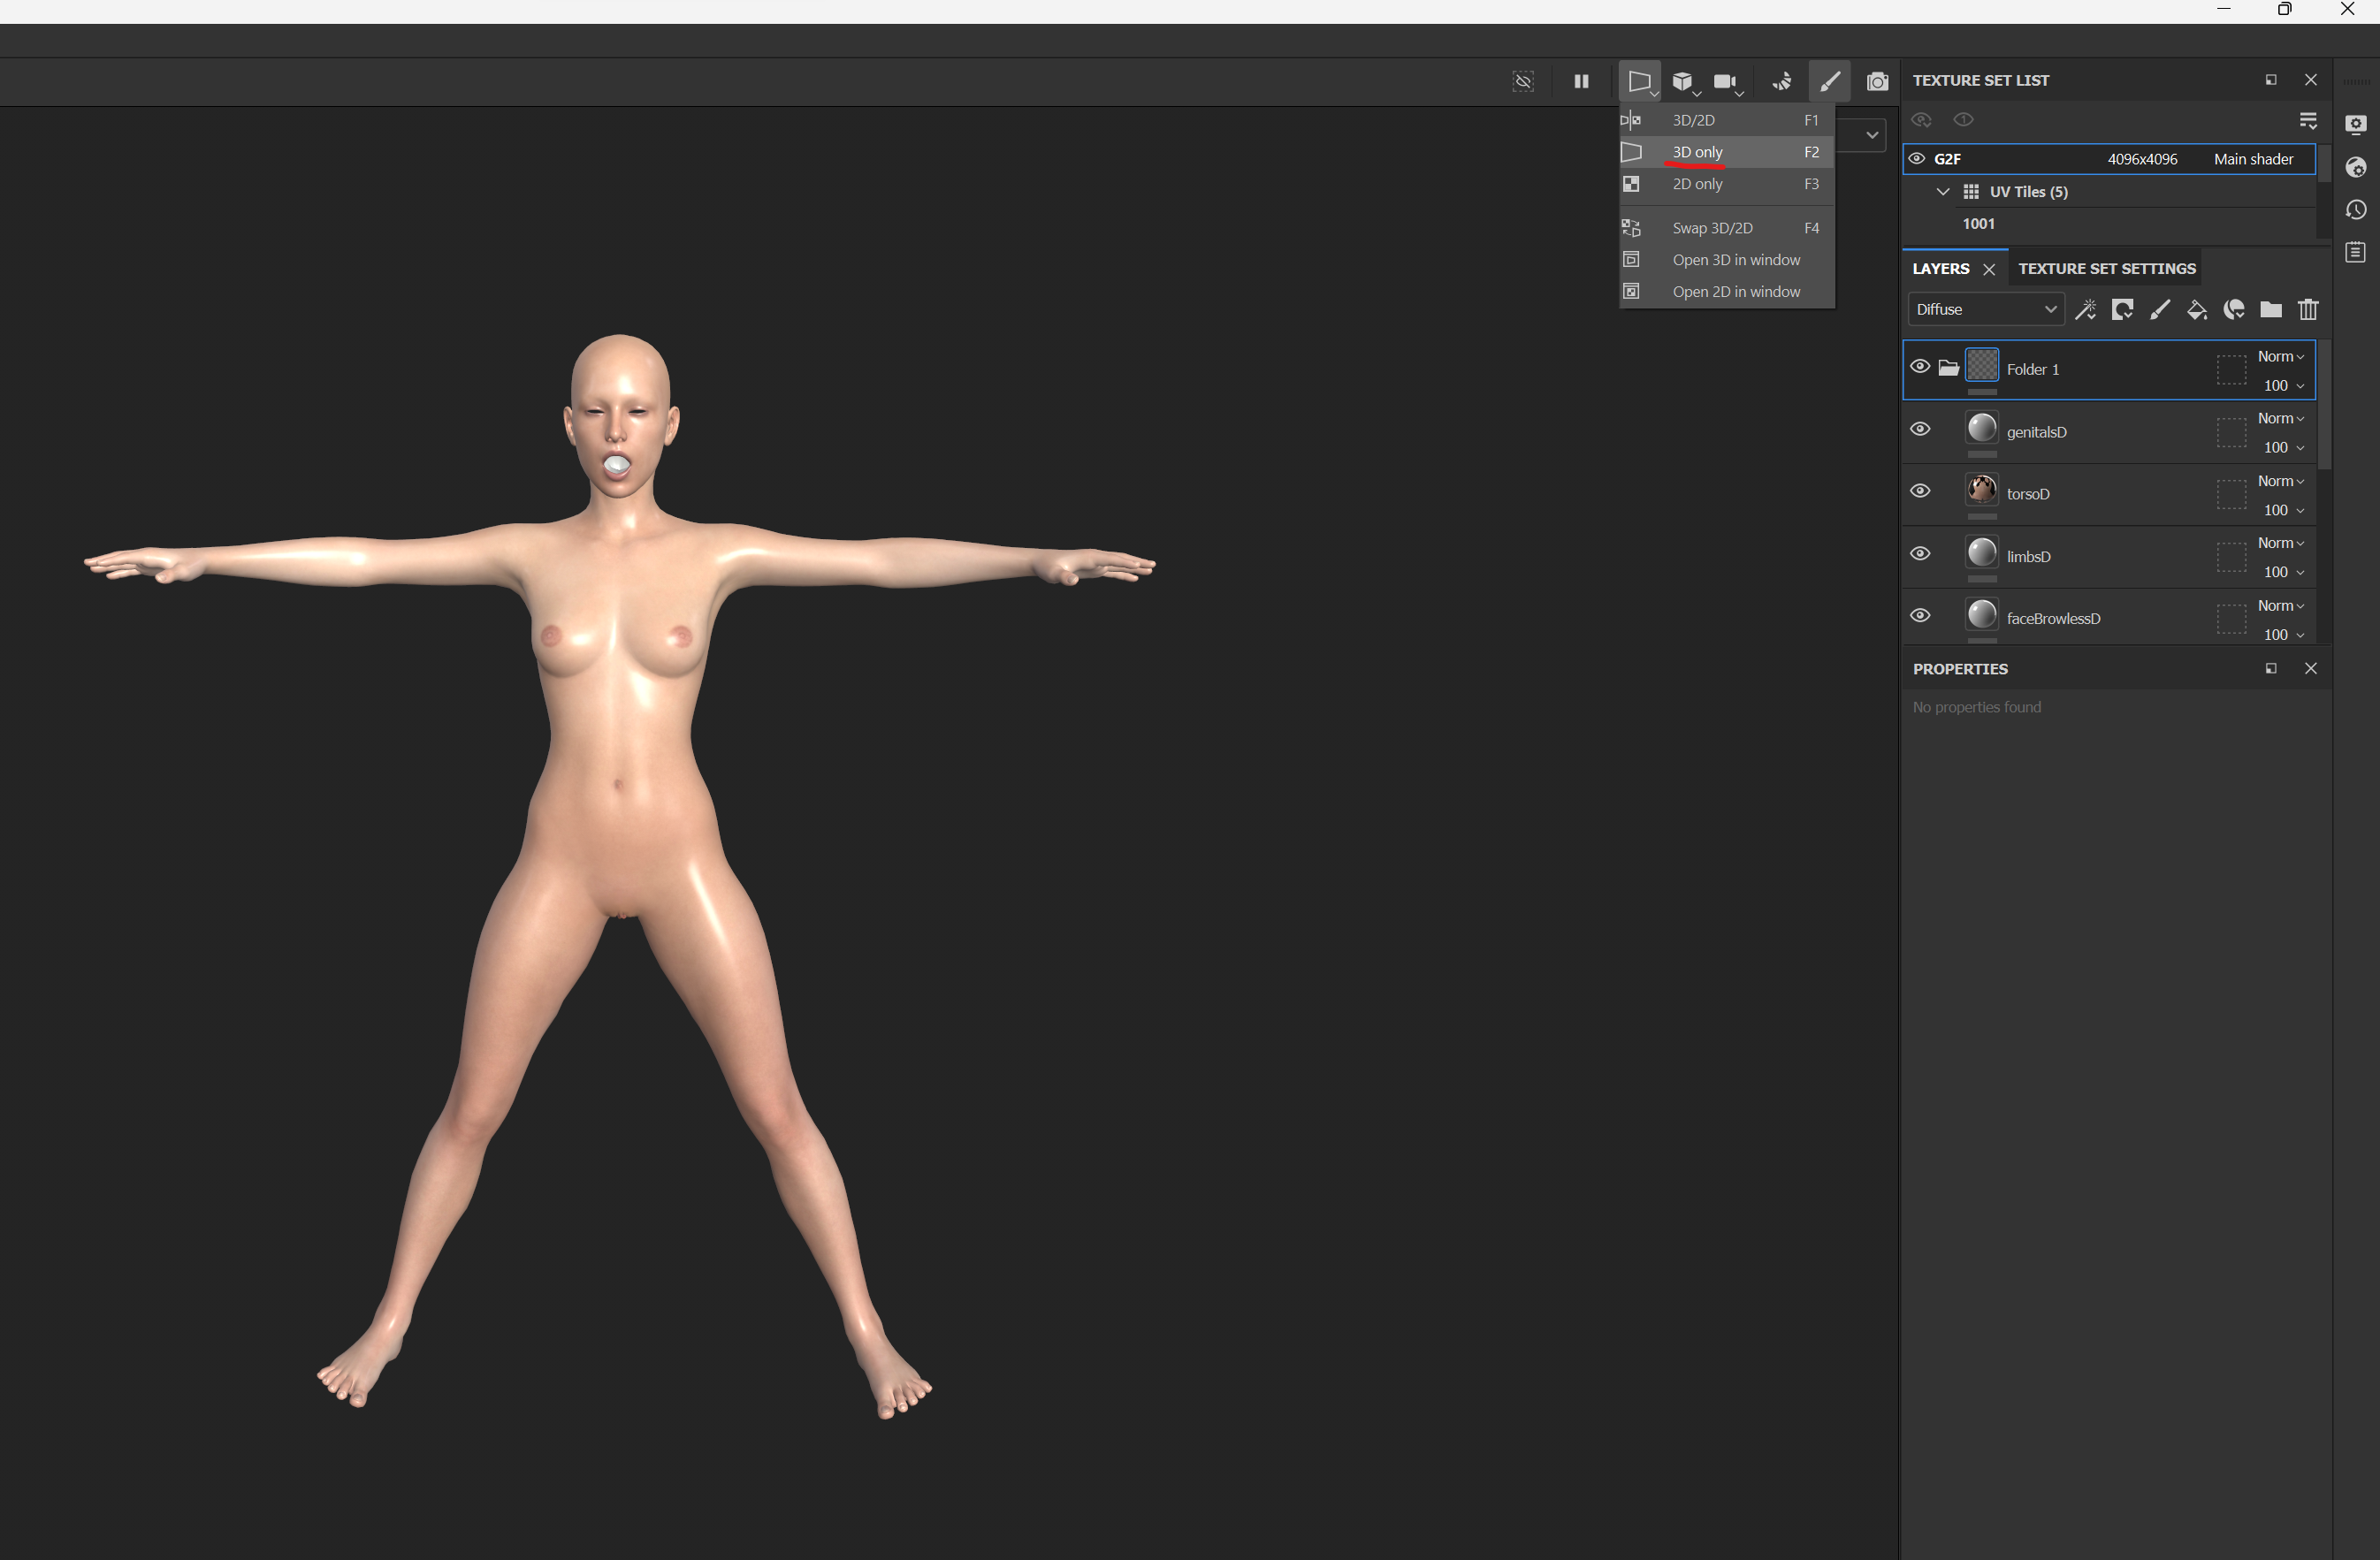
- At this point we have no use of the 2D view port and you can change the viewport to 3D exclusively.
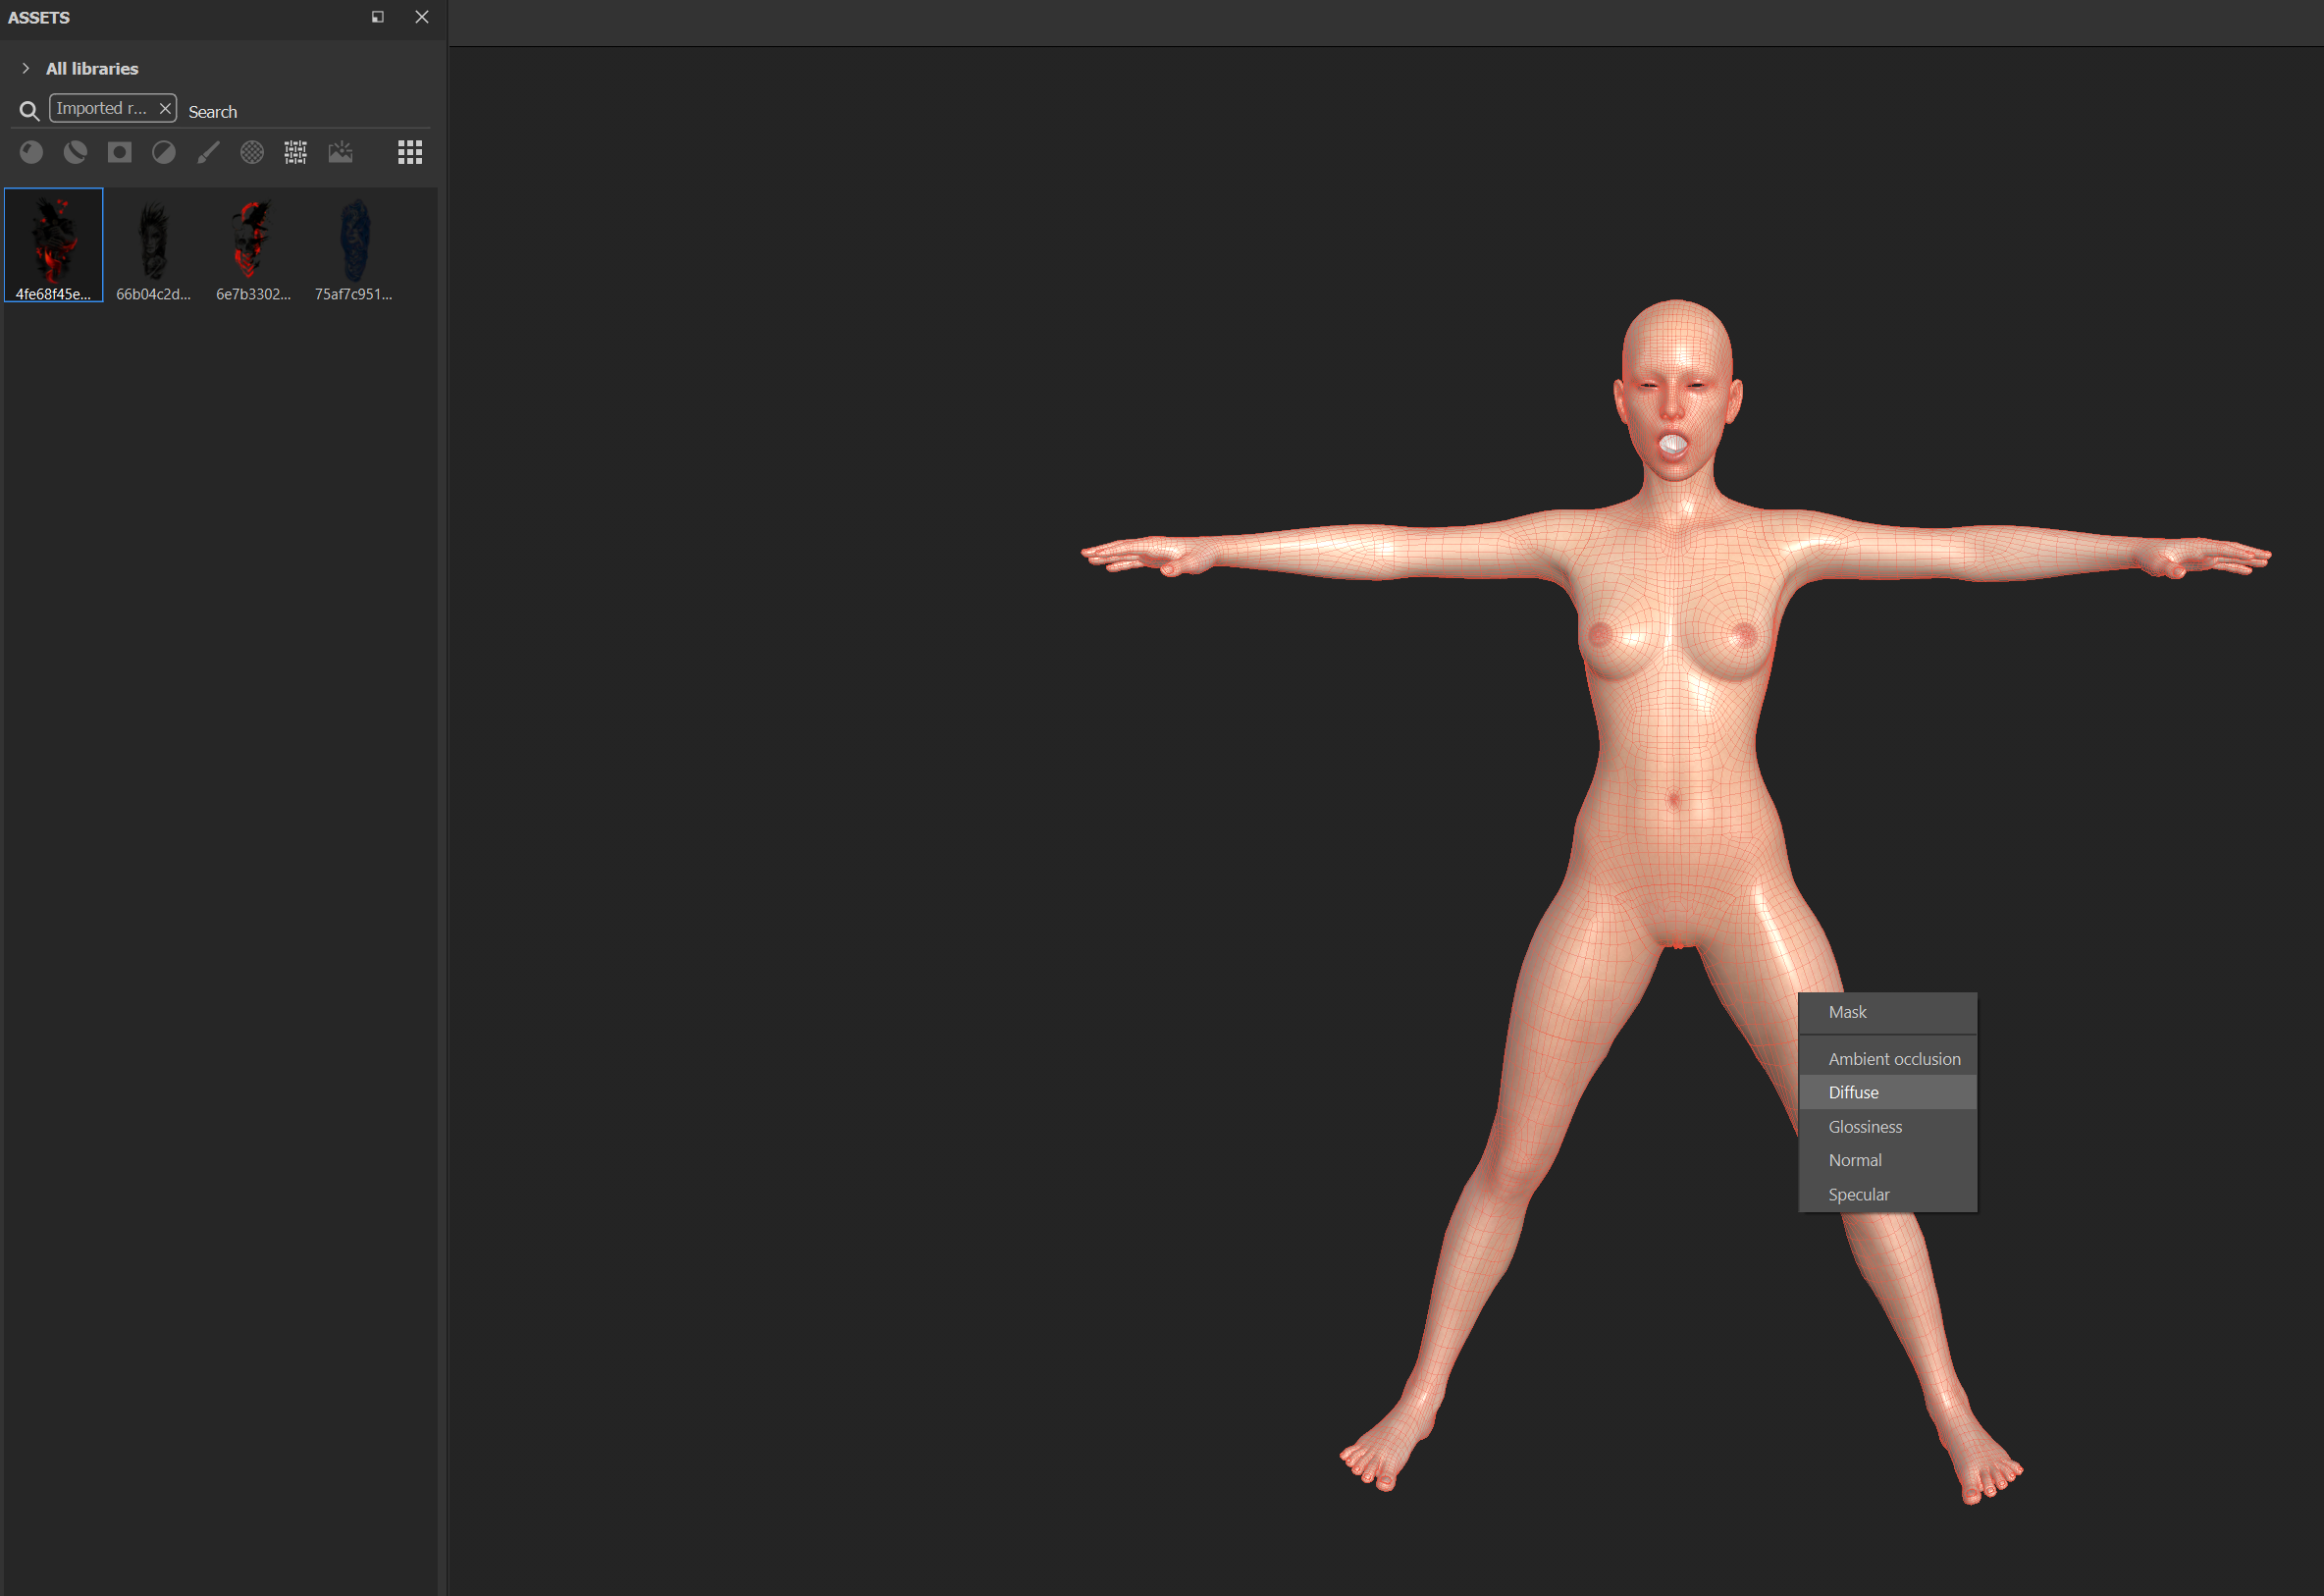
- Now the fun part. Import the tattoos to the current session like you have imported the skin texture. Drag the desired tattoo onto the model and map it as a diffuse layer.
- Scale(W), Scale(R) and Rotate(E) the tattoo as desired and place it where you want.
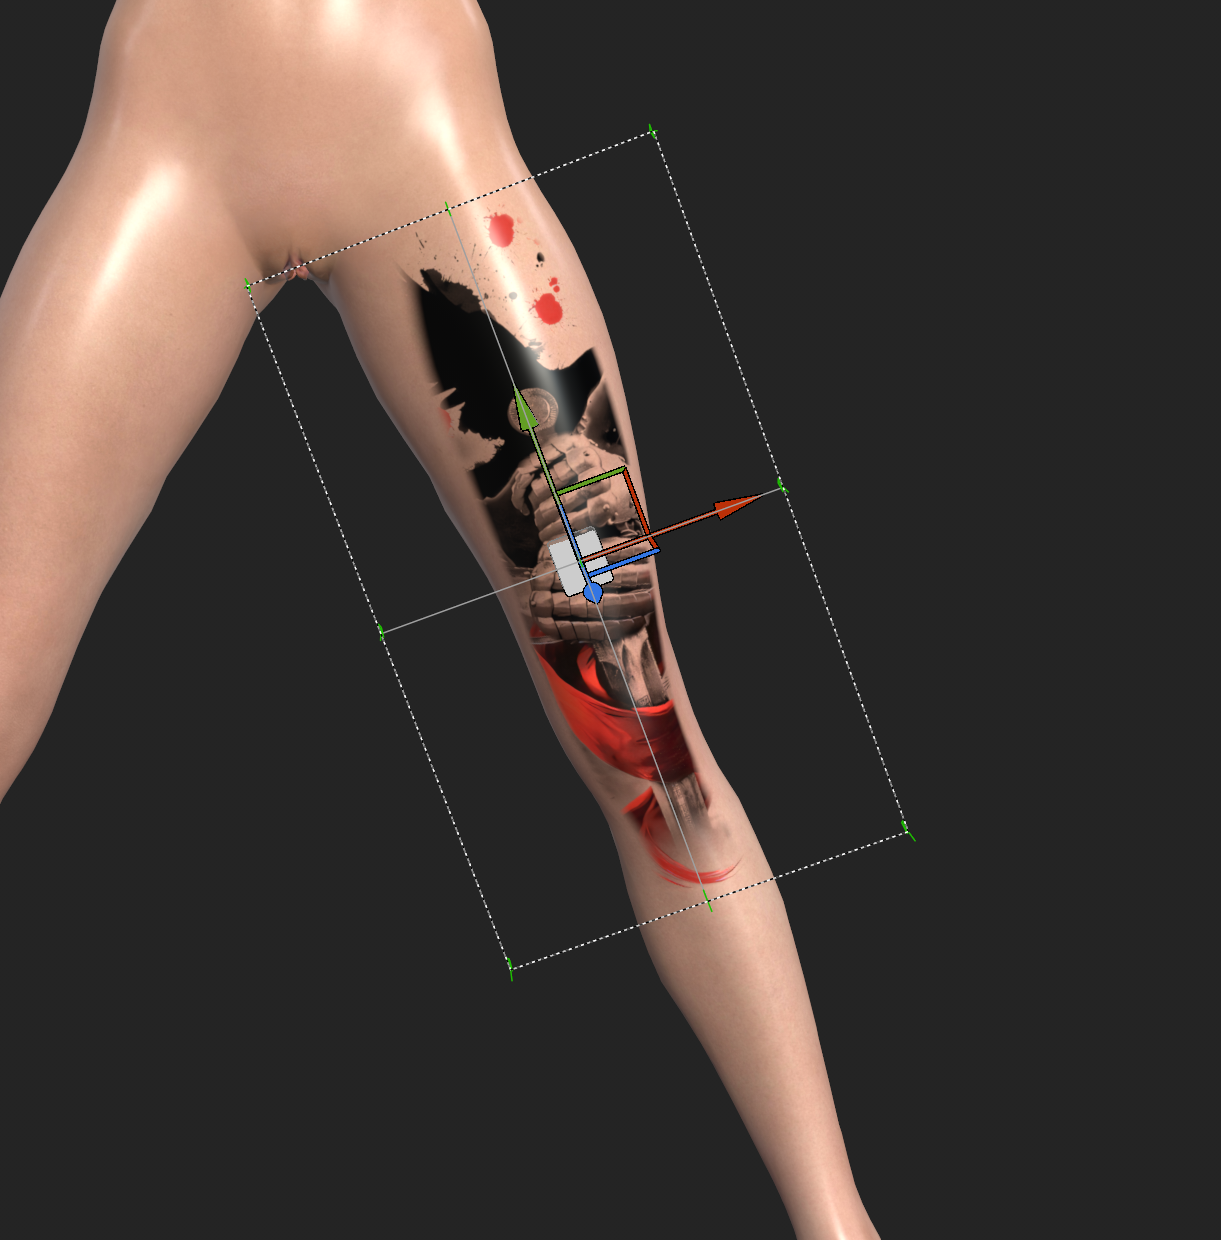
- When we add texture this way it creates a fill layer in substance painter. Set the fill layer property to this.
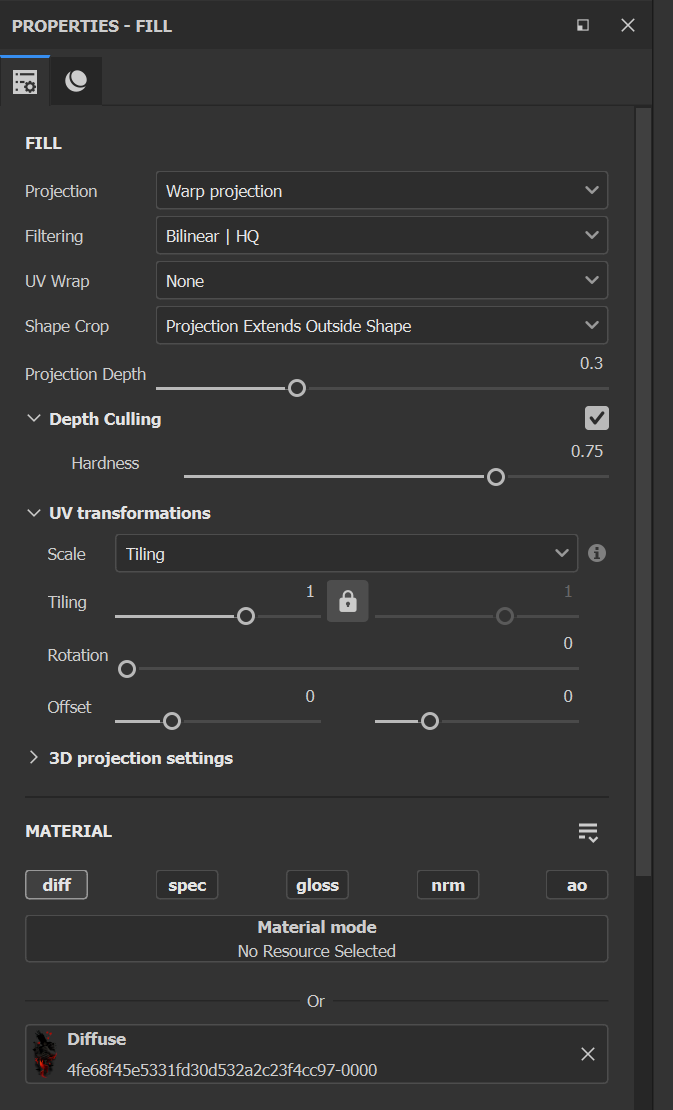
Project - Set to Warp Projection (Really Important)
Filtering - Bilinear | HQ
Project Depth - Play around with it but higher values gives bad results i keep it less that 0.5 always.
- We will work with Warp Projection and "Edit Vertices" a lot to wrap the texture smoothly around the contours of the body. Once the texture is placed properly click on "Edit Warp as a Whole" and select "Edit Vertices".
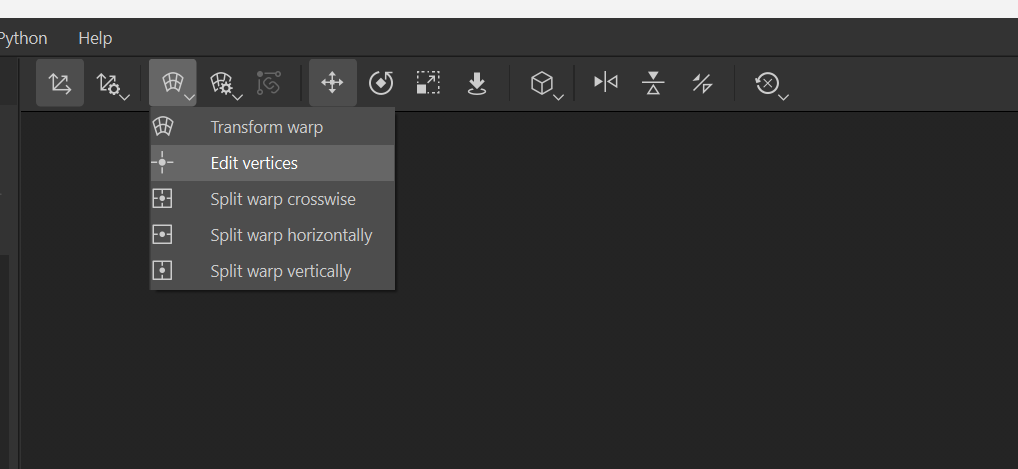
This will allow us to manupulate individual verticies of the fill layer.
This is where it becomes tricky to to specify what to do. Because it becomes very specific to your art style and texture and model. But i will try to explain as best as i can.
- From here you will try to warp the verticies using move and rotate tools(Do not use scale at all or else you will notice tear in the texture) to hug the contours as best as possible.
I start with the top and bottom three vertices and push them towards the body so that they barely touch the skin.
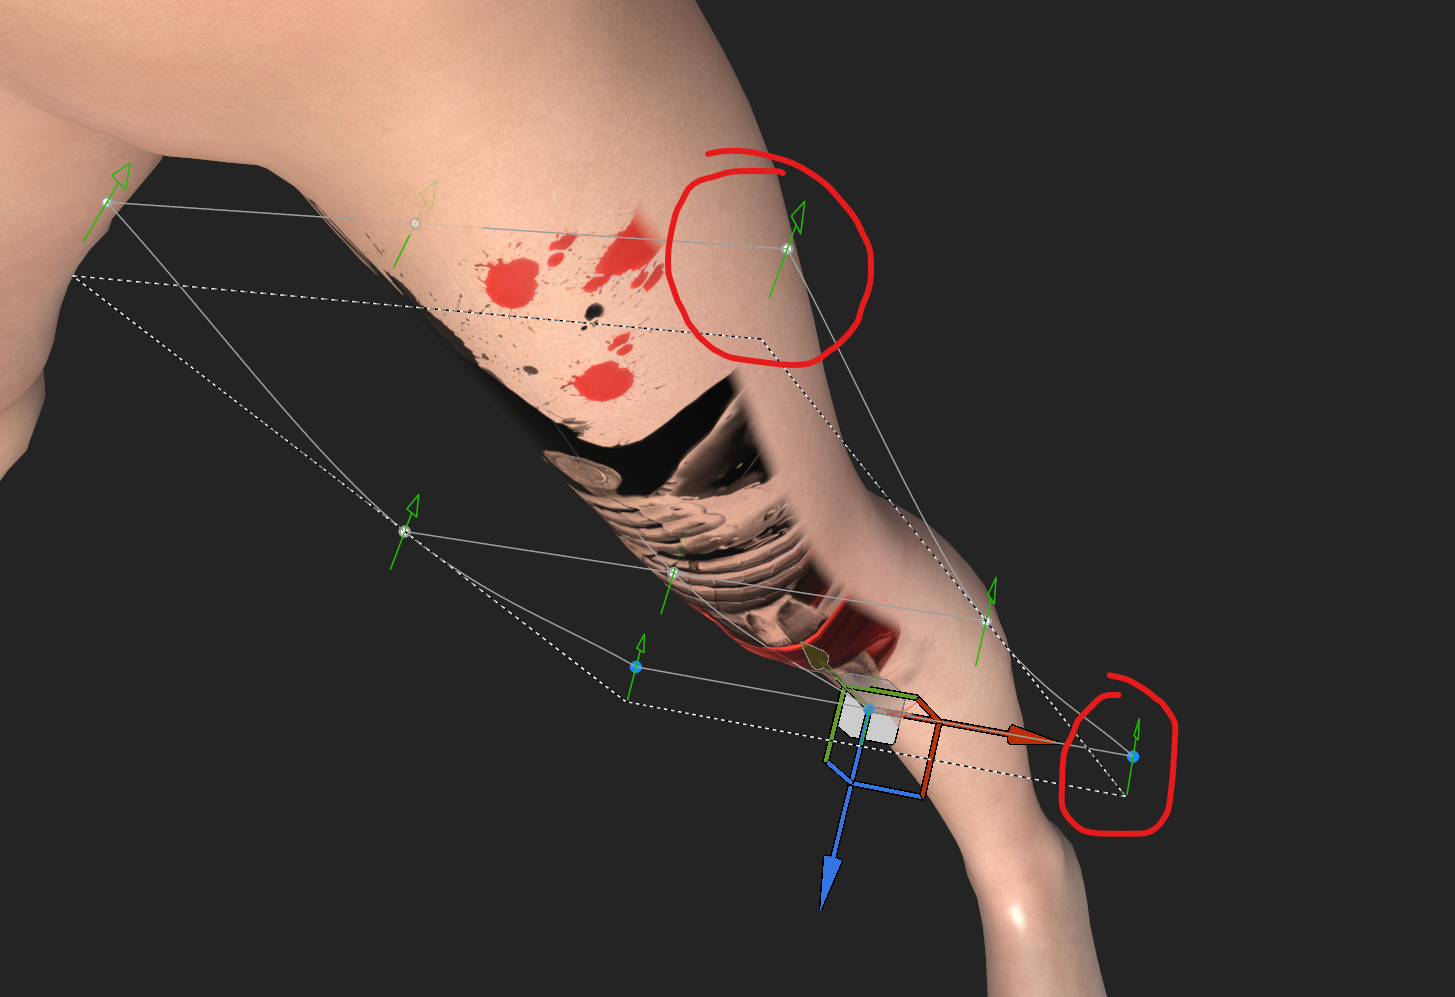
- The use rotate tool to rotate the texture to match the curvature of the body(Dont just work with move tool, use rotate to get really smooth results). Something like this
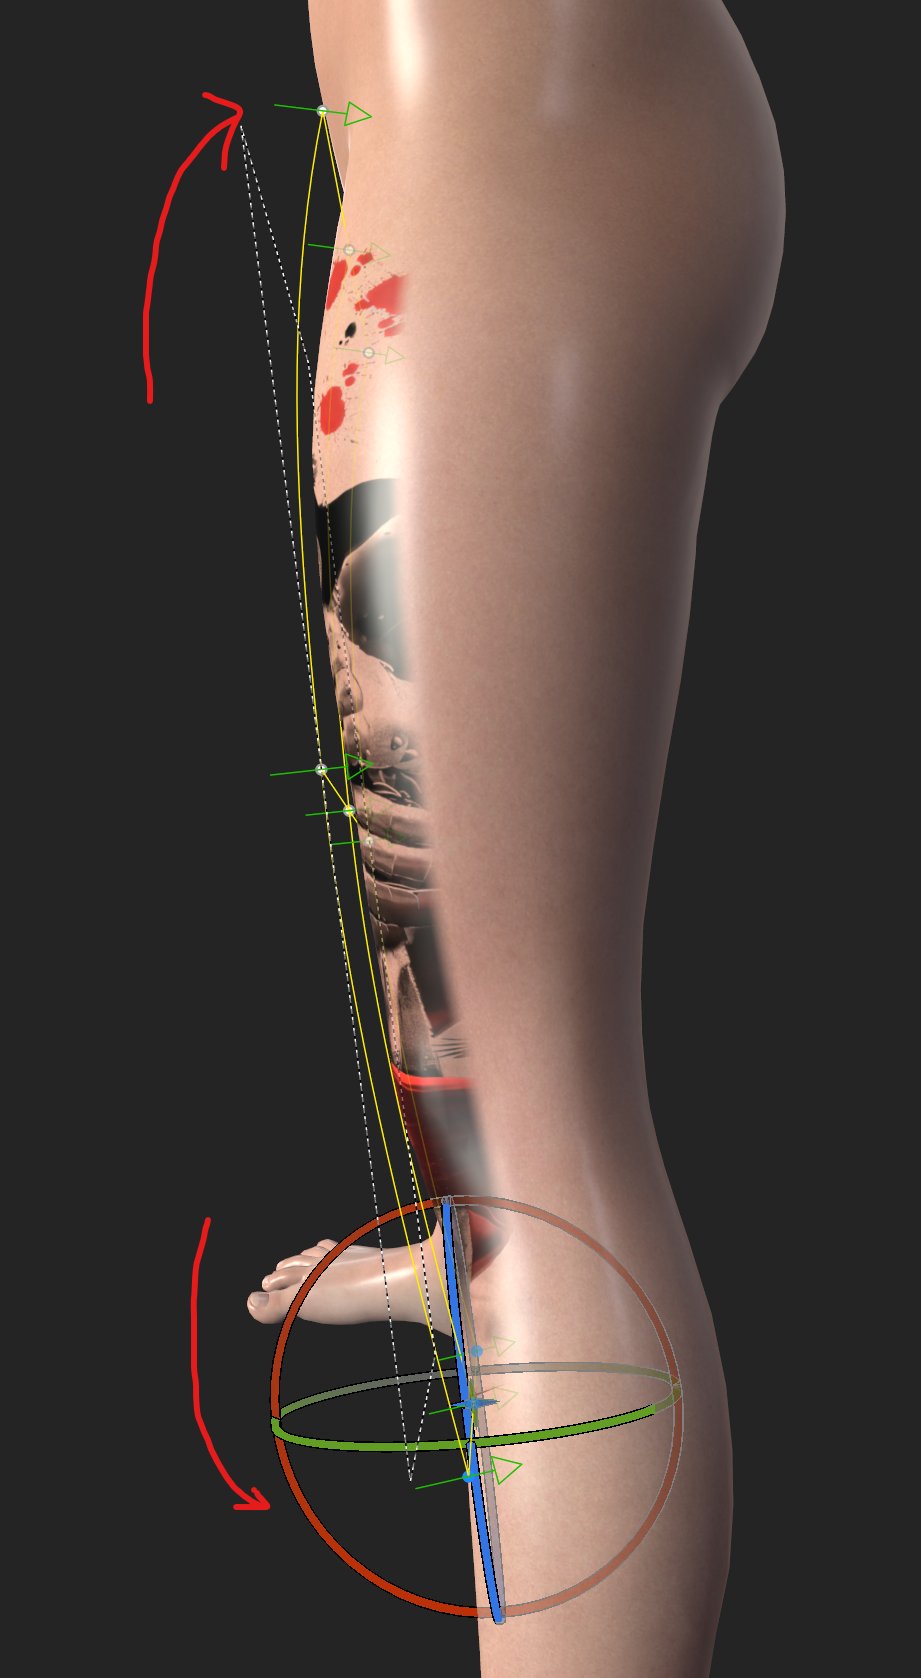
- Once the top and bottom part of the texure is taken care of we will move to the sides(This is the main challenge). Similar to what we did for the top and bottom we will select the side vertices and move and rotate them to best fit the curvature. (Always select all the edge/top verticies together and work on broad adjustments. I would not suggest to work with individual verticies at all, it results in tearing)
Note: - Dont get greedy and enlarge the image way big. It will create a lot of trouble in wraping it properly aroung the model.
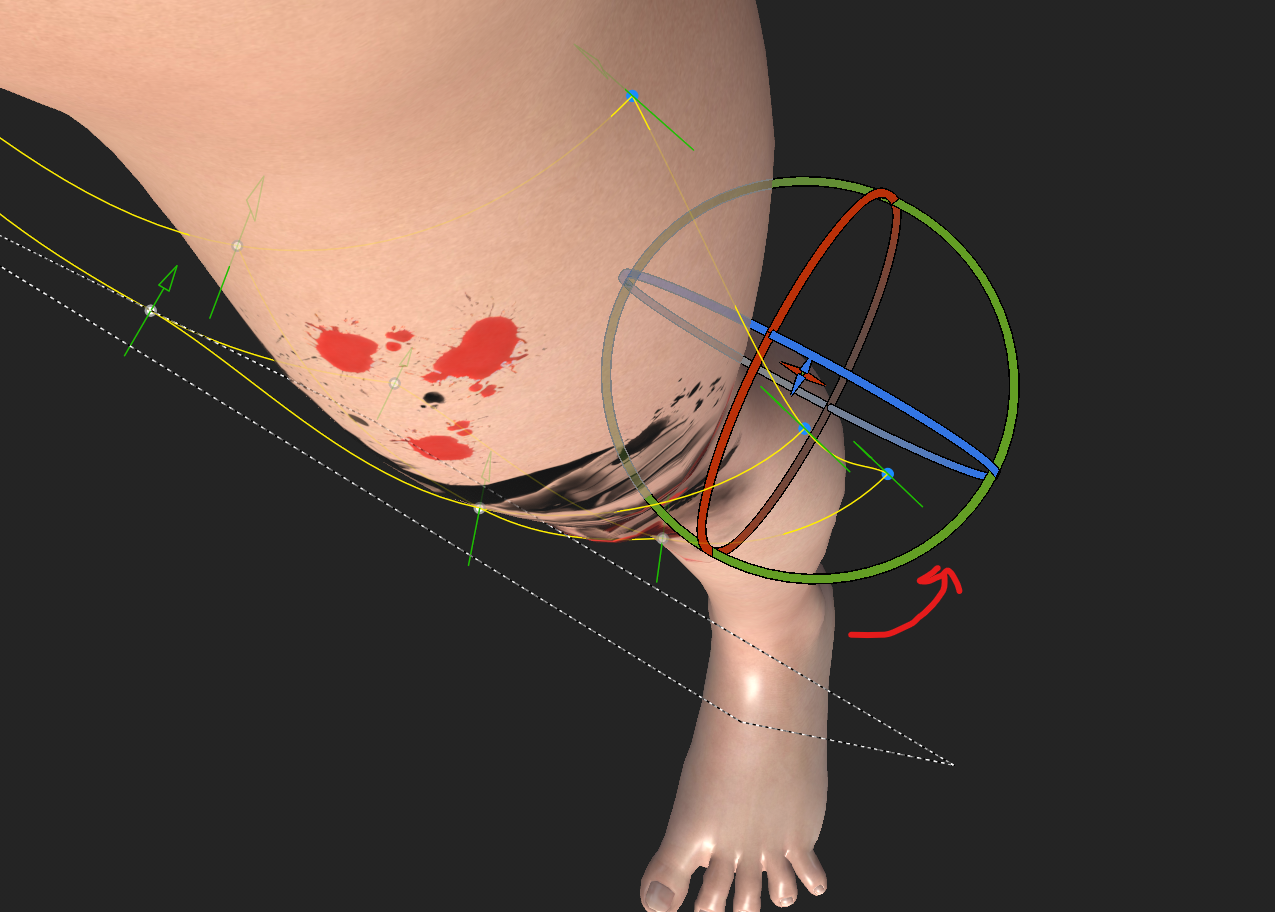
- Work in small progression and try to do this as best as you can. Keep an eye out on the texture tearing. It usually happens when we stretch the texture too much out of proportion.
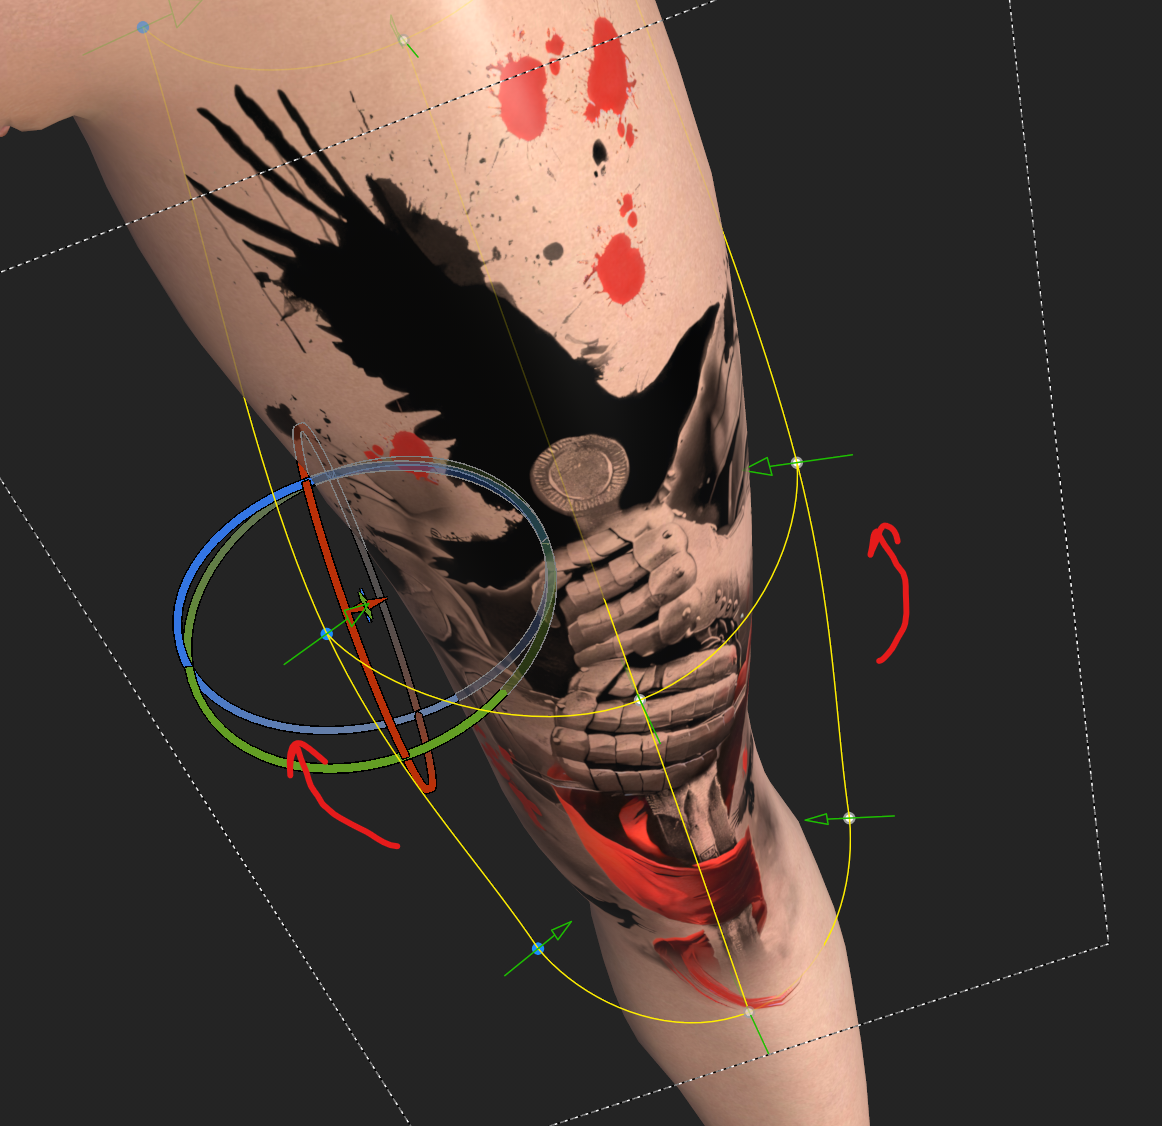
- When the 1st tattoo is places perfectly, You can repeat the same process to place another tattoo in the vecinity of the 1st tattoo. We will do a lot of intelligent masking to merge both the tattoo together so they seem seamless.
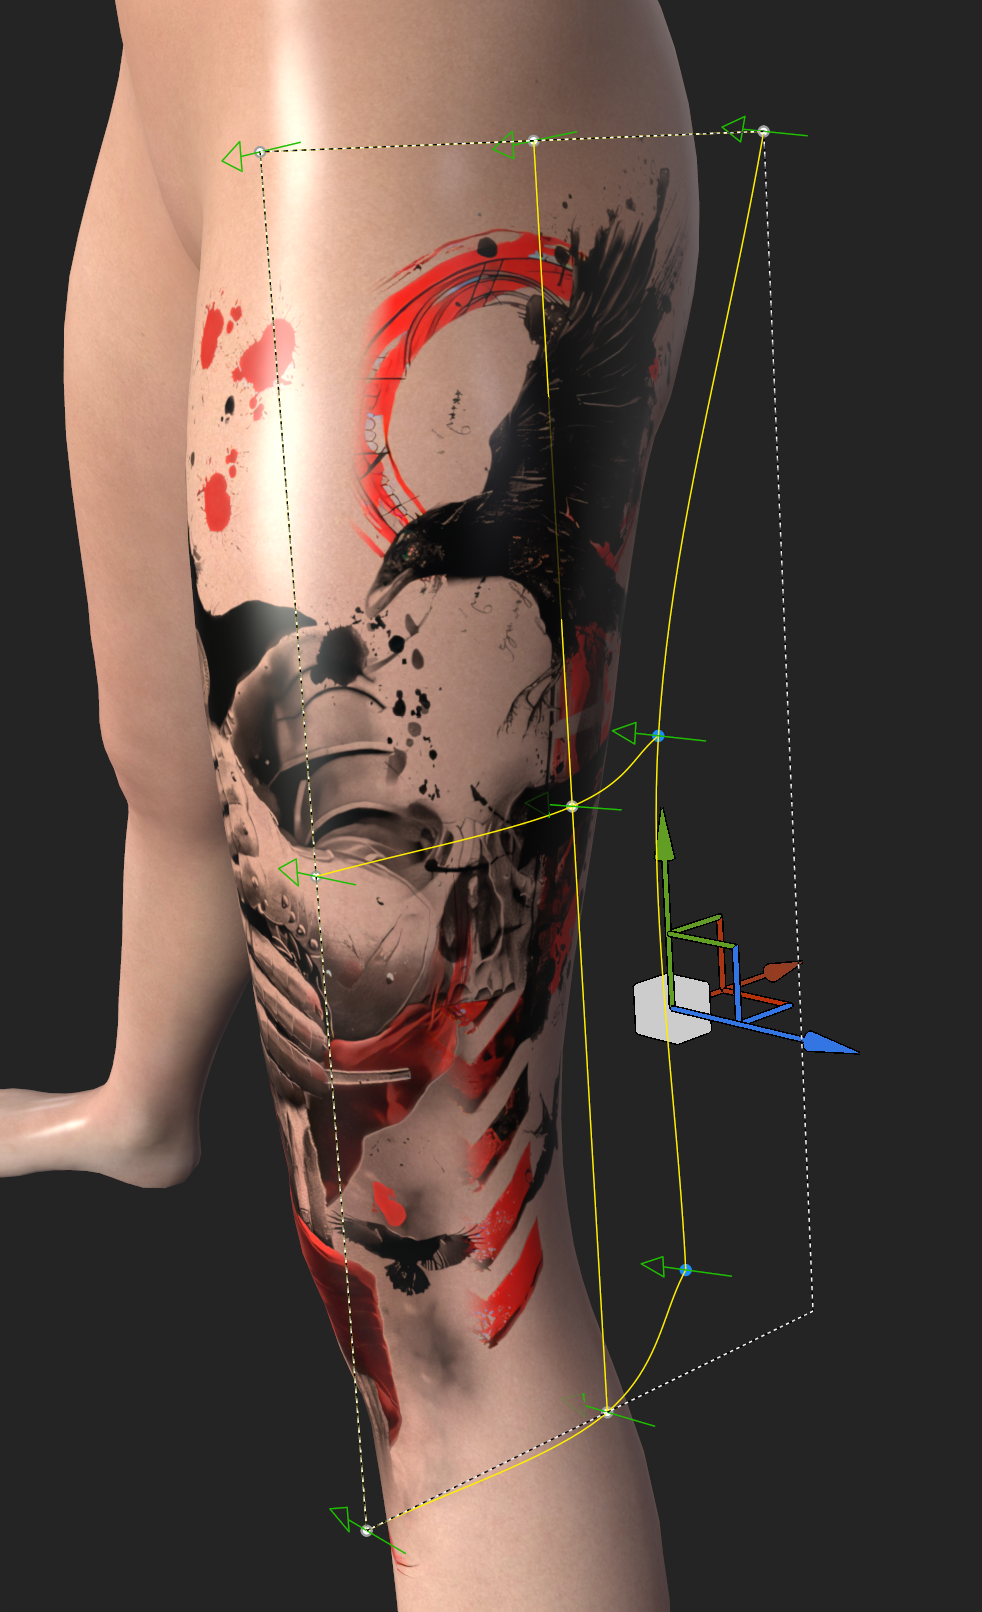
- Repeat the same move and rotate verticies that we have done with the 1st texture and wrap it around the curvature.
- Add white masks to both the tattoo fill layers
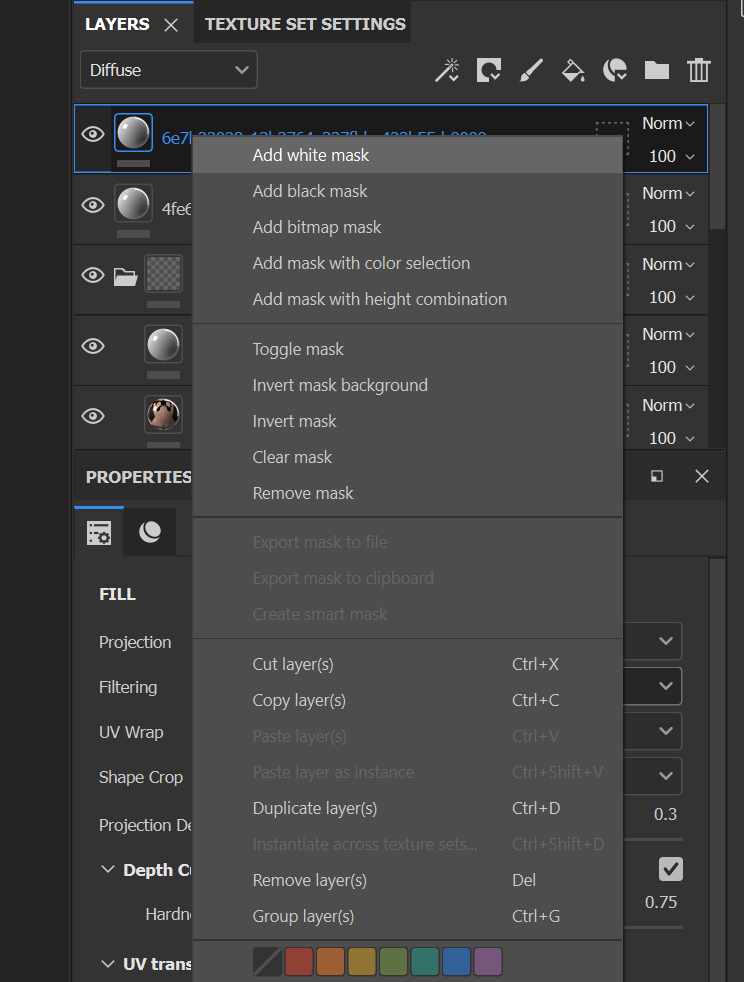
It should look something like this.
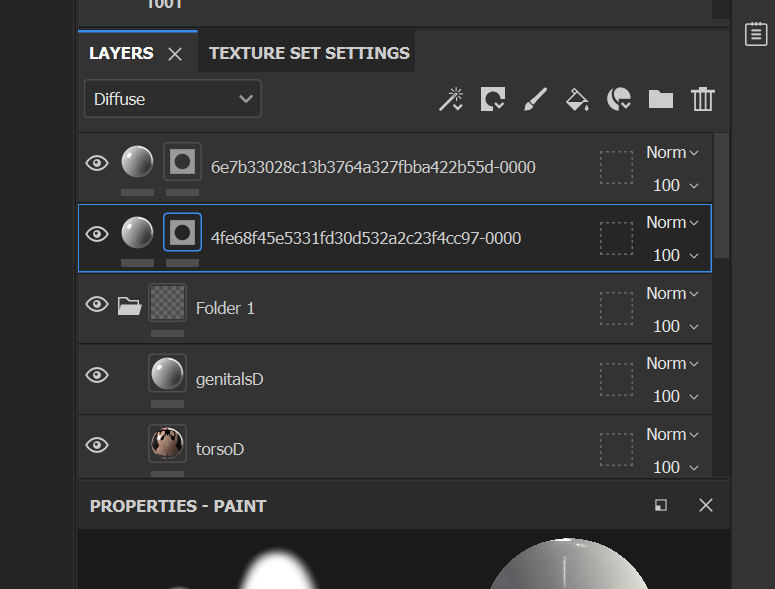
- Now is the part where your inner artist should take over and you should decide what you want to mask and how.
- By default when you select the mask on the fill layer, brush tool with black color will be selected. And when you draw on the texture it will start hiding the texture layer. I hope i wont have to go in details regarding masking.(black brush hides, white reveals, brush and color control are all on the property-fill pannel to the right side)
- As per you artistic choice try to merge the tattoos as best as you can.
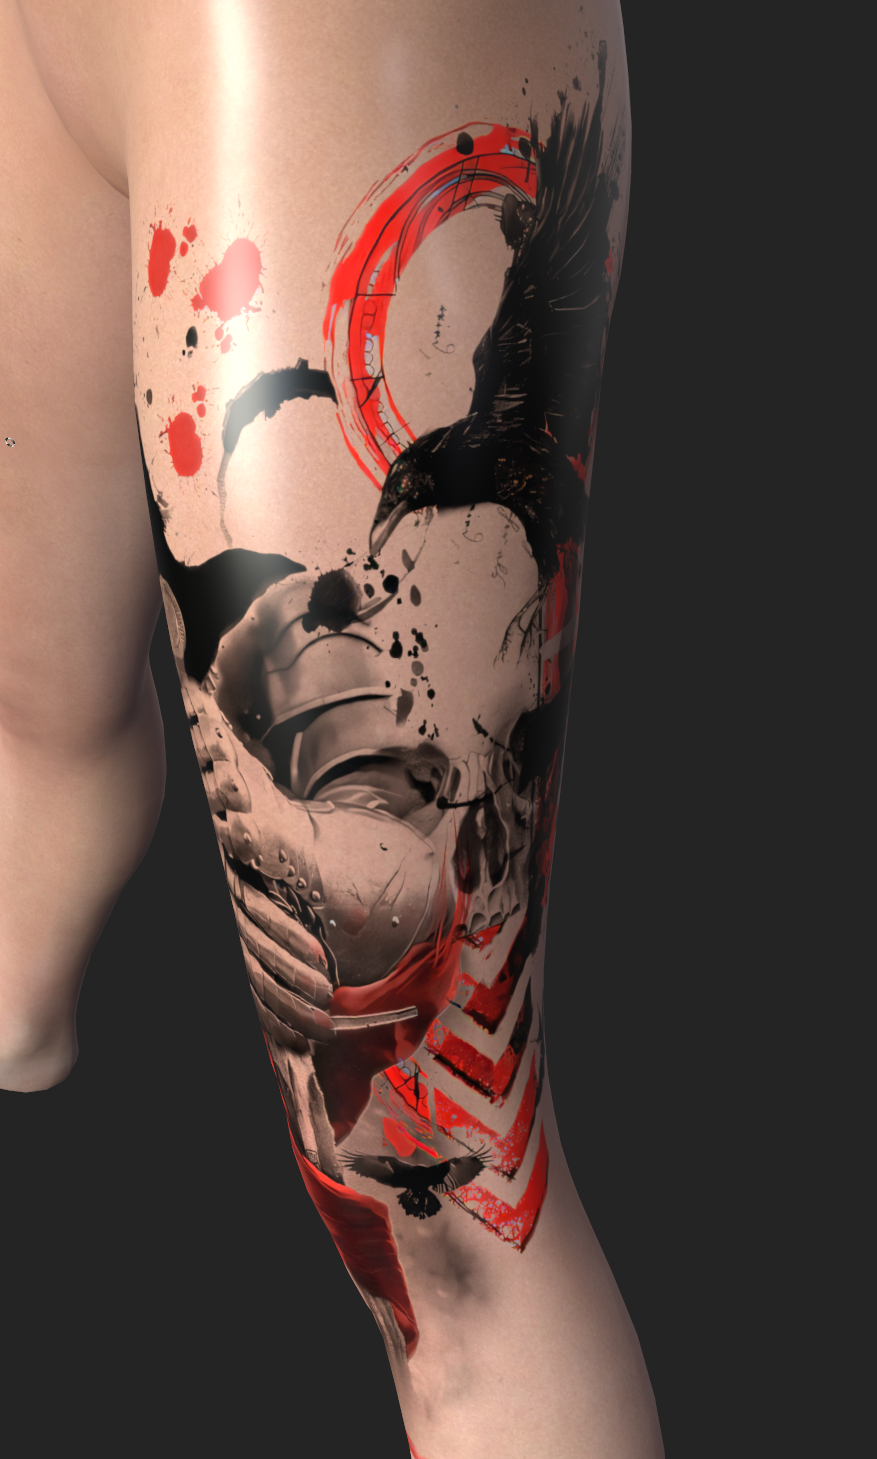
- A good practice to follow is to have variation in the masking. Try to create dynamics between both tattoos. Dont try to put one tattoo underneath another. I work with tentacles and smokey tattoos a lot and i try to intertwine the smokey part or tentacles of one tattoo on another and vice versa. But then again like i said it depends on your artistic choice.
- Layer as many tattoos as you want to get the perfect look.
- Once that is done we are ready to export the final texture.
- Before exporting hide the base texture group .(This is really important, else the exported tattoos will be baked onto the skin texture instead of having white background. But if you want to bake the tattoo onto a particular skin then go ahead and dont hide the base skin group. One tip here would be to change the tattoo fill layes from normal to multiply mode. This will give very good results)
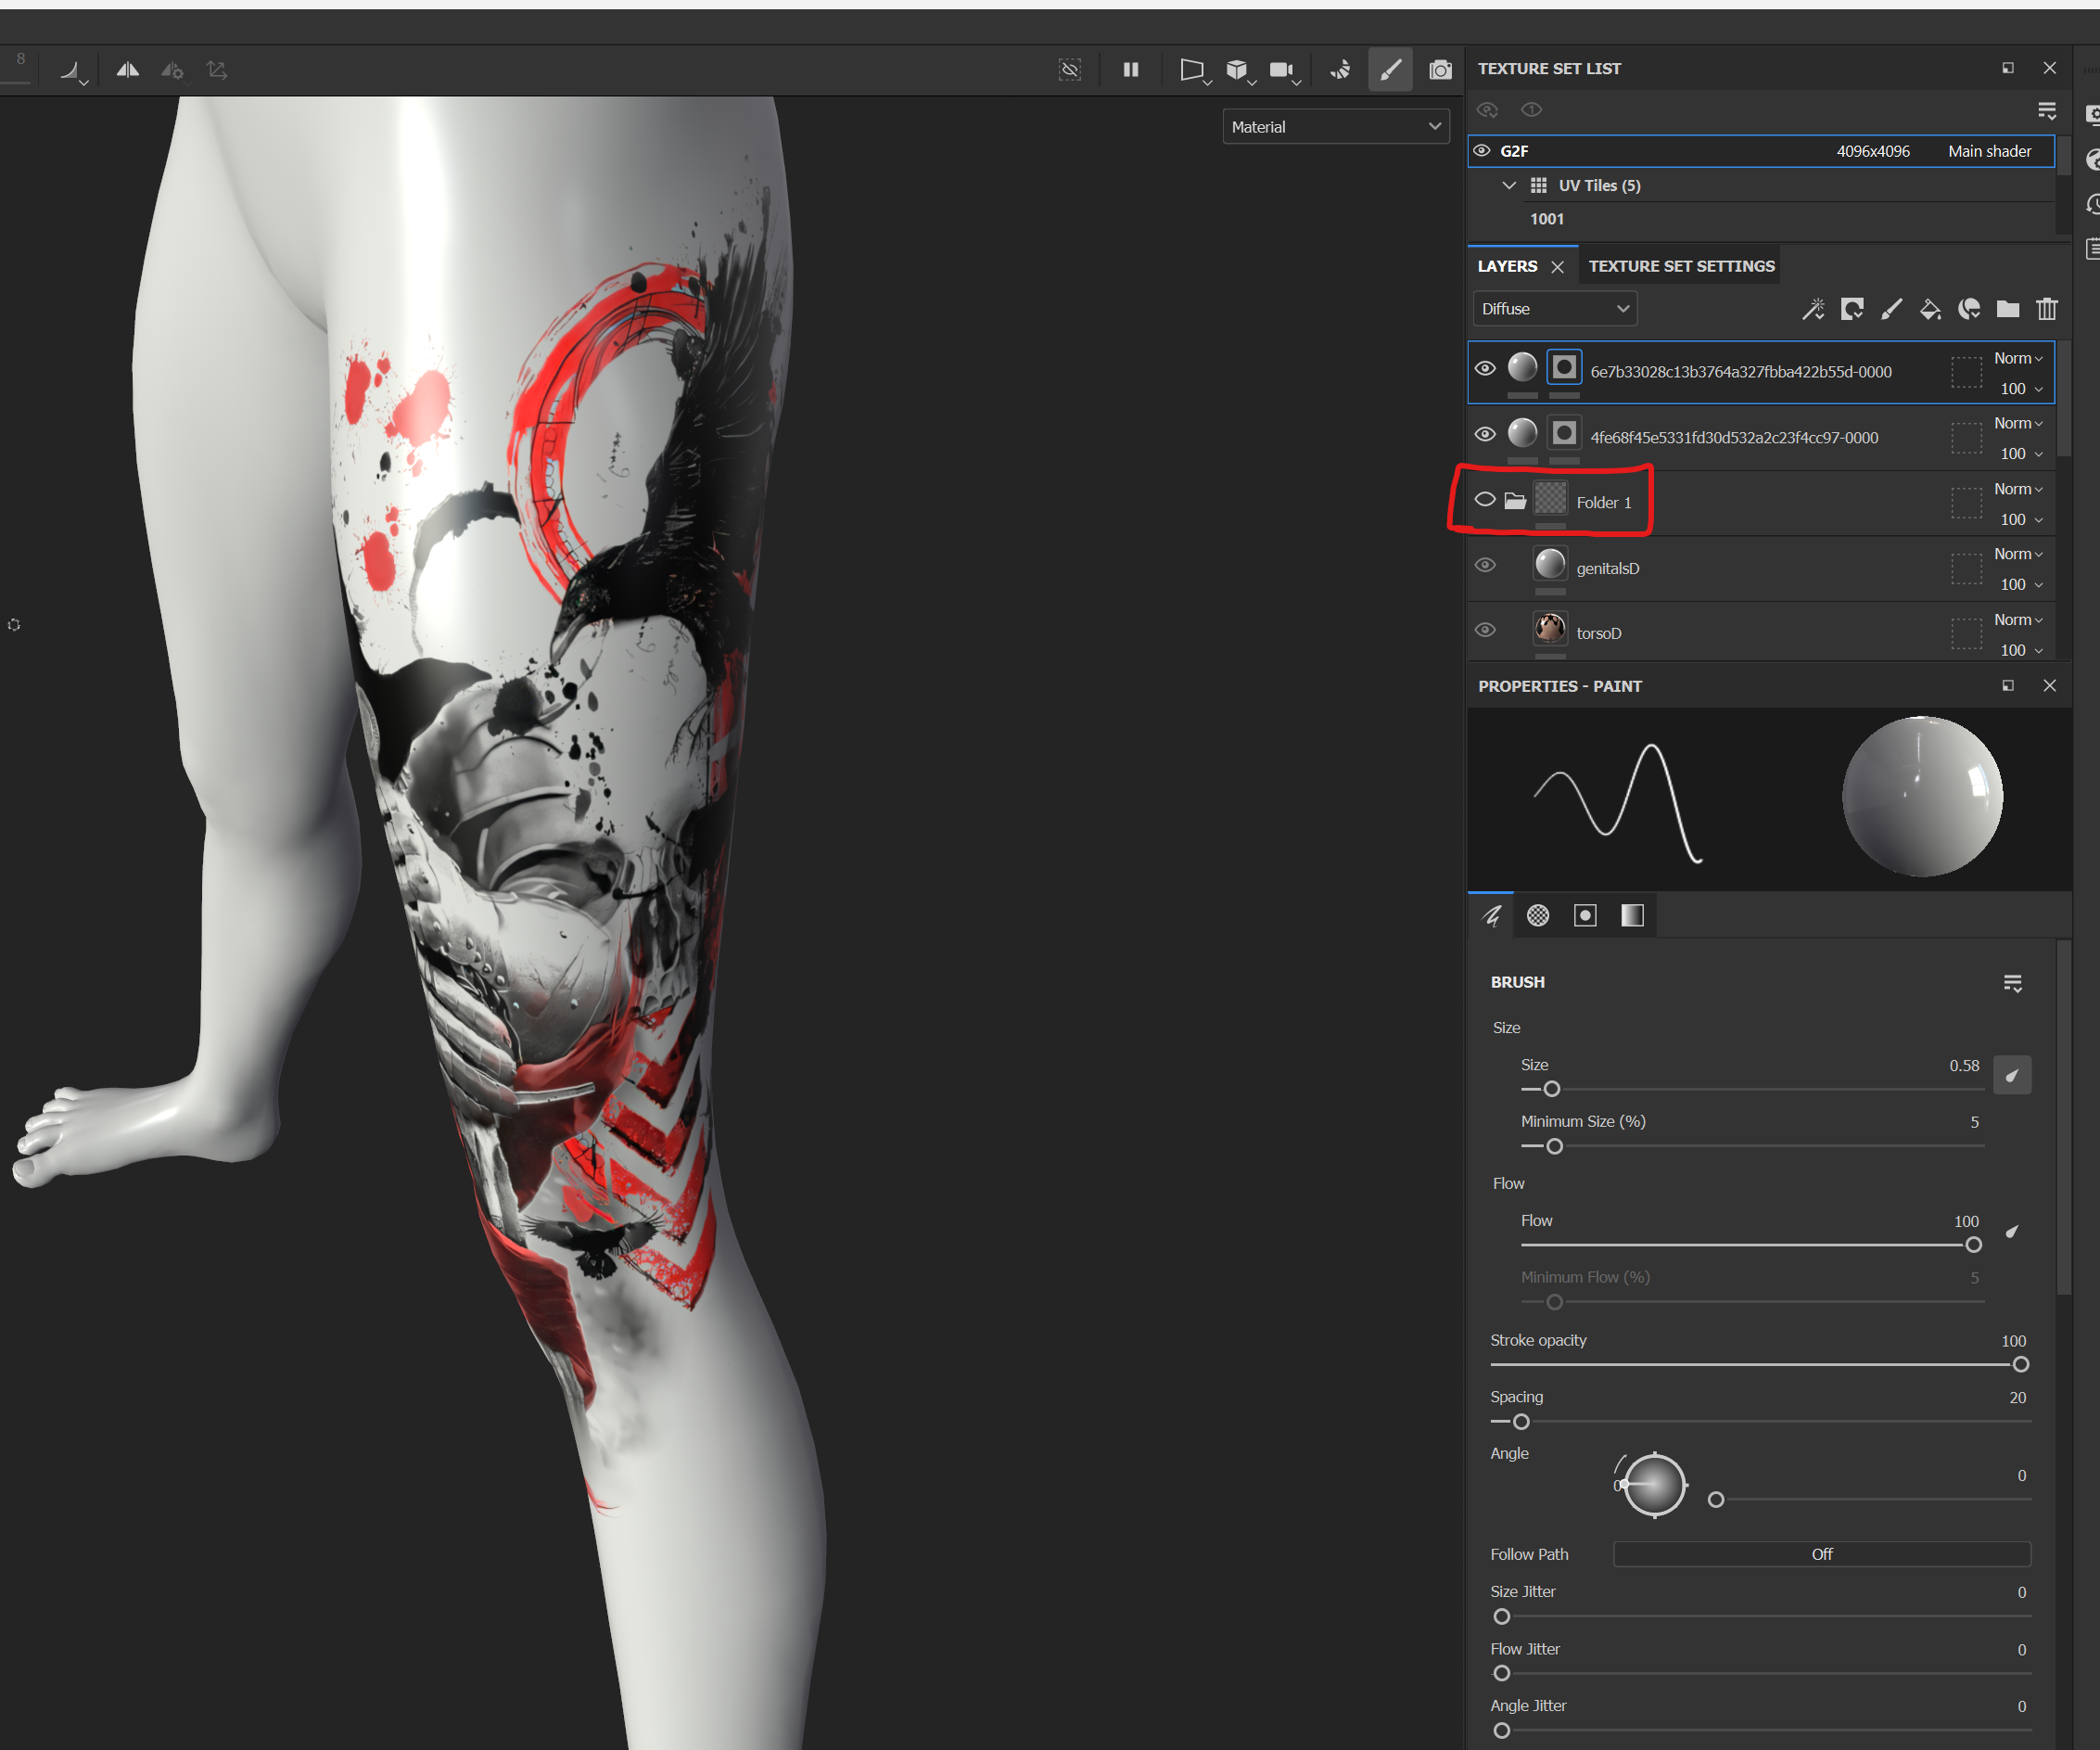
- Go to File -> Export Textures (Ctrl + Shift + E) and change these settings to import textures in high quality.
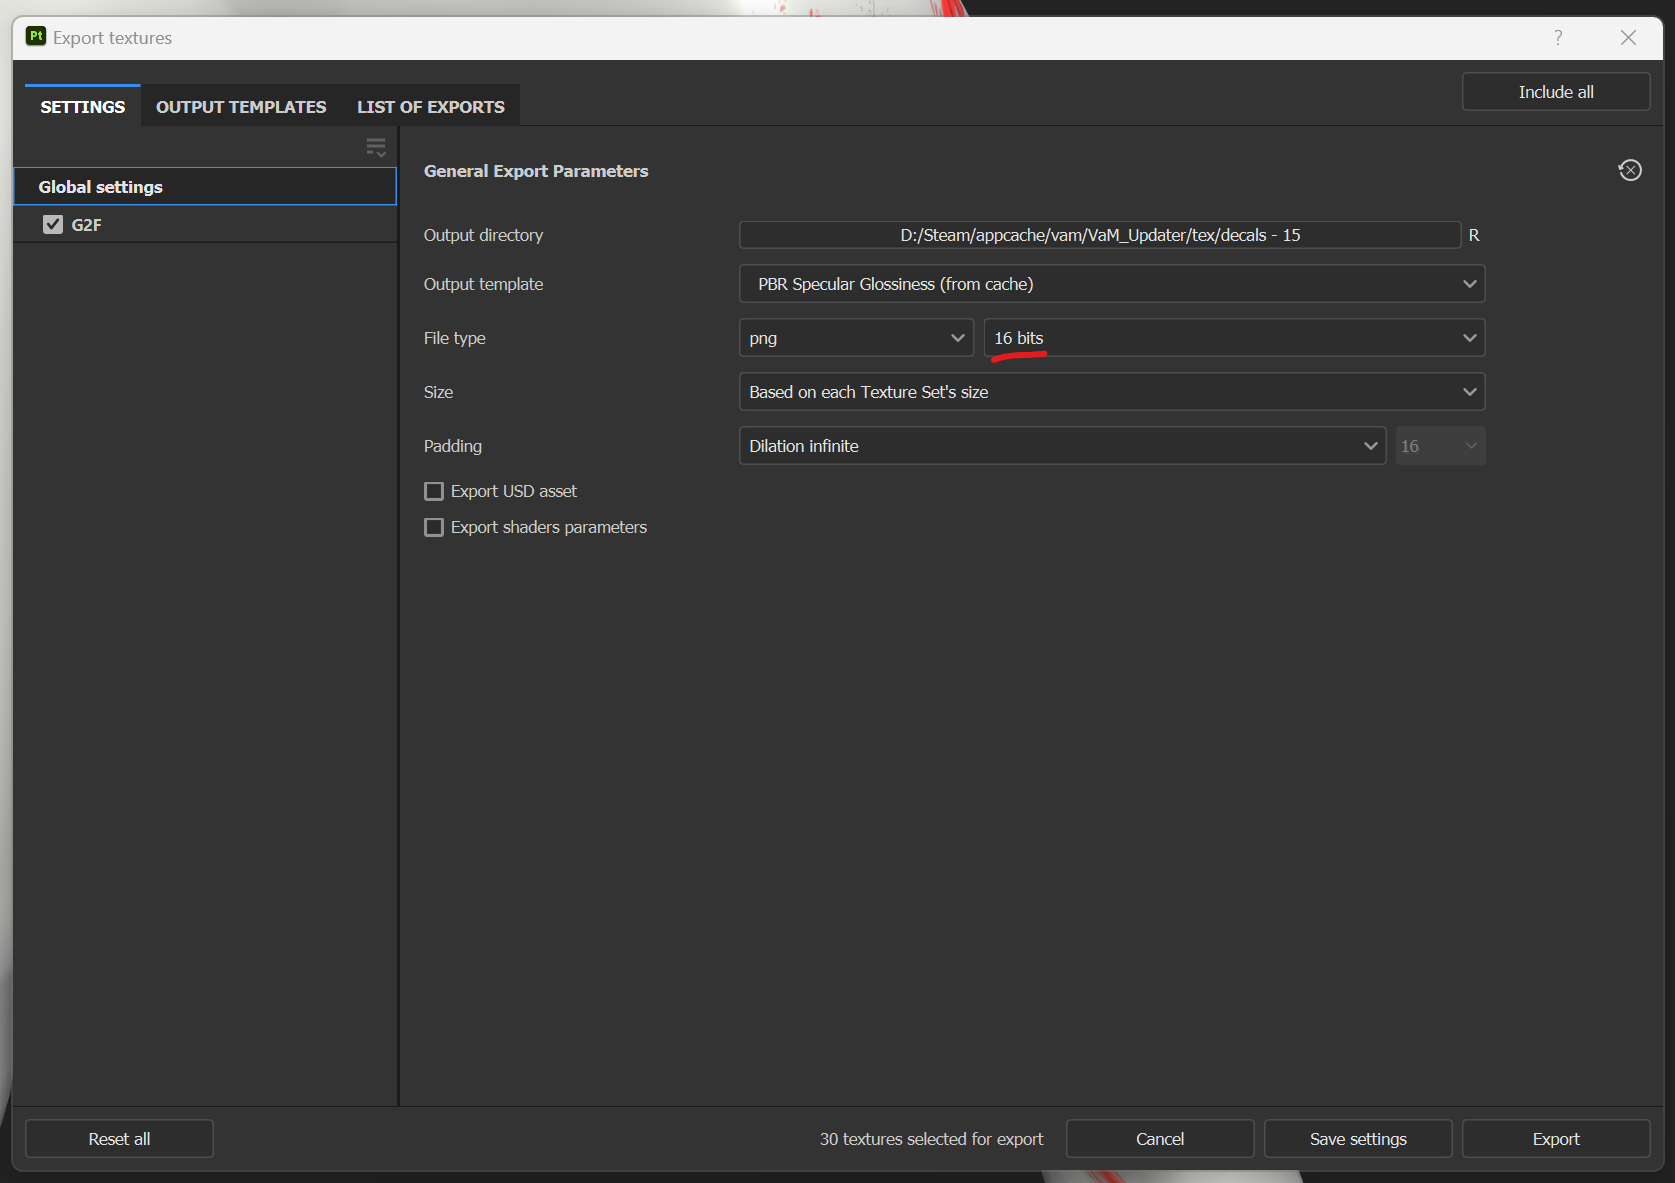
- You can click on G2F and hide some unnecessary exports like gloss and other. I just leave behind diffuse.
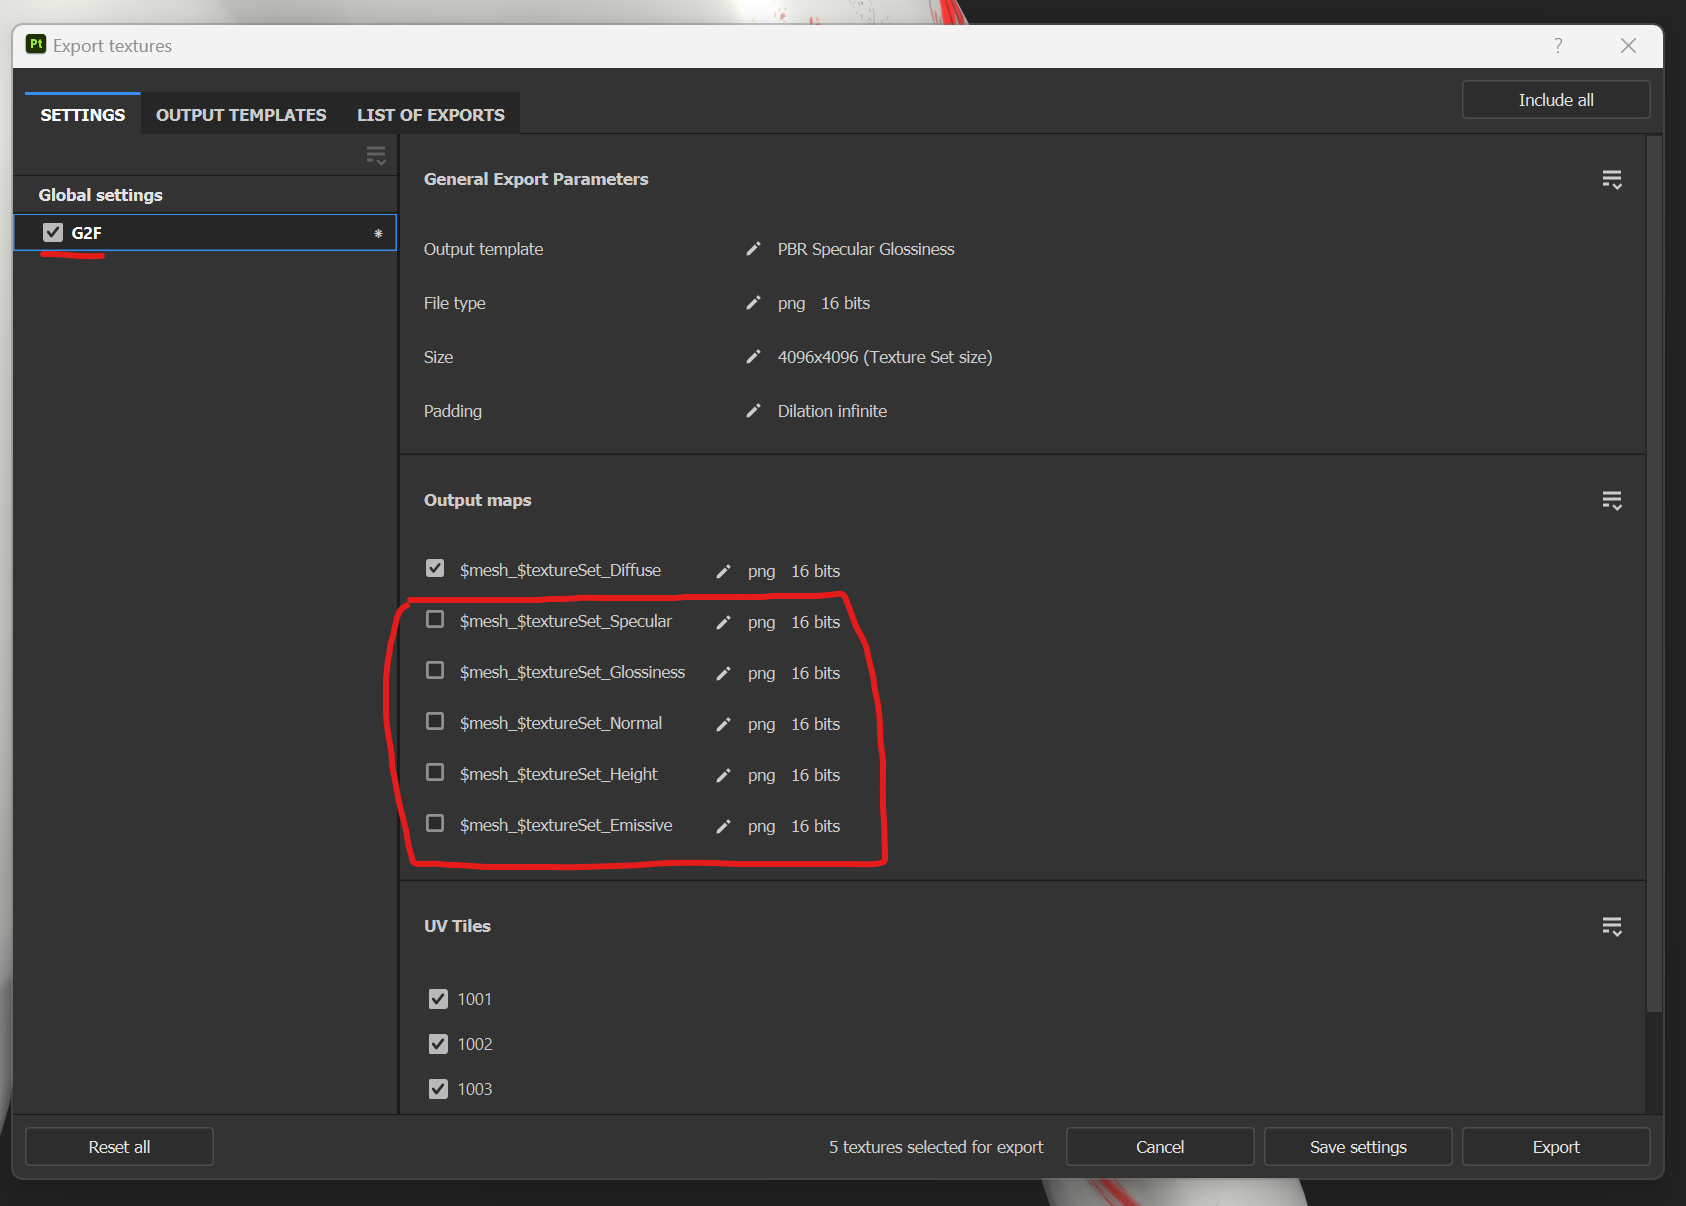
- In this expamle we are just working with the Torso and limb part so you can also unselect the UV Tiles if you want. I have just left them as is. Thats it now click Export.
- You should end up with something like this.

- Now just import the two highlighed textures to Gimp and convert them to PNG as describe in earlier steps. And there you go. You now have the tattoo ready to be used in VaM
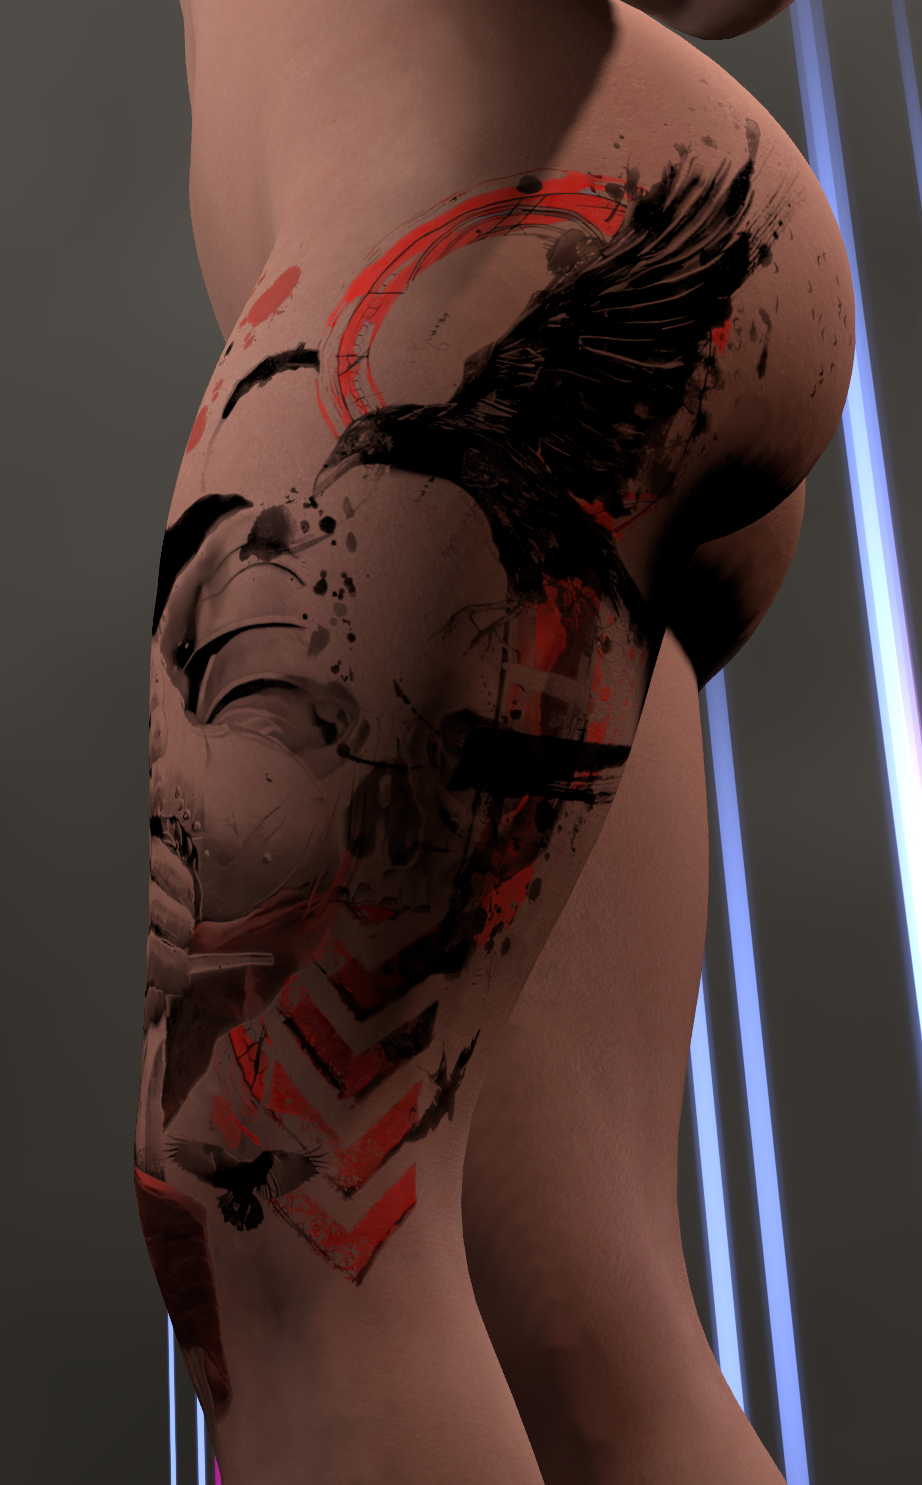
Its a long ass guide, i know!! But this is pretty much what i do to create my tattoos. Now create a ton of free tattoos so that i dont have to and i can free load

Cheers!!
I have got quite a lot of request to create a guide for how i am creating the wrap around seamless tattoos. I couldnt create a video tutorial, but here is a rough guide on how to do it.
Tools Used
- Gimp
- Photoshop
- Substance Painter 3D
Methodology
Get your tattoos (White background is a real necessity)
Convert the images to PNG
Use substance painter 3d for composite work.
Get Your Tattoos
I use Midjourney to create my tattoos. Once I have my tattoos I upscale them using stable diffusion using 4x-UltraSharp upscaler. The higher the texture size then better for VR consumption(Just dont go crazy with the upscale
Prepare the Image for PNG conversion
This step is not really necessary, but is important to create clean tattoos so i highly recommend you to not skip on it.
The way Gimp turn a photo into a PNG is by locking onto a particular gradient of a color and removing that from the picture. Since our goal is to remove anything white from the image, we need to turn everything in the image except for the tattoo to as near as pure white.
- Load up the tattoos into photoshop and press ctrl+L to bring up the level slider.
Slide the left most slider to just past the tallest light line. Essentially this will turn the gray gradient to pure white.
DONT OVER DO IT. It will screw up the exposure.
Convert The Image to PNG
Now we are ready to convert the image to PNG.
Open Gimp and load up the image.
Select Colors -> Colors to Alpha -> Make sure the color is set to White and click on OK.
Press Ctrl+Shift+E or File-> Export As to export the image as PNG to a destination folder.
Now we are pretty much read to start the main process.
Composite in Substance Painter 3D
Disclaimer - I am a noob at substance painter. I only know what i need to know
Download the .spp model file from here
Tool - Blender/Substance Painter G2F Painting Template
Substance Painter recently added UDIM support, now you can paint across uv tile, still need a bit setup to actually paint. This SP template aim at give you a head start. Blender Template included in the package as well, since it also very useful...
Extract the file and load up the .spp file into substance painter(At this point i am assuming that you have some rudimentary knowledge in SP 3D like me or you are an expert!!)
- Make sure the view port is set to 2D/3D view port as we will be mapping textures to the 2D view port.
- Take VaM default skin texture(custom/atom/person/texture/female or any of your fav skin texture from any of our awesome VaM creators) And import them as textures to the current session in SP.
- Drag the corresponding texures from the Assets tab from the left to the 2D view port on the right to the corresponding part.(Head texture to UV tile, torso to torso and so on.. and put them as Diffuse.
- Once thats done, stretch the textures to fill up the corresponding UV tile as precisely as you can. It should look something like this.
- At this point group the 4 texture layers into one group.
- At this point we have no use of the 2D view port and you can change the viewport to 3D exclusively.
- Now the fun part. Import the tattoos to the current session like you have imported the skin texture. Drag the desired tattoo onto the model and map it as a diffuse layer.
- Scale(W), Scale(R) and Rotate(E) the tattoo as desired and place it where you want.
- When we add texture this way it creates a fill layer in substance painter. Set the fill layer property to this.
Project - Set to Warp Projection (Really Important)
Filtering - Bilinear | HQ
Project Depth - Play around with it but higher values gives bad results i keep it less that 0.5 always.
- We will work with Warp Projection and "Edit Vertices" a lot to wrap the texture smoothly around the contours of the body. Once the texture is placed properly click on "Edit Warp as a Whole" and select "Edit Vertices".
This will allow us to manupulate individual verticies of the fill layer.
This is where it becomes tricky to to specify what to do. Because it becomes very specific to your art style and texture and model. But i will try to explain as best as i can.
- From here you will try to warp the verticies using move and rotate tools(Do not use scale at all or else you will notice tear in the texture) to hug the contours as best as possible.
I start with the top and bottom three vertices and push them towards the body so that they barely touch the skin.
- The use rotate tool to rotate the texture to match the curvature of the body(Dont just work with move tool, use rotate to get really smooth results). Something like this
- Once the top and bottom part of the texure is taken care of we will move to the sides(This is the main challenge). Similar to what we did for the top and bottom we will select the side vertices and move and rotate them to best fit the curvature. (Always select all the edge/top verticies together and work on broad adjustments. I would not suggest to work with individual verticies at all, it results in tearing)
Note: - Dont get greedy and enlarge the image way big. It will create a lot of trouble in wraping it properly aroung the model.
- Work in small progression and try to do this as best as you can. Keep an eye out on the texture tearing. It usually happens when we stretch the texture too much out of proportion.
- When the 1st tattoo is places perfectly, You can repeat the same process to place another tattoo in the vecinity of the 1st tattoo. We will do a lot of intelligent masking to merge both the tattoo together so they seem seamless.
- Repeat the same move and rotate verticies that we have done with the 1st texture and wrap it around the curvature.
- Add white masks to both the tattoo fill layers
It should look something like this.
- Now is the part where your inner artist should take over and you should decide what you want to mask and how.
- By default when you select the mask on the fill layer, brush tool with black color will be selected. And when you draw on the texture it will start hiding the texture layer. I hope i wont have to go in details regarding masking.(black brush hides, white reveals, brush and color control are all on the property-fill pannel to the right side)
- As per you artistic choice try to merge the tattoos as best as you can.
- A good practice to follow is to have variation in the masking. Try to create dynamics between both tattoos. Dont try to put one tattoo underneath another. I work with tentacles and smokey tattoos a lot and i try to intertwine the smokey part or tentacles of one tattoo on another and vice versa. But then again like i said it depends on your artistic choice.
- Layer as many tattoos as you want to get the perfect look.
- Once that is done we are ready to export the final texture.
- Before exporting hide the base texture group .(This is really important, else the exported tattoos will be baked onto the skin texture instead of having white background. But if you want to bake the tattoo onto a particular skin then go ahead and dont hide the base skin group. One tip here would be to change the tattoo fill layes from normal to multiply mode. This will give very good results)
- Go to File -> Export Textures (Ctrl + Shift + E) and change these settings to import textures in high quality.
- You can click on G2F and hide some unnecessary exports like gloss and other. I just leave behind diffuse.
- In this expamle we are just working with the Torso and limb part so you can also unselect the UV Tiles if you want. I have just left them as is. Thats it now click Export.
- You should end up with something like this.
- Now just import the two highlighed textures to Gimp and convert them to PNG as describe in earlier steps. And there you go. You now have the tattoo ready to be used in VaM
Its a long ass guide, i know!! But this is pretty much what i do to create my tattoos. Now create a ton of free tattoos so that i dont have to and i can free load
Cheers!!


