


This is Tutorial How to Make CUA Hair whith has Spring Bone and Auto Morph Follow.
Requires:
DAZ Studio(Making This Guide with D|S 4.15).
Unity 2018.1.9f2
EZSoftBone(OSS SpringBone Library)

 github.com
also find in Asset Store https://assetstore.unity.com/packages/tools/physics/ezsoftbone-148136
github.com
also find in Asset Store https://assetstore.unity.com/packages/tools/physics/ezsoftbone-148136
CUAAutoFollow
 hub.virtamate.com
MacGruber's CUA Project Template
 hub.virtamate.com
Step 1 Getting Boned Hair:
First, you must have "extra boned" G2F Hair.
(If you don't need SpringBone, offcourse they don't need)
There is many Tutorials creating Hair in D|S Search in Google and Youtube")
Recomend Tutorial, Adding Bones to Existing Figure.
In this tutorial, I use "Bo Peep Hair" from DAZ/RDNA.
This is V4 Hair. Transferd to G2F and Reboned by myself.
Recommend: Keep Hair Figure Bone from hip to head.

Step 2 Export Hair as FBX:
This Hair has sculp. that is hard to fit with CUA scaling and shifting.
So I divide em and make sculp to standard VAM clothing.
In Geomety Editor In D|S, set sculp to Hidden.

and Select "Delete Hidden Polygon" from right click menu.

Save non sculp Hair as New Figure and Load Hair Figure again. and Hide and Delete all polygons without sculp and Save as Sculp.

Ready to Export. load Non Sculped Hair and Export As FBX.

"Allow Degraded Skinning/Scaling" and "Collapse UV Tiles" is very important option. don't forget this to checked.
Step 3 Setup Unity Project:
Create New Project In Unity. and Copy Files from MacGruber's CUA Project Template.
Then Check Project Settings for Ready to VR. If it is forgotten, CUA will be double Image in VR mode.
In "Edit>Project Settings>Player"
1) "Other Settings>Color Space" set to "Linear" from "Gamma".

2)"XR Settings" , "Virtual Reality Supported" checked, and "Stereo Rendering Method" as "Single Pass".
(If you import Template correctry, these will be set already)

Ready to Import FBX. Create New Folder In Assets and Drag exported FBX to there.

Step 4 Import EZSoftBone Library:
Stable and Recommended way for importing EZBone is Importing from AssetStore.
First, Purchase Free EZBone Asset from AssetStore.
This Asset is Lisence clean. Cos EZSoftBone is OSS
From "Asset Store > My Assets", select EZSoftBone and Import.


Step 5 Setup SpringBone with EZSoftBone
Drag Imported FBX into Hierarchy, Hair will be Spawned in (0, 0, 0).
(I Renamed FBX for Maintainance)

Add Empty Object(s) under Hair root.
This hair seems to need 2 controls(Rear curls and Side curls), so I create Empty Object "FrontCurl" and "SideCurl"

Select "SideCurl" and "RearCurl", and Add Component "EZ Soft Bone".

This Hair have 7 curls, and "[L/R]Curl[A/B]" is Side, others is Rear, so Select "SideCurl" and set size of "Root Bones" to 4, and Select "RearCurl" and set size of "Root Bones" to 3.


and drag curl bones to each.


You can quck test in Play mode. Hit Play Button and Drag Hair in Scene Window. Curls will Swing.

You Can Edit SoftBone Setting Similar to VAM physics. Recomend Editting with Created Material and Forces(It can use when other Hair Setuping)
About Setting Details, See Documents in github of EZSoftBone.
Step 6 Adding Coliders
This Hair is bit long. so Need Coliders to Arms, Chest and Head.
But This Hair does no have arm bones.
So I will add arm bones from G2F rig.
First, Export Zero Figured G2F to FBX for Bone donnar and Import into Unity.

I dont need Donnar's Mesh. So I delete it from Hierarchy.

Drag non meshed G2F to Project for Donnar Prefab.

Next, Add Capsule Object to Donnar's lCollar-lHand Bones.
IMPORTANT: Capsule Collider must be checked "Is Trigger". if it is off, It makes phys conflict with Person.


Then Copy These Caosules to rCollar-rHand, and nagate x pos(ex change (-0.12,0,0) to (0.12,0,0))
With this Hair, I don't use Hand Colider. but I create now for other Hair what is need hand coliders.
these bone positions seems wired. but they will be ajusted when bone following.

Then Select these cupsules and Add Component "EZ Soft Bone Collider".

Then Add Capsuls to Chest and Head with Same Settings.


Select All Capsuls and Disable Mesh Renderer.

Colider Template is Done. Select Prefab root and hit "apply" to save prefab.
This Template Can Use in Other Hair Setup. So you have to these setup only Once.
Copy lCollar and rCollar bone from Template to Hair. and Delete Hand bones.

And copy Head and Chest Capsule also.

Then Setup Colider Radius of Curls. Select "SideCurl" and set "Collision > Radius" to 0.02 and Select "RearCurl" to 0.04


Bone Colider Gizmo will be seen.

Then Set Curls Gravity to bit -Y(-0.001-0.005ish) and test in play mode.

Curls will colide

Colider Setup is Done.
Step 7 Build EZSoftBone DLL
To Get EZSoftBone Component as CUA's DLL, Need Building Unity Project.
Go to "File>Build Setting", Select "x86_64" and hit "build".

Unity asks folder to build, Create folder "builds" in Project root and select it.
after building, you can find "EZhex1991.EZSoftBone.dll" in "builds\builds_Data\Managed"
this is EZSoftbone's dll. you can copy this to assetbundle's folder and rename to "yourassetbundle.dll".
It will be ready to load into VAM.

Step 8 Taking Into VAM
See MacGruber's Tutorial
build assetbundle and copy into Somewhere in Custom/Assets, and place dll which is made with last step into same place

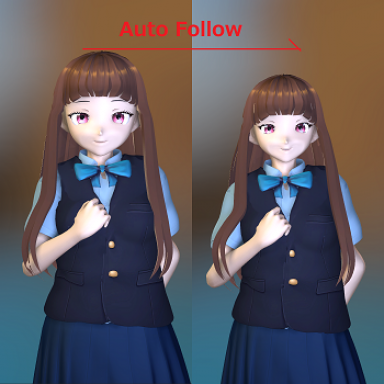
Step 9 AutoFollow Setup
Launch VAM. and Load any Setup Scene.
Select Person ando Turn Off All Auto Bhaviours and Disable Morph Applying Plugin (Life etc.).
And Zero All Morph and Apply Target Look Morph Only.
If your Look is not maked by Only one morph, make it Only One Morph using MorphMerger etc.
Recommend: You'd better select Morphs you want to setup and set Fav these

Ready To Setup. Create CUA Atom and Select assetbundle and Apply CUAAutoFollow.


In CUA Control, Select Person as Parent and Link to "Peson/head(not headControl)" and select "Hold".

Hair will move to Base position cos there is no AutoFollow Entry.
Go to Plugin UI, Hit "Add From Fav" to Create Morph Entries.

Morph Entry Created.

Select Current Morph And Select Head Bone. And Adjust Offsets.

When Finished, Apply another target morph and adjust also.


Done. CUA become Mixable with adjusted morphs.

After adjusting, go to Plugin UI and hit Save.
Save Data will be created in "Saves/PluginData/yourame/yourItem/yourassetbundle_yourprefab.json"
CUAAutoFollow will AutoLoad Savedata when next Running.
Appendix
Don't forget Credit EZhex1991 when you distribute CUA using EZSoftBone
Thx for Finished Reading So Long Tutorial.
Enjpy
Requires:
DAZ Studio(Making This Guide with D|S 4.15).
Unity 2018.1.9f2
EZSoftBone(OSS SpringBone Library)
GitHub - EZhex1991/EZSoftBone: A simple kinetic simulator for Unity, you can use it to simulate hair/tail/breast/skirt and other soft objects
A simple kinetic simulator for Unity, you can use it to simulate hair/tail/breast/skirt and other soft objects - EZhex1991/EZSoftBone
github.com
CUAAutoFollow
CUAAutoFollow - Plugins + Scripts -
I uploaded "VRoid Starter Pack" for Sample of CUAAF. You can try CUAAF with this. https://hub.virtamate.com/resources/vroid-starter-pack-for-vam.20252/ CUAAutoFollow Is CUA Plugin for G2F Compatible Rigged CUA. When It is Applied, CUA Rig...
MacGruber's CUA Project Template
Unity AssetBundles for VaM 1.xx - Guides -
After some people essentially begged me to do it, I spend several evenings this week and the this entire Saturday on writing a tutorial on Unity AssetBundles. It ended up to be an 13 page PDF of 2700 words. Lots of pictures, obviously. This...
Step 1 Getting Boned Hair:
First, you must have "extra boned" G2F Hair.
(If you don't need SpringBone, offcourse they don't need)
There is many Tutorials creating Hair in D|S Search in Google and Youtube
Recomend Tutorial, Adding Bones to Existing Figure.
In this tutorial, I use "Bo Peep Hair" from DAZ/RDNA.
This is V4 Hair. Transferd to G2F and Reboned by myself.
Recommend: Keep Hair Figure Bone from hip to head.
Step 2 Export Hair as FBX:
This Hair has sculp. that is hard to fit with CUA scaling and shifting.
So I divide em and make sculp to standard VAM clothing.
In Geomety Editor In D|S, set sculp to Hidden.
and Select "Delete Hidden Polygon" from right click menu.
Save non sculp Hair as New Figure and Load Hair Figure again. and Hide and Delete all polygons without sculp and Save as Sculp.
Ready to Export. load Non Sculped Hair and Export As FBX.
"Allow Degraded Skinning/Scaling" and "Collapse UV Tiles" is very important option. don't forget this to checked.
Step 3 Setup Unity Project:
Create New Project In Unity. and Copy Files from MacGruber's CUA Project Template.
Then Check Project Settings for Ready to VR. If it is forgotten, CUA will be double Image in VR mode.
In "Edit>Project Settings>Player"
1) "Other Settings>Color Space" set to "Linear" from "Gamma".
2)"XR Settings" , "Virtual Reality Supported" checked, and "Stereo Rendering Method" as "Single Pass".
(If you import Template correctry, these will be set already)
Ready to Import FBX. Create New Folder In Assets and Drag exported FBX to there.
Step 4 Import EZSoftBone Library:
Stable and Recommended way for importing EZBone is Importing from AssetStore.
First, Purchase Free EZBone Asset from AssetStore.
This Asset is Lisence clean. Cos EZSoftBone is OSS
From "Asset Store > My Assets", select EZSoftBone and Import.
Step 5 Setup SpringBone with EZSoftBone
Drag Imported FBX into Hierarchy, Hair will be Spawned in (0, 0, 0).
(I Renamed FBX for Maintainance
)Add Empty Object(s) under Hair root.
This hair seems to need 2 controls(Rear curls and Side curls), so I create Empty Object "FrontCurl" and "SideCurl"
Select "SideCurl" and "RearCurl", and Add Component "EZ Soft Bone".
This Hair have 7 curls, and "[L/R]Curl[A/B]" is Side, others is Rear, so Select "SideCurl" and set size of "Root Bones" to 4, and Select "RearCurl" and set size of "Root Bones" to 3.
and drag curl bones to each.
You can quck test in Play mode. Hit Play Button and Drag Hair in Scene Window. Curls will Swing.
You Can Edit SoftBone Setting Similar to VAM physics. Recomend Editting with Created Material and Forces(It can use when other Hair Setuping)
About Setting Details, See Documents in github of EZSoftBone.
Step 6 Adding Coliders
This Hair is bit long. so Need Coliders to Arms, Chest and Head.
But This Hair does no have arm bones.
So I will add arm bones from G2F rig.
First, Export Zero Figured G2F to FBX for Bone donnar and Import into Unity.
I dont need Donnar's Mesh. So I delete it from Hierarchy.
Drag non meshed G2F to Project for Donnar Prefab.
Next, Add Capsule Object to Donnar's lCollar-lHand Bones.
IMPORTANT: Capsule Collider must be checked "Is Trigger". if it is off, It makes phys conflict with Person.
Then Copy These Caosules to rCollar-rHand, and nagate x pos(ex change (-0.12,0,0) to (0.12,0,0))
With this Hair, I don't use Hand Colider. but I create now for other Hair what is need hand coliders.
these bone positions seems wired. but they will be ajusted when bone following.
Then Select these cupsules and Add Component "EZ Soft Bone Collider".
Then Add Capsuls to Chest and Head with Same Settings.
Select All Capsuls and Disable Mesh Renderer.
Colider Template is Done. Select Prefab root and hit "apply" to save prefab.
This Template Can Use in Other Hair Setup. So you have to these setup only Once.
Copy lCollar and rCollar bone from Template to Hair. and Delete Hand bones.
And copy Head and Chest Capsule also.
Then Setup Colider Radius of Curls. Select "SideCurl" and set "Collision > Radius" to 0.02 and Select "RearCurl" to 0.04
Bone Colider Gizmo will be seen.
Then Set Curls Gravity to bit -Y(-0.001-0.005ish) and test in play mode.
Curls will colide
Colider Setup is Done.
Step 7 Build EZSoftBone DLL
To Get EZSoftBone Component as CUA's DLL, Need Building Unity Project.
Go to "File>Build Setting", Select "x86_64" and hit "build".
Unity asks folder to build, Create folder "builds" in Project root and select it.
after building, you can find "EZhex1991.EZSoftBone.dll" in "builds\builds_Data\Managed"
this is EZSoftbone's dll. you can copy this to assetbundle's folder and rename to "yourassetbundle.dll".
It will be ready to load into VAM.
Step 8 Taking Into VAM
See MacGruber's Tutorial
build assetbundle and copy into Somewhere in Custom/Assets, and place dll which is made with last step into same place
Step 9 AutoFollow Setup
Launch VAM. and Load any Setup Scene.
Select Person ando Turn Off All Auto Bhaviours and Disable Morph Applying Plugin (Life etc.).
And Zero All Morph and Apply Target Look Morph Only.
If your Look is not maked by Only one morph, make it Only One Morph using MorphMerger etc.
Recommend: You'd better select Morphs you want to setup and set Fav these
Ready To Setup. Create CUA Atom and Select assetbundle and Apply CUAAutoFollow.
In CUA Control, Select Person as Parent and Link to "Peson/head(not headControl)" and select "Hold".
Hair will move to Base position cos there is no AutoFollow Entry.
Go to Plugin UI, Hit "Add From Fav" to Create Morph Entries.
Morph Entry Created.
Select Current Morph And Select Head Bone. And Adjust Offsets.
When Finished, Apply another target morph and adjust also.
Done. CUA become Mixable with adjusted morphs.
After adjusting, go to Plugin UI and hit Save.
Save Data will be created in "Saves/PluginData/yourame/yourItem/yourassetbundle_yourprefab.json"
CUAAutoFollow will AutoLoad Savedata when next Running.
Appendix
Don't forget Credit EZhex1991 when you distribute CUA using EZSoftBone
Thx for Finished Reading So Long Tutorial.
Enjpy