Hairstyling
The simulated V3 hair introduces tools to generate and style strands of hair. The hair can have physics, react to movement and gravity and collide. The VR and the desktop mode share the tool set, but are controlled slightly differently.

Links

The Scalp - The Base of your Style

Scalp Mask Edit - Razor that Line

Generate the Strands - Let it grow

Styling - Wash, Cut and Set
The simulated V3 hair introduces tools to generate and style strands of hair. The hair can have physics, react to movement and gravity and collide. The VR and the desktop mode share the tool set, but are controlled slightly differently.
Links
- Hairstyling (V1.18.2.1 Beta) by JustLooking ForNothin
- There is also a #hairstyle channel in the official VaM Discord
- tbc
- When working on hair it's best to "Focus Selected(F)" (menu bar) on the models head for better navigation and rotation.
- Hairstyles can be either made from scratch or modified from an existing hairstyle item and saved as a new item. Or made from a "Custom Scalp Base" item (which also works for beard, eyebrows or other body Hair)
- To make a new hair simply activate the "Hair Creator" checkbox and click Customize.
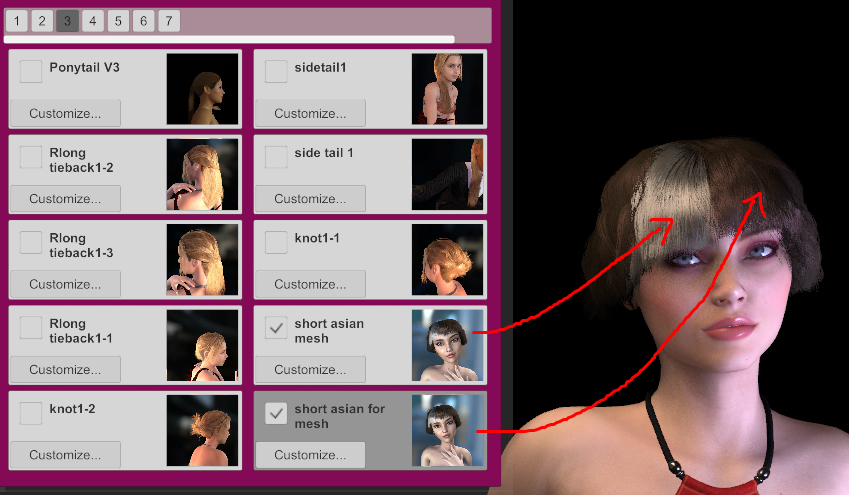
- For complex hair it works best to work in multiple parts. For example: Middle/Side parted hairstyles, bangs, or styles with layers or undercuts. This will not only make the styling easier, but also offers the opportunity to have separate settings for the parts e.g. Curls on a ponytail, but not on the bangs.
- There is no Undo and it's easy to mess up a complete hairstyle. While styling you can use the "Keep Style" as a temporary save. If you mess up then just "Cancel Style Mode". You can also make temporary WIP-saves by adding increments to the "Store Name" (e.g. Name a, Name b, Name c...). [bug: In 1.18.2.1 the store item will not update and look like it did not save, you have to "Force Reload"]
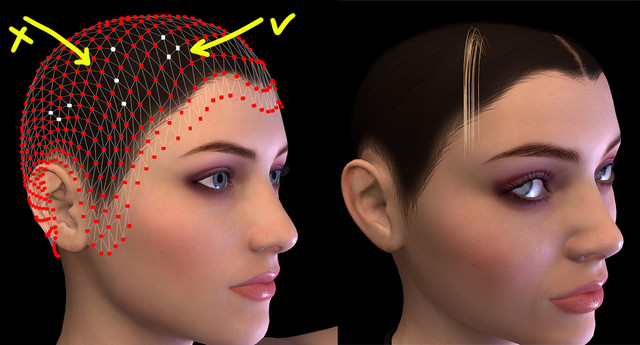
- To get a feel for the behavior of the hair tool it is helpful to just play around with one single strand (3 connected style mask selectors, see below)
The Scalp - The Base of your Style
- VAM comes with a selection of inbuilt scalp meshes. You can find them in the top richt corner of the "Generate & Style" tab. The default is the UdaneScalp.
- Warning: Some scalps are not 100% close to the head skin, so if you want to make very short hair Udane is your friend.
- Warning: As of Beta 1.18.2.1 there is a Bug with the DirectSkin scalp: The finished hair style item will only load if the active Skin is the skin that was used while making the hairstyle. Sometimes you also need to click Force Reload. After that it is possible to change the skin
- If you want to get rid of the texture: Turn down Alpha Adjust in the "Scalp Materials" tab. It's not possible right now to exchange the texture of the inbuilt scalps. You'd have to import a custom scalp.
Scalp Mask Edit - Razor that Line
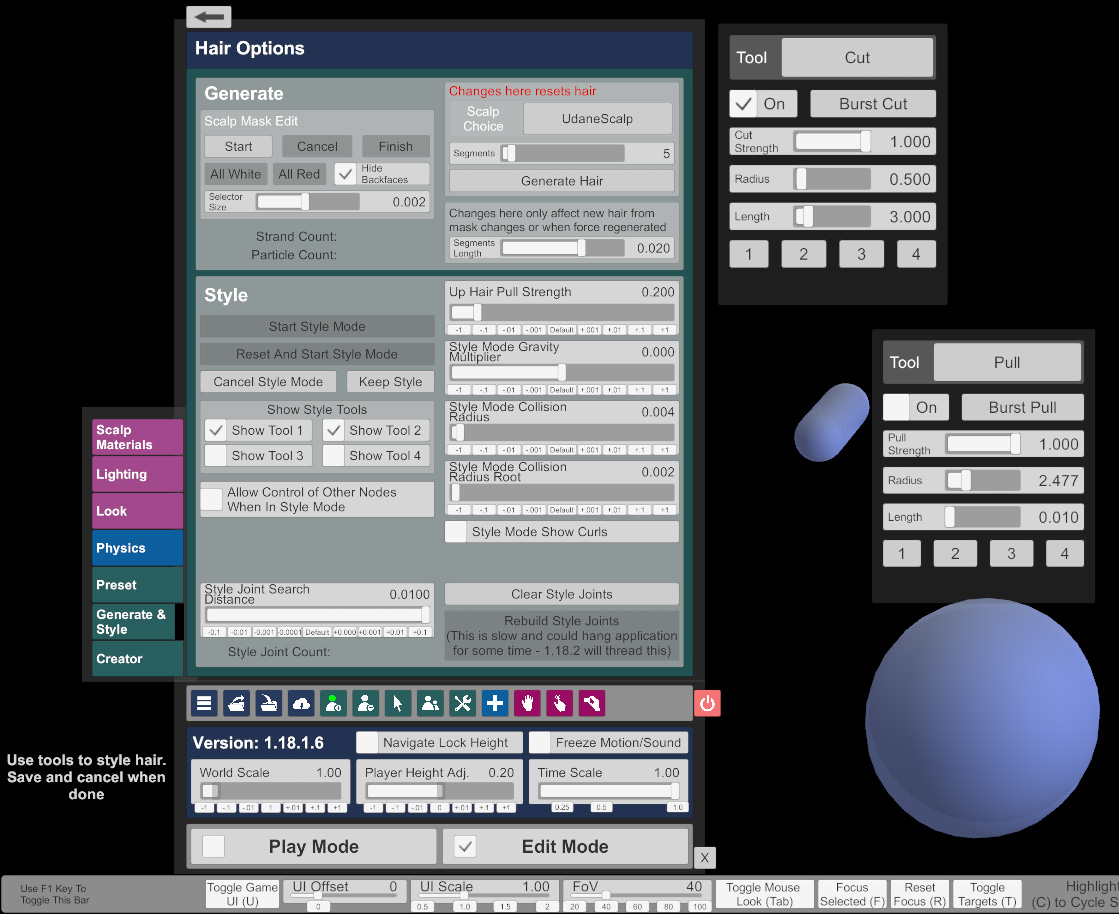
- Find the Scalp Mask Edit Mode in the top left corner of the "Generate & Style" tab.
- Scalps usually come with one or two rows of Selectors that are below the hairline. You need to scalp mask edit those to get a more natural hair line. You also need to edit the scalp mask for under cuts or for custom scalps that are covering a wide area.
- The mask edit mode displays active selectors as white, inactive as red. Selectors = Vertices of the scalp mesh.
- Desktop Mode: Click on one Selector to toggle it's state. Click and drag from empty space to brush select multiple selectors. Ctrl + click-drag to deselect multiple selectors.
- Zoom in and out to have a relative "smaller" selection brush.
- Change the selector Size for a better overview.
- It's theoretically possible to add or remove Mask Selectors in the middle or at the end of styling. However, this might lead to a bug where all hair strands disappear.
- Usage Tip: 3 active and CONNECTED selectors will create a strand of hairs. In Style edit mode the 3 corners of that strand are visualized. That means that one single, isolated, active Selector will NOT create a hair strand.
Generate the Strands - Let it grow
- Settings for the hair generation are in the top right of the "Generate & Style" tab. Be aware of the red note saying "Changes here resets hair".
- The segments indicate how many parts a strands has.
- Segments Length indicates the length of each of the segment.
- The overall length is therefore Segments*Length.
- The segments and their length do also have an impact on how tiny the curls can be: many small segments allow smaller curls
- The hair color can be changed in the "Lighting" tab.
- Tip: For a natural look it looks better to have fairly dark and desaturated colors in the Root & Tip settings and instead introduce a bright color with the Specular color setting.
- The Root->Tip Rolloff can be used to change how far the root color spreads along the strands
- Random Color and Normal Randomize can be used to add variation and make the hair look more natural or messy
- If you want single colored (or grey) strands in your hairstyle you need (take a guess!)... Multi-Part-Hair.
- For now it's not easily possible to copy the complete hair color settings at once to different hair parts. Or edit multiple parts at once. This is on the nice-to-have-features-list. You can copy the lines from the .vaj files if you need to batch edit many hair items: lines 36 - 46 and 78 - 92. There are also some plugins that work very well.
- It's a good idea to save and test your color settings in different scenes under different lighting conditions.
- For short styles, beard stubble or for performance reasons: It's sometimes useful to adjust the amount of hair. Just using the Cut tool will not reduce the length to extremely short.
- Tab Physics -> Hair Multiplier will reduce/increase how many single hairs are rendered in one strand. So obviously lower values will thin out the hair.
- Look -> Width can be used to make have "finer" looking hairs or more "full" hair even with a lower Hair Multiplier setting
- Look -> Shader type can be set to thick and thicken more to render really strong hairs, e.g. for stubble
- Look -> Length 1,2,3 will thin out the ends of the hair and can also be adjusted for really short hair.
- Look -> Curl Normal Adjust can also be used carefully to make really short hair or stubble.
- Look -> A subtle curling can fake volume and adds a bit of "natural" messiness to the hair texture
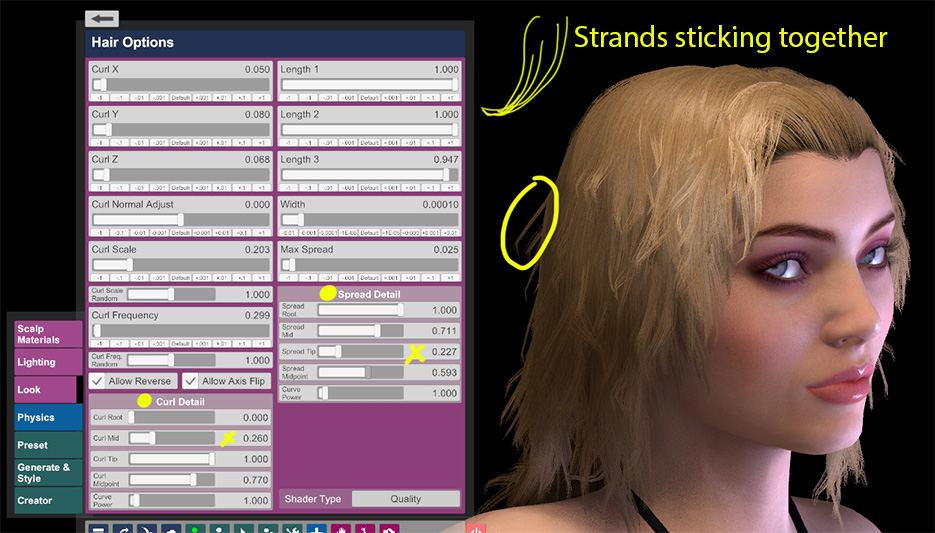
- Look -> Max Spread has very fine values in the range to 0.025 that can be used to produce more patchy hair. To have finer control: use the Spread detail sliders. Decreasing the spread on the tips only will have a more "sticking together" look like hair gel or eyelashes with mascara for example.
- A scalp with large spaces in between the Mask Selectors will produce hair with less volume then a scalp with a lot of tightly placed selectors.
- Naturally: More hair = less good performance. Tip: When you finished your style its usually a good idea to reduce the Hair Multiplier and Curve Density sliders to find a good balance between quality and performance. On very short hair consider to disable Sim and Collisions, too.
Styling - Wash, Cut and Set
- The Style mode will visualize the "corners" of the strands (see above at Scalp Mask Edit) and they are somewhat connected. If you need a clean parting or clean single strands: Consider building your style from multiple separate hair parts.
- The Style mode will display the rigidity of the strands with a red = high to green = low color scheme. As soon as you leave the Style mode with Sim active the hair will be affected by Physics as much as the rigidity permits.
- There are two Buttons to start the Style Mode:
- Start Style Mode: Will use the active simulated state of the hair as starting point for styling. You can still reset the status by pressing the "Clear Style Joints" button in the Styling Mode, or...
- Reset And Start Style Mode: Will use the last Not-Simulated state of the style as a starting point for styling. Use this to manually build volume in the Style tool and KEEPING your volume. Otherwise: Each switch in and out of style mode will flatten and apply another pass of gravity to the style.
- The Hair tool will remember the hair state of the strands without Simulation. So you can change the physics properties AFTER styling to snap the hair closer to your styled hair shapes. If you disable the Sim the hair will snap back to the last reset state.
- Use Painted Rigidity: For complex styles where root-main-tip-rigidity is not detailed enough. Activate the checkbox, go into Style Mode, look in you tool list for 3 new tools that can be used to paint rigidity data directly on the strands. Speaking of which...
- The more rigidity you need for your style will however limit the Simulation. The Rigidity is (at the moment) relative to the head/root - High rigidity at the tip will fix it's location relative to the root point, while the in-between area moves freely. A more natural rigidity would control "how far the hair segment angle can change relative to the last segment", but this is still a feature request.
- Activating Style mode will add windows and some blue 3D gizmos to the view. The gizmos can be grabbed in VR or dragged and dropped in desktop mode. They work similar to a brush in 2D programs. Touching a strand with the blue thingy will affect that strand. The windows can be dragged too and are connected to the blue gizmo.
- Reducing the Length option will turn the "pill" into a Sphere shape
- The Tools can be set to On, Off and Burst - Applying the effect only shortly, combined with low strength Burst is useful for fine control.
- In the top of the Window is a list to select the kinds of tool:
- Cut - well guess what this does...
- Grow - This will increase the length of a strand. There is a limit that is probably set by the Segments/length at generation. So if you need a few unusually long strands in your hair style: Either generate long and cut everything else, or just make a multi-part-hairstyle.
- Hold - Useful in VR or as a support tool in desktop: Strands sections in this area wont be dragged away with Brush or Grab.
- Grab - Moves and drags the strand along the direction it is moved. Tip: In desktop mode it is most useful when you constantly deactivate-reposition-activate-move the tool and rotate your view (the movement will go along your screen). Can also be used to push strands closer together when moved from the outside towards strands. Can also be used to build up volume when deactivated and moved into the head, then activated and moved outwards... very versatile indeed
- Push - pushes hair into an angle that goes from the center of the tool gizmo outwards. For example: To "comb back" hair place a big radius sphere BEFORE the nose of a model, then Burst Push. Can also be used to start over from a spread out state if you mess up...
- Pull - drags hair towards the center of the tool. On high strength it will concentrate the hairs at that point. At lower strength it can be used to lump strands together.
- Brush - Similar to Grab, except that there is a Bug (and this bug is useful): When it's OFF and strands are in it, those will instantly point straight upwards when Brush is turned ON. So remember to activate it before touching the hair unless you need to quickly separate a few strands.
- Rigidity Increase, Decrease: Adds and subtracts rigidity.
- Rigidity Set: Instantly sets everything it touches to the specified value.
- Remember to use "Keep Style" often as a save. The only thing you can do to Undo is "Cancel Style Mode", which loses all changes since the last time you activated Style Mode.
- Make it a habit to turn tools OFF when leaving style mode (maybe even park them outside of the hair strands), so you don't accidentally pull them straight through your hairstyle the next time you go into style mode.
- As of 1.18.2.1 they do indeed default to a clockwise rotation.
- It is best to make a few hair strands that go to different direction to get a feeling how the Curl settings work. They are not very intuitive, but can be used for some advanced styling e.g. turning the tips of your hair inward or outward for bob hairstyles.
- The Axis: The axis are not relative to the strand, but add a "global" displacement. This also means: If a strands changes it's angle or position then the curling might change.
- Allow Reverse: As mentioned above the curl defaults to clockwise. Allow Reverse will also display some strands as counter-clockwise. There is right now no way to switch ALL strands to CCW.
- Allow Axis Flip: As of 1.18.2.1. the Axis sliders do NOT have negative values. This means that hair strands get dislocated into one direction. e.g. Y shift the whole hairstyle up, Allow Axis Flip will also push some hairs DOWN (basically randomly using the negative value).
- Curl Frequency: Lower values make wider waves. Remember that a short segment length + many segments allow smaller curves. Curve density also affects the curve quality and look. A lot is happening in the first few pixels of that slider, after that the effect is kinda overblown.
- The Curl Detail Sliders: 0 = curl is not applied; 1.0 = 100% curl is applied. Curling the Root will usually displace the root from the scalp, so use with caution.
- It's possible to rotate the styling tools. In VR simply rotate your hand and in Desktop hit the TAB key 2 times to display a 3D gizmo. This can be used with the GRAB tool to "twirl" a bunch of hairs into one strand. With a higher setting in LOOK -> CLING this strand will not unravel and keep it's shape "rather okay"
- Creating a Bob style with an inward or outwards curve? You can use CURL-Y limited to the TIPS to and positive or negative Normal Adjust to curve them in or out. The downside is that you can't really use curl on the middle and root anymore. Image Example:
- It's possible to use presets that only change some settings while keeping other settings. In the .vap file set the first line "setUnlistedParamsToDefault" to "false". Then delete every setting you don't need, while keeping the "id" lines.
- You can use separate, thin strand of hair as a fake "Hairband"
- It's possible, but not easy to do braids or hair with a lower hairband.
- "Baking" the Simulation: Very handy for stubble/short hair where Sim is not needed. Use the Simulation for styling. Then enter "Start style Mode" without resetting. Then immediately hit KEEP Style. Now your hair will look flatter, but as soon as you disable Simulation it will look exactly like the last state before entering Style mode.
- My style tool does not work on hair close to the skin! - Reduce Physics -> Collision Radius and Collision Radius Root. This usually helps.
- At some areas (e.g. near the ear) my hair just stands out and won't react to styling or cutting at all - This can happen for very short hair and the only solution I know is to turn off Collision completely. It's best to do very short areas of a hairstyle as a separate part for that reason.
- I accidentally moved/rotated the whole Model because I somehow clicked on the root gizmo while in Style Mode! Help, everything is a mess! - I hope you saved or used "Keep style" recently, because the only thing you can do is to Cancel Style Mode, lose your work, reset the pose of the person, start over...
- Strange, the hair roots are sticking into the head on one side of the head? - Check if you have activated Curl X, try Allow Axis Flip.


