


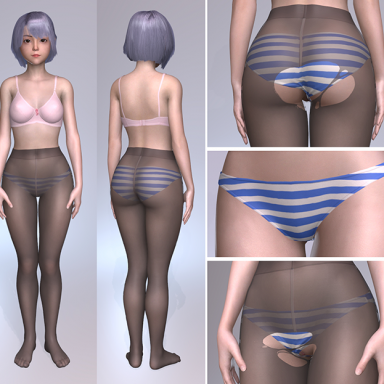
This is a custom shader designed for skin tight, semi-transparent clothing, namely, stocking and pantyhose.
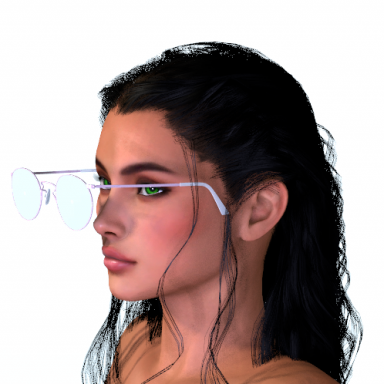
VaM Default Shader:

Custom Shader:

It should be used with this plugin:
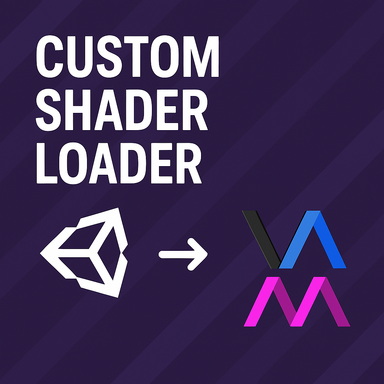
 hub.virtamate.com
How to use:
1. find a clothing you want to use it on, either create one or an existing one.
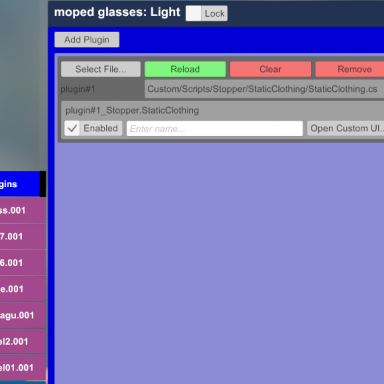
2. Load the assetbundle and shader with CustomShaderLoader plugin
3. adjust the shader propery control on the right of the plugin UI, also adjust the clothing material tab to achieve the desired look.
It is recommended to use this via @Stopper's clothingpluginmanager, please read below guide for how to load plugins on clothing items
 hub.virtamate.com
 hub.virtamate.com
With this you can save default preset tied to the clothing item. The plugin an shader will automatically load when the clothing is loaded.
About the shader's effect
This shader basically implements two effects:
1. darken effect on surface that is facing away from viewport
This is basically to emulate the effect on pantyhose where edge darken when viewing angle is small.
2. anisotropic highlight
Highlights that stretch or streak along a specific direction. This is to emulate the effect of certain fabric material that is more reflective along one direction than others.
About the shader properties and how to adjust them to get your desired look
Each clothing item is different, so you will most definitely need to do a bit tweaking of property sliders:

1. Max Edge Alpha:
This basically controls how opaque the edge effect make. Usually 0.8 ~ 0.95 is good.
2. Edge Color Darken:
This controls how much darker the edge effect can make. Generally speaking for brighter colors this value should be low or 0. For darker colors it should be high and close to 1.
2. Edge Threshold
This controls the threshold of the angle that the darken effect starts to kick in.
3. Edge Smoothness
How smooth the transition is between the darkened and un-darkend area.
3. Anisotropic Strength:
How strong the Anisotropic highlight is. At 0 it reverts to isotropic highlight which is just regular highlight.
4. Anisotropic Offset
Normally you shouldn't need to touch this. This is for when the mesh uv is not at a desired direction and you see the highlight runs along a direction that is not what you want. This changes the direction in which the highlight stretches.
5. Anisotropic falloff
How fast the stretch highlight fade out. Just adjust it until it looks good to you
6. filter cutoff
This is for _DecalTex filtering cutoff value. Please see below about _DecalTex
In additional to above sliders in plugin UI, this shader implements some of VaM's built in properties so you can control them directly from the clothing's material tab:
The controls in green boxes below works normally how you expect them to:
.jpg")
And in the texture tab:
_MainTex, _SpecTex, _GlossTex, _AlphaTex, _BumpMap all work same way as they do in VaM default shader.

As for _DecalTex, I repurposed it to be used as a map to enable/disable the shader effect, in the case you don't want the shader effect on certain part but you cannot separate the materials from the clothing. For this you should create a greyscale texture map similar to alpha map, where color white means the shader effect is on, and color black means the shader effect is off. You'll probably need to create other matching textures to match the diffuse and highlight. The Filter Cutoff slider mentioned above controls the cutoff value of the filter map.
But if you are creating a clothing with this shader in mind, please do consider separating material slots so you can easily control which part of the mesh gets the shader applied.
Additional tips:
1. Generally you should work with a somewhat uniform alpha map. Some clothing has painted alpha map to 'bake in' the effect this shader is doing. If the alpha map has too much highs and lows, you may see some part of the mesh disappear as you dial down the overall alpha via "Alpha Adjust" slider. In those case you should try just use a white alpha map, or modify the alpha map to be more even.
2. Normally you should start by deciding a overall alpha value using the "Alpha Adjust" slider in the material tab, then specular intensity and gloss. Then you can move to Plugin UI to fine tune the shader effect.
3. A detailed Specular/Gloss map can help a lot by adding more detail to the highlight and enhance the look quite a bit
4. You can dial down the diffuse normal strength and highlight normal strength via Diffuse Bumpiness and Specular Bumpiness.
Lastly, since this shader doesn't cast shadows, you can actually use it on some semi-transparent clothing just to avoid the ugly shadow VaM default shader has:
Thank you and please try and let me know any issue you run into.
Clothing used in screenshot credit:
 hub.virtamate.com
Scene screenshots credits again to @supperGR
 hub.virtamate.com
Special thanks to @Skynet and ✝⚜ Godefroy de Bouillon ⚜ ✝ as all of this came from a brainstorming discussion in @Sky.net's discord.

VaM Default Shader:
Custom Shader:
It should be used with this plugin:
Custom Shader Loader - Plugins + Scripts -
This is a plugin that loads custom unity shader from assetbundle. It works on person atoms, clothing items (via @Stopper 's clothing plugin manager) and CUAs. How to use: Where do I get the shader assetbundles? I have one posted here...
How to use:
1. find a clothing you want to use it on, either create one or an existing one.
2. Load the assetbundle and shader with CustomShaderLoader plugin
3. adjust the shader propery control on the right of the plugin UI, also adjust the clothing material tab to achieve the desired look.
It is recommended to use this via @Stopper's clothingpluginmanager, please read below guide for how to load plugins on clothing items
Clothing Plugins - Guides -
What is a "Clothing Plugin"? It turns out that you can trick VAM into loading plugins when an item of clothing is loaded. These plugins don't go into the default Atom plugin UIs and are generally their own separate thing. What can I do with a...
Clothing Plugin Manager - Plugins + Scripts -
A helper plugin that smooths out the rough edges with Clothing Plugins. Does a couple of useful things Sets up references to prevent startup errors Sets up a 'destructor' to clean up on forced reload Adds a "Plugins" UI tab to the clothing...
With this you can save default preset tied to the clothing item. The plugin an shader will automatically load when the clothing is loaded.
About the shader's effect
This shader basically implements two effects:
1. darken effect on surface that is facing away from viewport
This is basically to emulate the effect on pantyhose where edge darken when viewing angle is small.
2. anisotropic highlight
Highlights that stretch or streak along a specific direction. This is to emulate the effect of certain fabric material that is more reflective along one direction than others.
About the shader properties and how to adjust them to get your desired look
Each clothing item is different, so you will most definitely need to do a bit tweaking of property sliders:
1. Max Edge Alpha:
This basically controls how opaque the edge effect make. Usually 0.8 ~ 0.95 is good.
2. Edge Color Darken:
This controls how much darker the edge effect can make. Generally speaking for brighter colors this value should be low or 0. For darker colors it should be high and close to 1.
2. Edge Threshold
This controls the threshold of the angle that the darken effect starts to kick in.
How smooth the transition is between the darkened and un-darkend area.
How strong the Anisotropic highlight is. At 0 it reverts to isotropic highlight which is just regular highlight.
Normally you shouldn't need to touch this. This is for when the mesh uv is not at a desired direction and you see the highlight runs along a direction that is not what you want. This changes the direction in which the highlight stretches.
5. Anisotropic falloff
How fast the stretch highlight fade out. Just adjust it until it looks good to you
6. filter cutoff
This is for _DecalTex filtering cutoff value. Please see below about _DecalTex
In additional to above sliders in plugin UI, this shader implements some of VaM's built in properties so you can control them directly from the clothing's material tab:
The controls in green boxes below works normally how you expect them to:
And in the texture tab:
_MainTex, _SpecTex, _GlossTex, _AlphaTex, _BumpMap all work same way as they do in VaM default shader.
As for _DecalTex, I repurposed it to be used as a map to enable/disable the shader effect, in the case you don't want the shader effect on certain part but you cannot separate the materials from the clothing. For this you should create a greyscale texture map similar to alpha map, where color white means the shader effect is on, and color black means the shader effect is off. You'll probably need to create other matching textures to match the diffuse and highlight. The Filter Cutoff slider mentioned above controls the cutoff value of the filter map.
But if you are creating a clothing with this shader in mind, please do consider separating material slots so you can easily control which part of the mesh gets the shader applied.
Additional tips:
1. Generally you should work with a somewhat uniform alpha map. Some clothing has painted alpha map to 'bake in' the effect this shader is doing. If the alpha map has too much highs and lows, you may see some part of the mesh disappear as you dial down the overall alpha via "Alpha Adjust" slider. In those case you should try just use a white alpha map, or modify the alpha map to be more even.
2. Normally you should start by deciding a overall alpha value using the "Alpha Adjust" slider in the material tab, then specular intensity and gloss. Then you can move to Plugin UI to fine tune the shader effect.
3. A detailed Specular/Gloss map can help a lot by adding more detail to the highlight and enhance the look quite a bit
4. You can dial down the diffuse normal strength and highlight normal strength via Diffuse Bumpiness and Specular Bumpiness.
Lastly, since this shader doesn't cast shadows, you can actually use it on some semi-transparent clothing just to avoid the ugly shadow VaM default shader has:
Clothing used in screenshot credit:
Shimapan Technology - Clothing -
All three items include presets! Look by null7881 (not included) - https://www.patreon.com/null7881/posts
Scene screenshots credits again to @supperGR
Slut show - Your personal Exhibition Hall - Scenes -
-A private studio -一个私人工作室 -A photogenic spot -一个拍照圣地 -A dressing room -一个试衣间 -A character creation support scene -一个捏人辅助场景 -Or you can just use it to enjoy the characters -或者你也可以单纯用它来欣赏角色 Feel free to use it in any way you like! It...
Special thanks to @Skynet and ✝⚜ Godefroy de Bouillon ⚜ ✝ as all of this came from a brainstorming discussion in @Sky.net's discord.