Join the Shadow Venom's Workshop Discord Server!
Check out the Shadow Venom's Workshop community on Discord - hang out with 3041 other members and enjoy free voice and text chat.
Before We Get Started
This guide is primarily aimed at creators, but it also aims to help regular players — or players who want to become creators — so everyone can enjoy building their own lighting experience.Here’s a preview of what you’ll be able to do after reading this guide:
Goal of This Guide
 Make lighting design simple and fun — turning what used to be a boring, tedious, and even pain-in-the-ass process into something enjoyable.
 Lower the barrier to scene creation — so anyone can easily jump in and express their creativity and imagination in VAM.
 Simplify the complex — reducing what once required deep technical skills and experience to a process where you only need to focus on the design itself.
 Make your scene creation more efficient — helping you build and manage complex lighting systems with ease and speed.
 Take your lighting effects to the next level — dramatically boosting the visual impact and overall coolness of your scenes.
We’ll assume you already know how to use the High Performance Volume Light plugin to create volumetric lighting effects using a light atom or an empty atom.
If not, you can use the preset-based Light Creator I’ve provided to instantly generate various lighting examples — such as simple spotlights, fancy prism beams, more complex laser sweep lights, LED strips, and more.
Light Creator - Scenes -
✨ Light Creator — A Plug-and-Play Lighting Preset Repository for VAM Overview Light Creator is a plug-and-play lighting preset repository designed to share my original lighting shape and rig designs — from simple single moving heads to...
In order to start creating your stunning lighting effects — whether it’s simple light effects for a lap dance scene, the full lighting atmosphere of a nightclub, or a complex programmed lighting array for a large concert stage — here are the Skills You Need to Know:
- How to load a plugin onto an atom.
- How to adjust plugin settings through the plugin panel.
- How to create and edit triggers
(You need to know how to use triggers to change light colors, how to use transition triggers to dynamically adjust light intensity, and more — especially for advanced control. For example, if you want to build a full, complex stage lighting setup or dynamically adjust lighting effects through Timeline, mastering triggers is essential.)
You’ll also need the following two plugins:
- High Performance Volume Light (HPVL) by @PluginIdea
- C&G-STUDIO Audio Visualizer Suite by Shadow Venom in collaboration with @C&G-STUDIO
Once you’ve finished reading this guide, check out the YouTube video tutorial and follow along to build it step by step yourself.
YouTube Video Tutorial: How to Build a Concert-Level Stage Lighting Array in VAM in 20 Minutes - Guides -
Having trouble or want to share your stage design ideas? Join our Discord channel! 🎧✨ https://discord.gg/MvkhsYRHVw YouTube Video Tutorial: How to Build a Concert-Level Stage Lighting Array in VAM in 20 Minutes By spending just 20 minutes or...
How Things Work
Just like in the real world — where one device plays the audio source, another controller analyzes it, converts it into digital frequency data, and then sends the categorized signals through data lines to terminal fixtures like moving-head lights — but here, we don’t have to deal with any of those boring technical details.
Simply put, we’re bringing real-world DMX lighting control technology to life inside VAM, in the simplest and most user-friendly way possible.
DMX (short for Digital Multiplex) is a standardized digital communication protocol widely used in stage, concert, and architectural lighting control. It allows a single controller to send real-time commands to hundreds of lighting fixtures — adjusting parameters such as brightness, color, movement, and effects — through a unified signal chain. In short, DMX serves as the “language” that enables all lights and effects on stage to work together in perfect synchronization.
Building a Basic DMX-Style Setup
While each component in the C&G-Studio Audio Visualizer Suite plugin suite can be used independently based on your own needs, they work best as a system.
Earlier, we explained how it simulates a DMX-style lighting control system — now, let’s go step by step to build a basic signal flow.
Step 1: Load RhythmReactor and BPMIntervalTrigger
First, load the RhythmReactor plugin onto the sound atom that plays music in your scene.
Then, load the BPMIntervalTrigger plugin onto any atom. It’s recommended to load BPMIntervalTrigger onto a newly created empty atom — this will give you greater flexibility for quick access and future expansion of its functions.
Step 2: Setting Up RhythmReactor
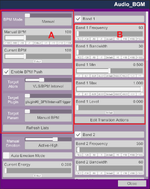
RhythmReactor sits at the very top of the entire signal flow — it’s responsible for parsing the audio source. Its core functions include BPM detection (either automatic or manual), audio frequency band analysis, and an emotion state machine.
A. BPM Setup
First, you’ll need to set the BPM mode. For the best synchronization results, it’s recommended to set the BPM manually.In most cases — especially for lap dance scenes where the track is fixed — you can easily find the song’s BPM through a quick search. Once set, assign the BPM target output to the BPMIntervalTrigger plugin, and in the Target Param field, choose Manual BPM.
BPM stands for Beats Per Minute — it’s a unit used to measure the tempo of music.
In simple terms, it tells you how many beats occur in one minute of a song.
A higher BPM means a faster rhythm (common in dance, EDM, and K-pop tracks), while a lower BPM indicates a slower, more relaxed tempo (like in ballads or ambient music).
In lighting and animation systems like this one, BPM acts as the heartbeat of the entire scene — it synchronizes lights, motions, and effects with the rhythm of the music, ensuring that every flash, move, and color change happens perfectly in time with the beat.
If you’re building a general-purpose stage meant to play various MMD dance animations with different tracks — and you don’t feel like looking up the BPM for every song — Auto mode is more suitable. Although it’s less precise, it adapts dynamically when songs change.
B. Frequency Band Analysis
RhythmReactor also provides audio band analysis. For example, a frequency value around 93 Hz often represents the bass range.Each frequency band includes an editable transition action, which can be used to dynamically control properties such as light intensity, brightness, or color transitions in real time. In practical use, it’s recommended to keep only the light intensity controlled at this level, as assigning other properties to the next layer or directly to the fixture itself will give you greater freedom and creative flexibility.
| Category | Source / Instrument | Typical Frequency Range | Notes |
|---|---|---|---|
| Female Vocal (Soprano) | 250 – 1,000 Hz (core), up to 8 kHz | Bright, airy harmonics | |
| Female Vocal (Alto / Mezzo) | 200 – 800 Hz | Warm, midrange tone | |
| Male Vocal (Tenor) | 150 – 600 Hz | Clear and strong presence | |
| Male Vocal (Baritone / Bass) | 80 – 400 Hz | Deep and full | |
| Breath / Air Noise | 6 – 10 kHz | Adds realism and space | |
| Sibilance (“S”, “T” sounds) | 5 – 8 kHz | Sharp high-frequency detail | |
| Kick Drum (Bass Drum) | 50 – 100 Hz | Low-end punch and thump | |
| Snare Drum | 150 – 250 Hz (body), 2 – 5 kHz (crack) | Defines rhythm and snap | |
| Hi-Hat / Cymbals | 5 – 12 kHz | High shimmer | |
| Toms | 80 – 500 Hz | Full tone and resonance | |
| Clap | 1 – 2 kHz | Crisp attack | |
| Electric Bass / Synth Bass | 40 – 250 Hz | Foundation of groove | |
| Electric Guitar | 100 – 1,200 Hz (body), 2 – 6 kHz (presence) | Harmonic texture | |
| Acoustic Guitar | 80 – 1,000 Hz | Balanced body tone | |
| Violin | 200 – 3,000 Hz | Sharp melodic range | |
| Cello | 60 – 600 Hz | Warm, low-mid resonance | |
| Piano | 27 Hz – 4 kHz (fundamentals), up to 8 kHz (harmonics) | Wide dynamic range | |
| Synth Pads | 200 Hz – 3 kHz | Ambient layers | |
| Lead Synths | 500 Hz – 4 kHz | Melodic focus | |
| Sub-Bass | 20 – 60 Hz | Deep rumble | |
| Bass | 60 – 250 Hz | Weight and drive | |
| Low-Mid | 250 – 500 Hz | Warmth and fullness | |
| Mid | 500 Hz – 2 kHz | Definition and clarity | |
| High-Mid | 2 – 5 kHz | Attack and presence | |
| High / Presence | 5 – 12 kHz | Brilliance | |
| Air / Sparkle | 12 – 20 kHz | Openness and shine |
C. Emotion State Machine
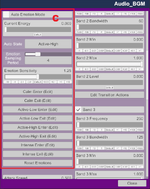
The Emotion State Machine is optional — you don’t necessarily need to use it.It mainly serves as a template-based high-level control system, allowing you to define lighting presets for different song sections.
For instance, your entire lighting array might use one color scheme and movement pattern during the verse, then automatically (or via trigger) switch to a different preset during the chorus.
In manual mode, you can control it through triggers — for example, by telling it to switch to a specific state at a certain time point in Timeline.
In automatic mode, it samples data from various frequency bands and uses an internal algorithm to calculate the energy level of the specified beat interval. For instance, if you set it to 4, it will analyze the energy over every four beats and switch states based on the resulting energy level.
Please note that this is a basic, experimental feature — you may need to fine-tune the interval and sensitivity settings to achieve the desired results. Achieving truly ideal behavior would require the use of AI-based large models, which is beyond the scope of this plugin.
Step 3: Setting Up BPMIntervalTrigger
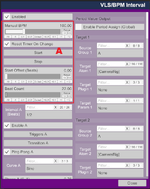
BPMIntervalTrigger is the second-level controller in the signal flow. Its role is to take the real-time BPM data pushed from RhythmReactor and further divide it into eight independent signal channels (A–H), allowing beat-accurate control over your lighting effects.
A. BPM Source & Sync Settings
In this guide, the plugin is set to receive its real-time BPM value from RhythmReactor. Be sure to uncheck “Reset Timer On Change” when using Auto BPM Mode in RhythmReactor — otherwise, every BPM update will reset the timer and cause desynchronization.You can use the Start Offset parameter to fine-tune synchronization — for example, to compensate if your music file contains a few seconds of silence at the beginning.
B. Channel Configuration (A–H)
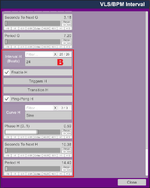
You can assign each of the eight channels (A–H) a unique beat interval, ranging from ¼ beat to 24 beats.- ¼ beat intervals are ideal for fast-changing effects such as strobe flashes or high-speed pulse beams.
- 24-beat intervals are best suited for smooth, lyrical transitions like soft fades or slow rotational movements.
| Interval | 60 BPM | 90 BPM | 100 BPM | 120 BPM | 140 BPM | Description / Common Use |
|---|---|---|---|---|---|---|
| 0.25 s | 0.17 s | 0.15 s | 0.13 s | 0.11 s | Extreme flicker, strobe light effects | |
| 0.5 s | 0.33 s | 0.3 s | 0.25 s | 0.21 s | Fast pulse lights or quick motion | |
| 1.0 s | 0.67 s | 0.6 s | 0.5 s | 0.43 s | Standard beat-to-beat sync | |
| 2.0 s | 1.33 s | 1.2 s | 1.0 s | 0.86 s | Alternating or step effects | |
| 4.0 s | 2.67 s | 2.4 s | 2.0 s | 1.71 s | Color changes per measure | |
| 8.0 s | 5.33 s | 4.8 s | 4.0 s | 3.43 s | Smooth fade or slow pan | |
| 16.0 s | 10.7 s | 9.6 s | 8.0 s | 6.86 s | Movement or brightness fade cycles | |
| 24.0 s | 16.0 s | 14.4 s | 12.0 s | 10.3 s | Long ambient or cinematic transitions |
Each channel includes a Curve Selector and a Ping-Pong Toggle that control how its phase signal evolves over time:
- Curve Type
- Linear – The default mode. Produces a constant, uniform progression from 0 → 1, ideal for steady transitions such as dimmer fades or linear motion.
- Sine – Generates a smooth sinusoidal curve (0.5 – cos(π × p)/2), giving natural acceleration and deceleration, great for breathing-style or oscillating effects.
- Smoothstep – Creates a soft S-shaped easing curve, smoother than linear but less round than sine, perfect for gradual lighting transitions.
- Ping-Pong Mode
When enabled, the signal cycles 0 → 1 → 0 instead of simply resetting from 1 → 0. This produces continuous back-and-forth motion, ideal for moving lights, swinging beams, or looping brightness waves.
- Event Trigger – Fires once every time a full interval completes (for example, every beat on a 1-beat channel).
- Transition Trigger – Outputs continuous float values (0 → 1 or 0 → 1 → 0 in Ping-Pong mode) that can be mapped to any property, such as light intensity, color blend, or joint movement.
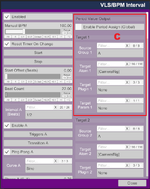
C. Period Value Output (Optional Feature)
As an enhanced function, BPMIntervalTrigger can push a constant period value to any target within VAM’s trigger space.For example, if Interval A = 1 beat and BPM = 60, the plugin outputs a 1-second value to the selected target.
You can use this to synchronize other systems — for instance, driving the AutoThruster plugin on a character atom to complete one forward-backward motion every second, perfectly in time with the music.
Let’s say you’re building a lap dance scene and want your lights — and even the performer’s movement — to stay perfectly in sync with the music.
Here’s how you can set it up:
Here’s how you can set it up:
- RhythmReactor:
- Set the BPM manually to match your track (for example, 100 BPM).
- Enable BPM Push and target your BPMIntervalTrigger plugin.
- BPMIntervalTrigger:
- Channel A → Set Interval = ¼ beat and link it to a strobe light’s intensity parameter — this creates rapid flashes perfectly timed to the beat.
- Channel C → Set Interval = 4 beats and connect it to a color change effect — your stage lights now shift hue smoothly every measure.
- Channel F → Set Interval = 16 beats and assign it to a spotlight or beam, accentuating transitions between the verse and chorus.
- Using Period Value Output (Channel A):
- Enable Period Value Output, and assign Target 1 to the hip joint of your character atom controlled by the AutoThruster plugin. This allows it to move according to the desired cycle.
- Set Interval A = 1 beat. At 100 BPM, this equals 0.6 seconds per cycle. You can switch the source channel for Target 1 at any time to make it move following different rhythmic intervals.
- Connect this value to an AutoThruster plugin on the hip joint — this makes the character perform a gentle up-and-down motion perfectly synchronized to the rhythm.
- Result:
- Your strobe pulses with every beat.
- The stage color flows naturally across musical phrases.
- The performer’s movement subtly follows the rhythm, making the whole scene feel alive and harmonized — all driven by the same BPM signal chain.
Setup and Control of a Single Fixture
We’ve finally made it through the boring technical prep  — now it’s time for the fun part: visualization!

Let’s hook up those fixture data lines Now that we have a basic DMX-style signal chain, we’ll connect the “lights” in the scene — whether real or simulated — as endpoints within that chain.
What we need to do next is load the StageMoverMH plugin from the suite onto the light atom, or onto an Empty atom that uses the HPVL plugin to simulate volumetric lighting.
Before we move on, I want you to remind yourself — by loading the StageMoverMH plugin, you’re essentially turning an atom in VAM into a real-world moving head fixture.
Yes, that’s right — thinking this way will greatly help you understand the following sections of the guide and make full use of its capabilities.
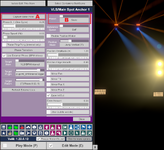
Step 1: Fixture Base Position
Step 2: Connect to the Signal Chain
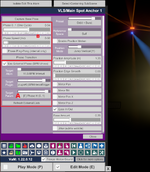
Although StageMoverMH can operate independently using its built-in cycle counter (B), it’s primarily designed to function as a terminal device within the signal chain.
For this guide, make sure it’s set to Use External Phase mode.
Then, use the dropdown menus to link it to your BPMIntervalTrigger — set the Target Atom and Target Plugin accordingly, and select the desired channel under Target Param (A).
In practice, you can dynamically switch its signal source at any time via triggers to make it follow different rhythmic channels.
Earlier, we learned that each channel behaves differently depending on its interval setting.
For example, if you select Channel A as the source and it’s set to ½ beat, the fixture’s behavior will be highly dynamic — it may move rapidly or flash at a high frequency (if its light intensity is controlled through its internal transition trigger).
However, if you later use a trigger in Timeline to switch its source to Channel H, which is set to a 24-beat cycle, the same fixture will become soft and graceful, moving in a calm, fluid rhythm instead.
Step 3: Define Fixture Type Through Presets
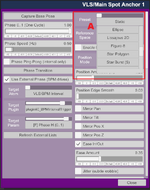
The StageMoverMH plugin provides a comprehensive suite of 31 motion presets (A) designed to emulate real-world stage lighting behaviors across various fixture types. Its presets range from classic pan/tilt sweeps and wave motions to advanced geometric paths such as circles, spirals, and Lissajous curves, as well as continuous multi-axis spins. Each motion pattern is physically inspired by real fixtures including moving head beams, spots, washes, hybrid units, linear LED bars, and FX or laser-style lights. Through parameter controls for amplitude, speed, easing, mirroring, position motion, and external BPM synchronization, StageMoverMH allows users to reproduce the expressive dynamics of professional stage lighting systems—from smooth audience sweeps to complex concert-grade choreography—directly within VAM. Like all other settings, they can be adjusted at any time through VAM’s trigger system.
 I. Basic & Linear Motion
- Static – Keeps the fixture still at its base position.
- Pan Sweep – Horizontal side-to-side panning motion.
- Tilt Sweep – Vertical up-and-down sweeping.
- Line Sweep (H) – Linear horizontal movement, often for light walls.
- Line Sweep (V) – Linear vertical movement.
- Wave Sweep (H) – Smooth wave-like horizontal motion.
 II. Artistic & Geometric Paths
- Hold-at-Ends – Sweeps with a short pause at each endpoint.
- Stepped Scan – Moves in discrete steps, creating a rhythmic chase.
- Segmented Bounce – Multi-section bouncing with overshoot for impact.
- Step Scan (Pan) – Horizontal three-point jump (left, center, right).
- Step Scan (Tilt) – Vertical three-point jump (up, center, down).
- Square Path – Draws a square motion pattern in space.
- Triangle Path – Triangular looping path.
- Arc Sweep – Semi-circular sweep motion.
- Dot Chase (3-pt) – Three-point chasing motion pattern.
 III. Curved & Patterned Motion
- Circle – Classic circular orbit around a center point.
- Ellipse – Elliptical path with off-center movement.
- Lissajous 2D – Complex dual-frequency sine pattern.
- Figure-8 – Infinity (∞) shaped continuous loop.
- Star Polygon – Rotating multi-point star pattern.
- Star Burst (5) – Five-point starburst explosion effect.
 IV. Dynamic & Random Motion
- Random Walk – Organic, noise-driven wandering motion.
- Oscillate Swing (Pan) – Gentle left-right oscillation.
- Oscillate Swing (Tilt) – Gentle up-down oscillation.
- Orbit + Burst – Circular orbit combined with pulse-like bursts.
- Spiral Up – Rising spiral motion over time.
- Spiral Down – Descending spiral motion.
 V. Continuous Rotation Series
- Spin X – Continuous rotation along the X-axis.
- Spin Y – Continuous rotation along the Y-axis.
- Spin Z – Continuous rotation along the Z-axis.
- Spin XYZ – Simultaneous triple-axis spinning motion.
 I. Basic & Linear Motion (Typical Moving Head / Beam / Spot)
| Preset | Real-World Fixture Type | Practical Usage | Real-World Fixture Examples |
|---|---|---|---|
| Static | Any Spot / Beam / Wash | Fixed position — front light, static projection, logo focus. | Clay Paky Sharpy, Robe Pointe |
| Pan Sweep | Moving Head (Pan axis) | Horizontal sweeping motion for audience scanning or energy builds. | Martin MAC Aura, Robe MegaPointe |
| Tilt Sweep | Moving Head (Tilt axis) | Vertical sweeping for beam fans or upward accents. | Clay Paky Mythos 2 |
| Line Sweep (H) | Linear Beam Bar / Blade | Horizontal bar movement creating light walls or scanning lines. | GLP Impression X4 Bar, Ayrton MagicBlade FX |
| Line Sweep (V) | Linear Beam Bar / Matrix | Vertical light chase for architectural rhythm. | Ayrton MagicPanel-R, Robe Tetra2 |
| Wave Sweep (H) | Curved Beam Bar | Wavy left-to-right movement matching music tempo. | GLP JDC Line, Robe Tetra2 |
 II. Artistic Scan & Geometric Path (Spot / Hybrid / Scanner / Laser FX)
| Preset | Real-World Fixture Type | Practical Usage | Real-World Fixture Examples |
|---|---|---|---|
| Hold-at-Ends | Moving Spot / Wash | Pauses at end points to emphasize rhythm or beat accents. | Robe ESPRITE, Martin MAC Viper |
| Stepped Scan | Moving Spot with macro steps | Discrete step scanning — DMX chase style. | Clay Paky Axcor 300 |
| Segmented Bounce | Hybrid Beam | Bouncing path with overshoot — ideal for EDM energy. | Beam 230 / 280 / 470 |
| Step Scan (Pan) | Pan-only Moving Head | Three-step left-center-right jump. | Robe Pointe, Elation Beam 5R |
| Step Scan (Tilt) | Tilt-only Moving Head | Three-step up-center-down jump. | Robe BMFL, Martin ERA 300 |
| Square Path | Moving Mirror / Hybrid | Square movement pattern for geometric effects. | Clay Paky Scenius, Robe BMFL Blade |
| Triangle Path | Moving Head / Mirror | Triangular scanning — visual geometry. | Martin MAC 101, Ayrton Diablo |
| Arc Sweep | Linked Pan-Tilt Sweep | Semi-circular light motion, often used for side walls. | Clay Paky Alpha Beam, Robe BMFL |
| Dot Chase (3-pt) | Multi-cell Bar / Matrix | Sequential three-point chase across fixtures. | GLP Impression X4 Bar, Chauvet Rogue R2X Wash |
 III. Curved & Patterned Motion (Graphic / FX / Laser Fixtures)
| Preset | Real-World Fixture Type | Practical Usage | Real-World Fixture Examples |
|---|---|---|---|
| Circle | Moving Spot / Wash | Classic circular sweep or motion orbit. | Robe Spiider, Ayrton Bora |
| Ellipse | Tilt-biased Moving Head | Elliptical orbit — off-center sweeping. | Martin MAC Quantum Wash |
| Lissajous 2D | Graphic / FX Head | Dual-frequency curve pattern — laser-style shape. | Ayrton MagicPanel-FX, Clay Paky Axcor 600 |
| Figure-8 | Beam / Wash | Infinity-shaped (∞) loop — continuous flowing motion. | Robe iPointe, Ayrton Perseo |
| Star Polygon | Graphic / Laser Fixture | Rotating star-shaped path — decorative or laser mimic. | KVANT ClubMax 3000, Pangolin LaserCube |
| Star Burst (5) | FX Wash / Beam Matrix | Five-point starburst flash effect. | GLP Impression FR10, Robe LEDBeam 150 |
 IV. Dynamic & Random Motion (Automated FX / Noise-Driven Movement)
| Preset | Real-World Fixture Type | Practical Usage | Real-World Fixture Examples |
|---|---|---|---|
| Random Walk | Wash / Matrix Head | Randomized wobble or noise-based subtle drift. | Robe TetraX, Elation ZW37 |
| Oscillate Swing (Pan) | Beam / Spot | Gentle horizontal swing — soft scanning. | Robe Pointe, Martin MAC 700 |
| Oscillate Swing (Tilt) | Beam / Wash | Smooth vertical swing — adds dynamic depth. | Clay Paky Arolla, Elation Proteus Maximus |
| Orbit + Burst | Hybrid Beam + FX | Orbital motion combined with rhythmic burst intensity. | Robe MegaPointe, Ayrton Domino |
| Spiral Up | Beam / Laser Scanner | Spiral upward — beam rises through space. | Clay Paky Xtylos, Ayrton Cobra |
| Spiral Down | Beam / Laser Scanner | Descending spiral — falling beam vortex. | Robe iForte, GLP JDC Line FX |
 V. Continuous Rotation (Spin Series — Infinite Rotation / Multi-Axis Fixtures)
| Preset | Real-World Fixture Type | Practical Usage | Real-World Fixture Examples |
|---|---|---|---|
| Spin X | Roller / Linear Axis Fixture | Rolling motion along the X-axis — roller FX. | Martin Atomic Roller, GLP XDC1 |
| Spin Y | Moving Head / Scanner | Continuous Pan rotation — wide sweeps or FX loops. | Robe BMFL Blade, Clay Paky Mythos |
| Spin Z | Matrix / Pixel Head | Head-self rotation — pinwheel or dot spin. | Ayrton MagicDot-SX, Chauvet Maverick MK2 |
| Spin XYZ | High-end 3-axis Hybrid Head | Triple-axis rotation — vortex spiral / “infinite twist.” | Clay Paky Xtylos, Ayrton Cobra, Robe iForte |
Step 4: Other Functions & Settings
A. Position Motion

The position function allows the fixture to move along the X, Y, or Z axis according to the rhythm defined by the input channel.
When Enable Position Motion is turned on, the fixture will shift within the distance specified by Position Amplitude.
If Position Edge Smooth is set to 0, the light will jump sharply between positions (you can think of this as the effect often seen in large-scale stage shows, where hundreds of lights in a massive array switch on and off in rhythmic groups).
Increasing this value makes the movement smoother, resembling the behavior of a track light gliding along a rail.
B. Mirror Controls
When working with paired or grouped lights, you can use the Mirror Pan, Mirror Tilt, and Mirror Position (X/Z) settings to make one fixture behave as a mirror reflection of the other.This is useful for creating symmetrical lighting rigs — for example, two moving heads sweeping in opposite directions or mirrored spotlights crossing each other perfectly in sync.
C. Fine-Tune Controls
The plugin also provides a variety of fine adjustment parameters, many of which are designed for specific presets.In most cases, you won’t need to modify them manually — they’re mainly there to let you fine-tune motion details, such as subtle wobble, pan/tilt center offsets, or step-based movement smoothness, when creating custom or experimental lighting behaviors.
LED-Type Fixture Simulation Based on CUA
LEDEmissionFXController can be applied to any CUA asset with an emissive material, turning it into a signal-driven LED fixture or other self-illuminated light source.
It works seamlessly with RhythmReactor and BPMIntervalTrigger, allowing your lighting effects to dynamically respond to music rhythm and control signals in real time.
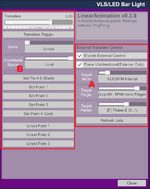
A. External Data Interface & Signal Input
Start by connecting the plugin to your control system via the External section:- External Atom / Plugin / Param define the data source (e.g., VLS/BPM Interval → plugin#0_BPMIntervalTrigger → [F] Phase E (0..1)).
- The selected channel determines how fast the intensity or color changes.
- You can enable external control for light intensity (UseExternalForIntensity) or color lerp (UseExternalForColorLerp) independently.
B. Renderer Selection & Application
When loaded, the plugin automatically detects the Renderer that uses an emissive material.If your asset has multiple emissive materials or sub-objects, you can manually choose one from the Renderer dropdown.
- ApplyToAllRenderers – Apply the same settings to all renderers in the asset.
- Material Index (-1 = All) – Select which material slot to affect.
- Apply Now / Refresh Renderers – Instantly apply or refresh the assigned renderers.
C. Intensity Control (Emission Intensity)
Controls the overall brightness of the emissive light:
- EmissionIntensity – Base brightness level.
- EnableIntensityVariation – Enables animated intensity variation.
- Intensity Lerp (0–1) – Current transition stage (0 = dim, 1 = full).
- Intensity Speed – Speed of the brightness transition.
- MinIntensity / MaxIntensity – Range of the brightness variation.
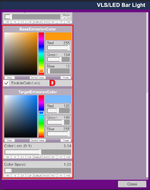
D. Color Control (Emission Color)
Controls color transitions between two emission states:
- BaseEmissionColor – Starting color of the light.
- EnableColorLerp – Enables color lerping (color transition).
- TargetEmissionColor – Target color to transition to.
- Color Lerp (0–1) – Current interpolation stage.
- Color Speed – Speed of the color transition.
In short, LEDEmissionFXController transforms any emissive CUA asset into a BPM-driven LED fixture, fully synchronized with the rest of your stage lighting system through the unified signal chain.
Linear Animation Controller (Modified Version)
MacGruber_LinearAnimation_Mod is an enhanced version of MacGruber’s original LinearAnimation plugin, redesigned and extended to integrate seamlessly with the Audio Visualizer Suite signal system.
It can be used to animate any type of object — not only lights or stage elements, but also props, characters, cameras, or UI components.
This makes it both a valuable complement to the rich fixture presets offered by StageMoverMH and a powerful creative tool that expands your design possibilities far beyond lighting control.
Timeline is a powerful animation plugin — but it’s built around a time-based system, whereas LinearAnimation_Mod is phase-based.
This means it can respond to and synchronize with the exact rhythm and beat of the music.
No matter which channel phase you switch to, the motion it controls will always stay perfectly aligned with the music’s tempo.
This means it can respond to and synchronize with the exact rhythm and beat of the music.
No matter which channel phase you switch to, the motion it controls will always stay perfectly aligned with the music’s tempo.

A. External Transition Control
This section allows the animation to respond to an external float parameter, such as a phase value from BPMIntervalTrigger.
- Enable External Control – Activates external data input for the transition.
- Force Unidirectional (External Only) – Converts incoming Ping-Pong data (0→1→0) into a unidirectional 0→1 motion, ideal for forward-only effects.
- Target Atom / Plugin / Param – Defines where the control data originates (for example: VLS/BPM Interval → plugin#0_BPMIntervalTrigger → [F] Phase E (0..1)).
- Refresh Lists – Updates atom, plugin, and parameter lists when the scene changes.
B. Transition & Motion Setup
The Transition slider represents the animation’s current progress (0–1).
When linked to external data, it updates automatically, but you can also adjust it manually for testing or fine-tuning.
Curve Options:
- Linear – Constant, even-rate motion.
- Sine – Natural easing with acceleration and deceleration.
- Smoothstep – A soft S-shaped transition, perfect for subtle or cinematic effects.
Select whether animation operates in World or Local space.
- Local (default) – Follows the parent atom’s transform, ideal for stage rigs or nested setups.
- World – Uses global coordinates, maintaining its absolute position.
Define up to five transform points (Start, optional intermediate Points 1–3, End).
Each point records position and rotation, allowing precise path-based or multi-stage animation.
Use the Set / Unset Point buttons to record or remove poses directly from the atom’s current state.
C. Editable Transition Trigger
The plugin provides an editable transition trigger, allowing you to create transition-based events for secondary control — such as adjusting an object’s size, color, brightness, or any other property — and to link it interactively with other objects in the scene.
This makes it a versatile coordination tool that bridges movement, timing, and reactive design.
Advanced Features
- Force Unidirectional Mapping: Ensures external Ping-Pong signals always move forward, preventing oscillation when driven by rhythmic data.
- Local/World Space Compatibility: Defaulting to Local for easy parenting and subscene usage.
- Multi-Stage Interpolation: Supports up to five points for layered, non-linear motion paths.
Designing and Controlling Large-Scale Stage Lighting Arrays
Well... I feel this part is more related to scene design and construction — and more importantly, to optimization techniques.
It might be easier to demonstrate with a demo scene, so if there’s interest, I’ll find some time to complete this section later.
However, here are a few tips that may help when you start building more complex lighting arrays:
- Always assign a parent atom for each atom or group of atoms.
For example, if your fixture is Empty A, nest it under another Empty atom as its parent.
Treat the parent atom as an anchor point — this allows your lights to take full advantage of local/self positioning, making your setup more flexible and scalable. - The HPVL plugin itself supports group-level volumetric light control.
The principle is the same as above: when HPVL is loaded onto a parent atom, all child atoms will inherit its lighting properties automatically. - Always plan ahead before you start — having a blueprint, even if it only exists in your mind, will make it much easier to turn your vision into the dream design you want.
I’ll go into more detail about the reasoning and practical applications of this method when I share how to build large-scale lighting arrays while still maintaining high scene performance in a future update.
How Can I Change Something with a Trigger?
This plugin suite exposes all adjustable parameters — everything you see in the plugin’s UI, as well as some internal parameters that may be useful — to VAM’s trigger system.
You can easily locate and modify them through triggers whenever needed.
YouTube Video Tutorial
Now you’ve finished reading this guide, check out the YouTube video tutorial and follow along to build it step by step yourself.
YouTube Video Tutorial: How to Build a Concert-Level Stage Lighting Array in VAM in 20 Minutes - Guides -
Having trouble or want to share your stage design ideas? Join our Discord channel! 🎧✨ https://discord.gg/MvkhsYRHVw YouTube Video Tutorial: How to Build a Concert-Level Stage Lighting Array in VAM in 20 Minutes By spending just 20 minutes or...
Note on Credits
First and foremost, special thanks to @C&G-STUDIO for their collaboration in developing this plugin suite. Without their long-term exploration of lighting and stage effects in VAM, I might never have discovered the joy of “light pollution” that first drew me into VAM.
I’d also like to thank @hazmhox and @HAL9001 — @hazmhox ’s original VAMAudioAnalyzer and @HAL9001 ’s subsequent BeatIt plugin provided the solid foundation on which the RhythmReactor component of this suite was built.
And finally, a heartfelt thanks to @MacGruber — his Utils plugin made development of this entire suite far more streamlined and efficient. This suite also includes an enhanced and improved version of the LinearAnimation plugin, which is part of his LogicBricks suite.
A very special thanks to @PluginIdea , who brought volumetric light simulation into the world of VAM.


