This guide is completely outdated!
You can check my deviantart page to see my creations using this workflow.
This is a small guide on how i create hentai artwork using VaM and Stable diffusion, with little to no drawing skills
First, install Stable Diffusion, lots of guides out there, i recommend using a one-click installer like Automatic1111 (the one i'm using)
- Use the Anything v4.5 model for a anime style look, with the vae-ft-nse-84000-ema-pruned VAE as default. Place the model into "/models/Stable-diffusion" and the vae into "/models/VAE".
- You can use a ton of different models (Realistic, stylized, comics, manga etc) or even create your own model to create your "personal" style.
Image size:
Using the right image size/ratio is the most important parameter to create good quality images.
- Try to match your Screenshot image ratio (there are options to fix unmatching ratios, but i will not cover them here). I recommend using 3:4, 2:3 or 1:1 (And 4:3, 3:2)
- For low quality test images in 3:4, i usually use 384x512, and when the style is right i double it (768x1024).
Other generation parameters:
- I recommend using 20-30 steps, but you can play with it between 20-100 to see the differences (very small dif above 50, for a heavy time cost).
- Euler_a or Heun Sampler (Euler_a for sharper results, Heun for smoother results. Very small difference at 50 steps, higher difference at lower steps)
- Use a low CFG (Guidance) Scale (7-8)
- Denoising strength set how the result will be different from the input image, set it to 0.3-0.4 to have a result really close to your screenshot, and 0.7-0.8 to let the AI be more creative.
- Only use the Face/eyes fix for realistic models.
With those settings, use a very descriptive prompt, describing the body shape, hair style, the clothing, the style etc.
Example prompt:
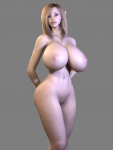
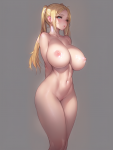
This is the prompt i generaly use as a base for naked anime characters standing (with the anything_v3 model).
Positive:
1Girl,(Simple background:1.4), (Fully naked:1.3), (Standing Sexy Pose:1.3), (Blonde hair:1.3), (Big breasts:1.4), (Big Hips:1.2), (Glossy skin:1.3), line art, celshading, anime, hentai, hd, stunning, 4k,Highly detailed, cinematic, agfacolor, (photorealism),detailed, colorful, 50mm, F/2.8, trending on CGSociety, trending on ArtStation
Negative:
Child, Childish, childlike, loli, lolicon, blurry, rendering, painting, signature, ((ugly)), ((duplicate)), (morbid), ((mutilated)), (mutated), (deformed), (disfigured), (extra limbs), (malformed limbs), (missing arms), (missing legs), (extra arms), (extra legs), (fused fingers), (too many fingers), long neck,((Wireframe)),Polygons,Screenshot,Character design,Software,UI,((watermark)),(text),(overlay),getty images,(cropped),low quality, worst quality
Prompt Explanation:
1Girl at the start of the prompt is a special word Anything_v3 has been trained on to create solo female characters, you can use 1boy as well. It will not work with other models.
The parenthesis give words importance, if you want to ensure something is in the image add parenthesis.
You can set the importance using the ":1.2" or "0.25" ie. at the end of the parenthesis.
Generation Tips:
- Having a simple mono color background in your screenshots helps a lot. You can use an emissive panel in vam to set the background color (set specular to 0, and select the material color). The background color will definitly influence the generation!! For exemple it will change the skin tint slightly, independently of your prompt.
- You can use naked characters in the screenshots, and specify the clothing in the prompt or you can put cloth on your character in VaM and match it in your prompt. I usually generate naked characters, and add the clothing using inpainting later.
Adding details
- You can use the InPainting feature of Stable Diffusion to add clothing/details after the first generation. Select the area you want to InPaint in your SD interface, and write a new prompt for this area! For example here i added the clothing with inpainting (Images made with a custom made model):
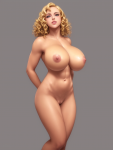
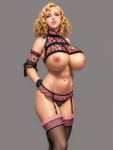
- I recommend using the same prompt you used for the naked body generation, and just replace the naked part by the clothing you want in the inpainted area. For exemple, in my prompt, replace the (((Fully naked:1.3))) by your clothing description, something like (((White Croptop:1.3))), (((Pink Skirt:1.3))).
Finishing touches:
When you are happy with your image, you can upscale it to HD.
if you are using Automatic1111, send it to extras, select the "upscaler 1" (i usually use "R-ESRGAN 4x+ Anime6B" for smoother images, and "R-ESRGAN 4x+" for sharper ones).
Adding High res details (require some experience to really understand how to use this technique)
You can add high res details to your image after you upscaled it. It's pretty hard to master, and give a lot of inconsistent results.
Start by sending your upscaled image to Inpainting, and toggle the "Only masked" on(or "Inpaint at full resolution", depending on the version). Now try to inpaint your characters face, and type a new prompt only for the face!
Example of a high res inpaint for the face:

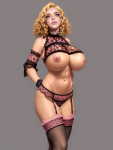
Now that you have your character, you can detour it and add a background in photoshop, gimp, or any other editing software, and your artwork is done!
Fixing the hands:
- You can use vam screenshots as stencils to fix the hands afterward (The hands are often wonky) if you don't have the drawing skills to redraw them directly. It take some times, but i think the result is worth it!
For exemple here, i used the hands from these screenshots, and painted the skin over:


- To do that, add the screenshots to your editing software as a layer, use the transform tool to scale it, and place it where you want.
- Now set it's opacity to half and draw the outline.
- Fill it with the neutral skin color (pick it from the image). Do the same for the highlights and shadows. Finally blend the skin colors.
Additionally, you can erase everything except the hands from the screenshot you used as stencil, and set it's opacity really low to give some of the original texture to the skin.
If you want me to add missing infos in the guide, send a message!
Have fun


