Build a stable, neutral scene quickly off of the default VaM scene
Perfect and easy for beginners, but intermediate players can learn something too. Some of these very simple options took me forever to figure out that they even existed.
I know everyone has experienced the frustration of dragging something in their scene when they least intended to, and everyone's experienced the frustration of playing a scene and watching it break horribly due to an accidental mouse click that the creator could have prevented for you. Oh no, they left the wood panel floor accessible! Now it's stuck through my model's chest and I'm in explosion city! Help!
(More stable vam) + (more time saved) x (number of vam players) = Net increase of vam creation and scenes for everyone. Simple as.
This guide contains step-by-step instructions with pictures. You can read it for overlooked tips you can make use of. Also, any intimidated beginner can use this guide. You can follow it step by step to make your own stable, risk-free character creator sandbox scene off of VaM's default scene. And at the end, you can save it and change it to be your VaM's default scene that loads in when VaM opens. You will save yourself a lot of time with these easy tips, and create many things, much faster. You will also prevent your players from breaking your scenes and save them aggravation and time.
Searchable Table
1) Orient, Stabilize, Add Atoms
2) Hide and Move Atoms
3) Lights
4) Wall
5) Save, Template, Default
Some Pro Tips will be tagged in orange, if you want to skim and find them. But I think this whole guide is a pro tip, or I wouldn't have taken the time to write it and illustrate it. I know how much time and frustration it's saved me, so I know it can help you too.
Let's get started.
1) Orient, Stabilize, Add Atoms
Let's create a stable scene with virt a mate. Open your default scene, or go to Create. We're looking for the scene "3 point light female model." Let's change the view to at least 60.
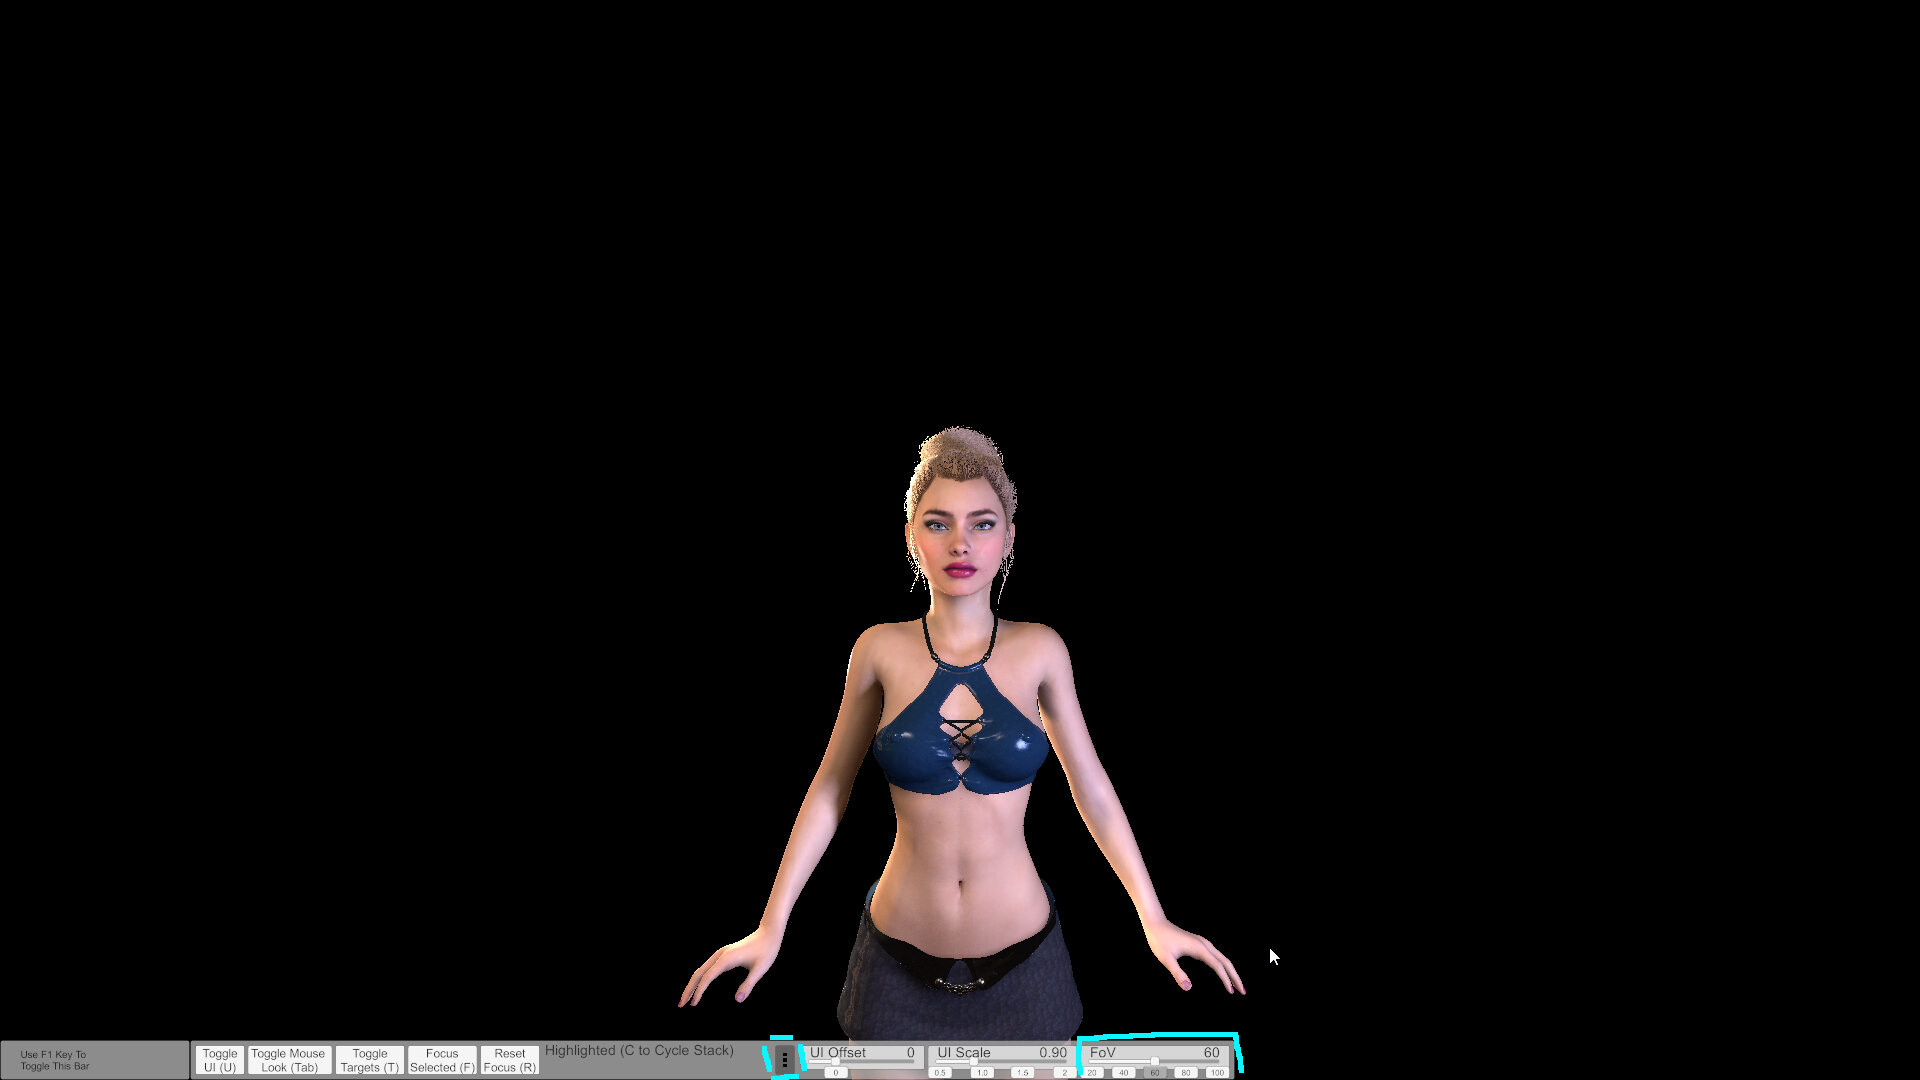
Hit u (menu), e (edit mode), and t (show atoms) and you should see this.
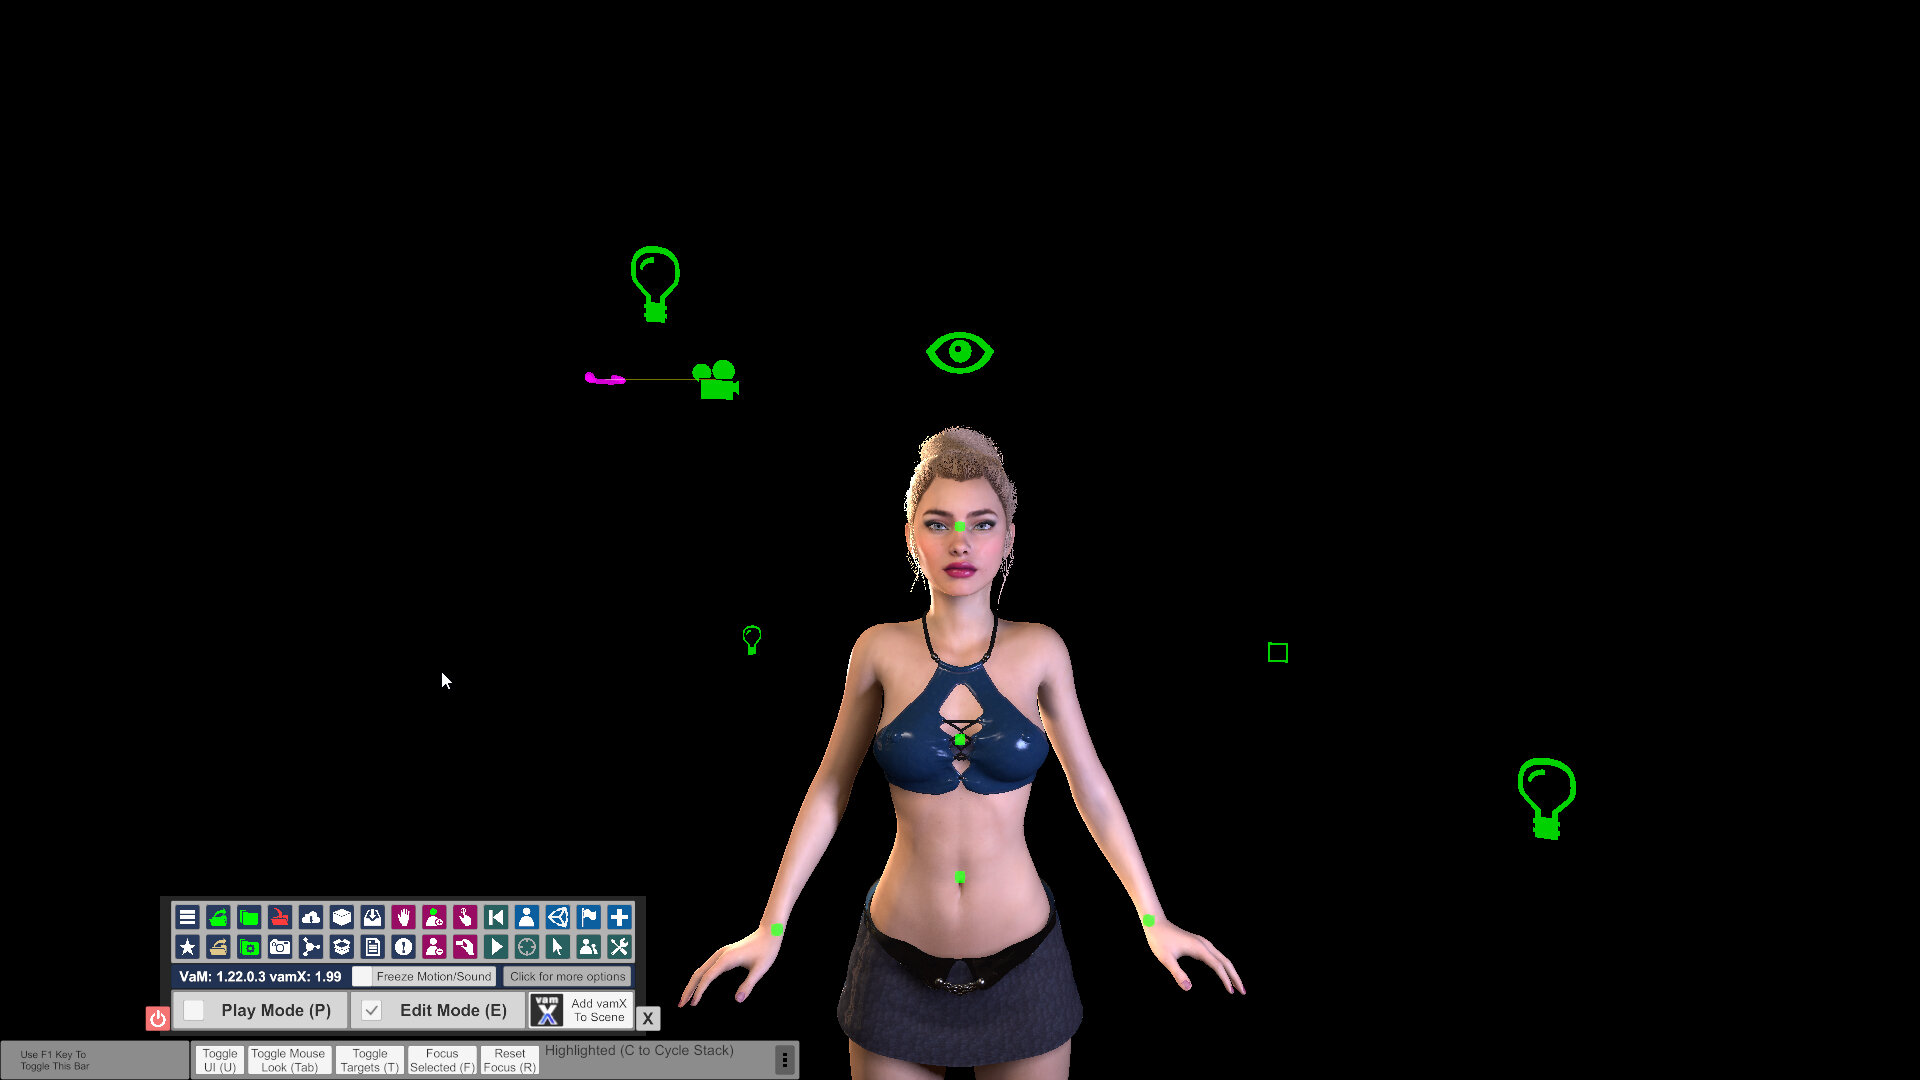
What's that square on the right? Pro Tip - It's the hidden controller for the 3 point light setup! I didn't know about this for the longest time. It's in its off state right now. Let's make use of it.
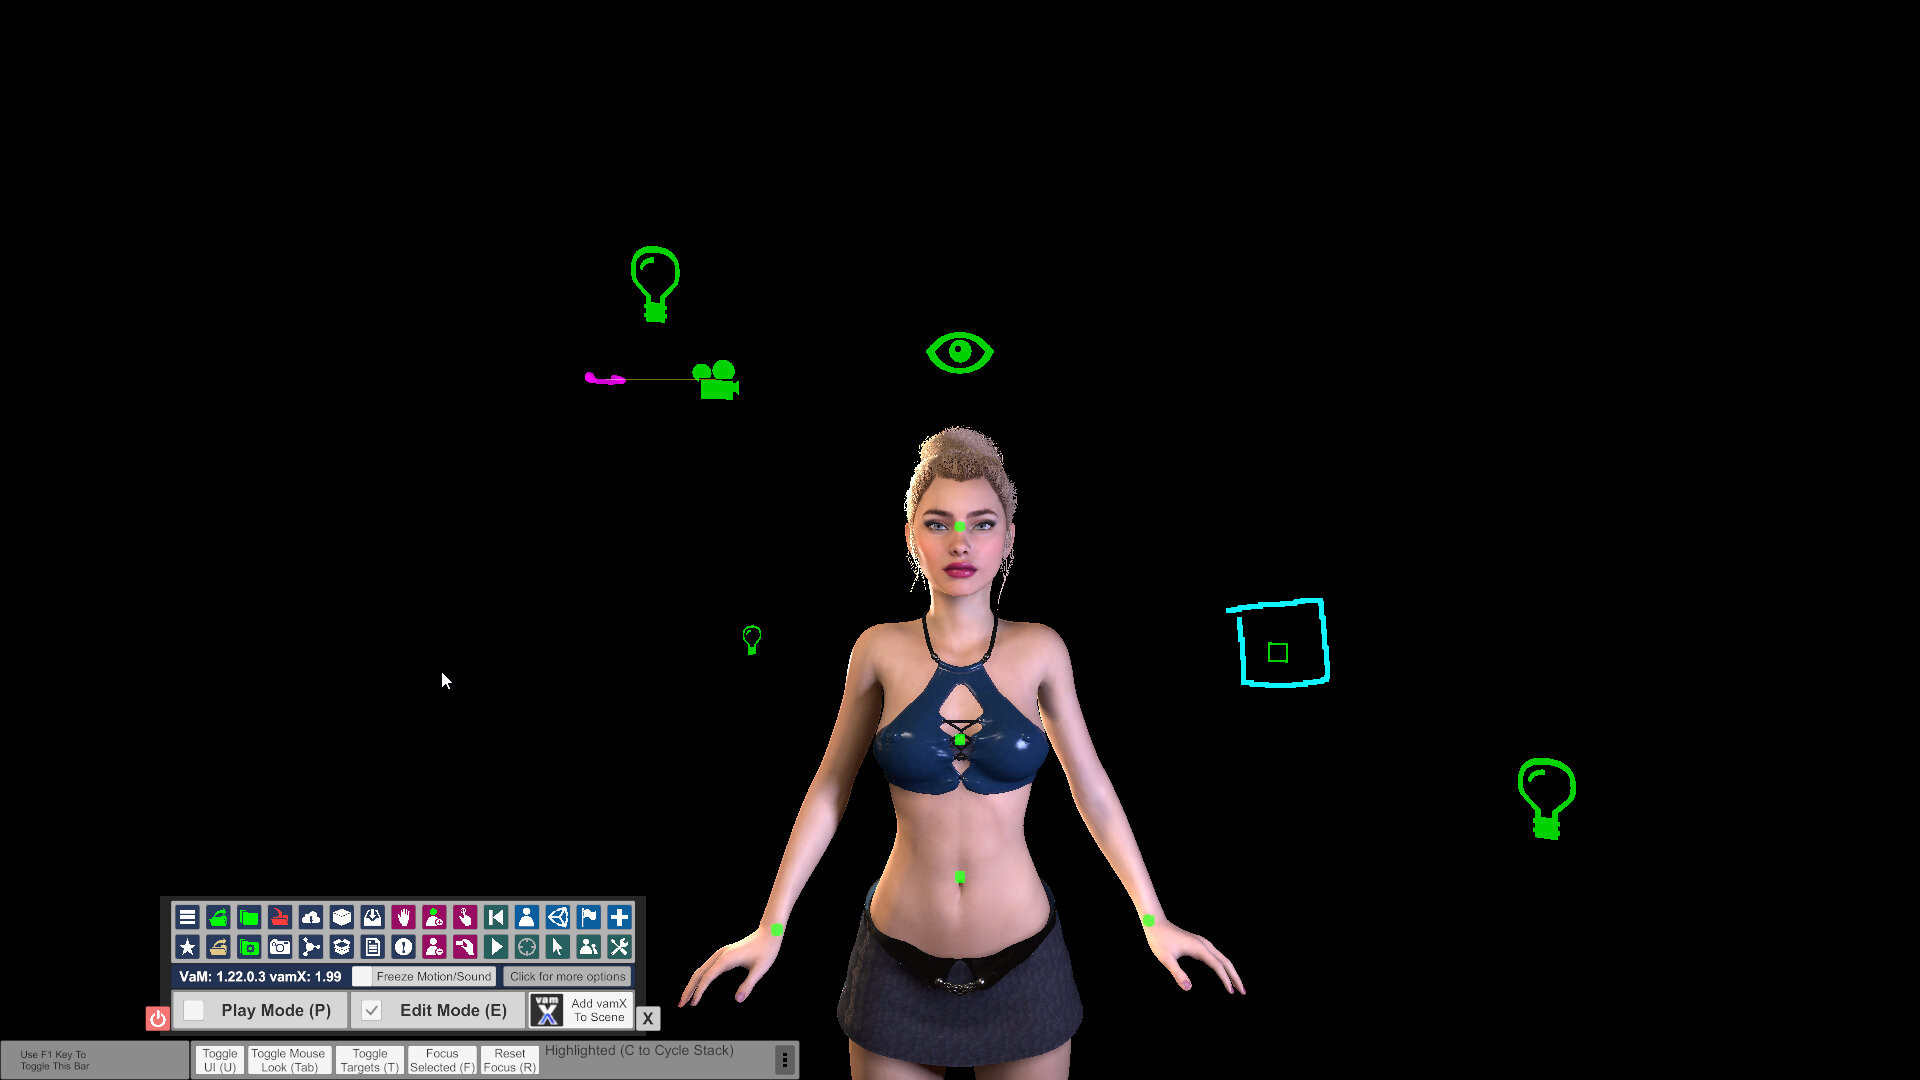
Click here to turn it on. Now we can control the lights with a UI.
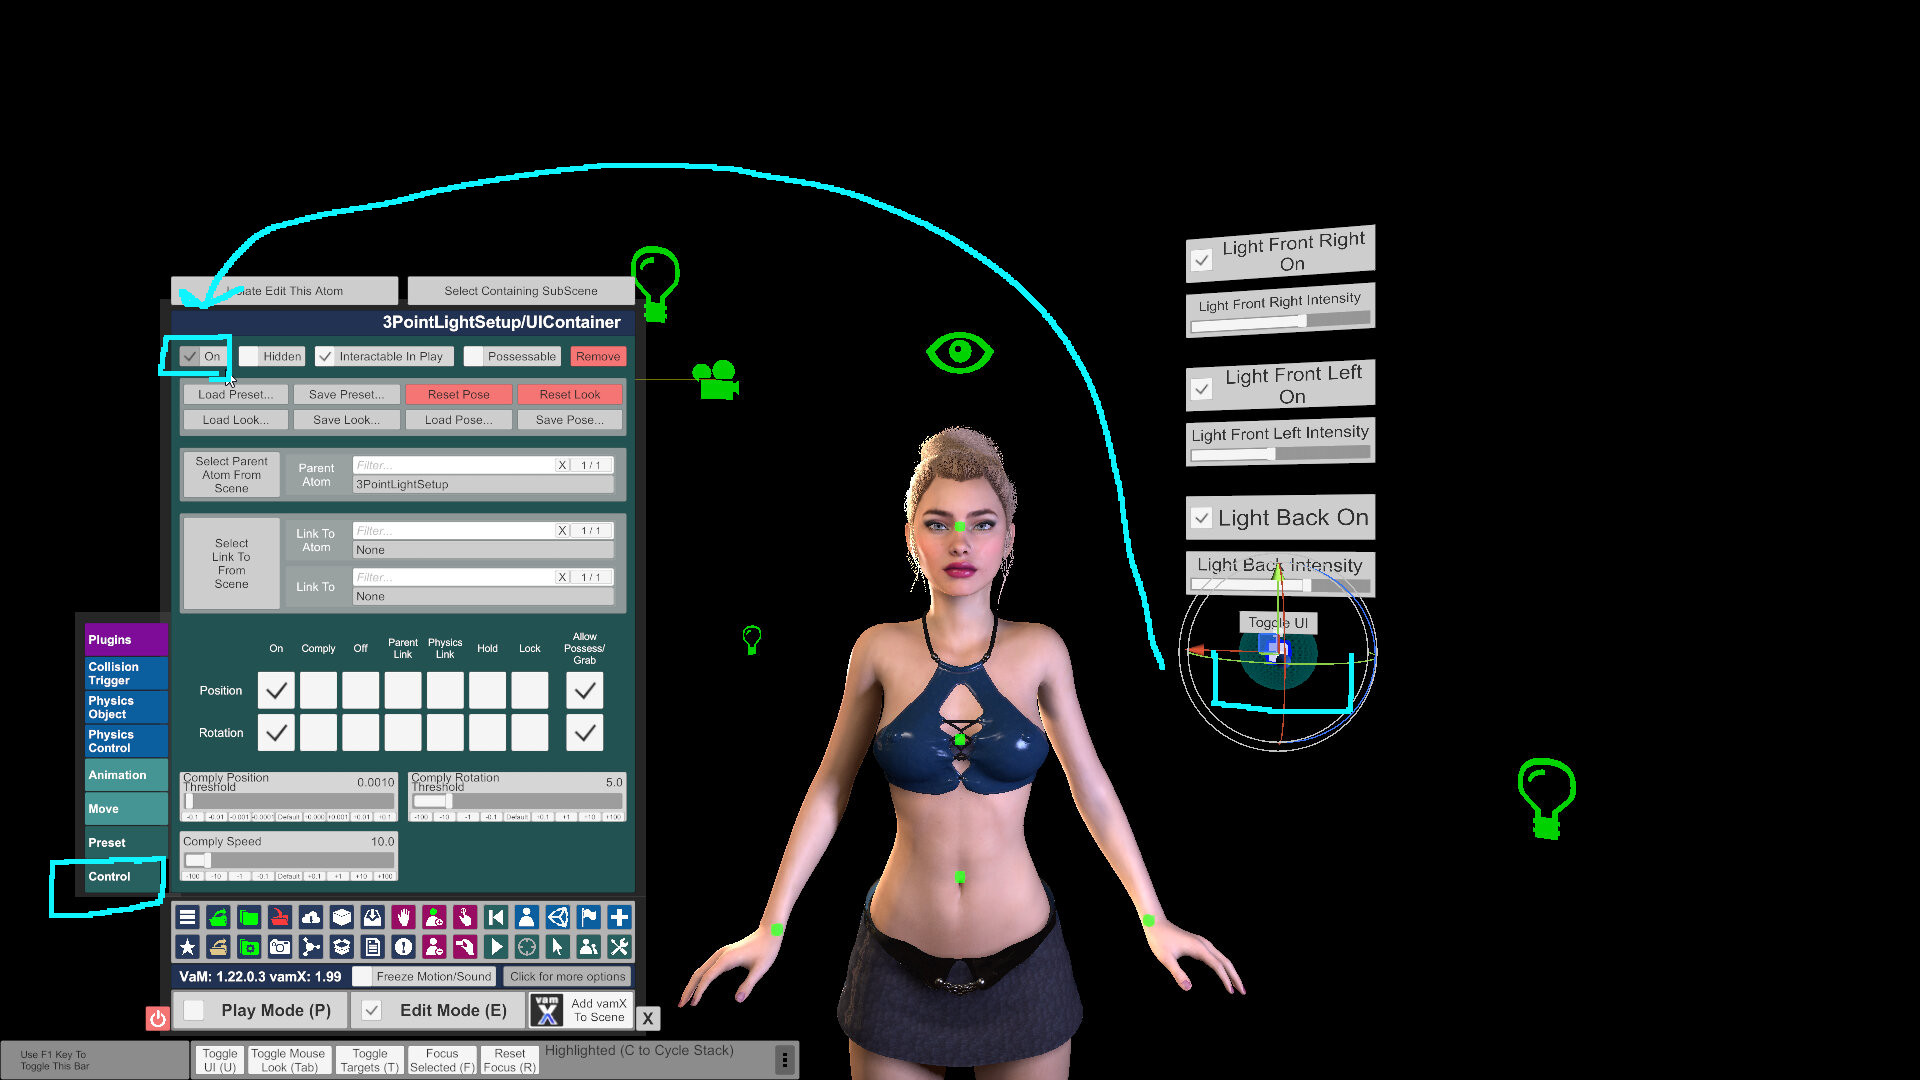
Now let's get our model stable. Get her selected by hitting N to cycle to her, or click a body part, and hit Select Root.
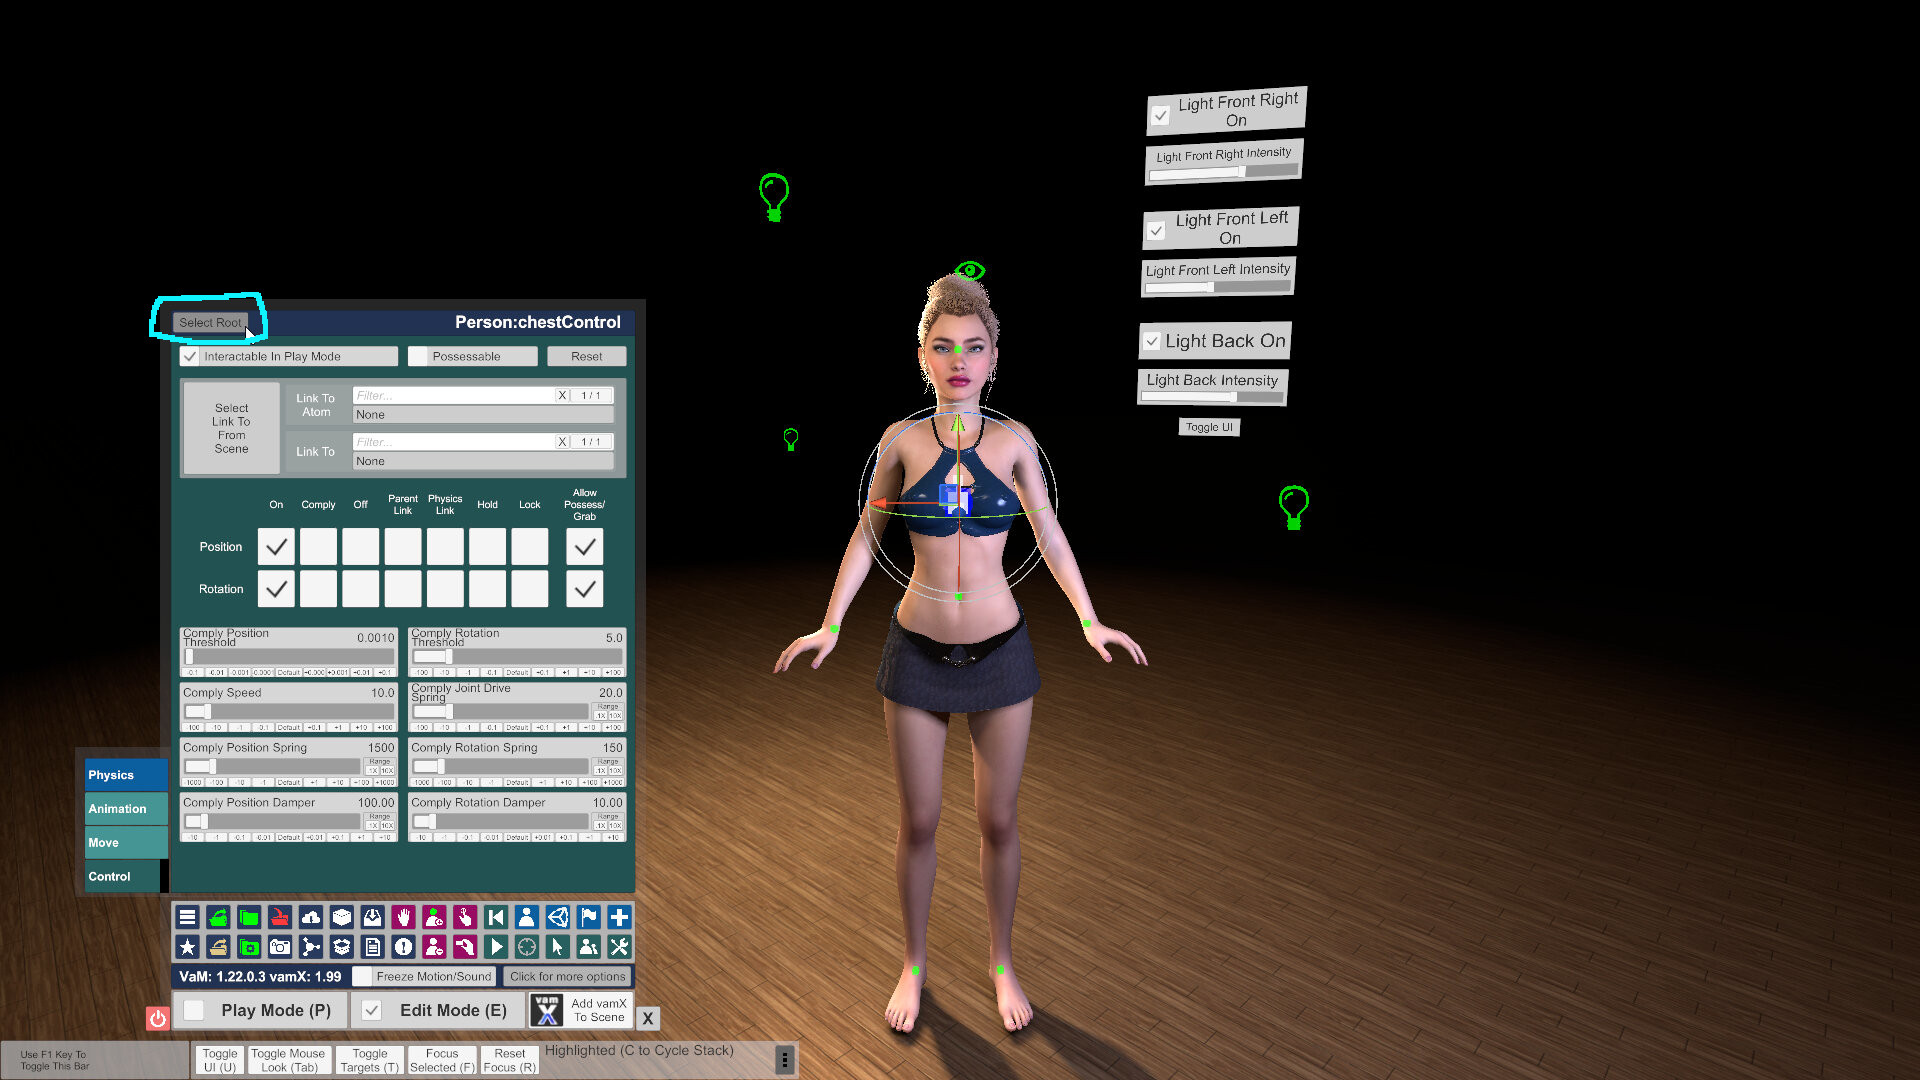
Click her plugins tab. Mine has nothing because I've changed some things, but if yours has MacGruber plugins like breathing and gaze, just click to remove them all. They're great plugins, but if we want a completely stable character for editing, we're going to turn them off.
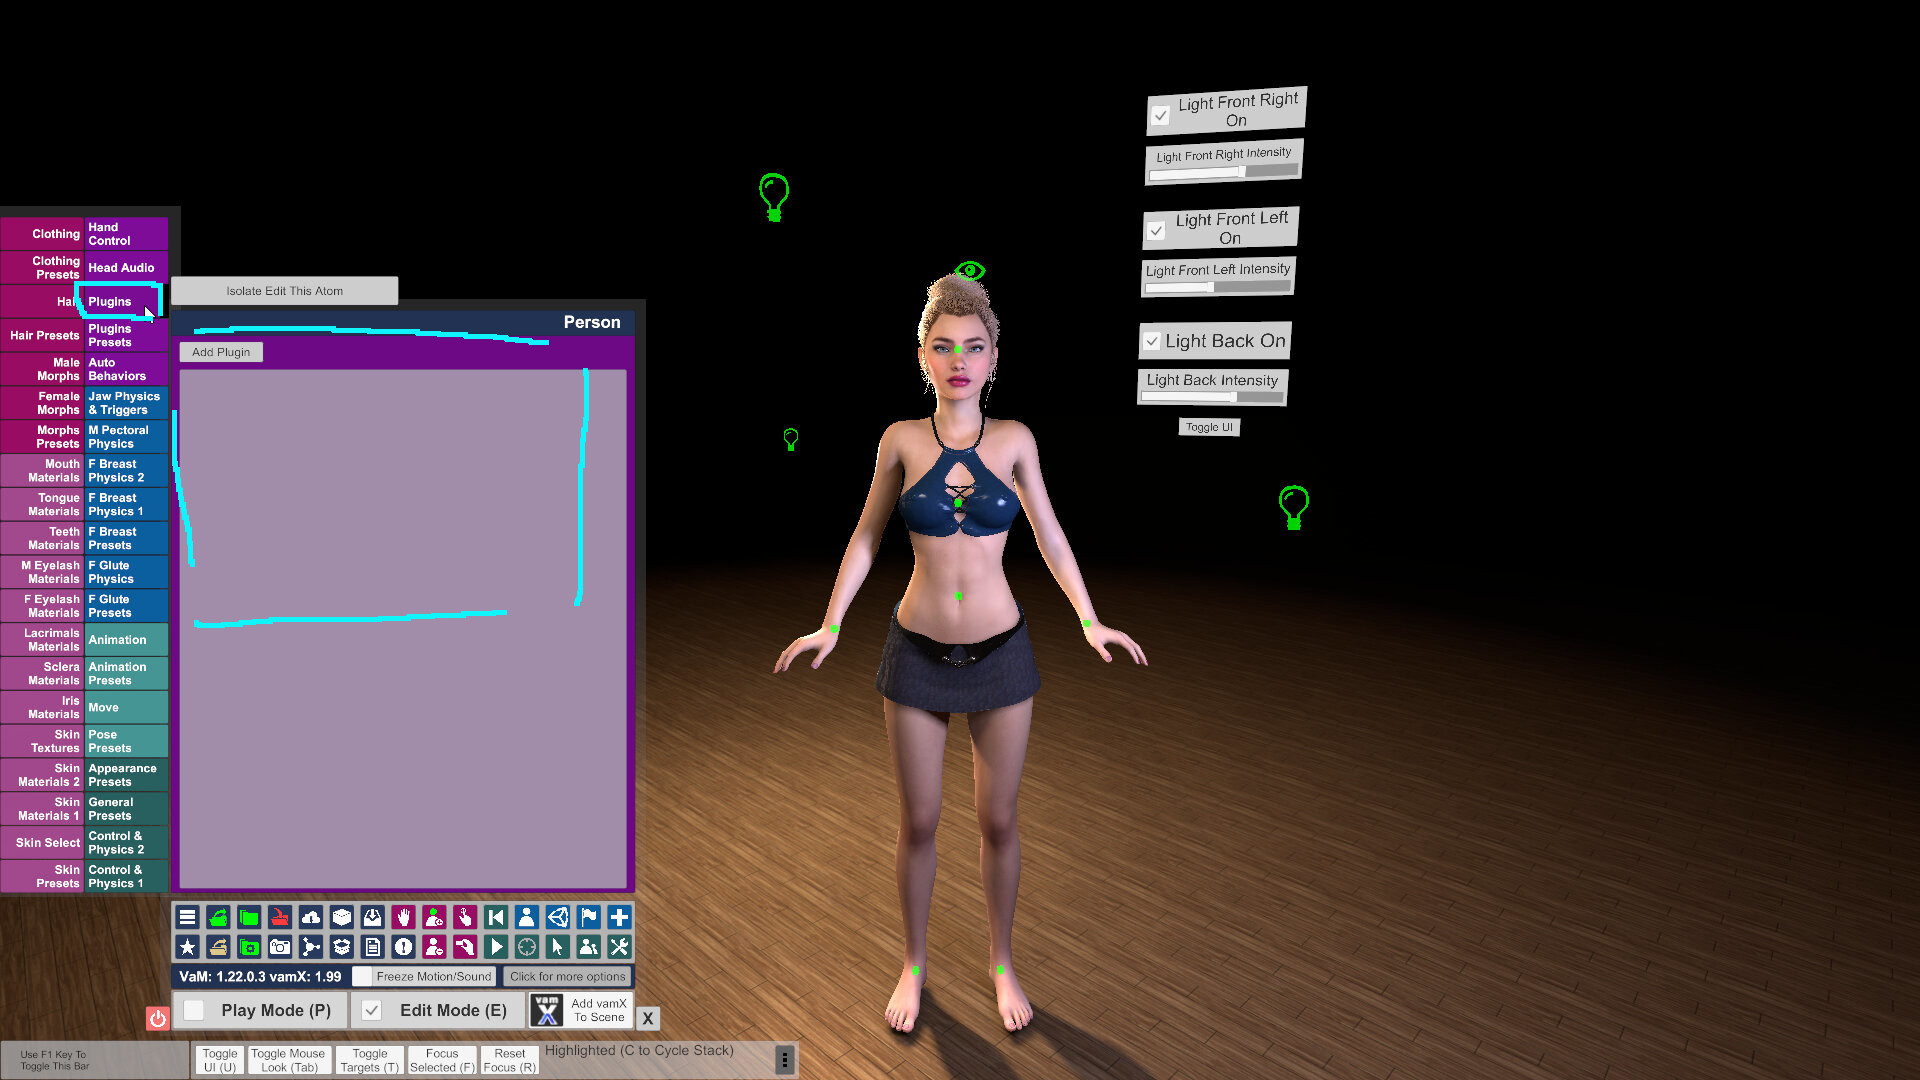
Next, we'll go to her auto behaviors tab, and turn auto blink off. Now she will not blink. This will help us when we edit the eyes.
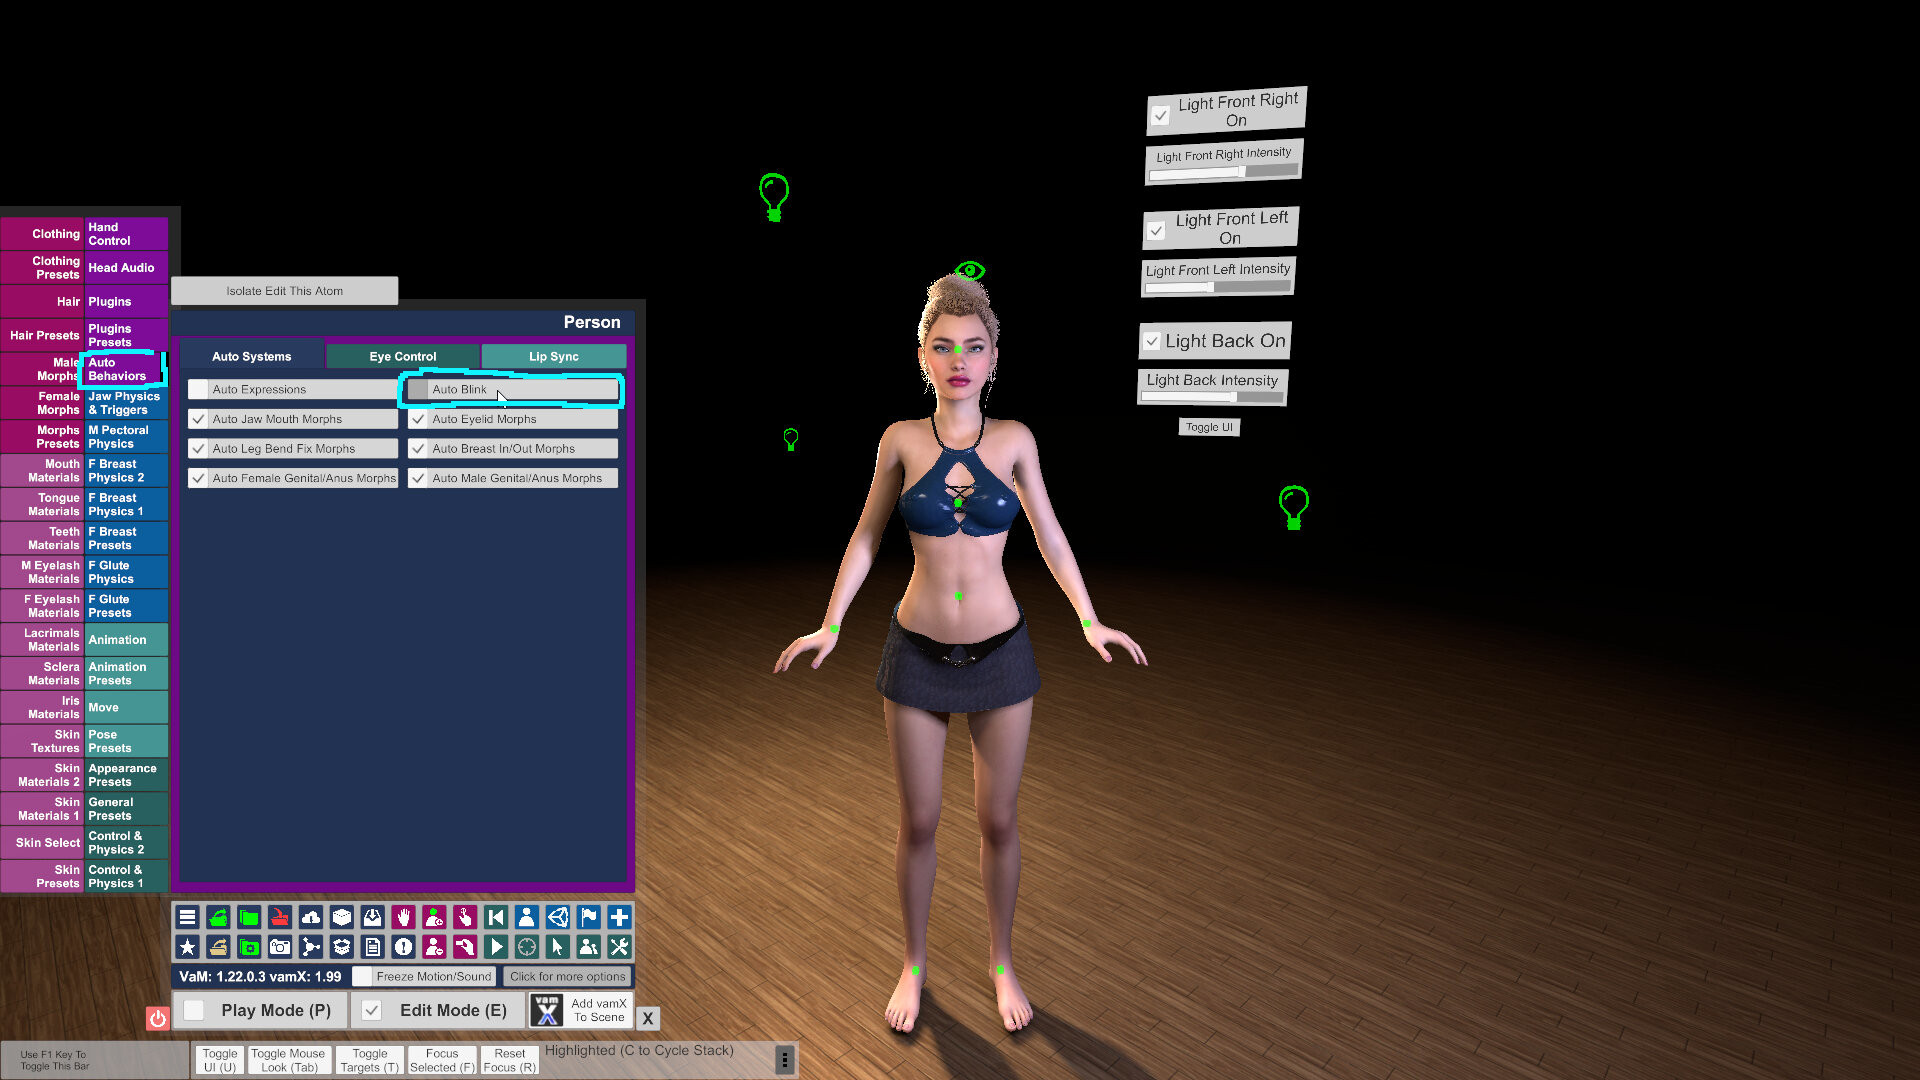
Next. Being spatially oriented can help with creation more than you realize. Let's get a floor in the scene quickly. We'll choose a wood panel.
Go to the add atom menu.
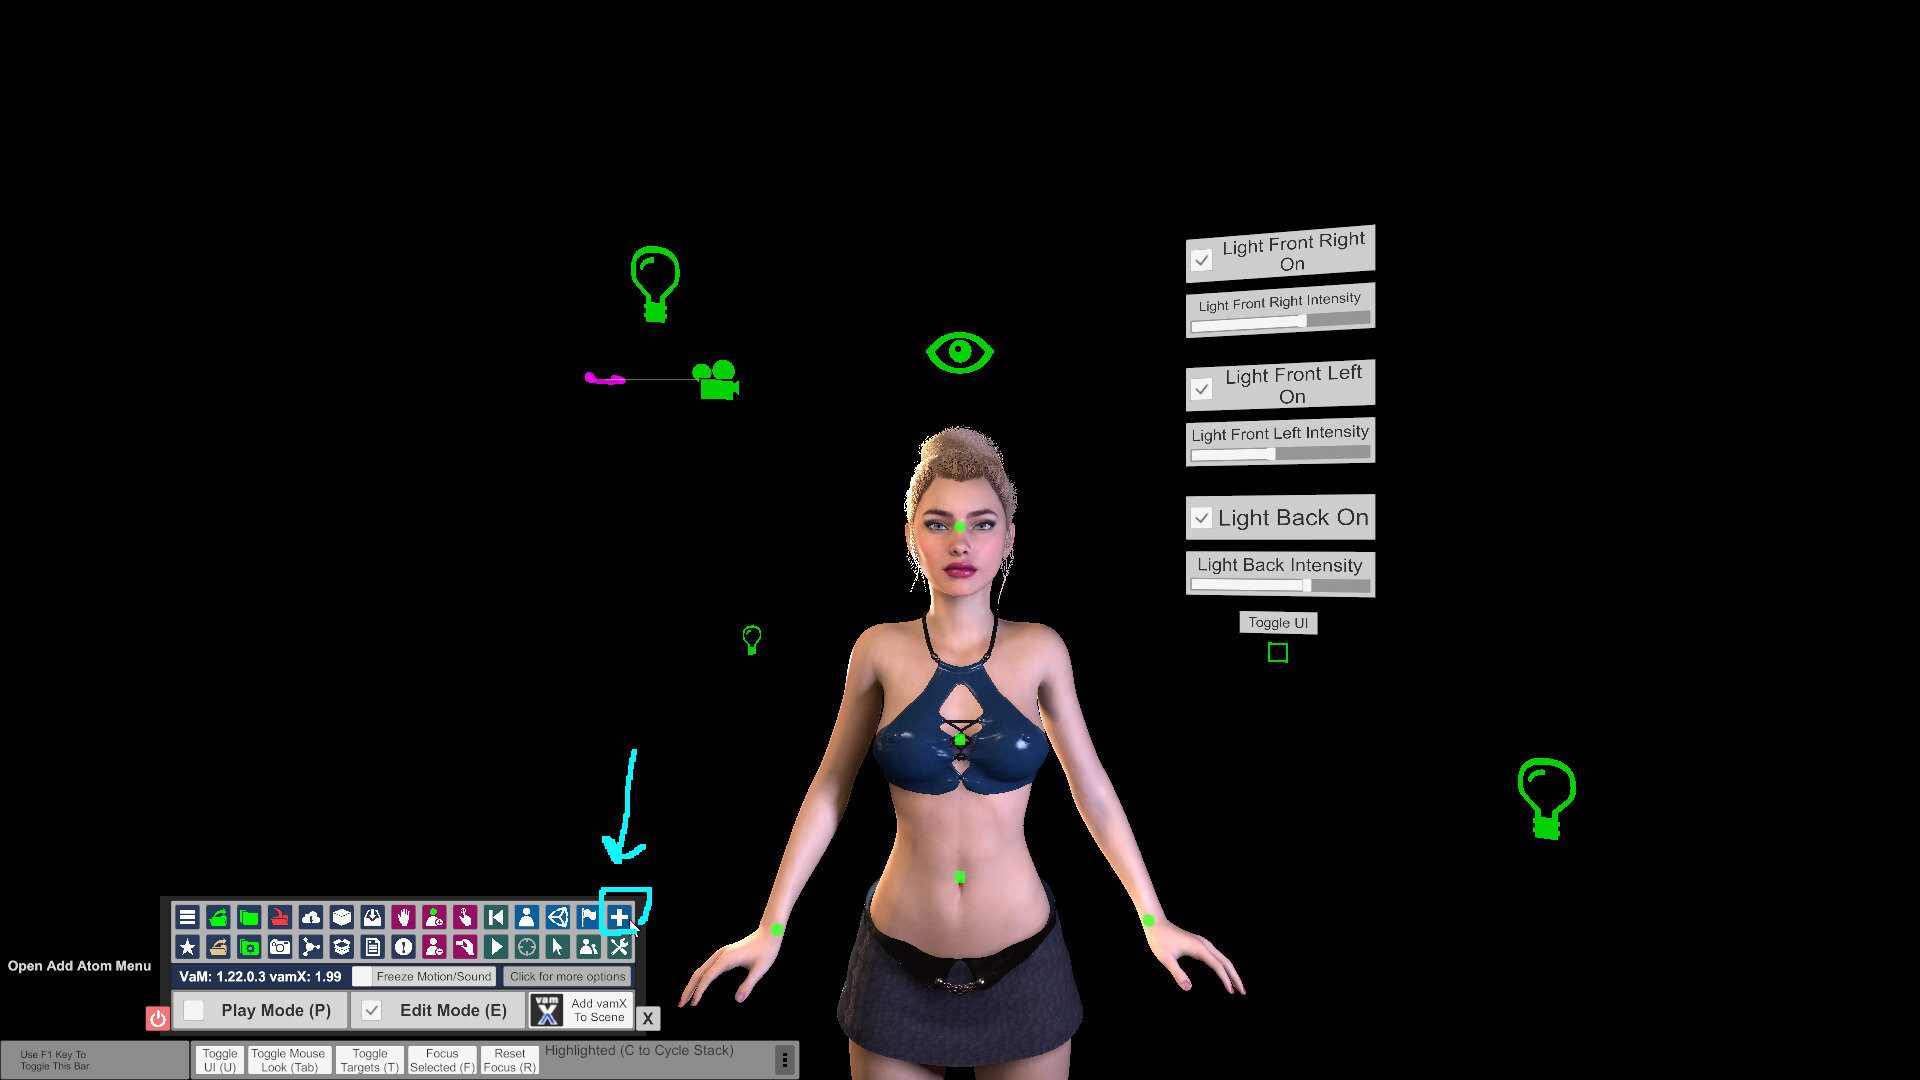
Pro Tip - For the next handy trick, click Select atom on add and Focus atom on add. This will target and focus on our atoms when we add them. That way we will not lose track of our atoms when we spawn them, and we will save ourselves time.
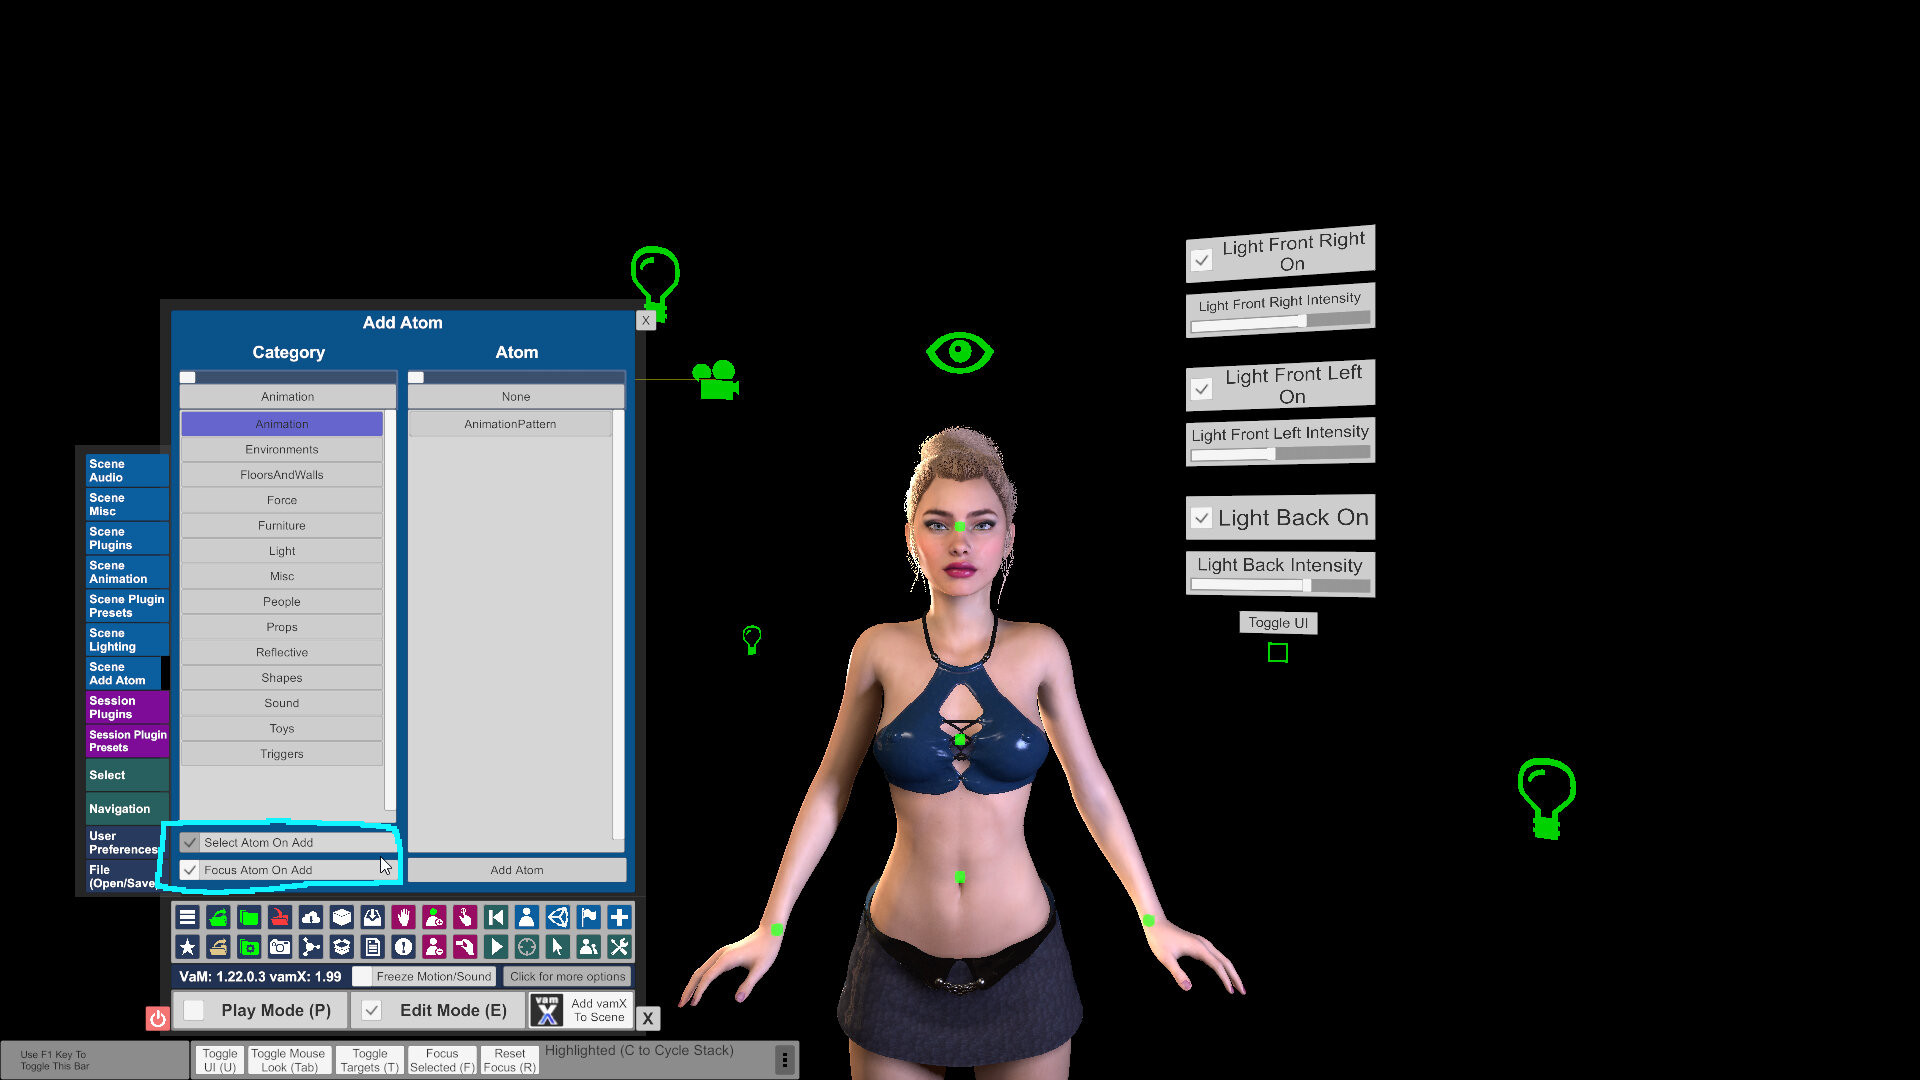
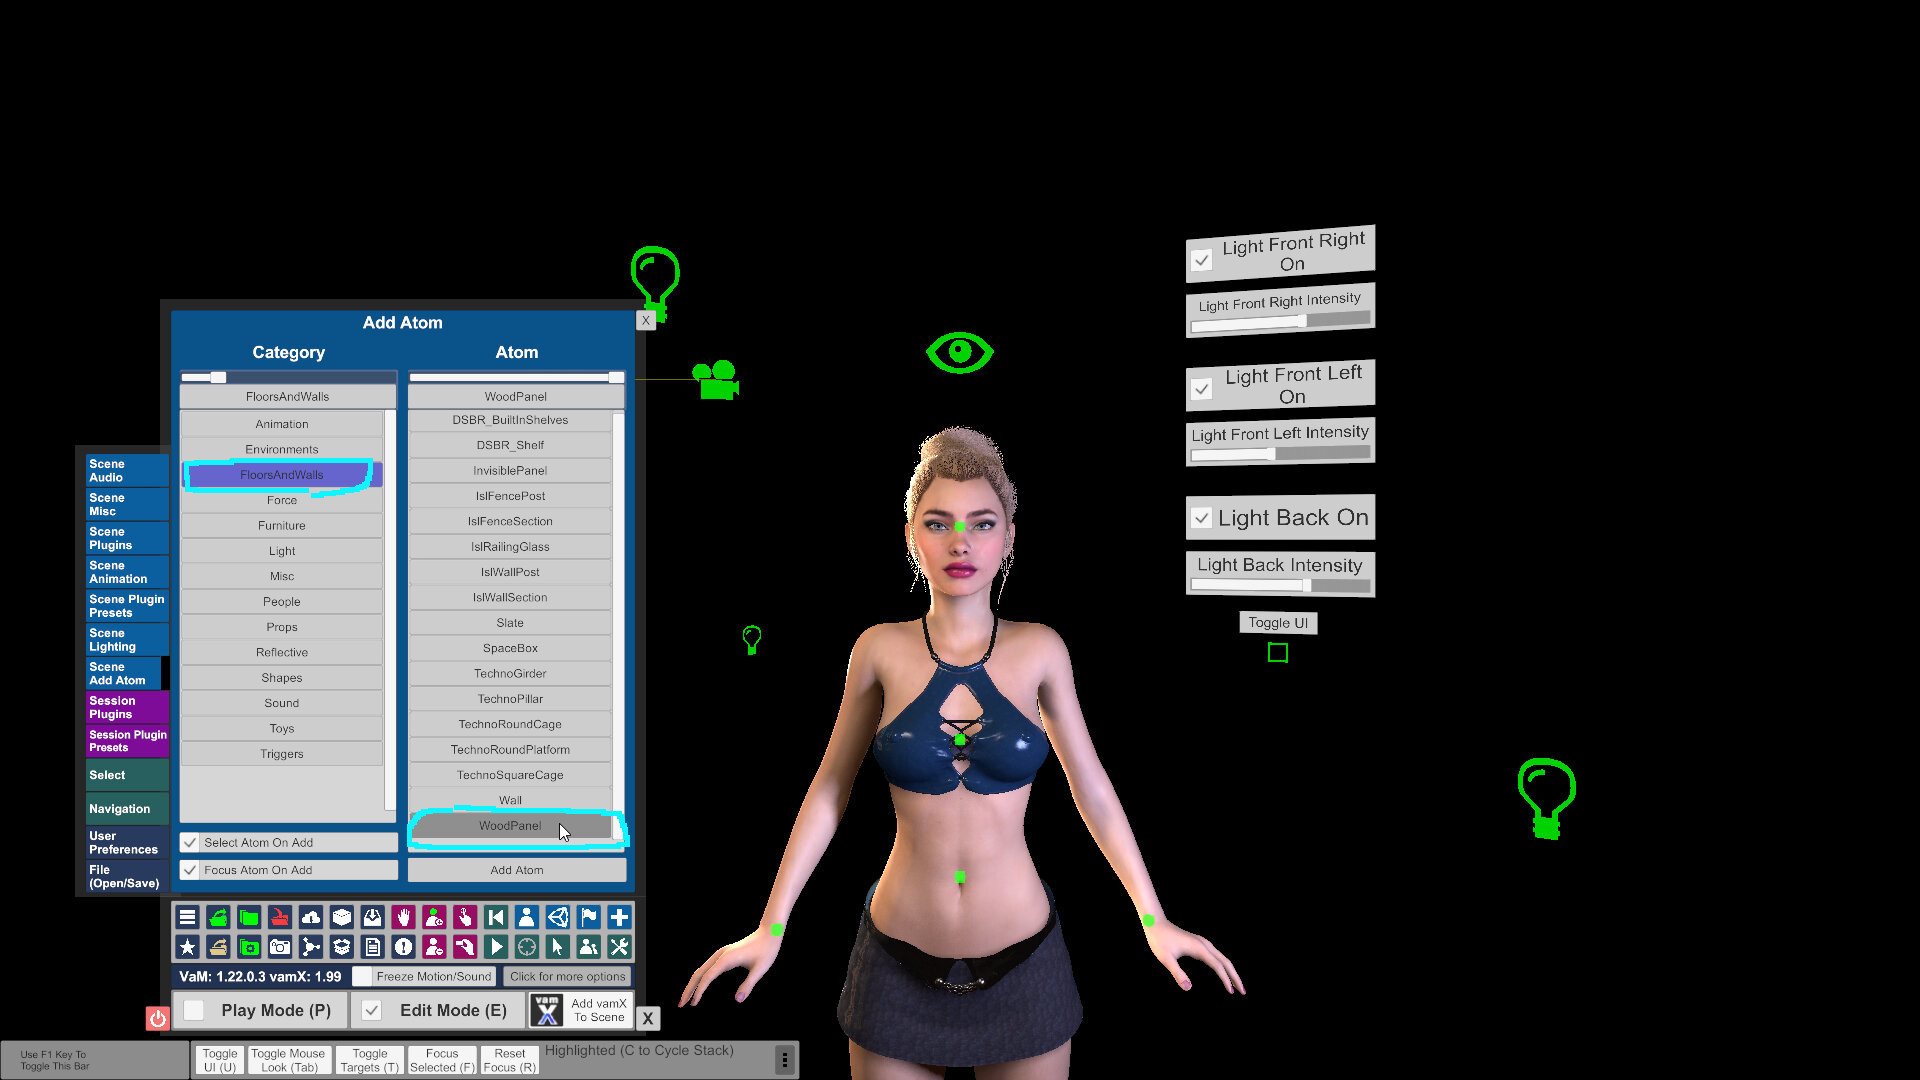
Go to floors and walls, wood panel, and click add atom.
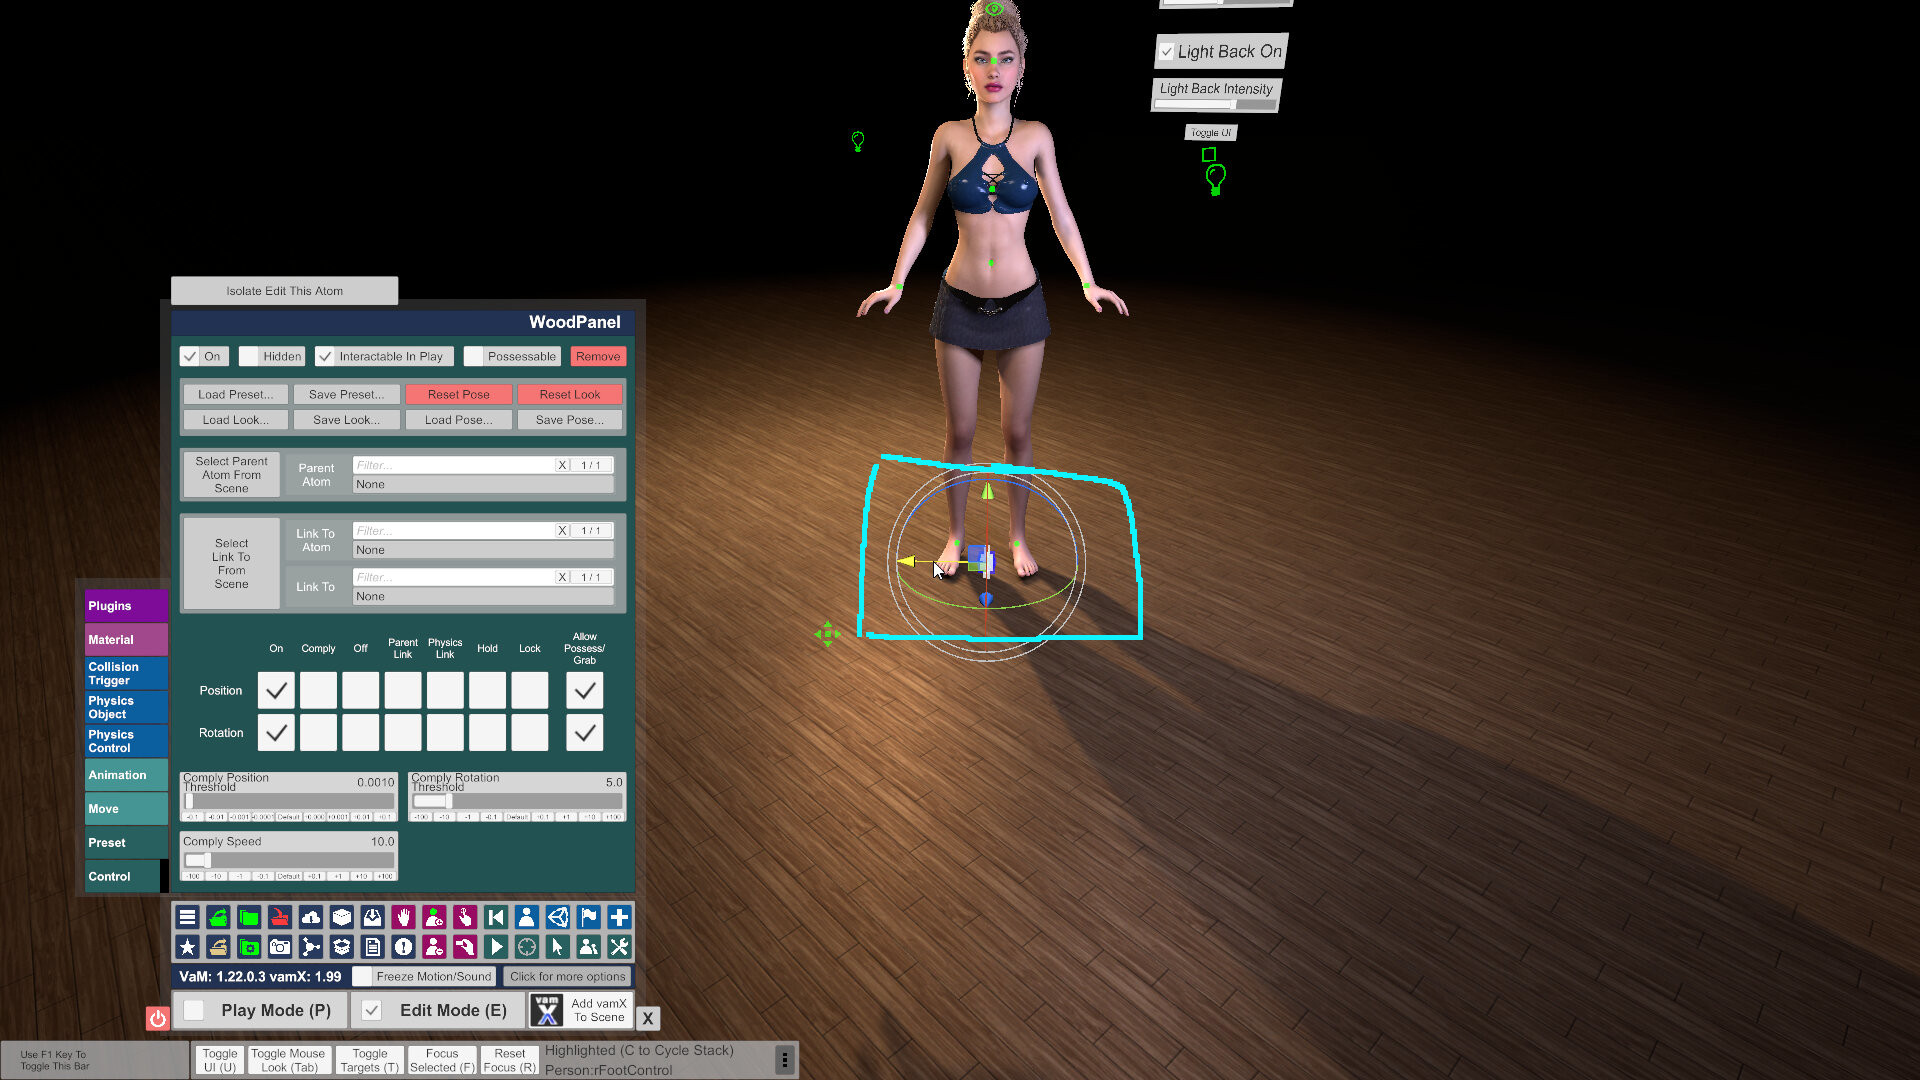
Our wood panel is here, and it has spawned in selected.
2) Hide and Move Atoms
Next, we will do something we're going to do a lot. This is what's going to prevent accidents and visual distraction for you. We will "hide" the atoms. This makes their icon disappear so that they can't get randomly dragged around or selected, by you, or more importantly, your players, yet they will still be on.
How many minutes of your time have been wasted by dragging something you didn't intend to drag and messing up your scene? In some scenes, one simple mouse click can move a piece of furniture, leading to a physics explosion between the characters. Let's end that once and for all.
Don't worry, this doesn't disable them or make them permanently disappear. It's very easy to get them back. This will come later.
At the top of the wood panel atom's tab, check "Hidden." (If you've lost your wood panel, it's between your person's feet. Hit C to cycle through atoms while hovering there until you can select it.)

This will leave the atom on, but hide its control from view. This way we are not going to pull on it, shift it, move it, anything, when we are dragging things around in the scene, or manipulating our person's feet. Has that ever happened to you? A floor doesnt need to move, and we're preventing that from happening now.
So let's go through what else we can hide to prevent unintended operation or accidental movement when we least want it to happen. It will also minimize visual clutter so you can think and make decisions more quickly. Don't underestimate this tip, it will speed up your creation and save your players hassle.
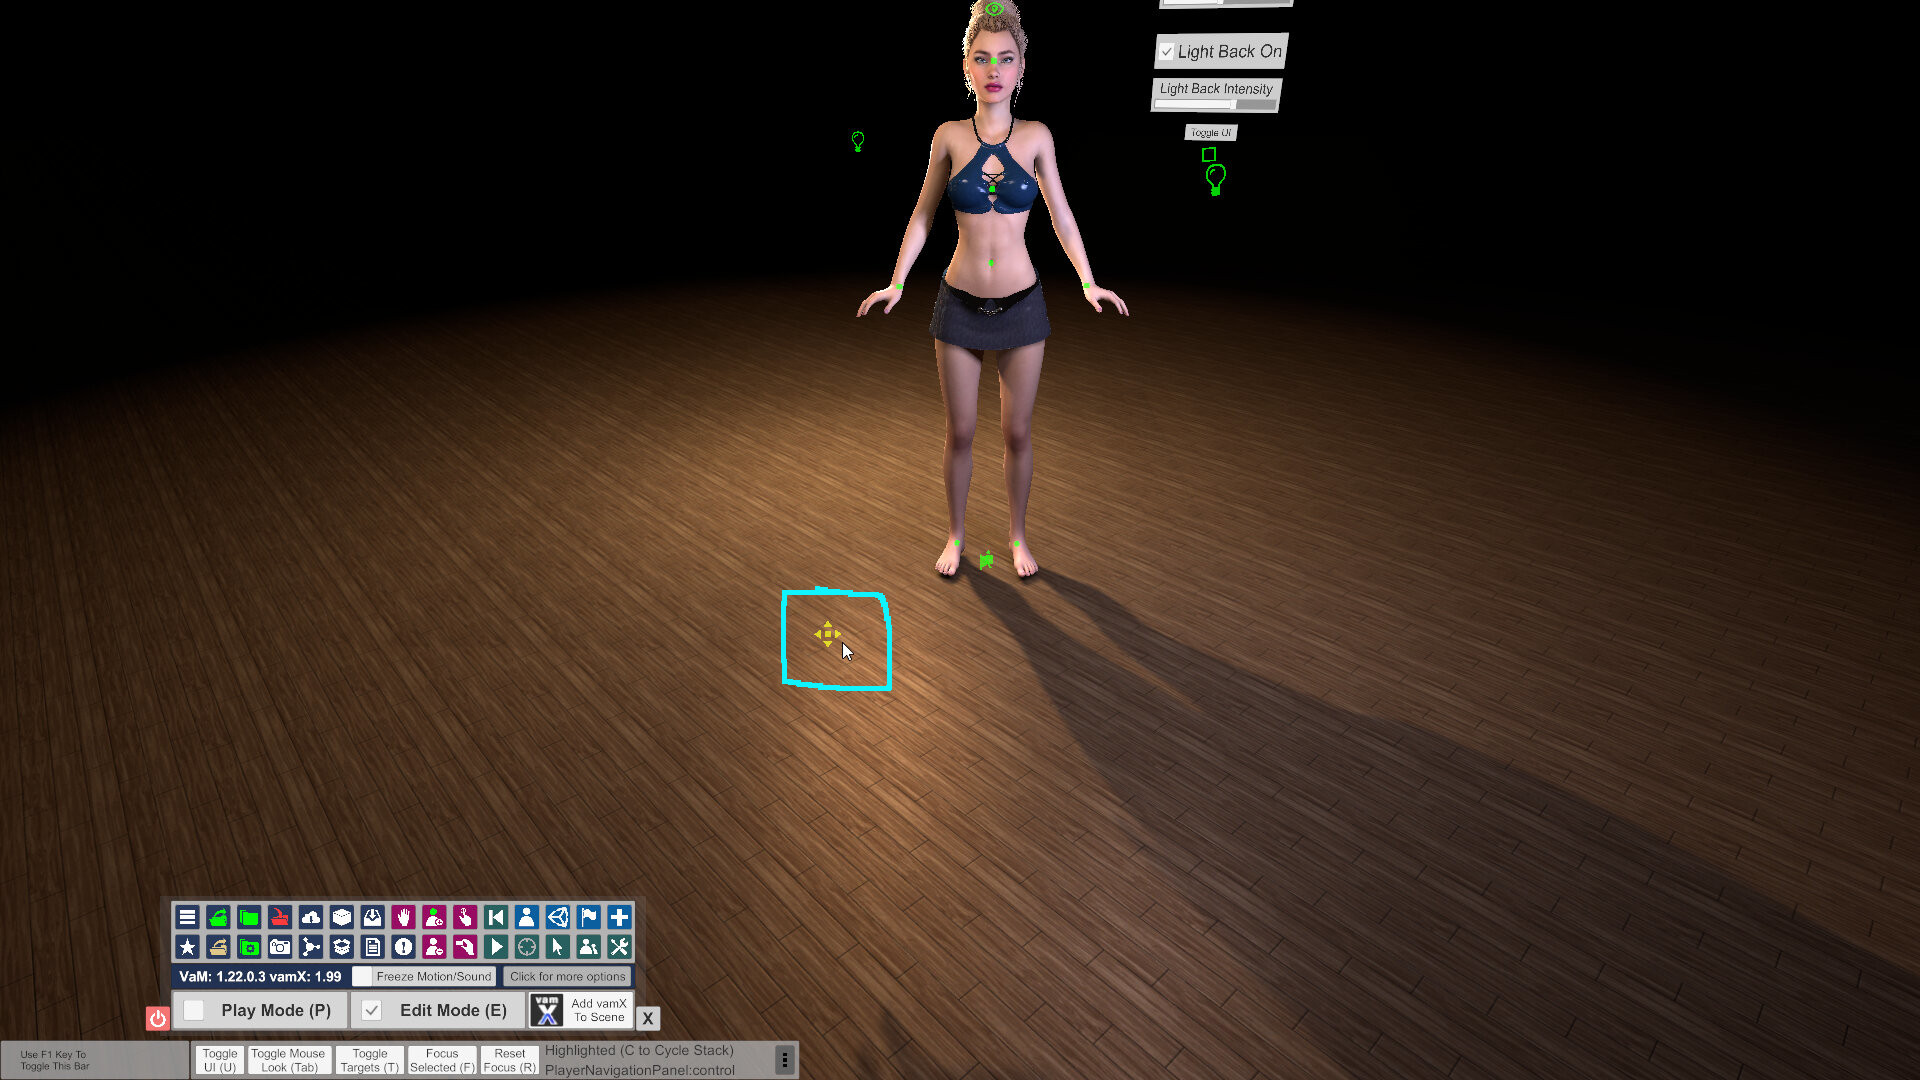
This thing is the player navigation panel. I know it can be used to move the player and do some nifty stuff like teleporting. But I don't use it. If you do, leave it alone. But I will hide it, as I don't need it and don't need the distraction.
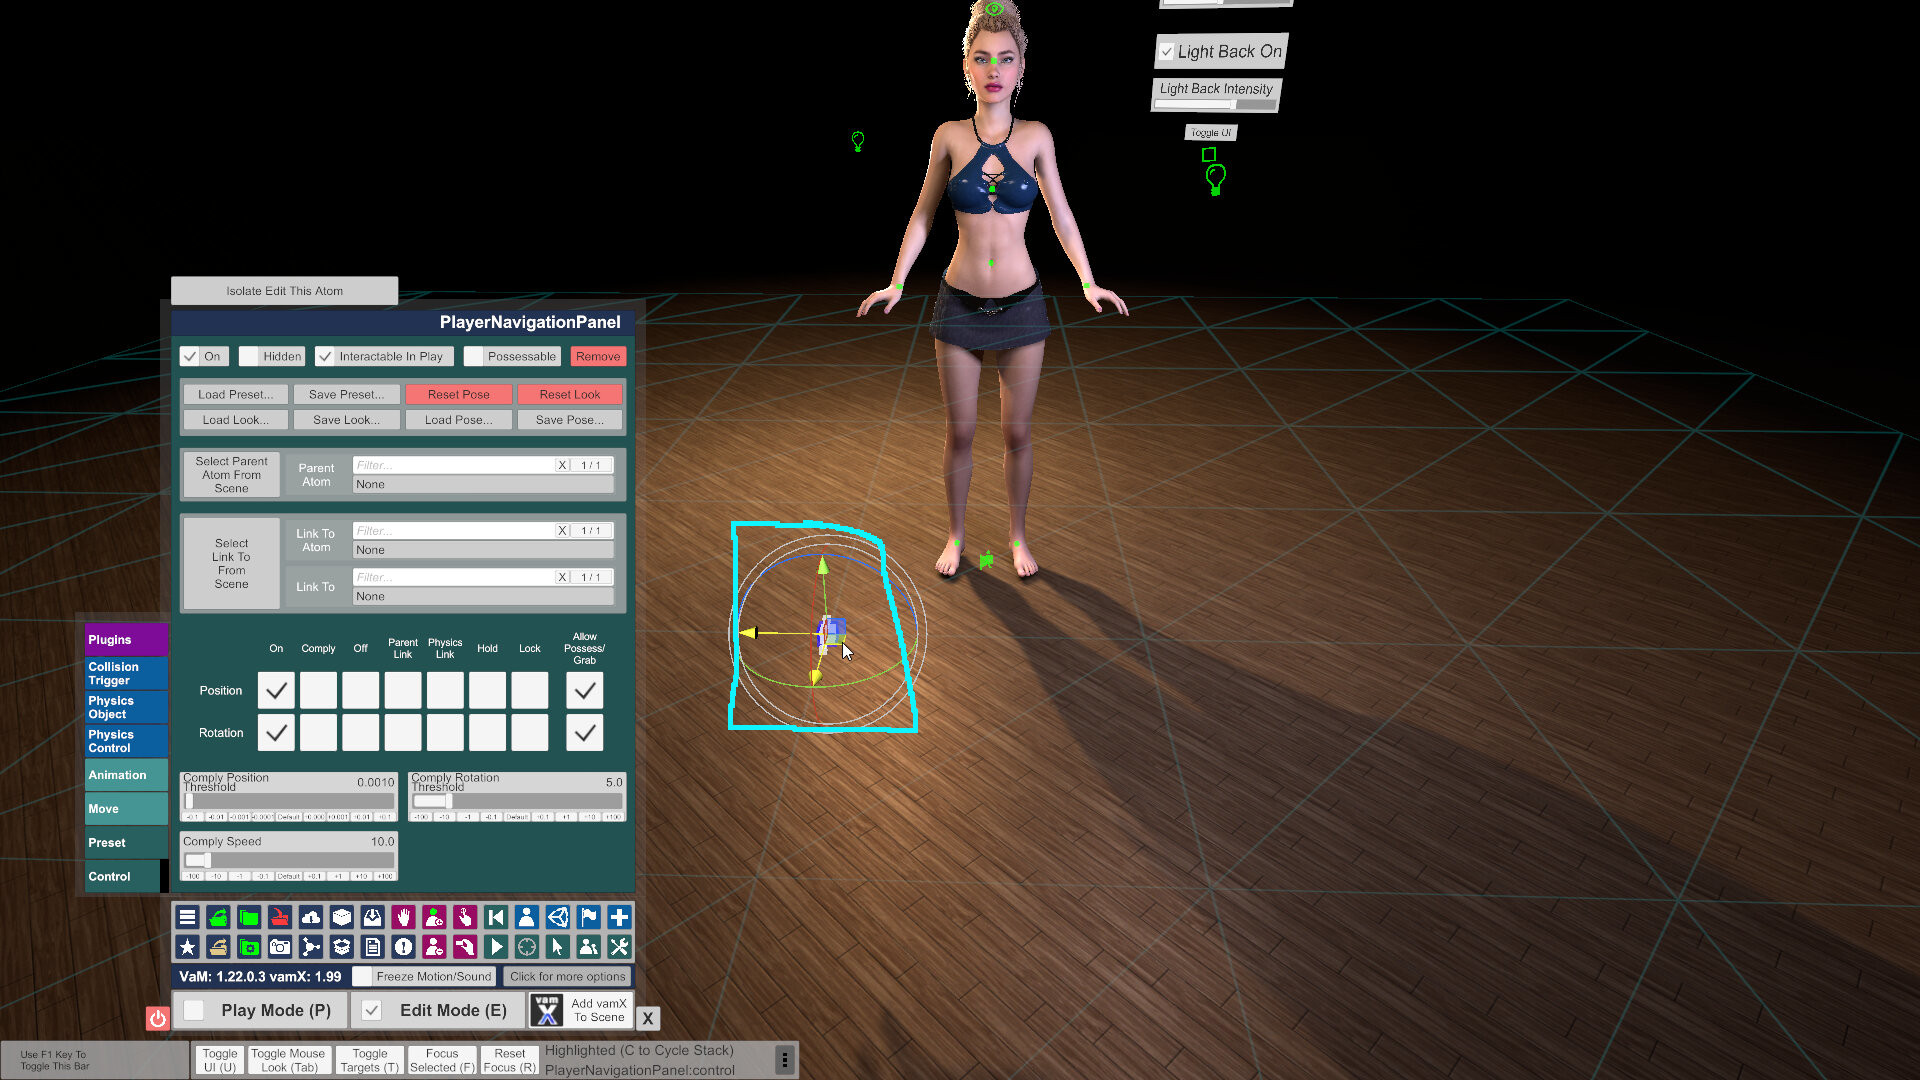
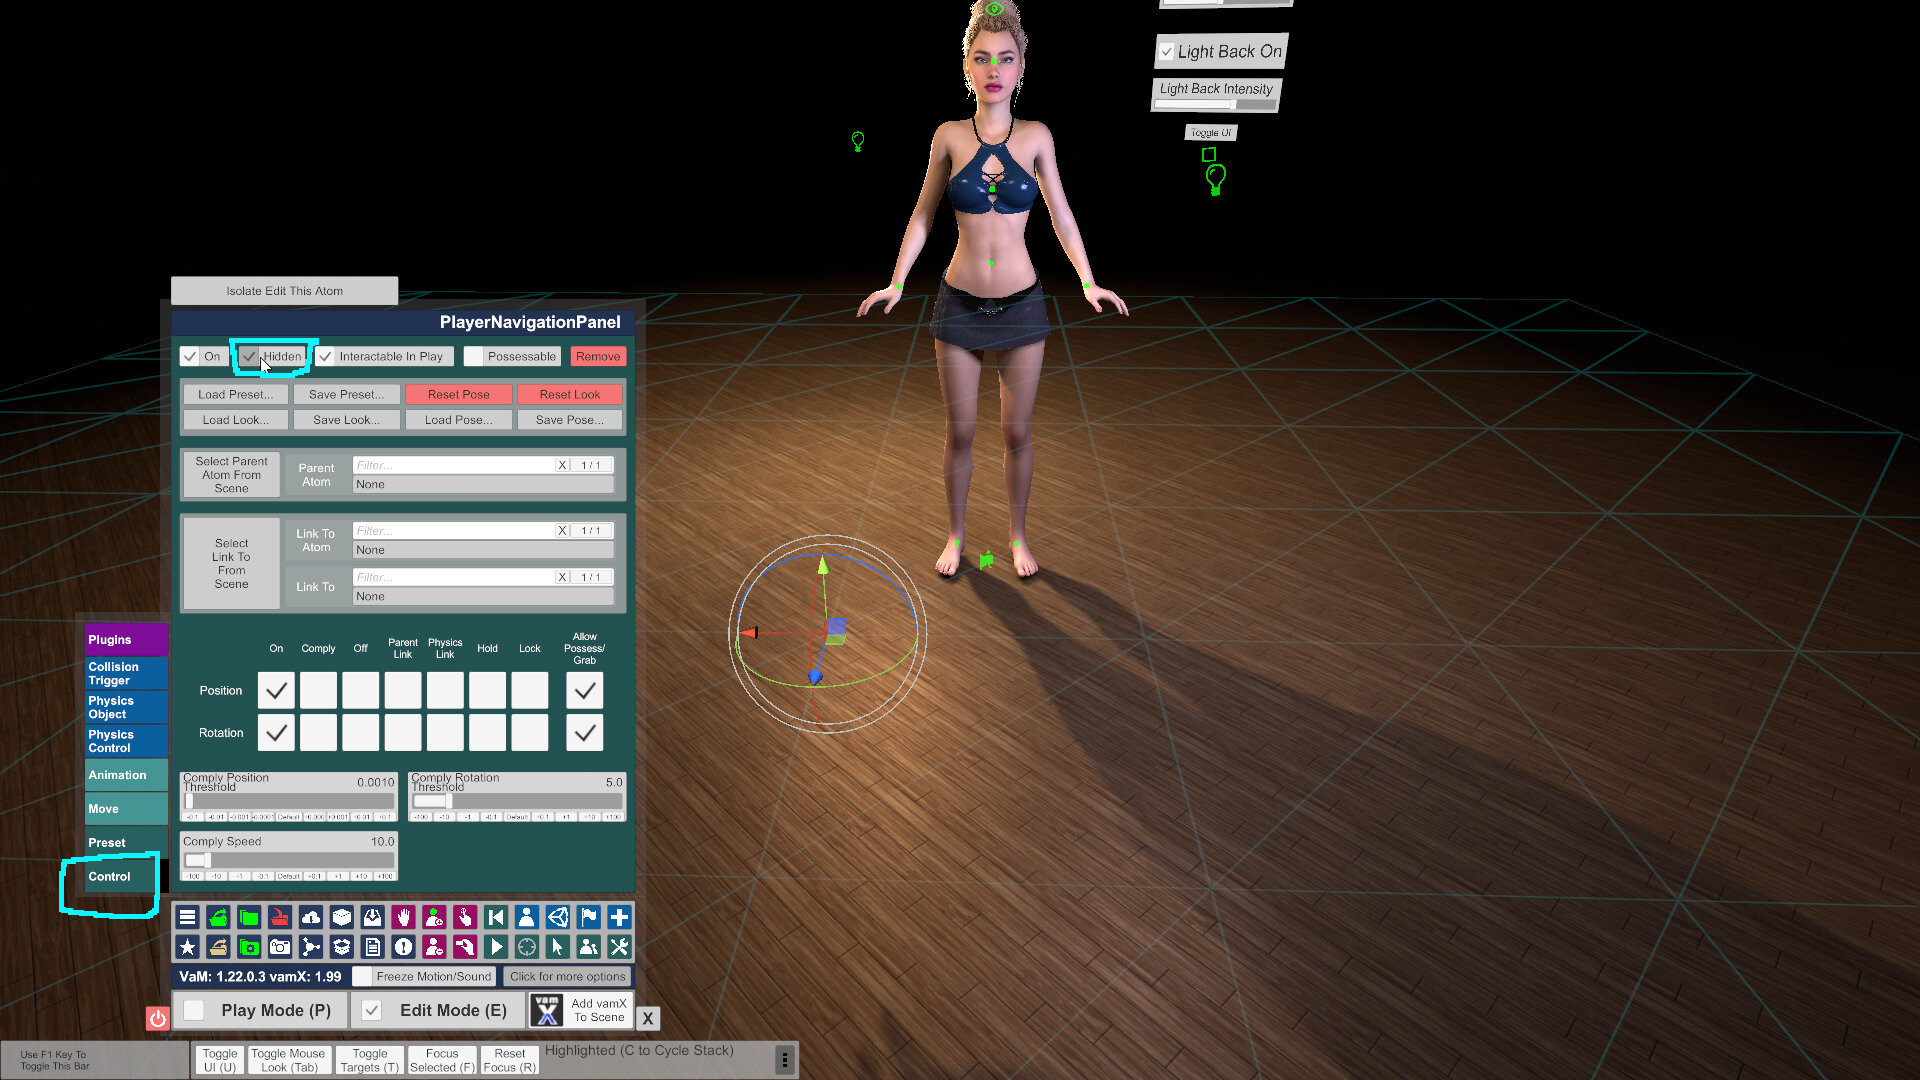
Next, the window camera. This can be used for many things- it's a camera feed. But we don't need it right now.
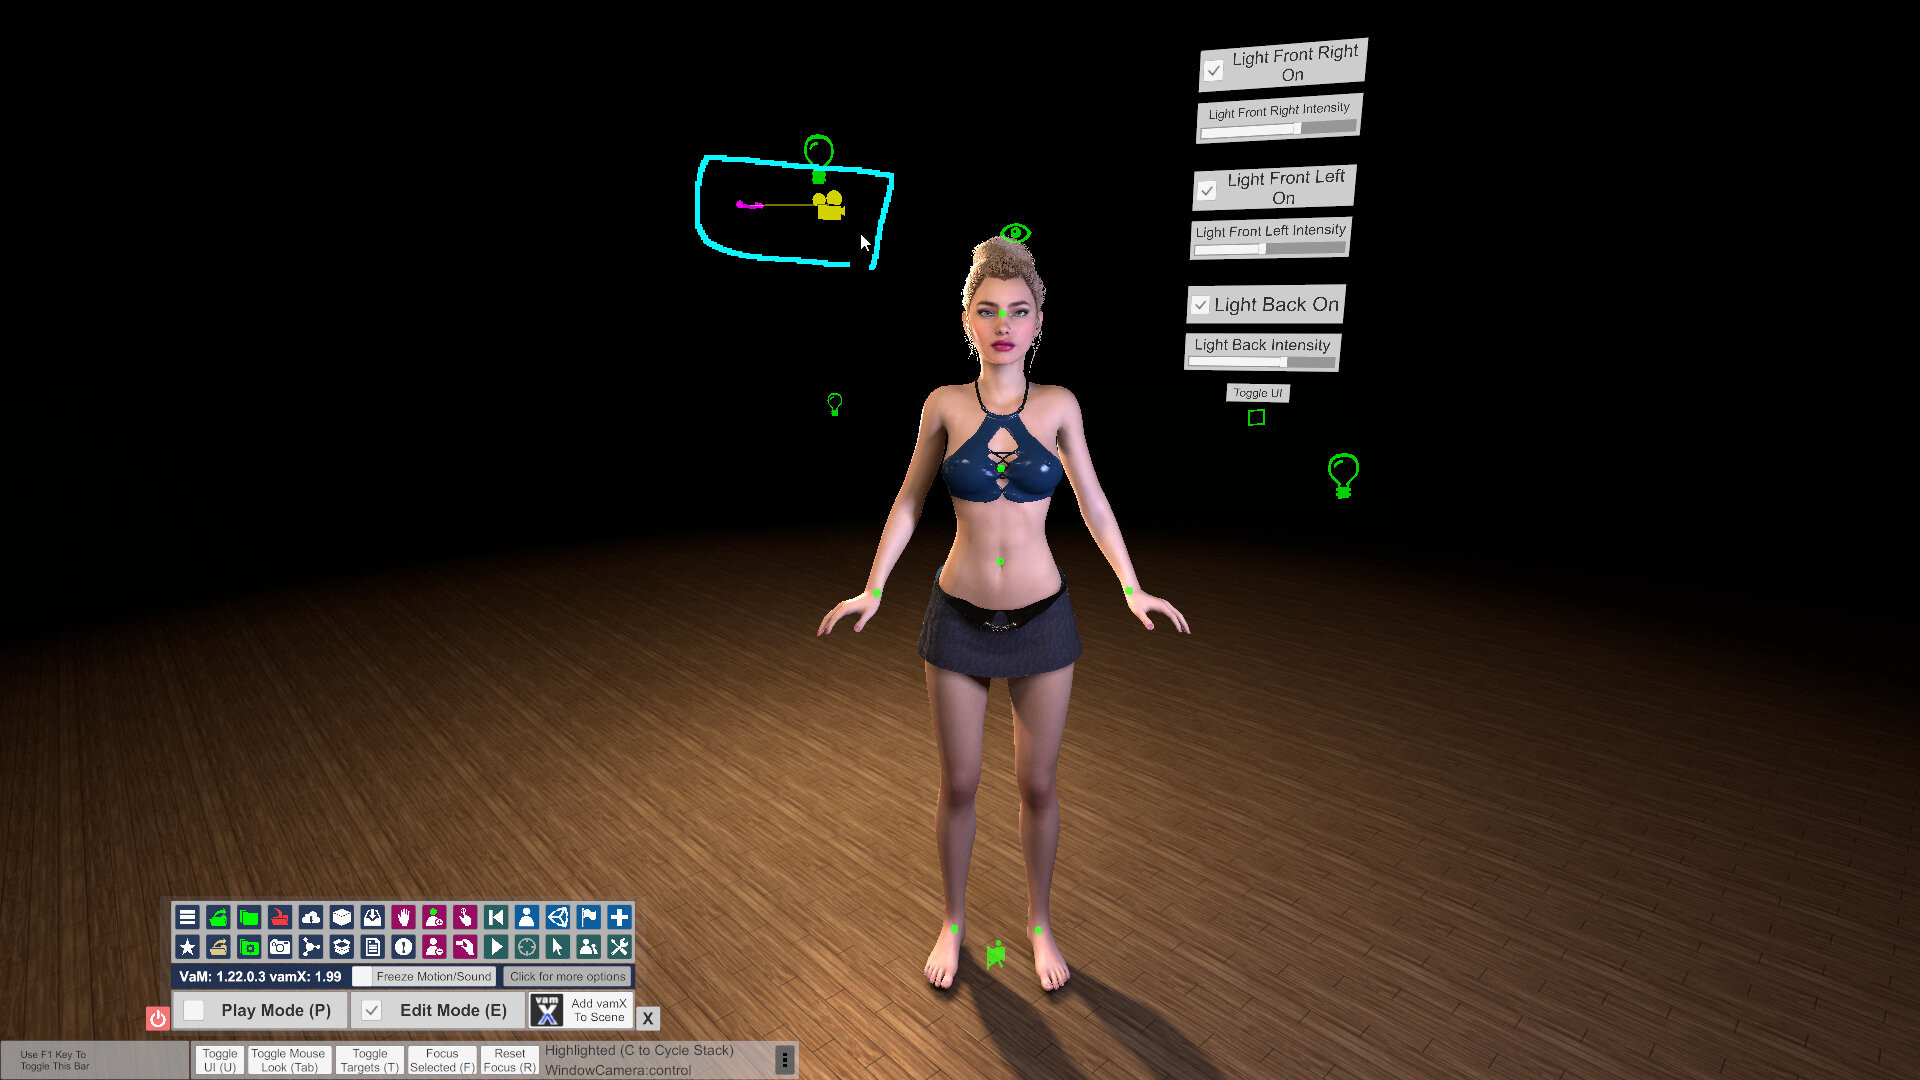
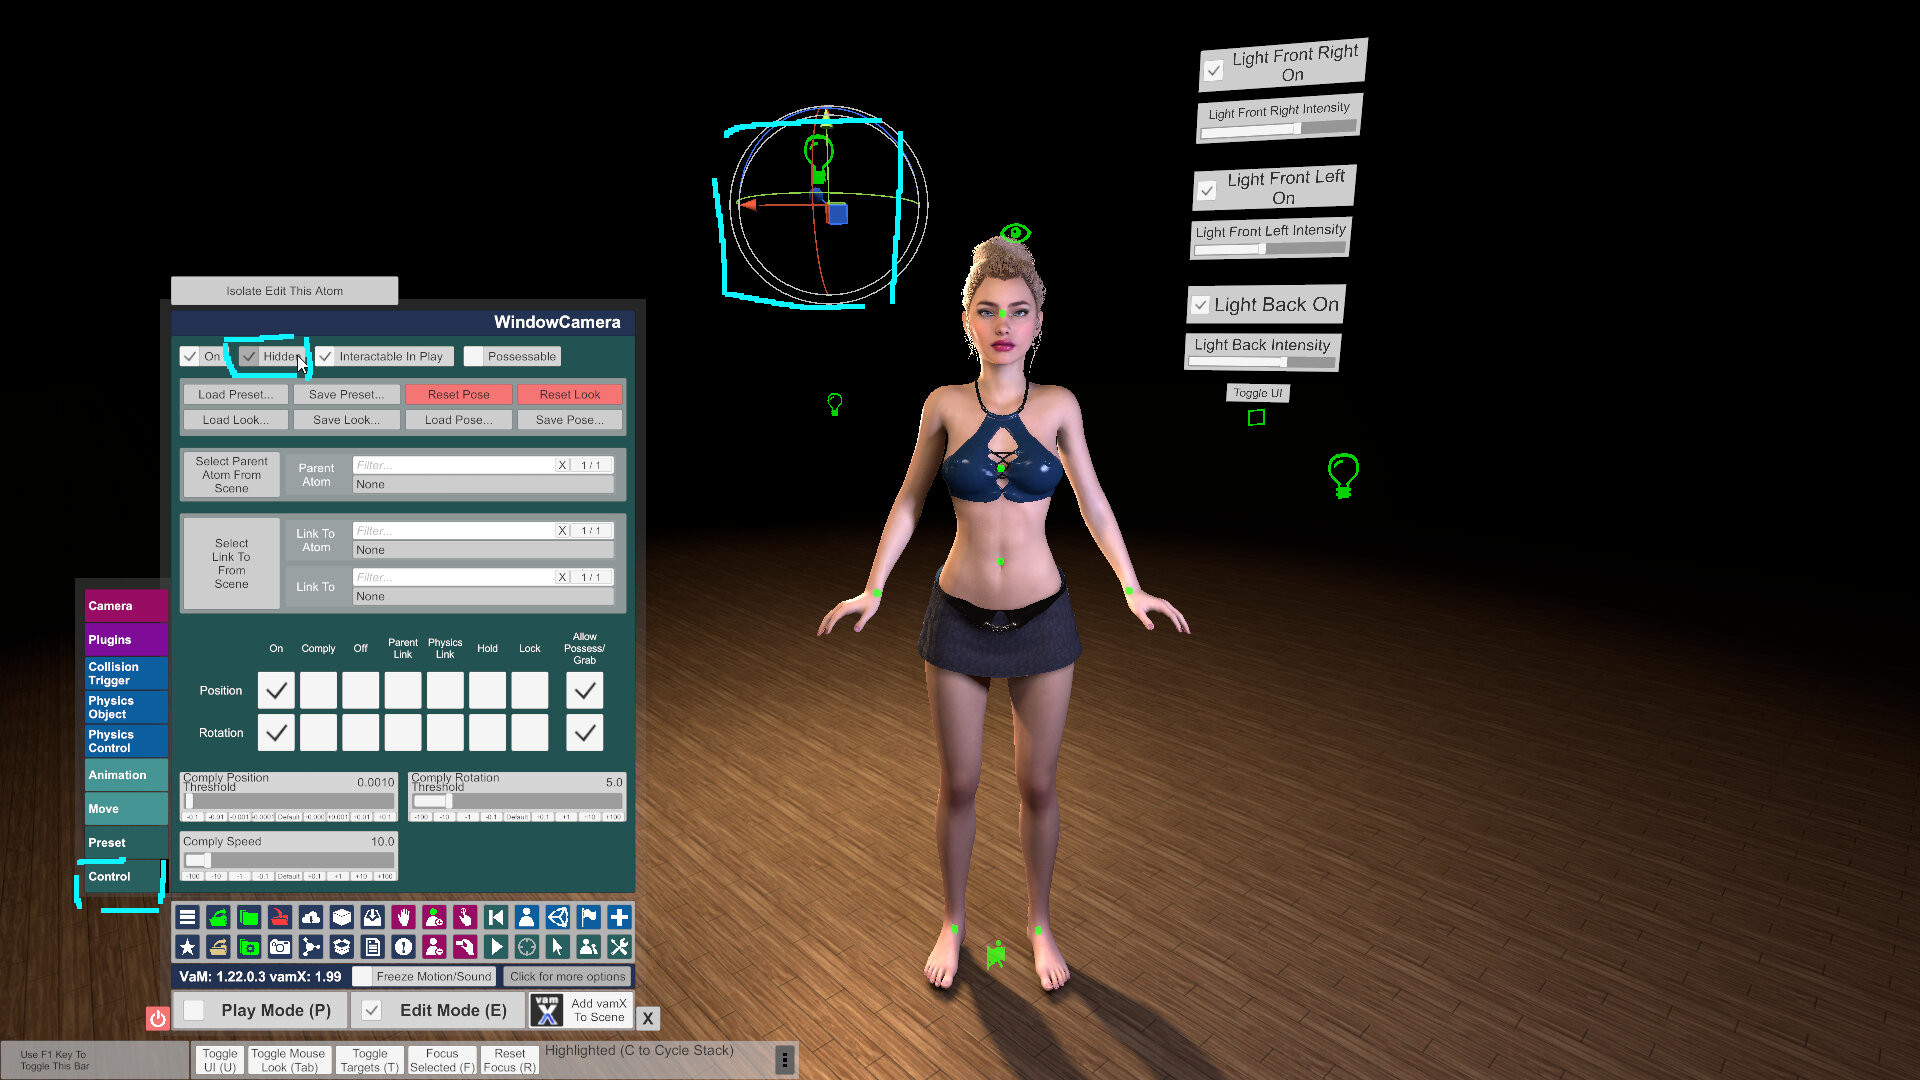
Don't worry, there is an easy way to see everything we've hidden and we can easily turn it back on. You can go to the select button which will show the hierarchy of all atoms in the scene, and click show hidden.
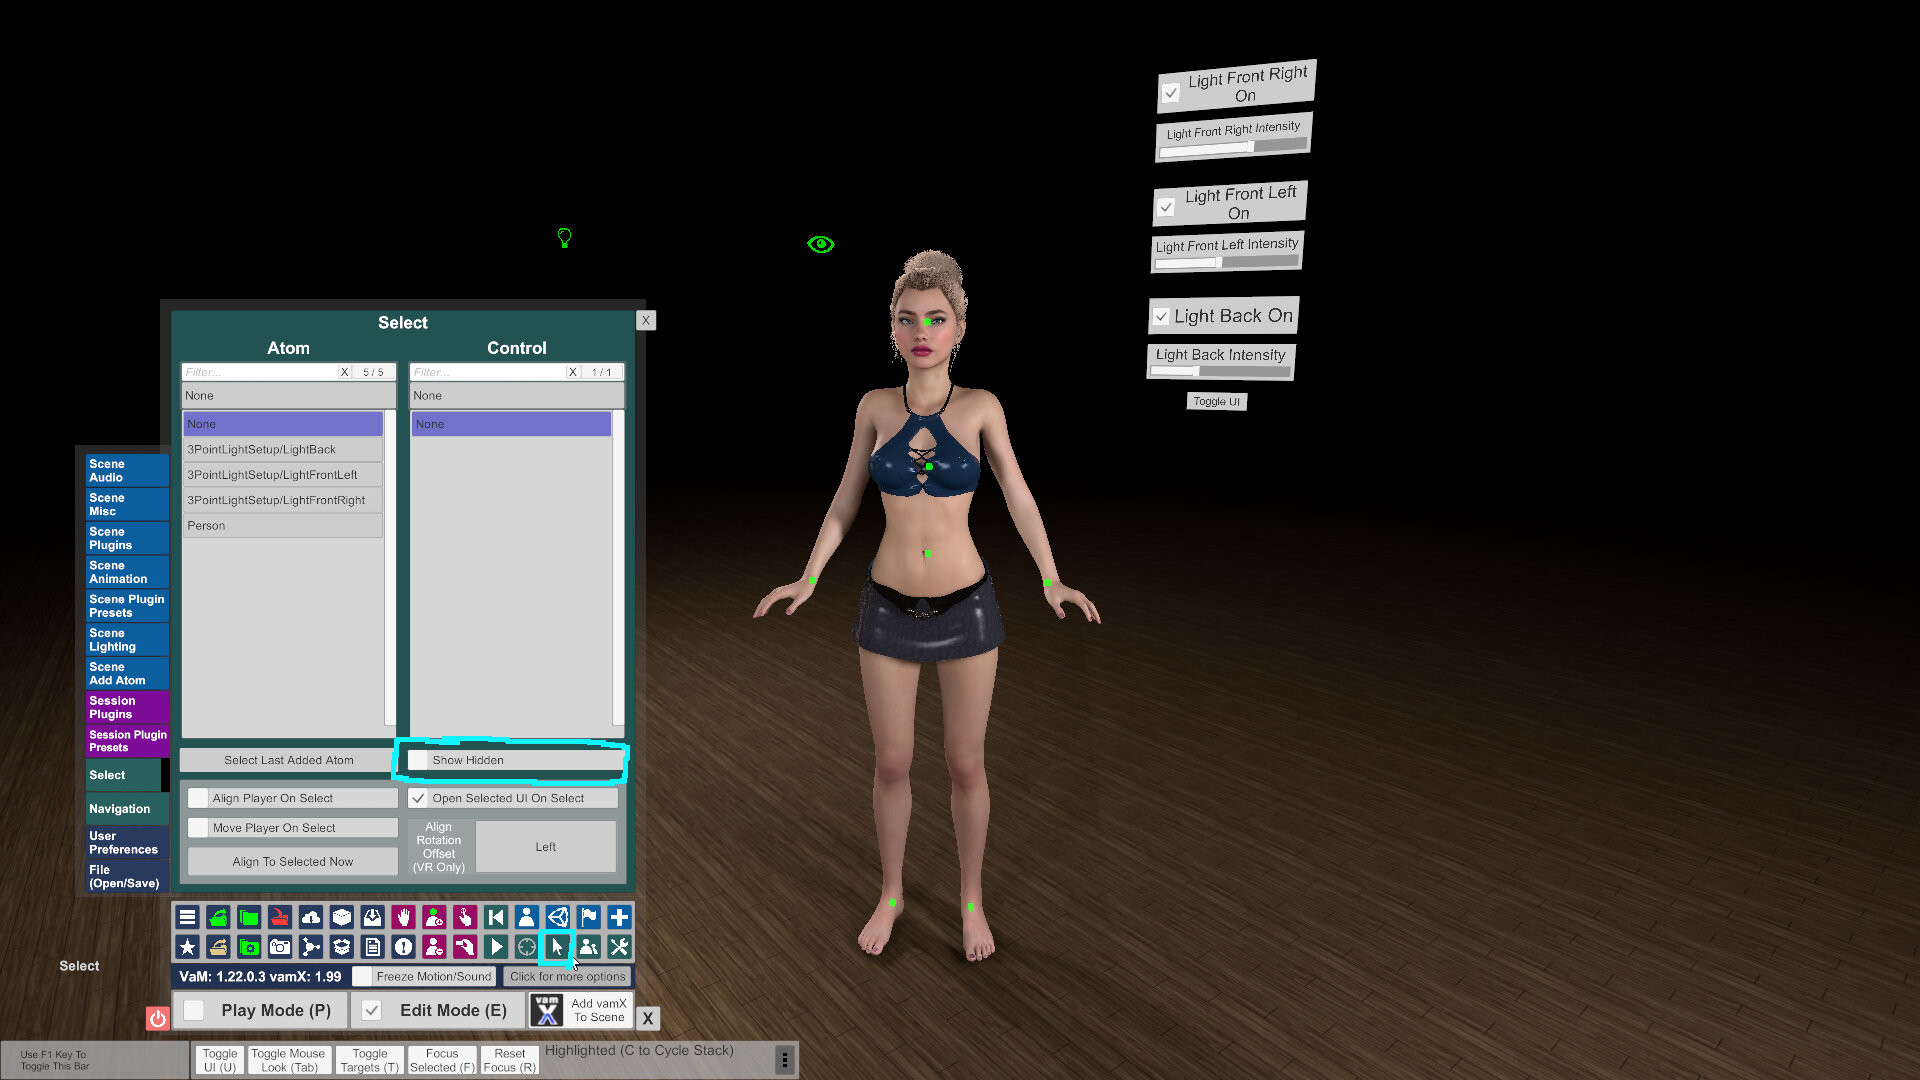
Pro Tip - OR, you can also just hit H on your keyboard! It took me the longest time to figure that out. So, to get these items back, just hit H, manipulate them, then hit H again to hide them.
Next, the container for the 3 point light setup is an option. I will leave mine on but you can hide it if you really hate accidentally dragging things around.
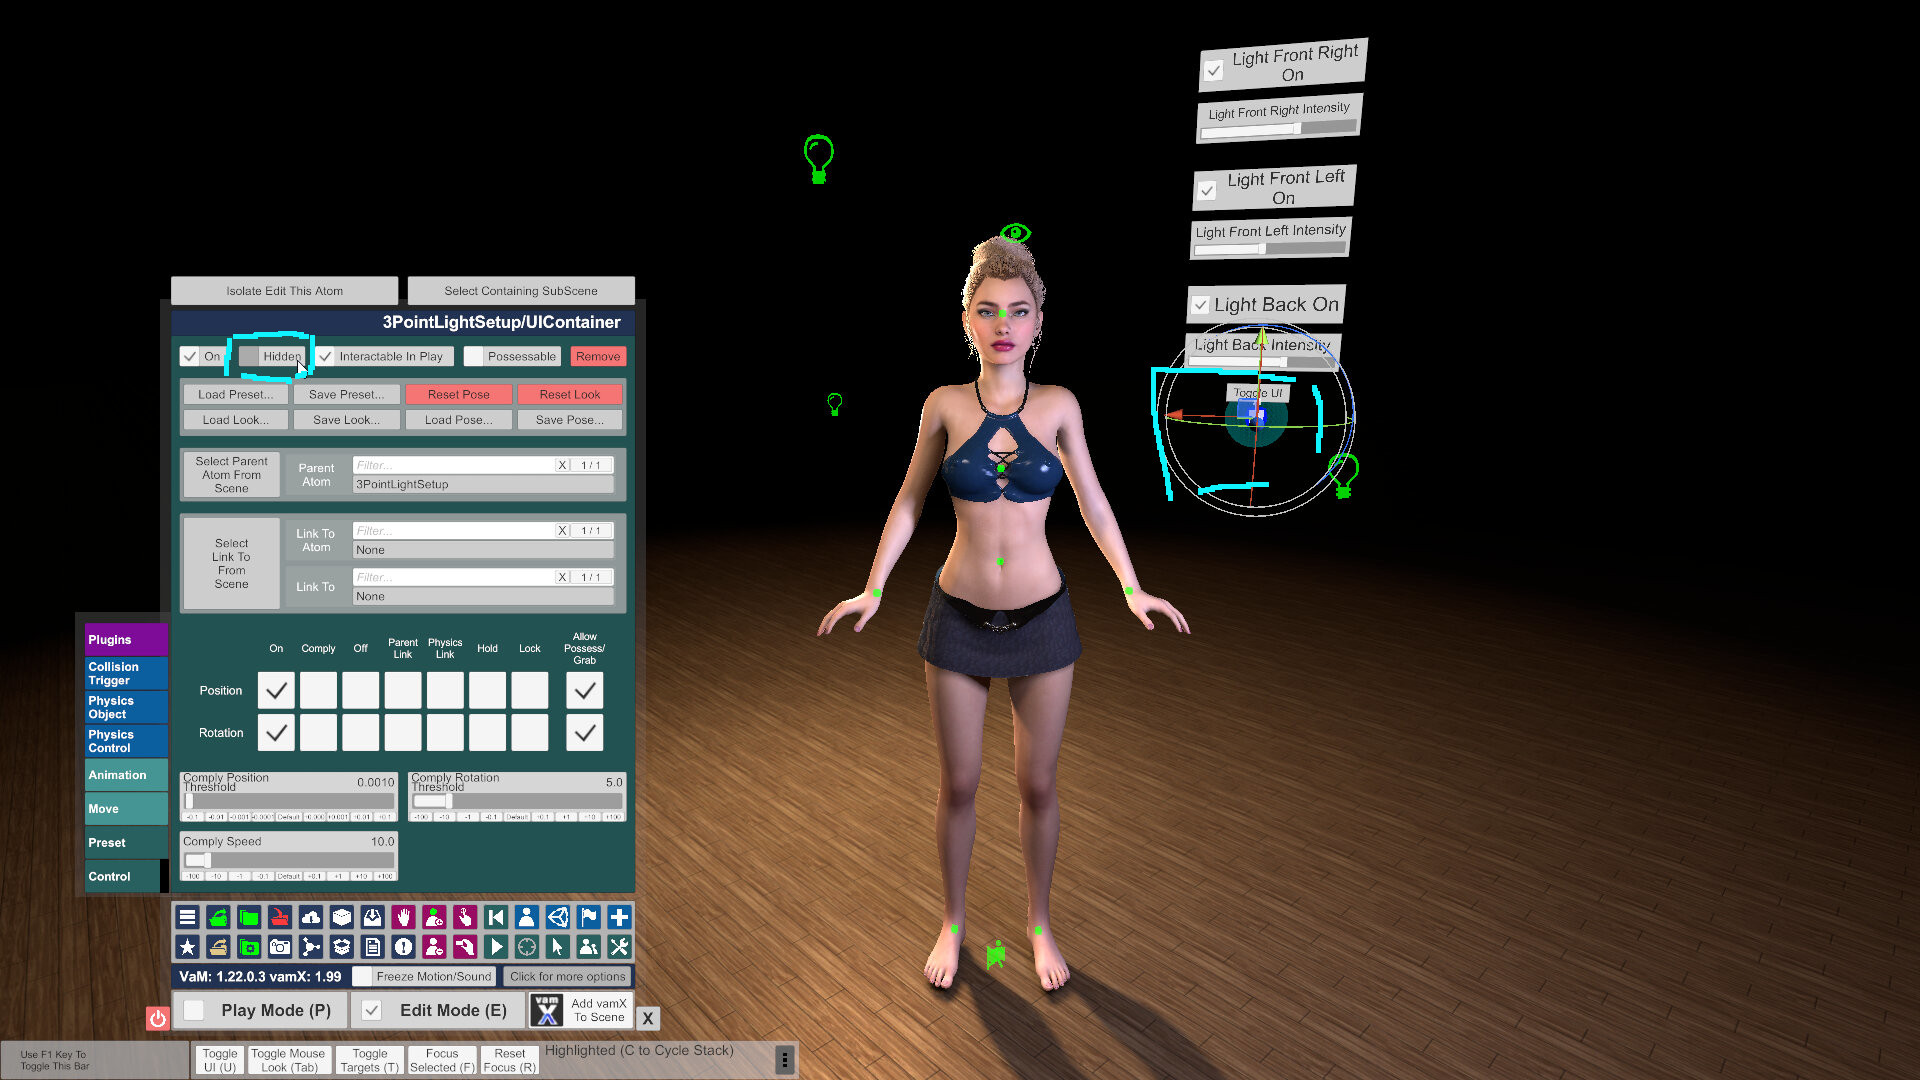
Pro Tip - This object happens to be snapped to a grid (check its Move tab), and partially rotation locked, so when it does move, it moves in a more stable way and is harder to mess up. But I will leave mine un-hidden for now.
Next, the biggest culprits- the things between our person's feet! Like the wood panel was. If you reach down here and can't target something close to other atoms, leave your cursor there and hit C to cycle between atoms near your cursor. When the flag icon is yellow, click it.
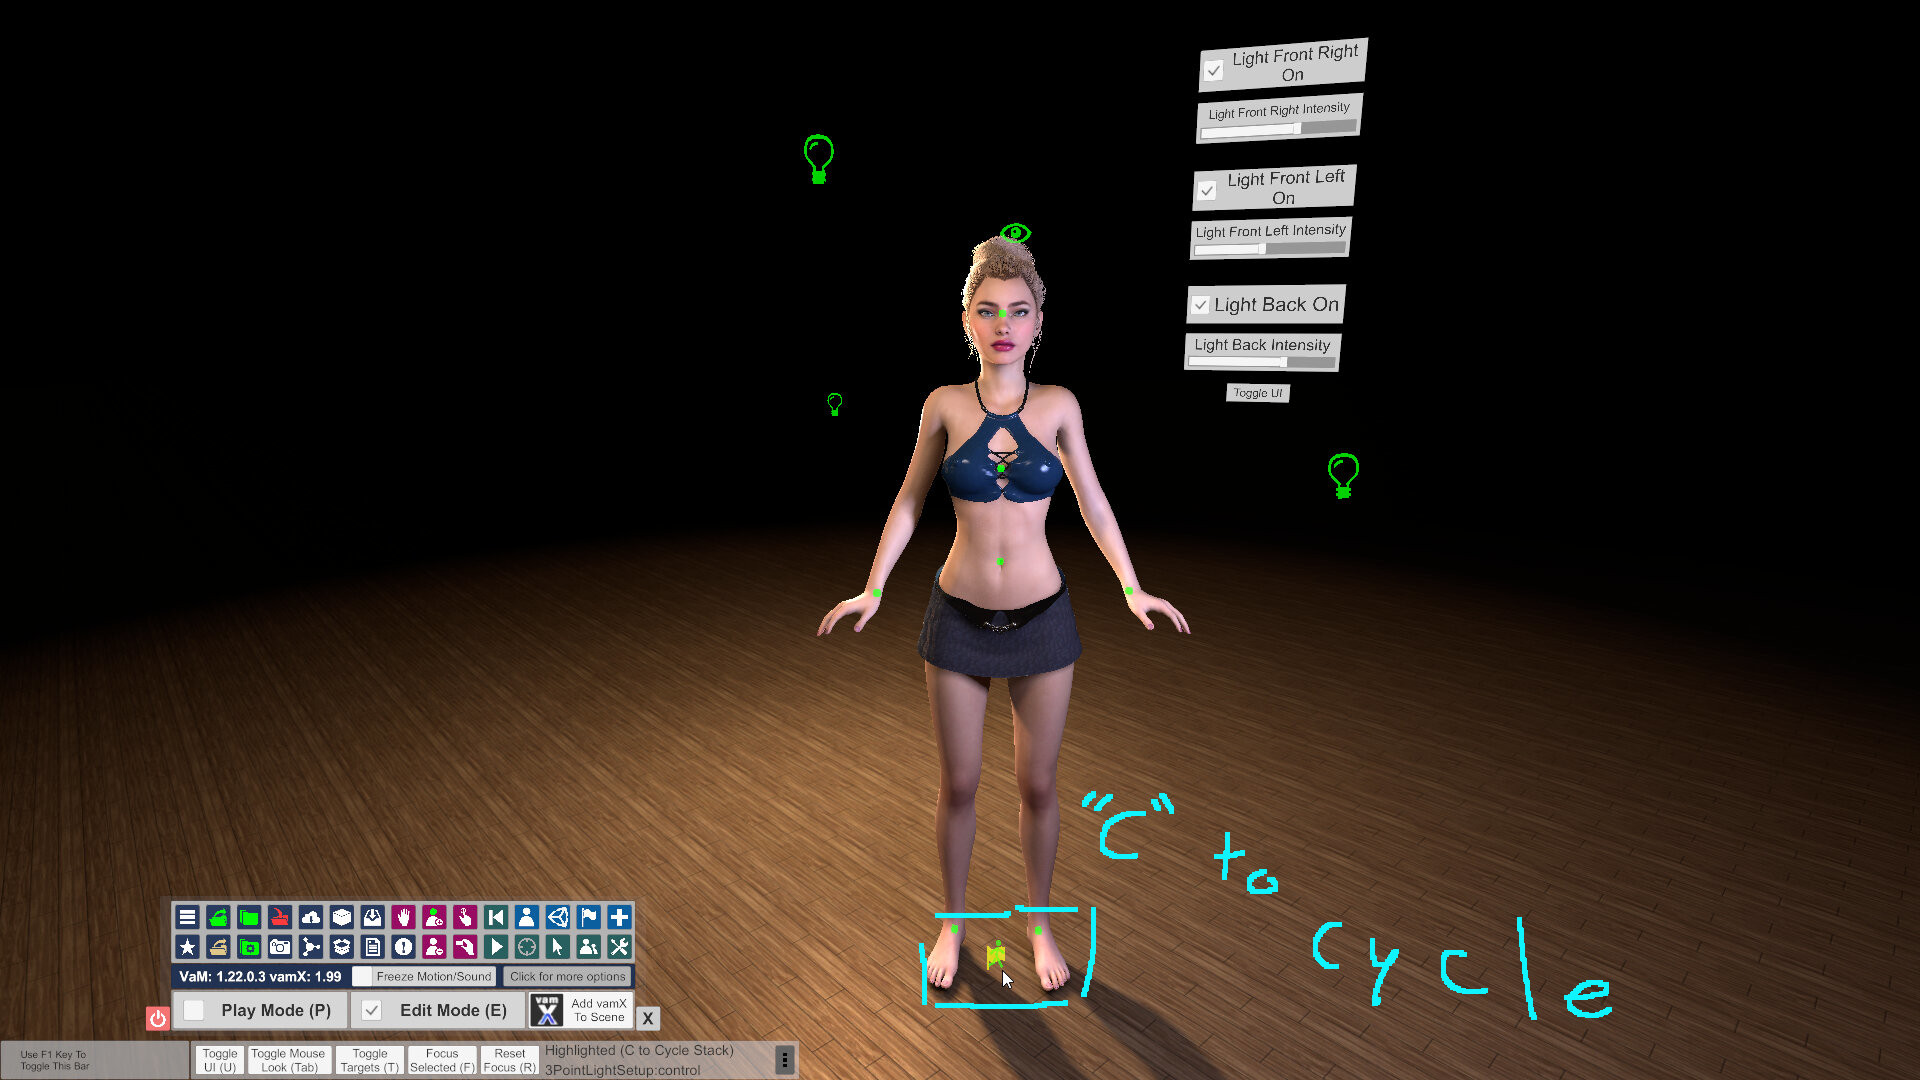
Oh wow! It's the subscene container for our 3 point light setup!
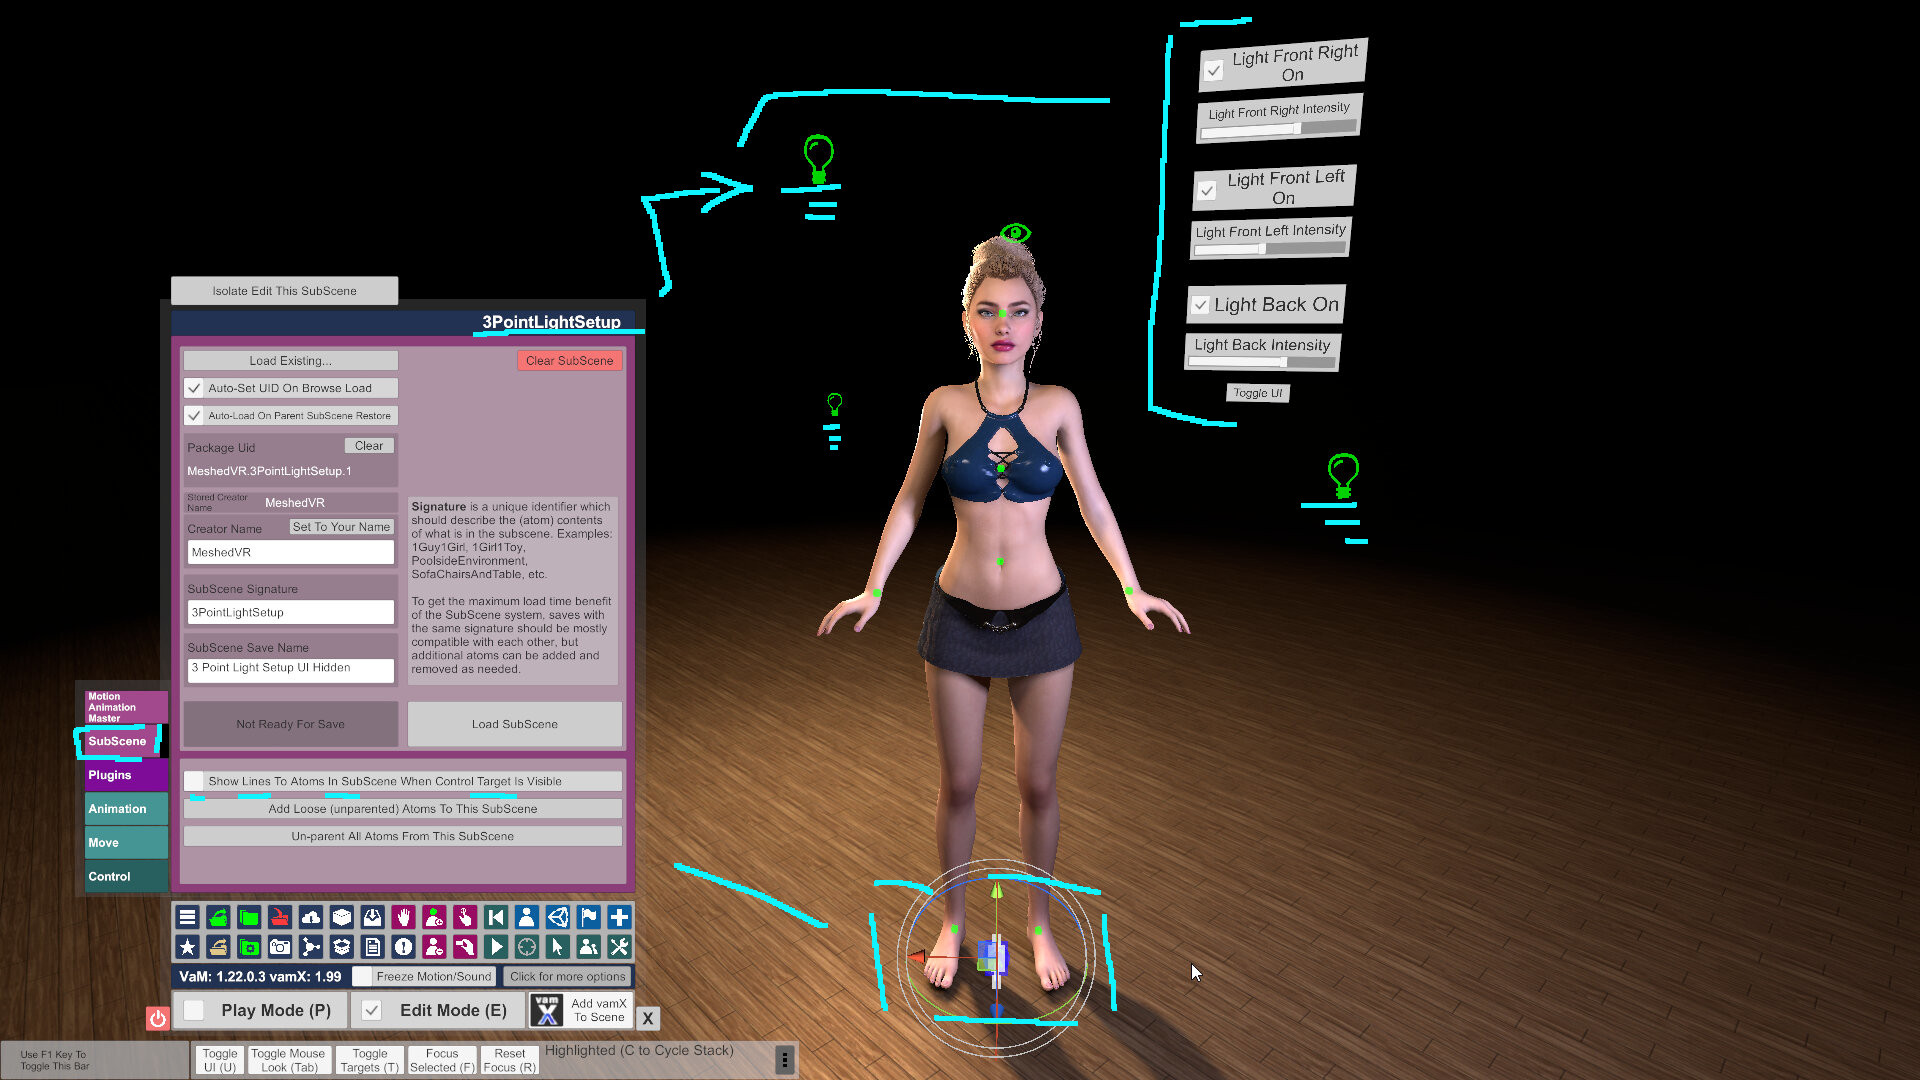
It's a subscene- basically a master object that contains a bunch of other objects. Go to the control tab so we can manipulate it, and just hide it.
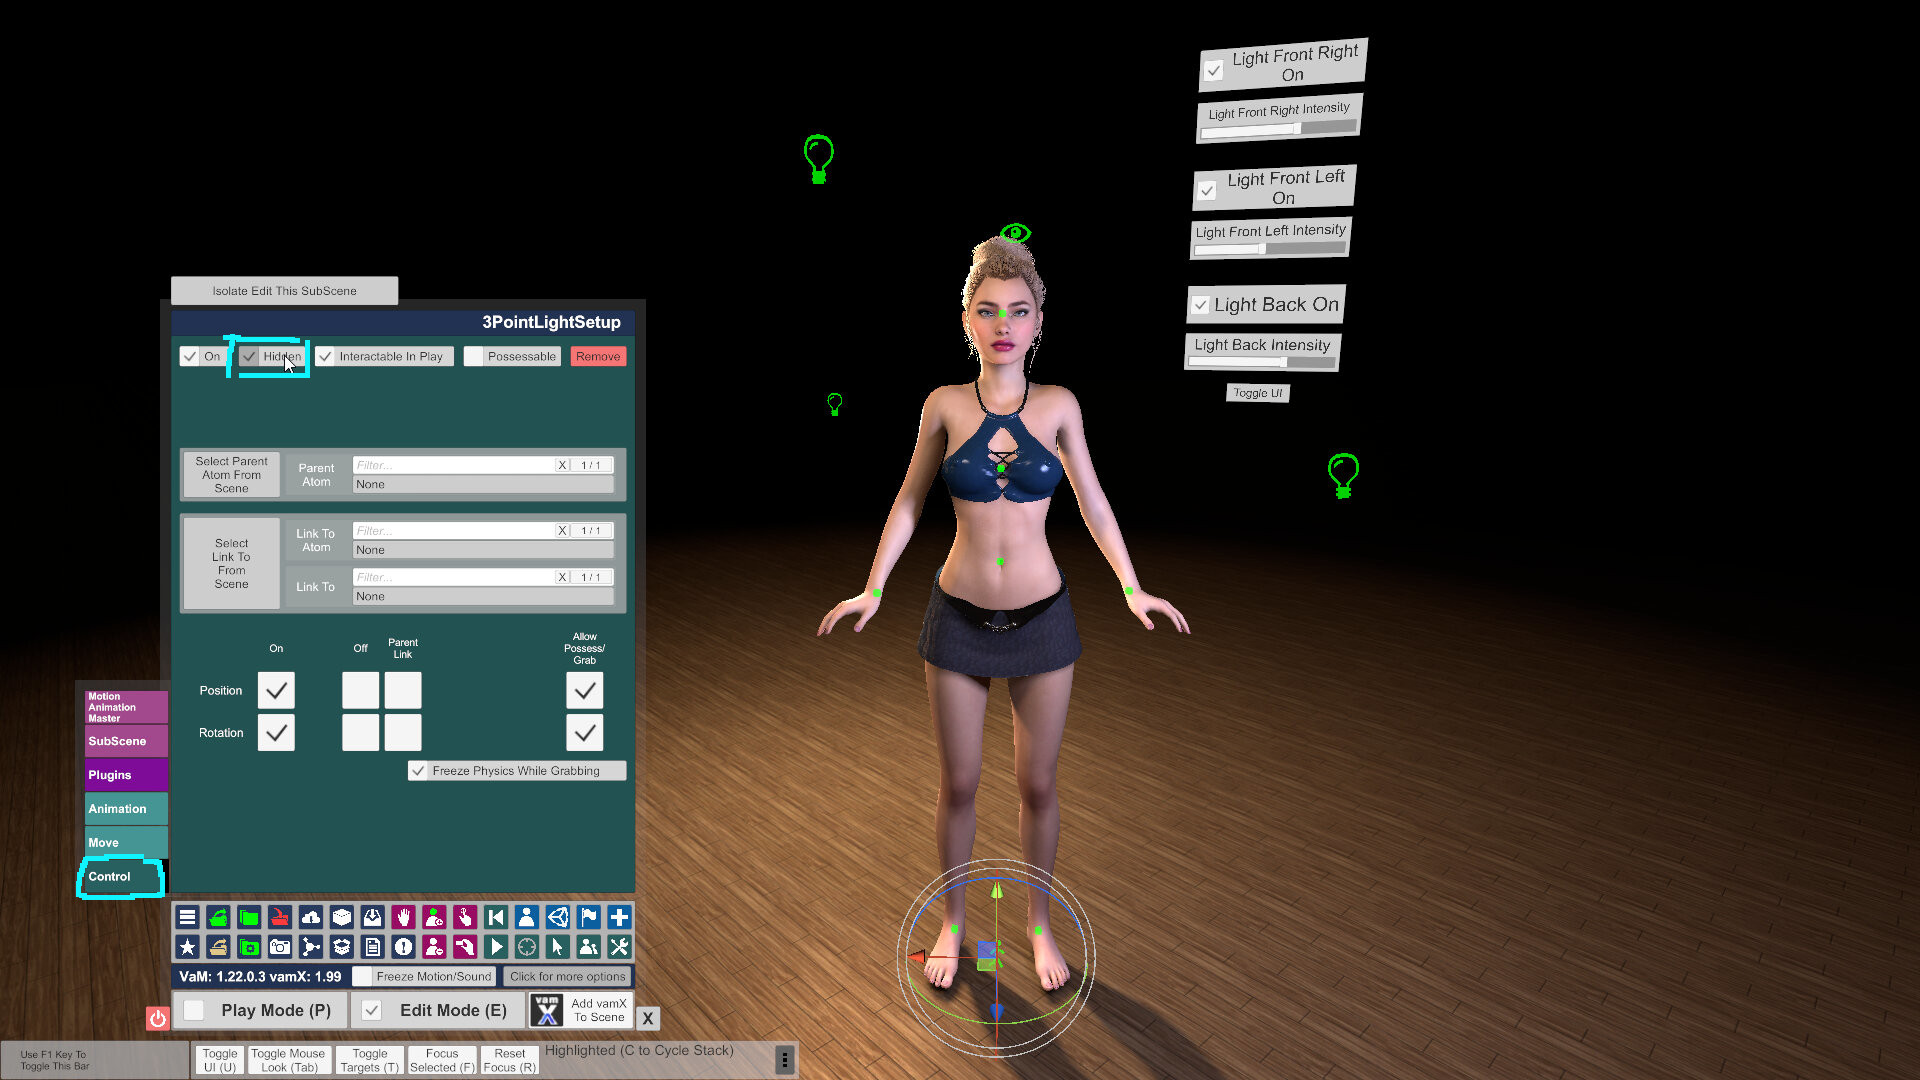
Now it will stay in our scene, but we won't be moving it around. Our lights are important, and I assume we want them to be where we put them.
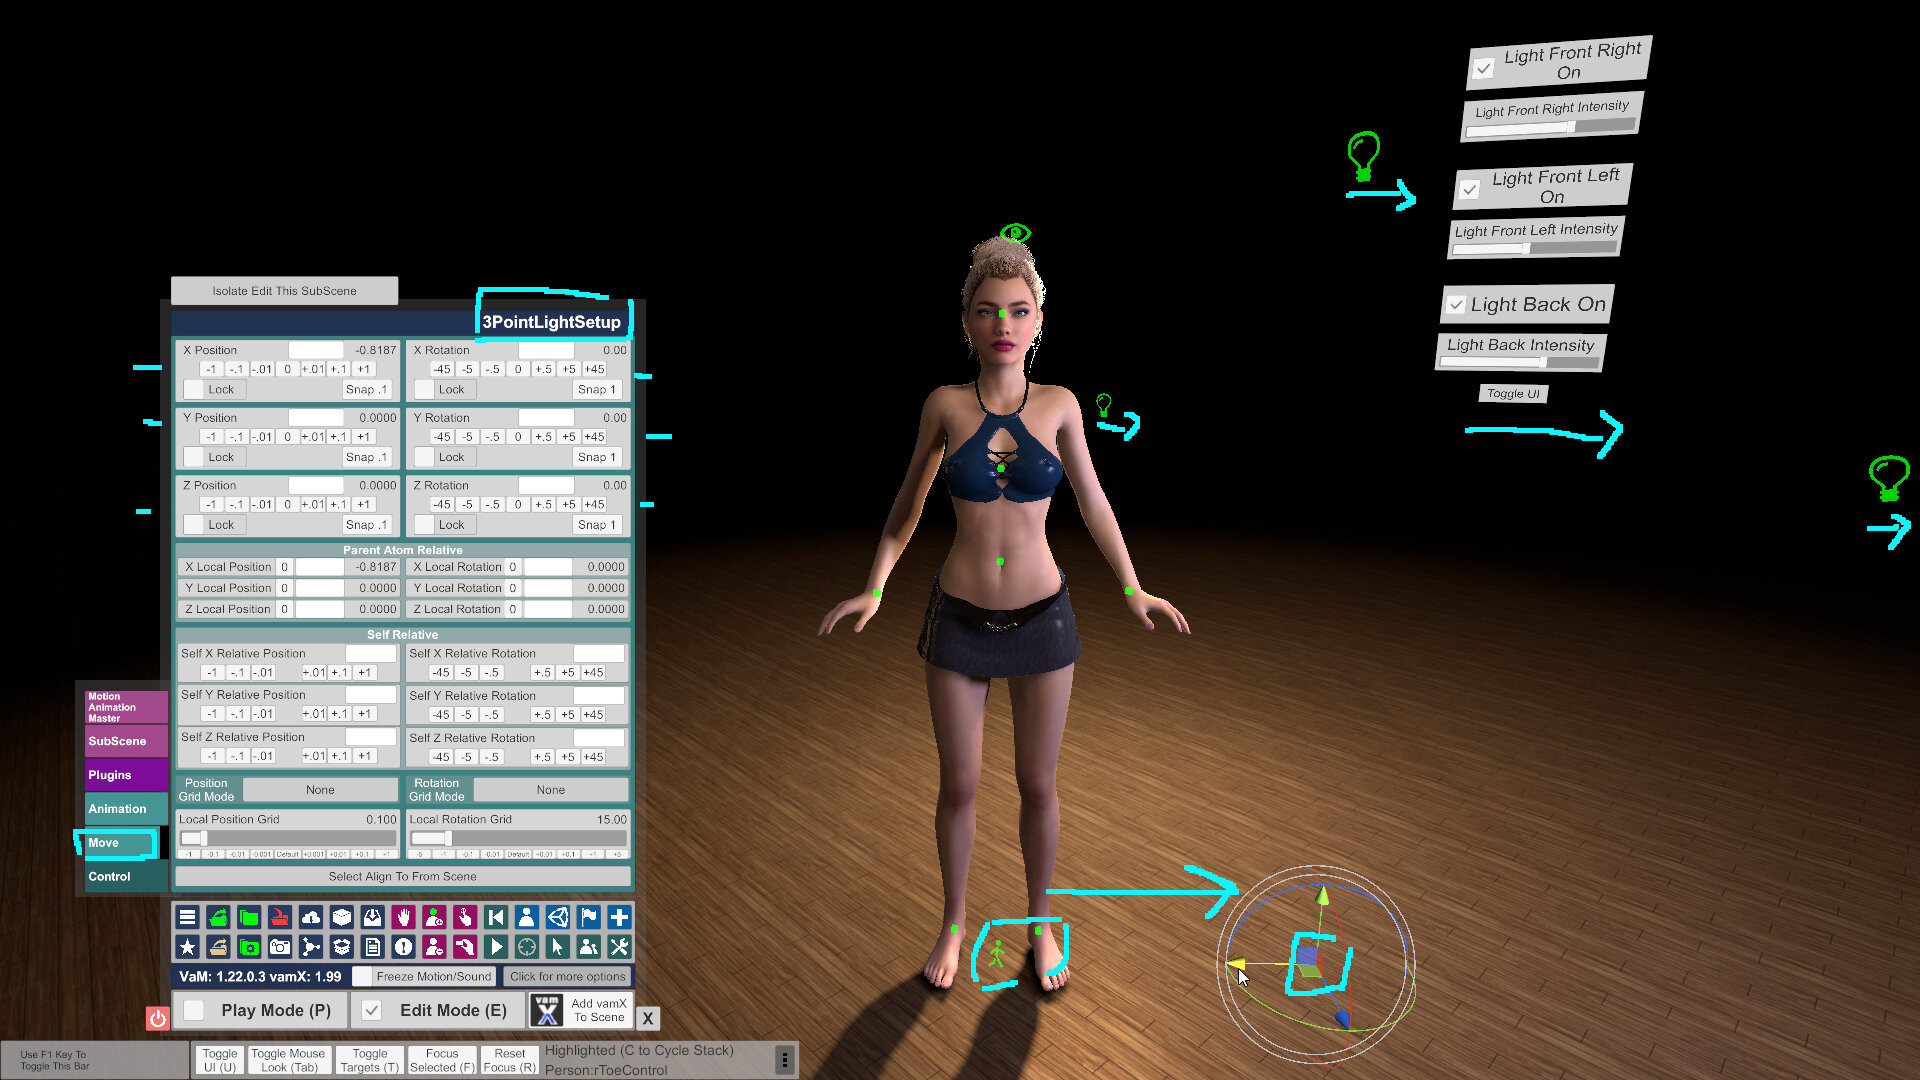
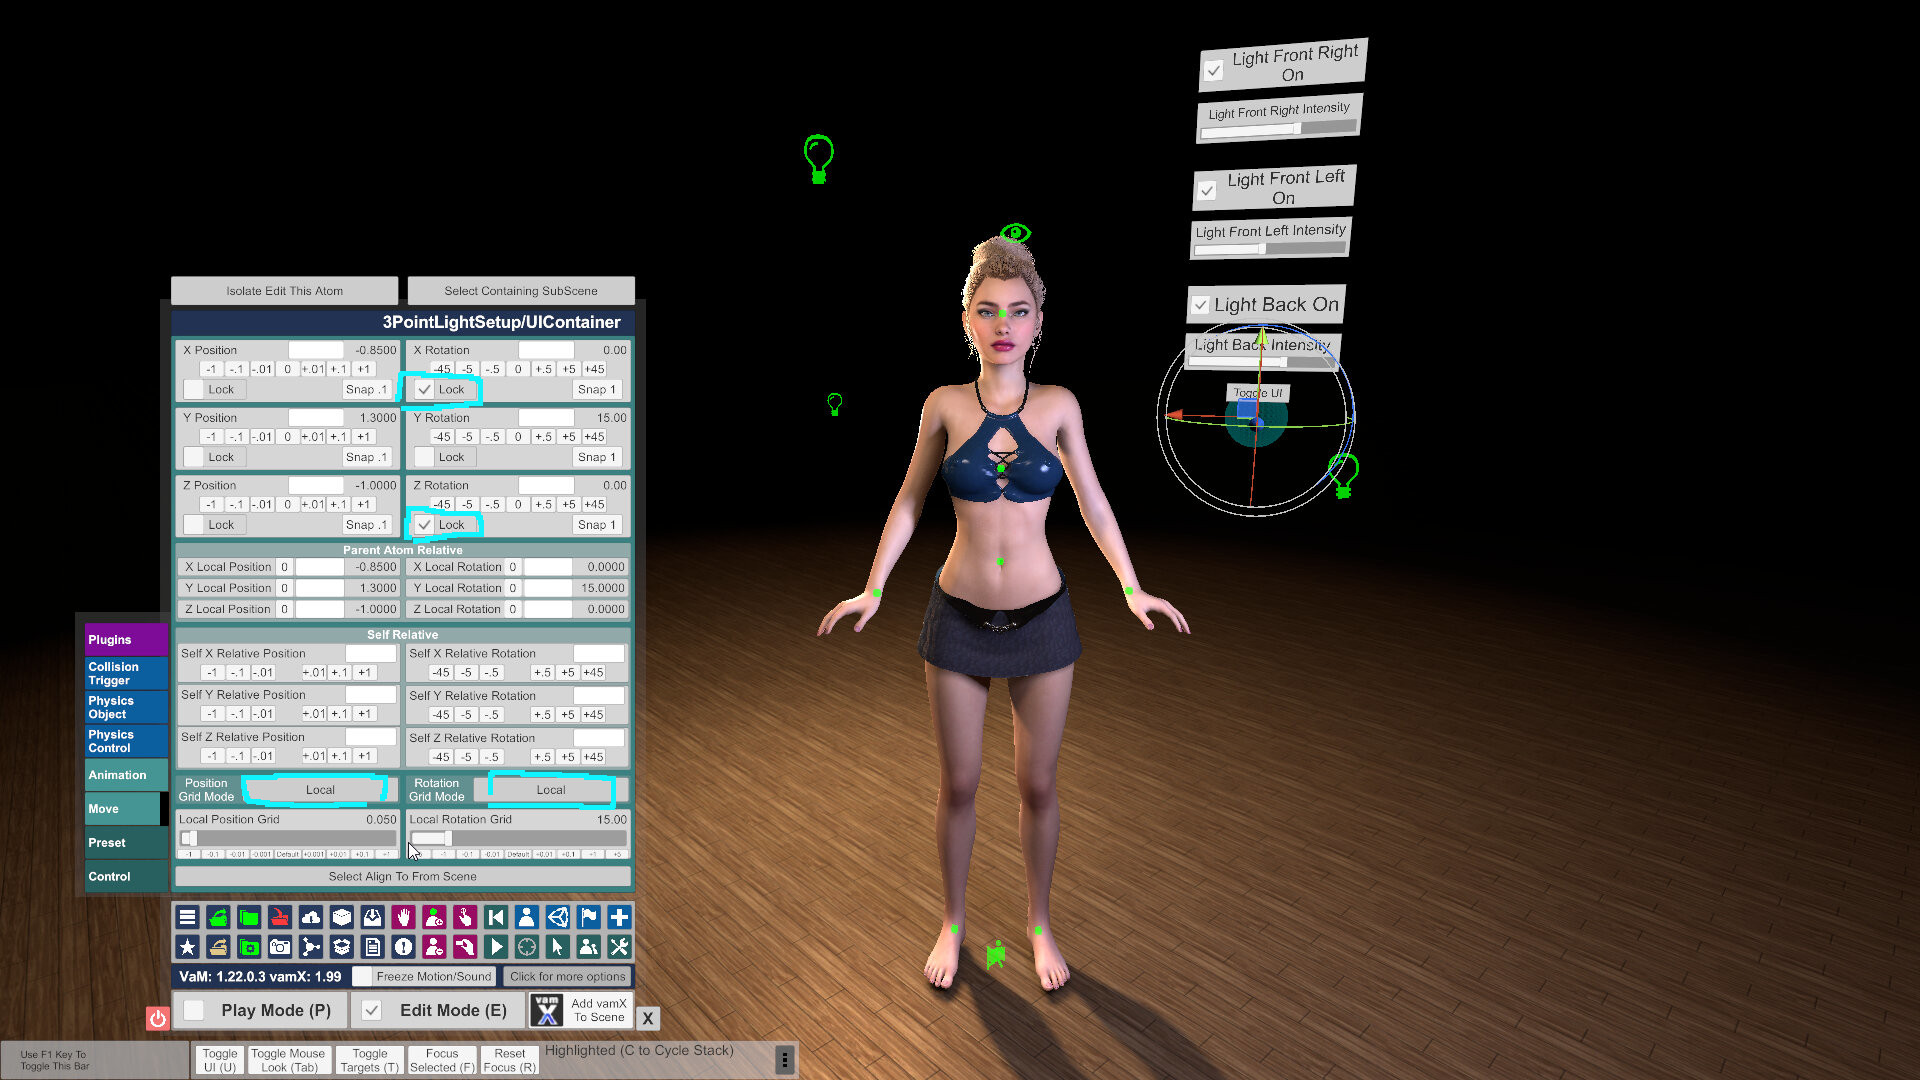
We don't need this happening, right? The entire lighting setup moving because of an accidental drag? If this happens to you with something, just go to the move tab and click 0 for the x, y and z positions, and rotations if necessary. That can wrangle a rogue atom (or you can always lock all 6 position and rotation options in advance).
(Pro tip coming!) Next, what about this, the cause of everyone's woes? Has this ever happened to you?
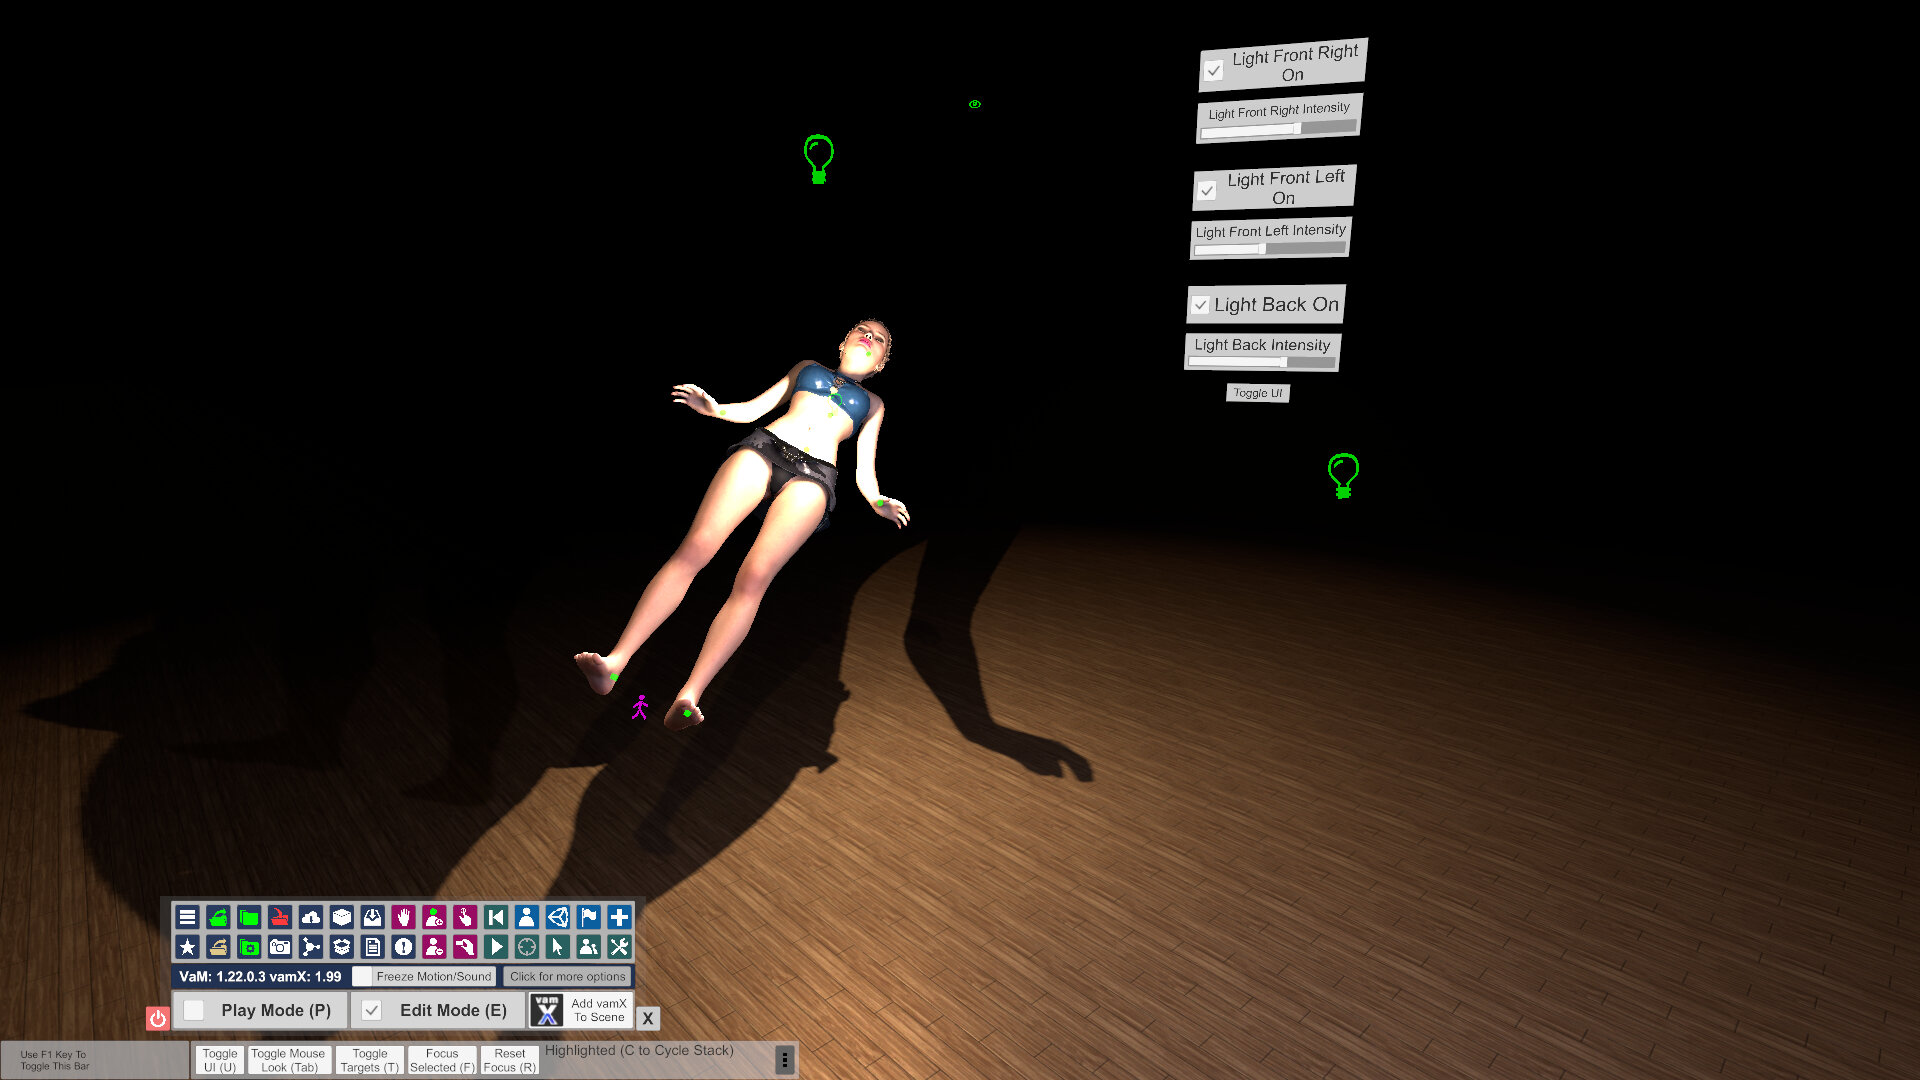
All you're trying to do is move your person's feet, and you end up sending her flying off somewhere. I'll zero her back out with the move tab, changing her rotation first to avoid collisions. If you're really scared, you can turn her collisions off in control and physics before zeroing her, then turn them back on. And you can always load the default pose via the pose presets tab.
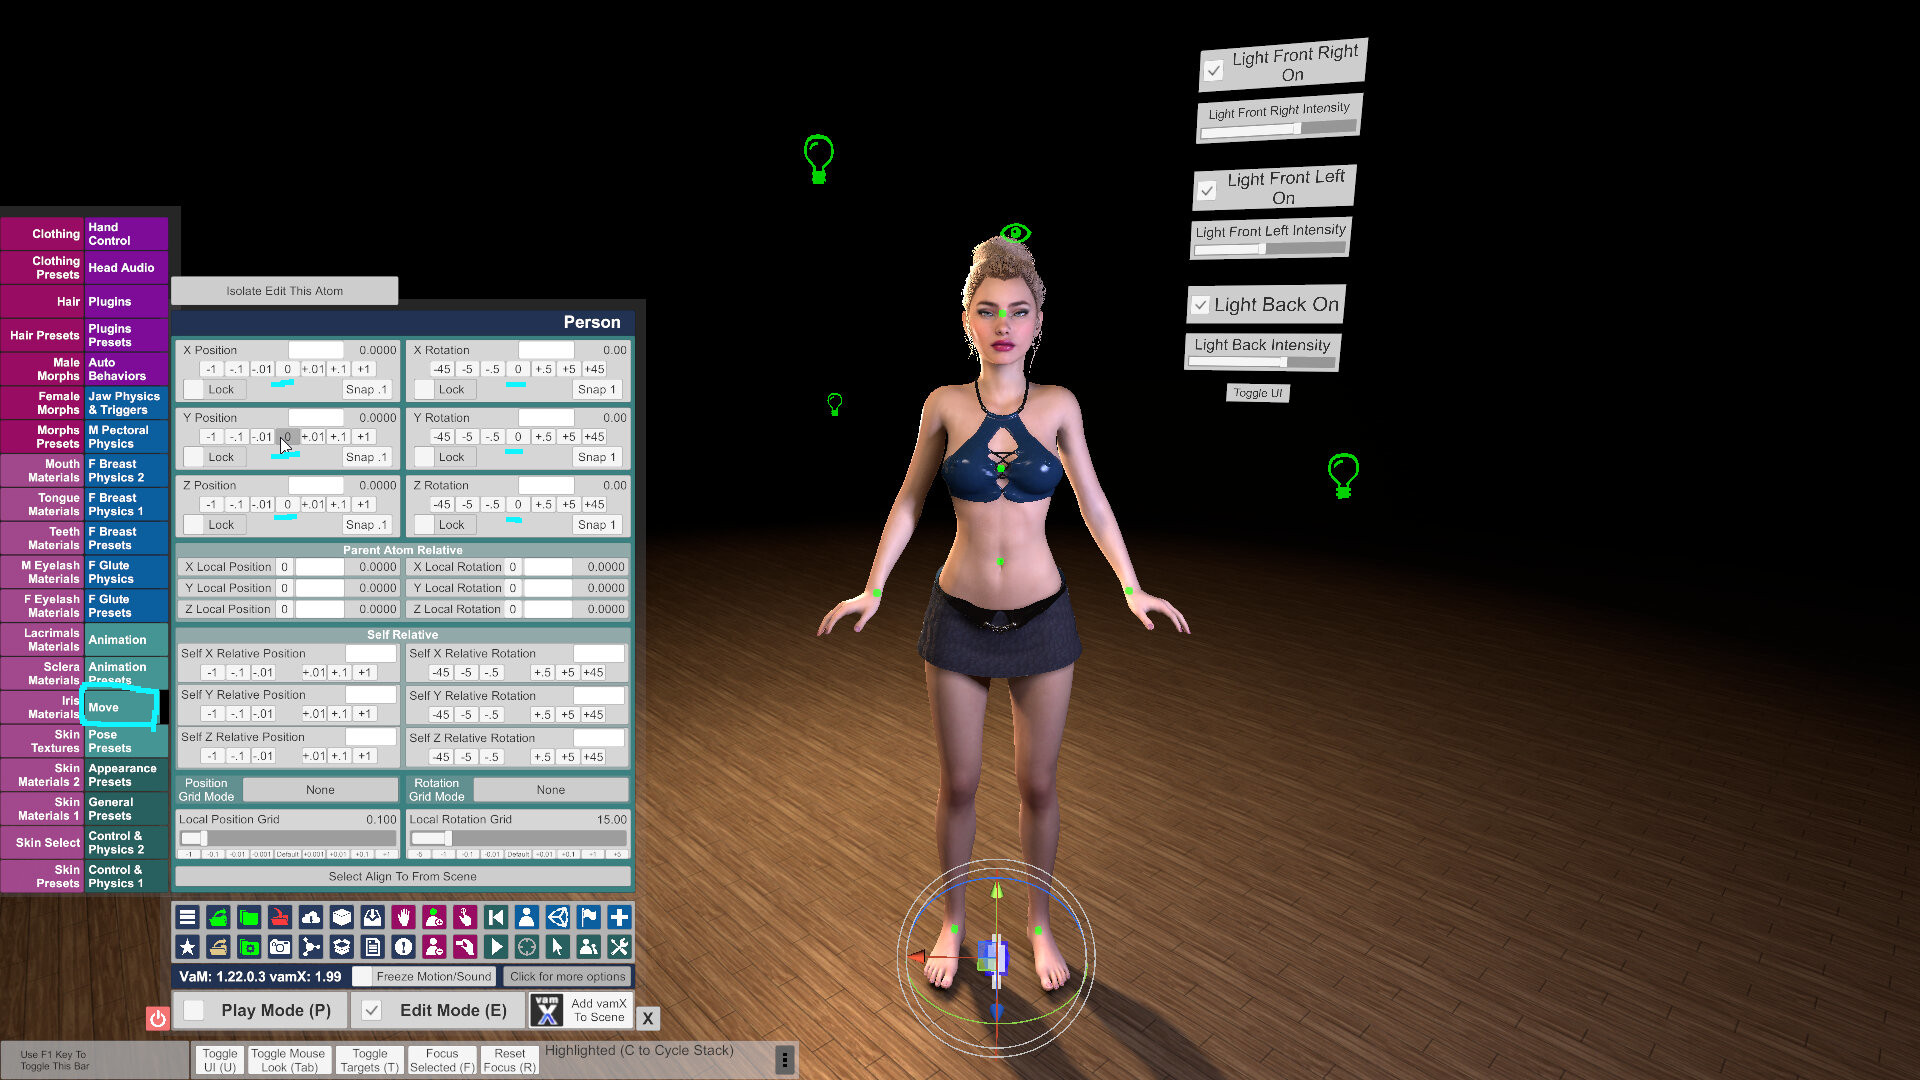
Pro Tip - Ok, go to control and physics 1, and check Detach person root control.
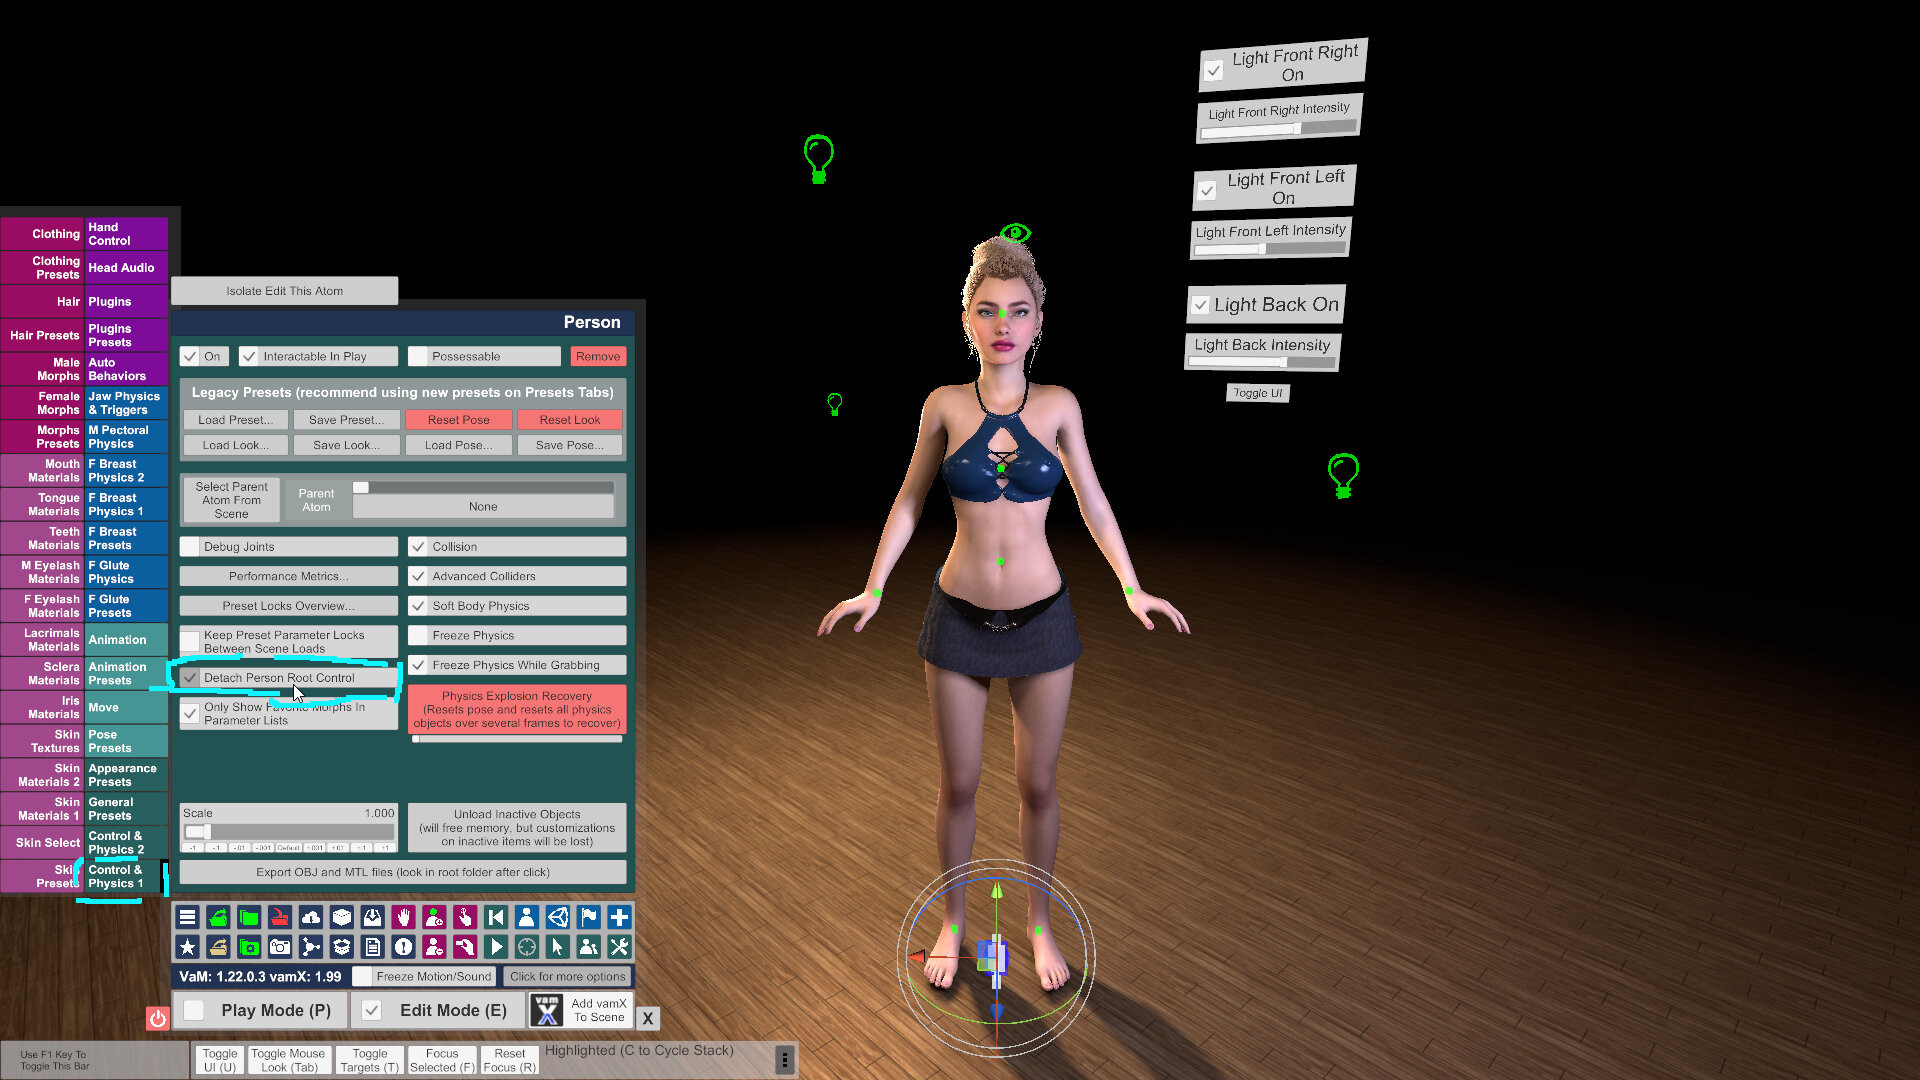
Her little man icon atom is her master atom that contains all her body parts. Now, dragging it around will not move her body parts, because the master atom has been "detached." If you need to quickly move her again, you can always re-attach the atom. Pro Tip - I recommend using my BioRigs resources if you want to be able to move your model faster without worrying as much about this master atom.
Now, let's slide the atom off to the side so we can see clearly when we sculpt our model.
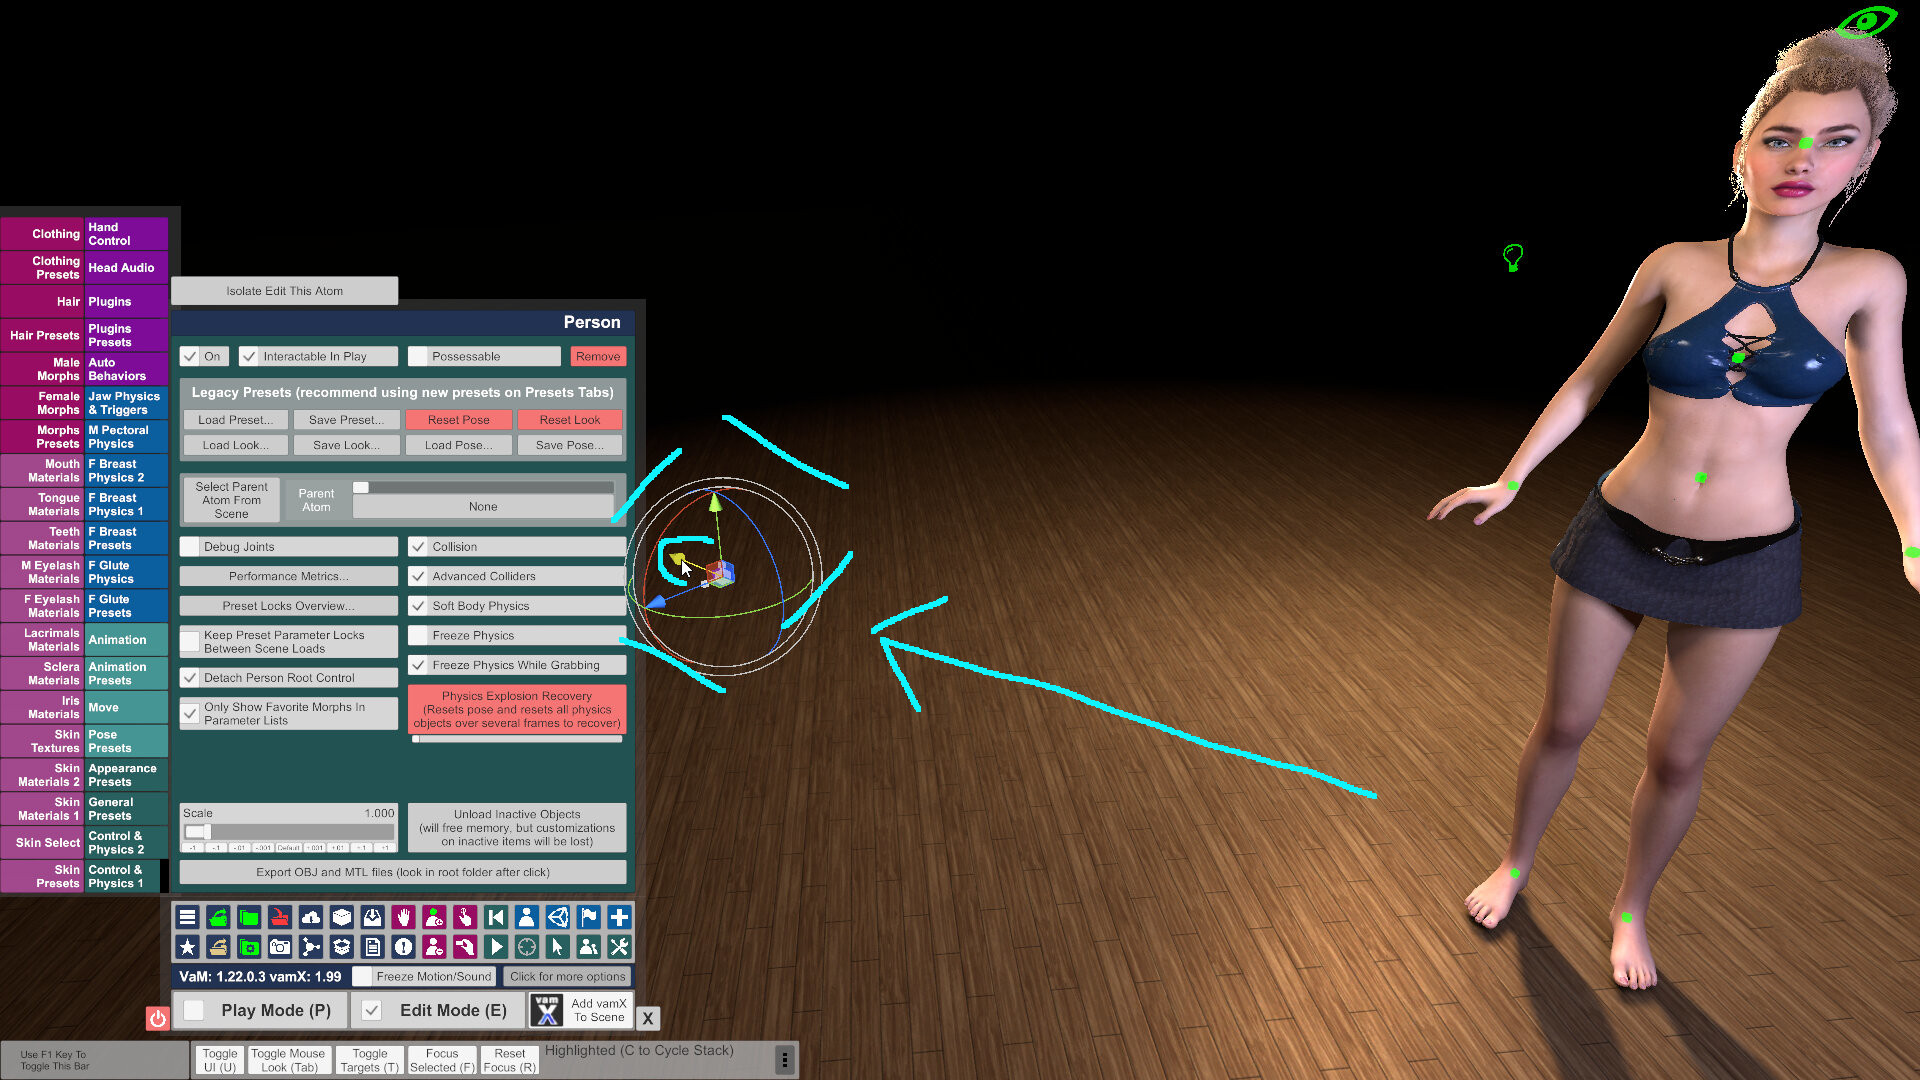
To quickly access its tabs, we can always hit the N key, which cycles through people in the scene. Manipulate it with an arrow here and just slide it out to the left, or somewhere. If you've lost it, find it with N or the select button, go to its move tab, and zero out its position to return it to the scene's center.
3) Lights
Great, now we're going to do the lights. The position they are in is just fine. But if you want to really move them easily, Pro Tip - click each one and change it to possessable in its control tab. We can then move each one easily by using possess. While in possess, use tab for mouselook. I have it bound to my thumb mouse button.
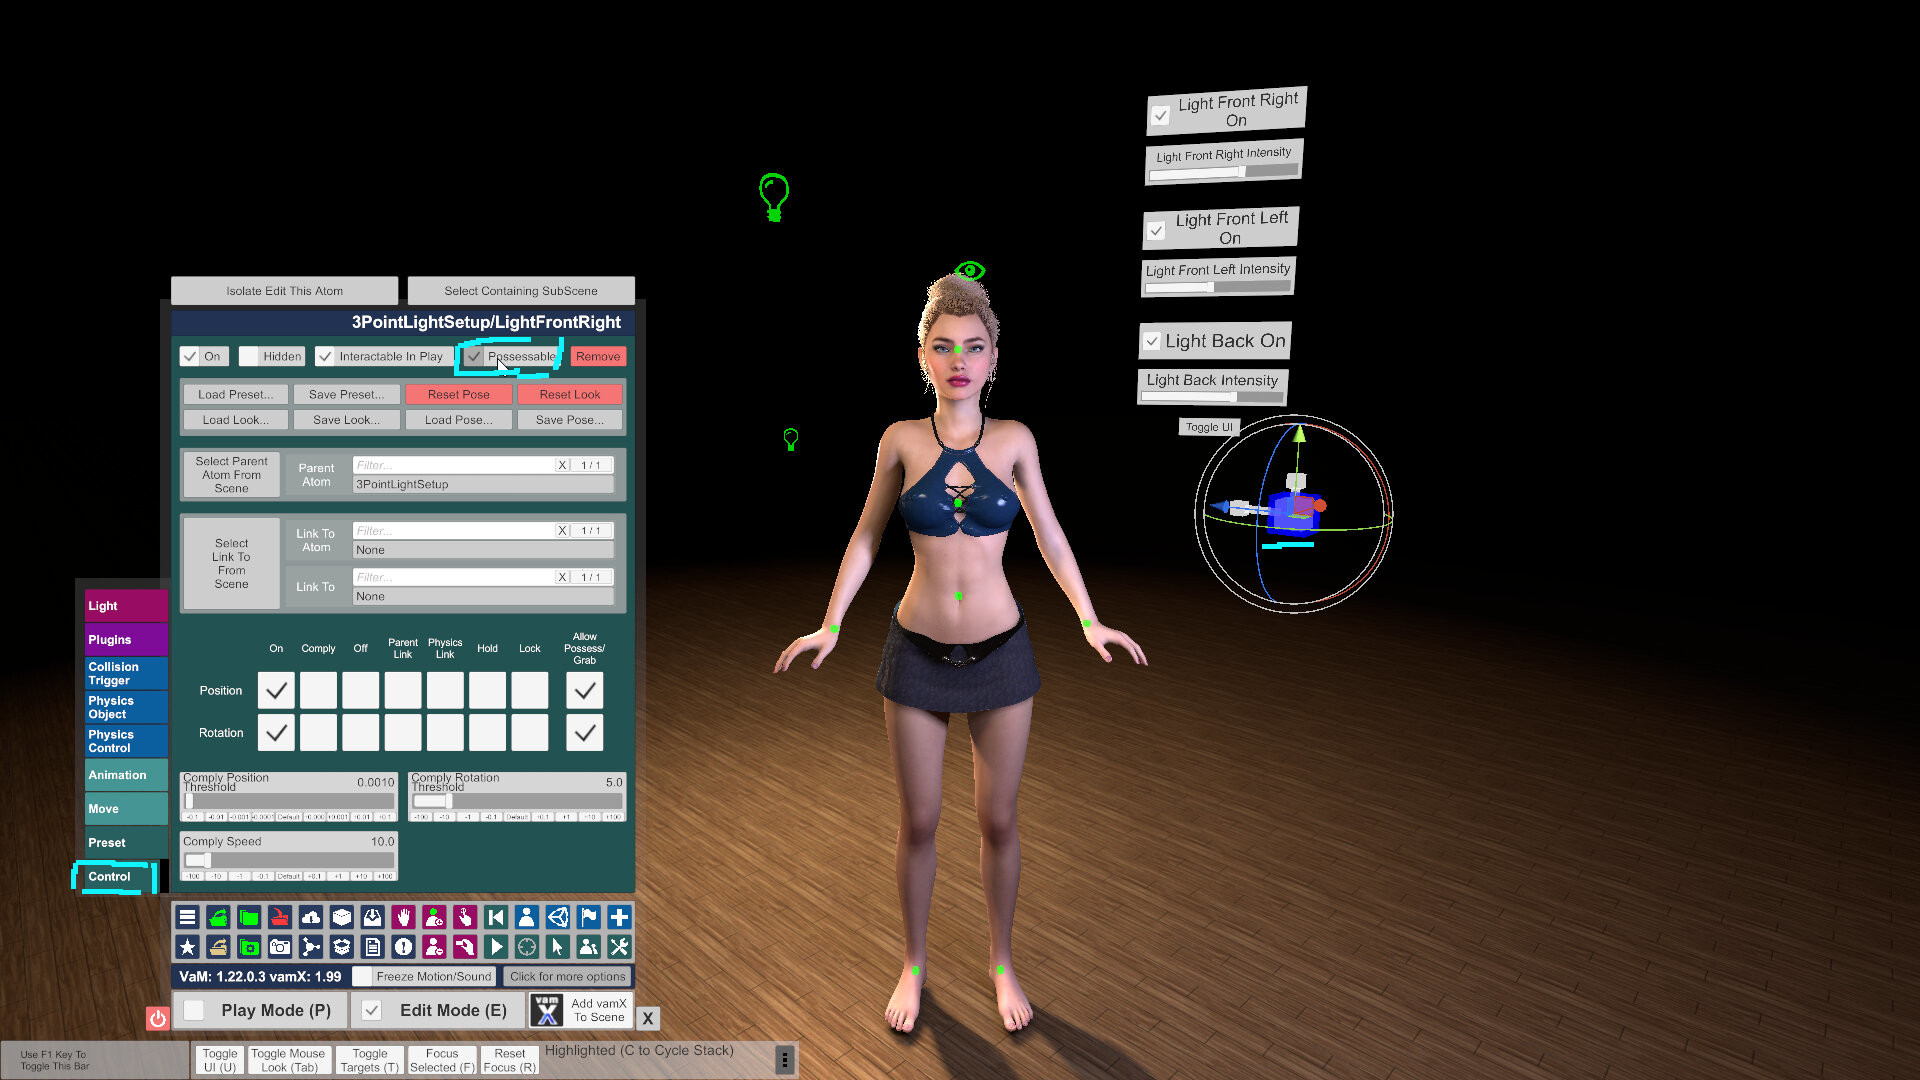
I will possess each light and drag them out a little further, to where I want them.
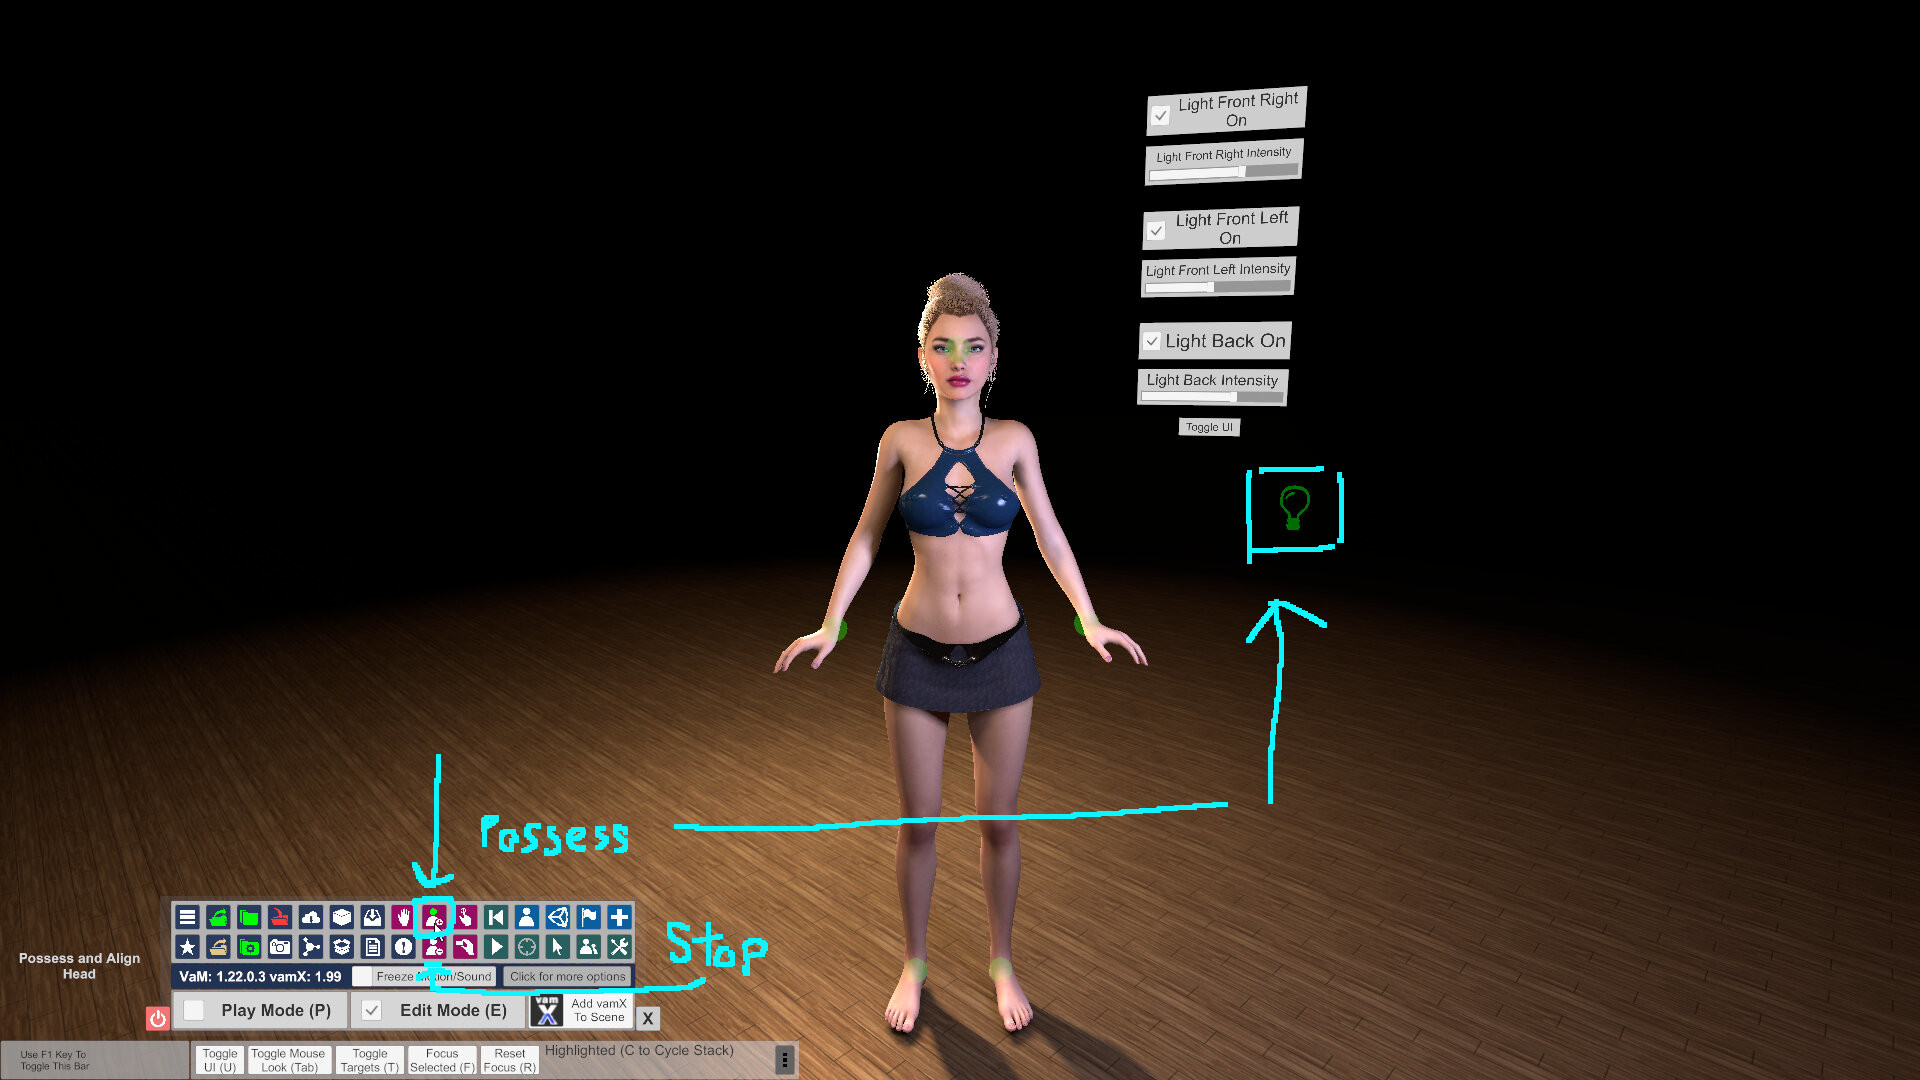
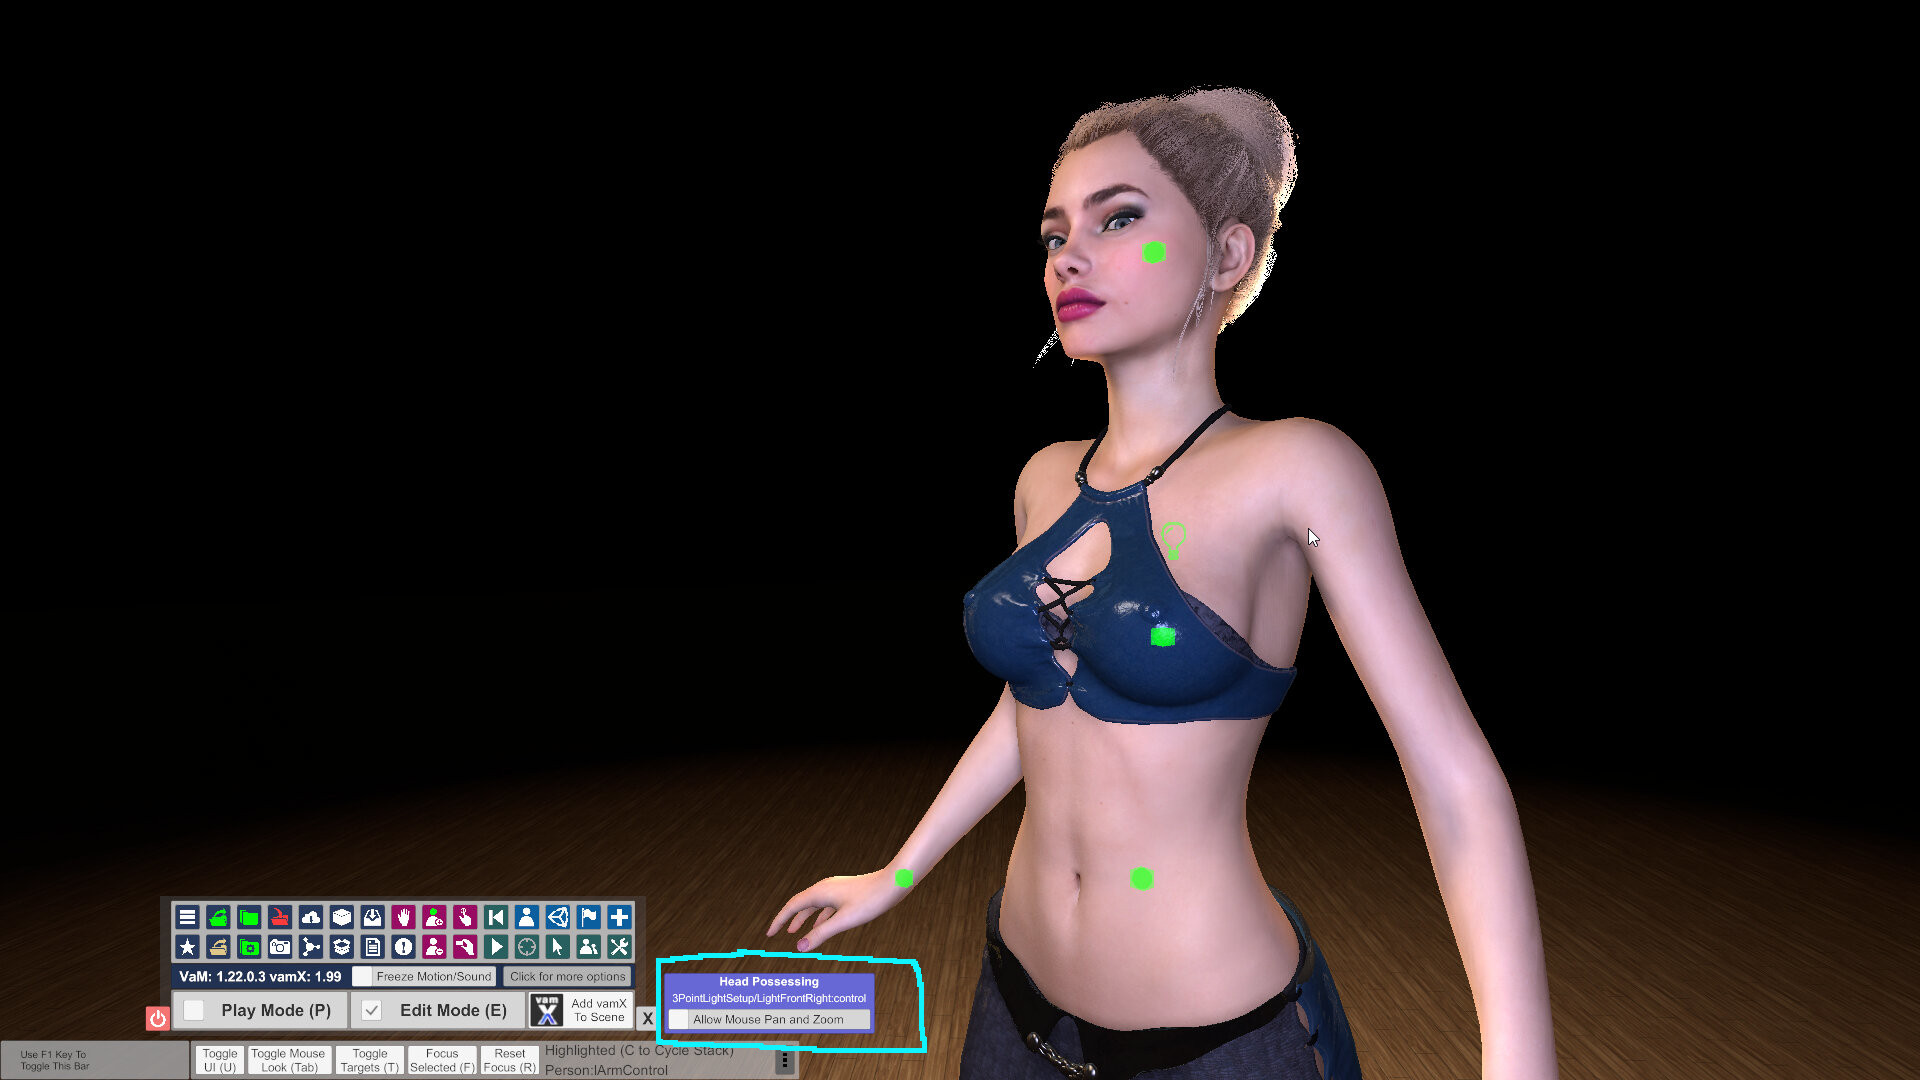
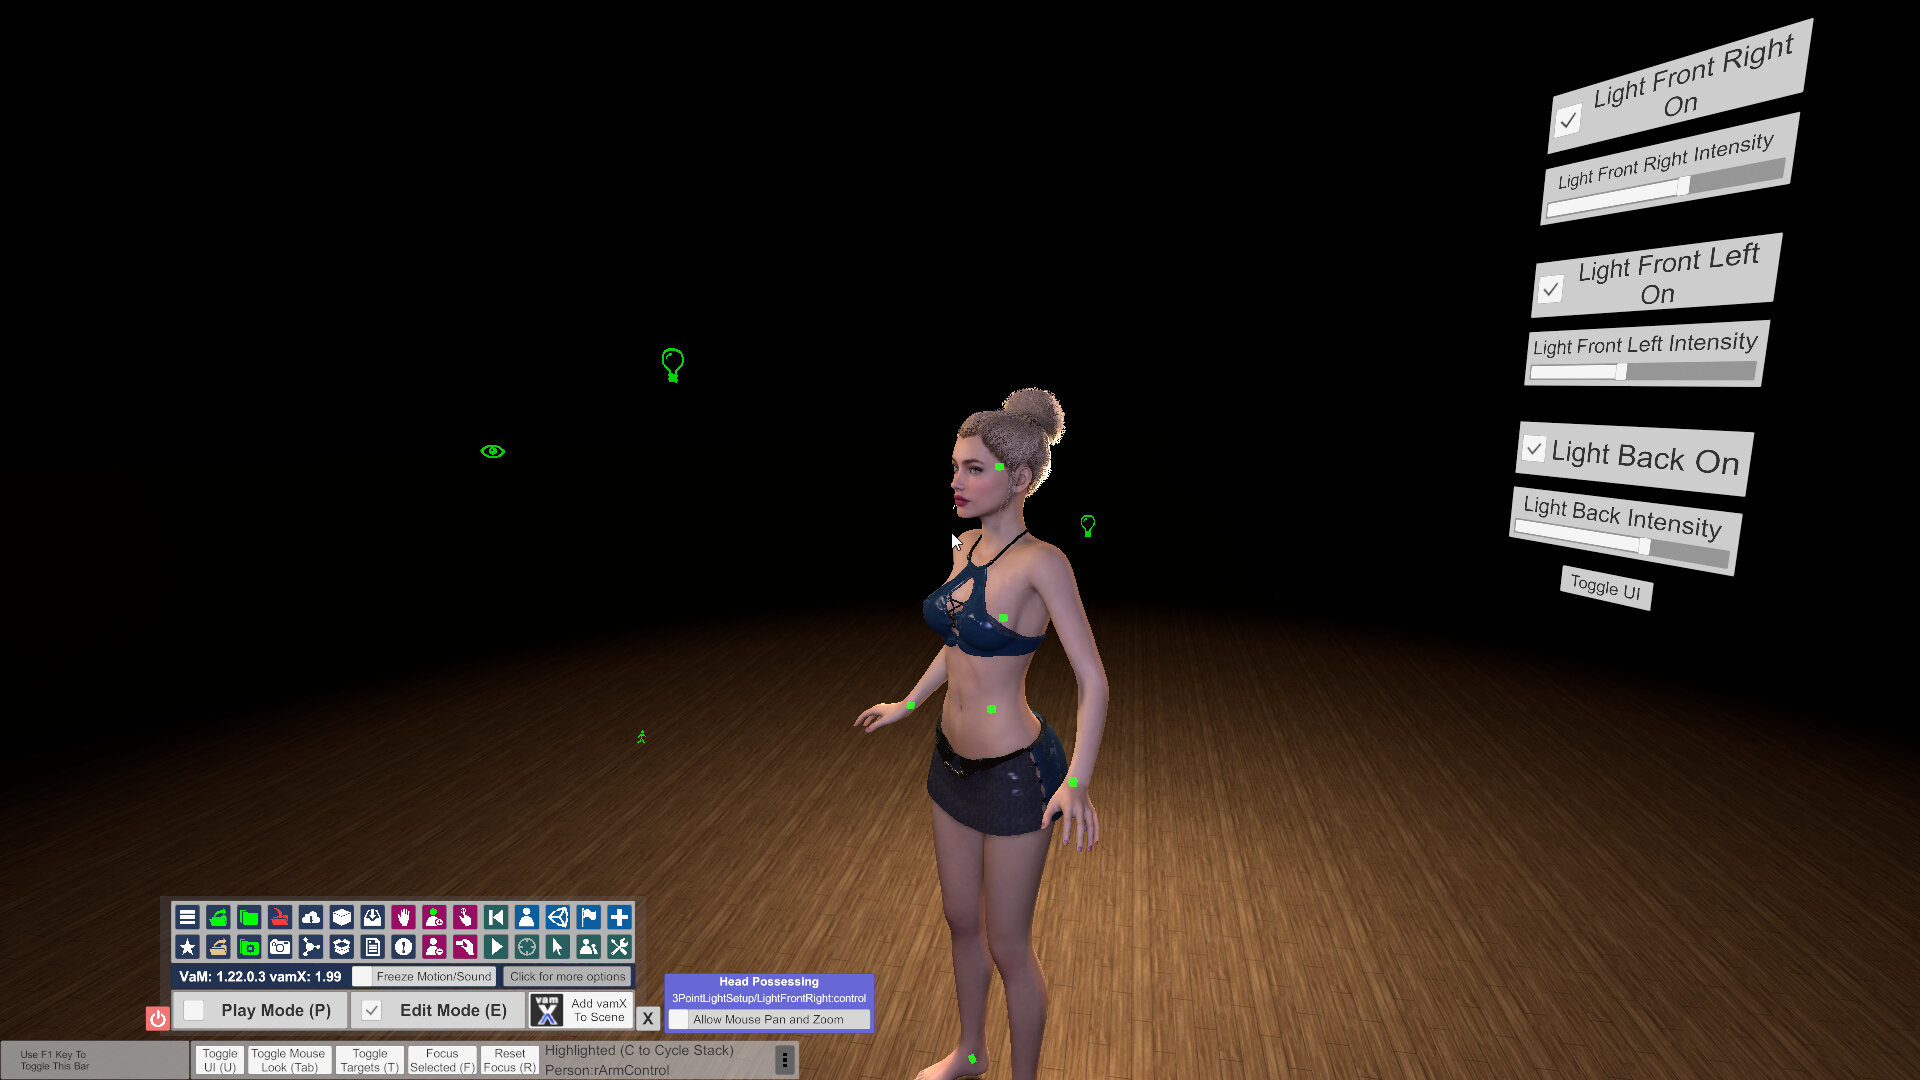
Oh yeah, that back light is always super duper bright, I always turn it down. Let's do that now.
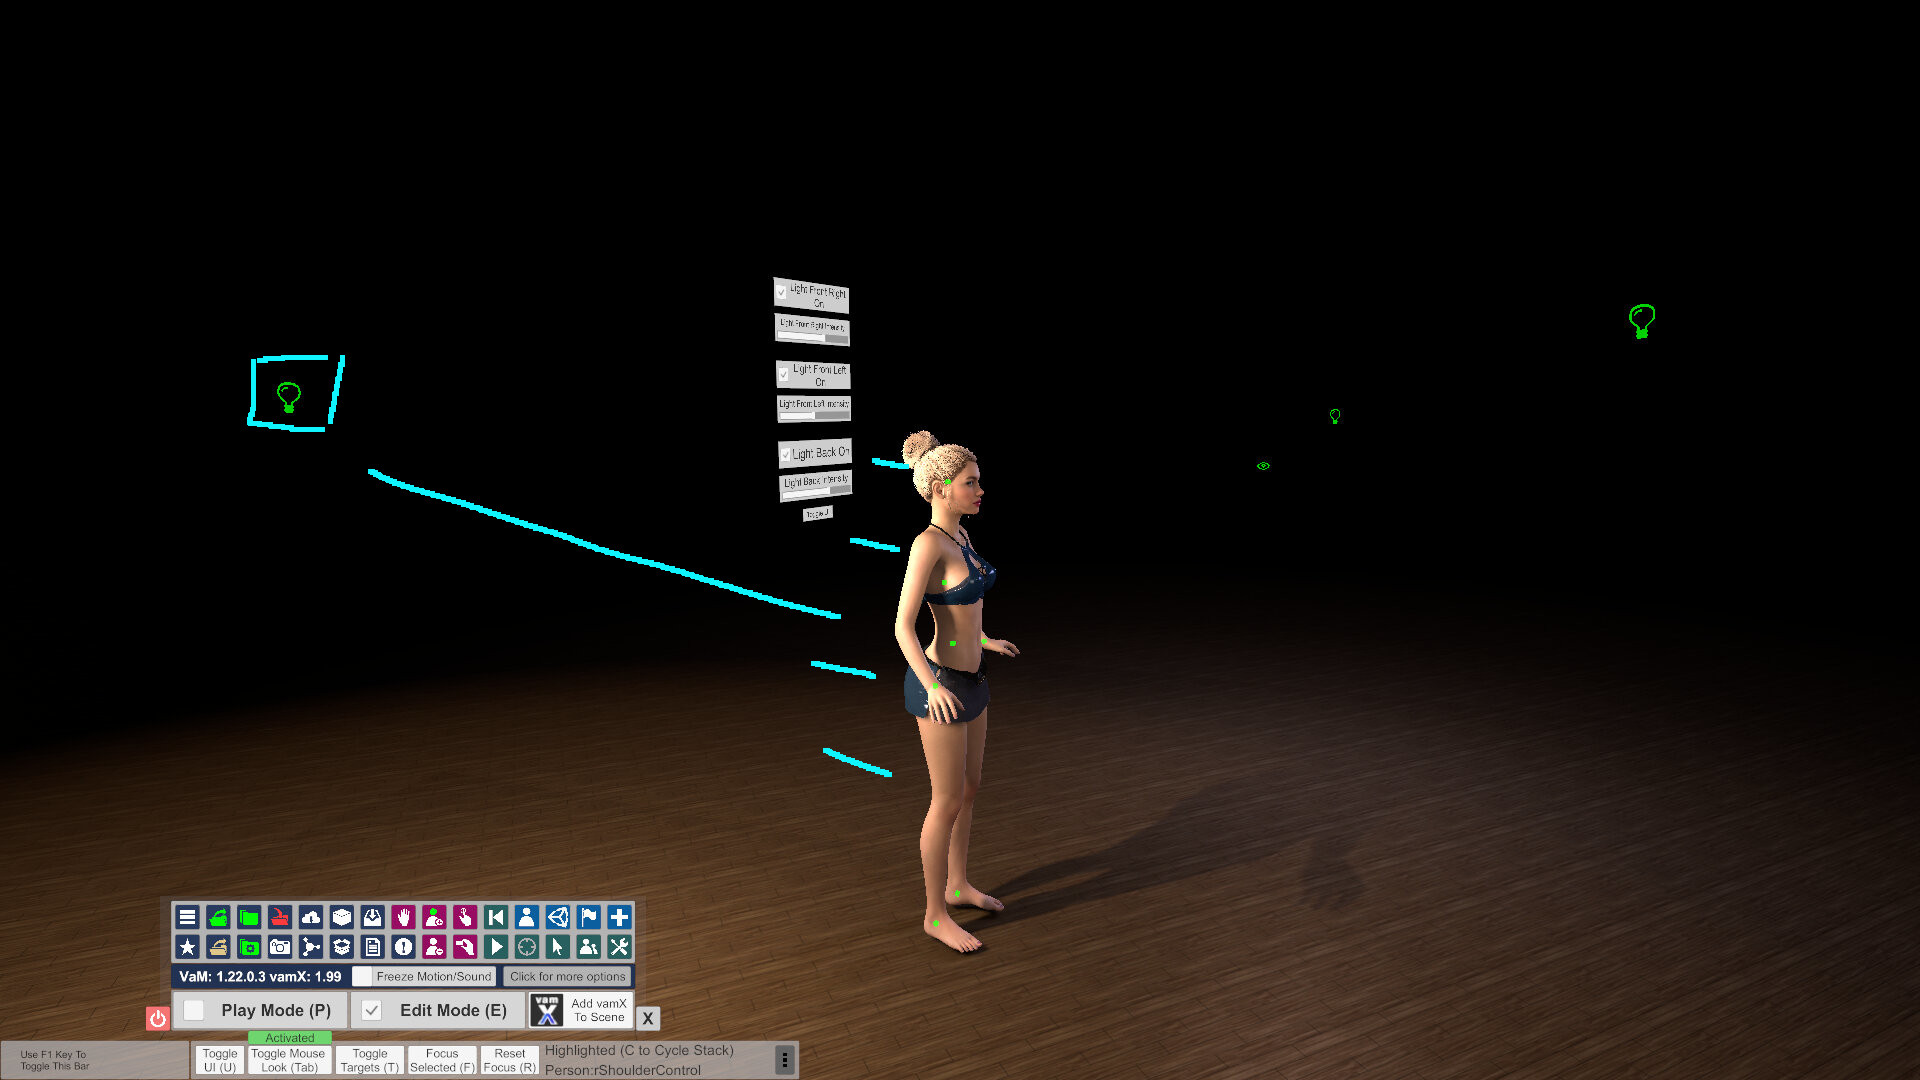
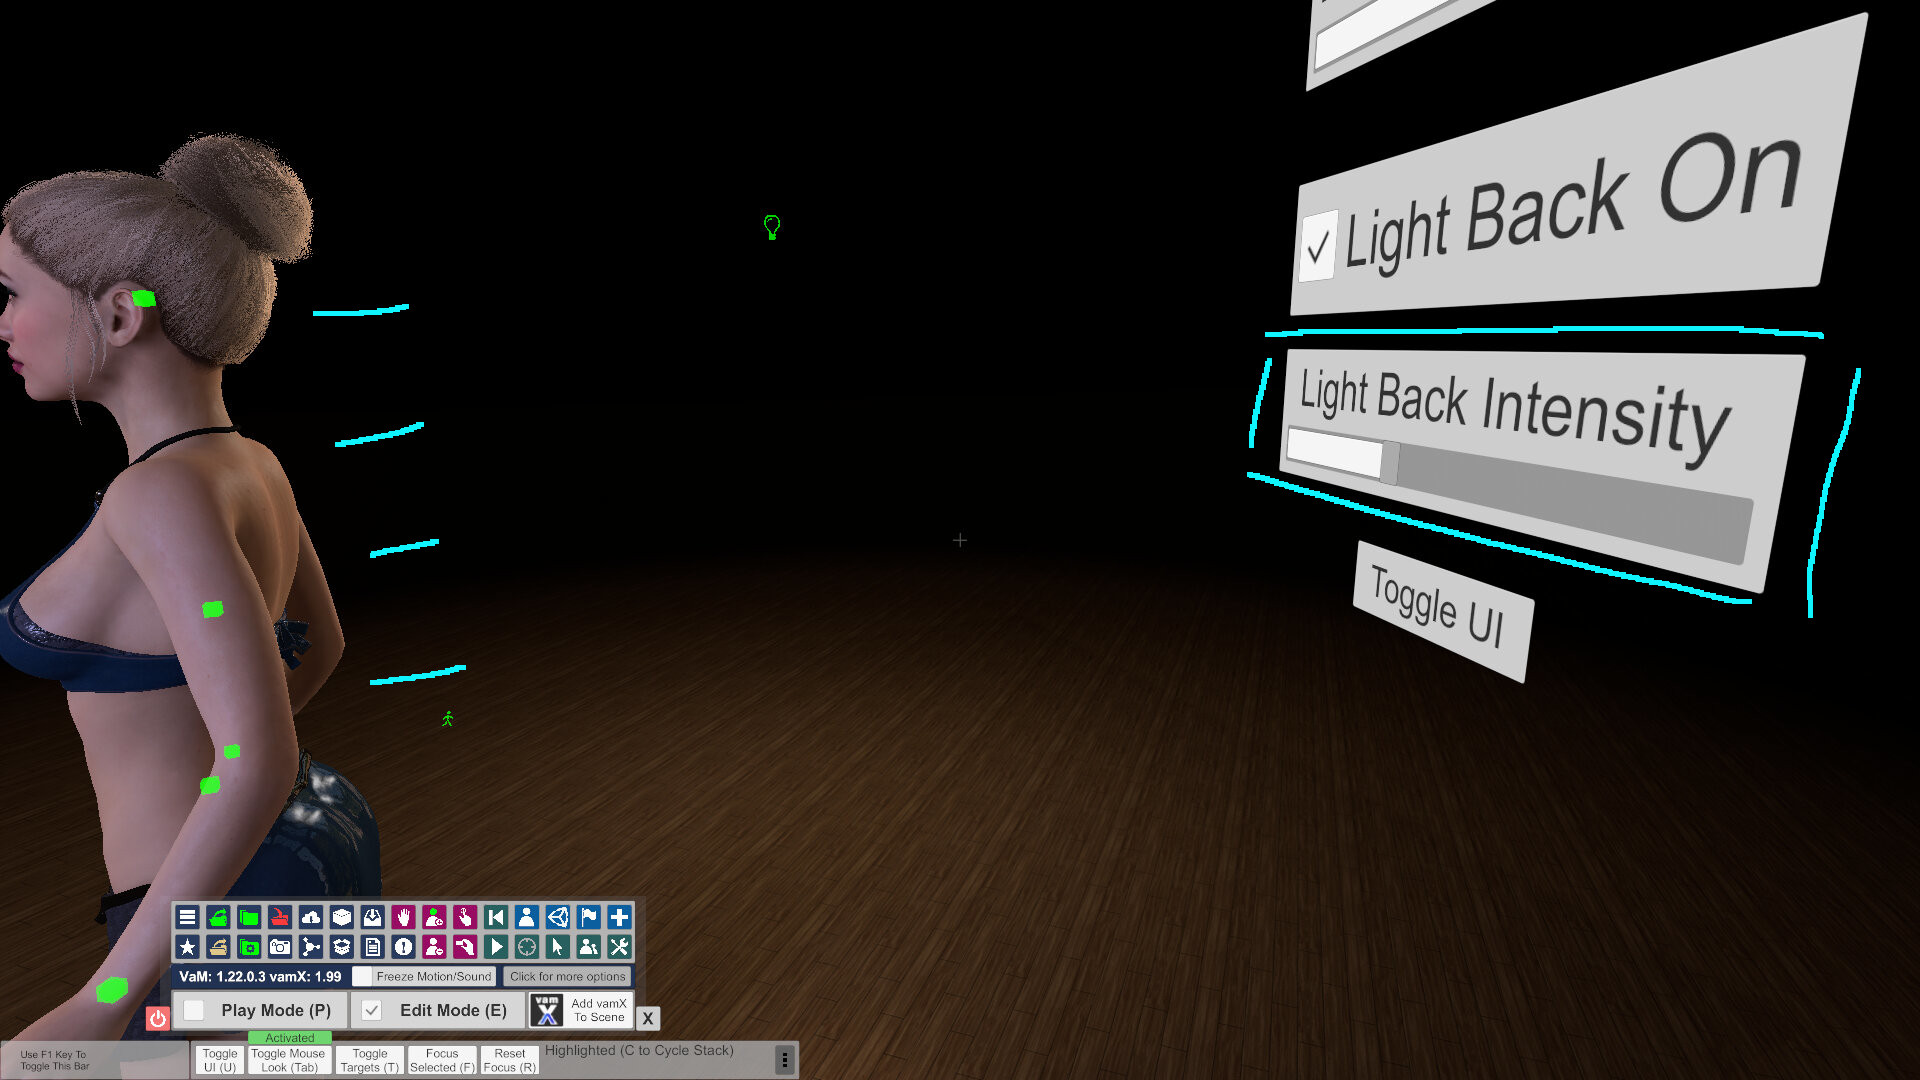
Great, no more glare on the back. But is it too dark? We'll edit the lights. Click the back light, or any other light, go to "Light," and simply raise its range if it's further away (not shown).
Pro Tip - Now, let's change each light to a cooler, whiter color. This will help you when seeing your model's true skin tone so you can have a neutral perspective when you adjust it. If you don't want to mess with this step, just move on.
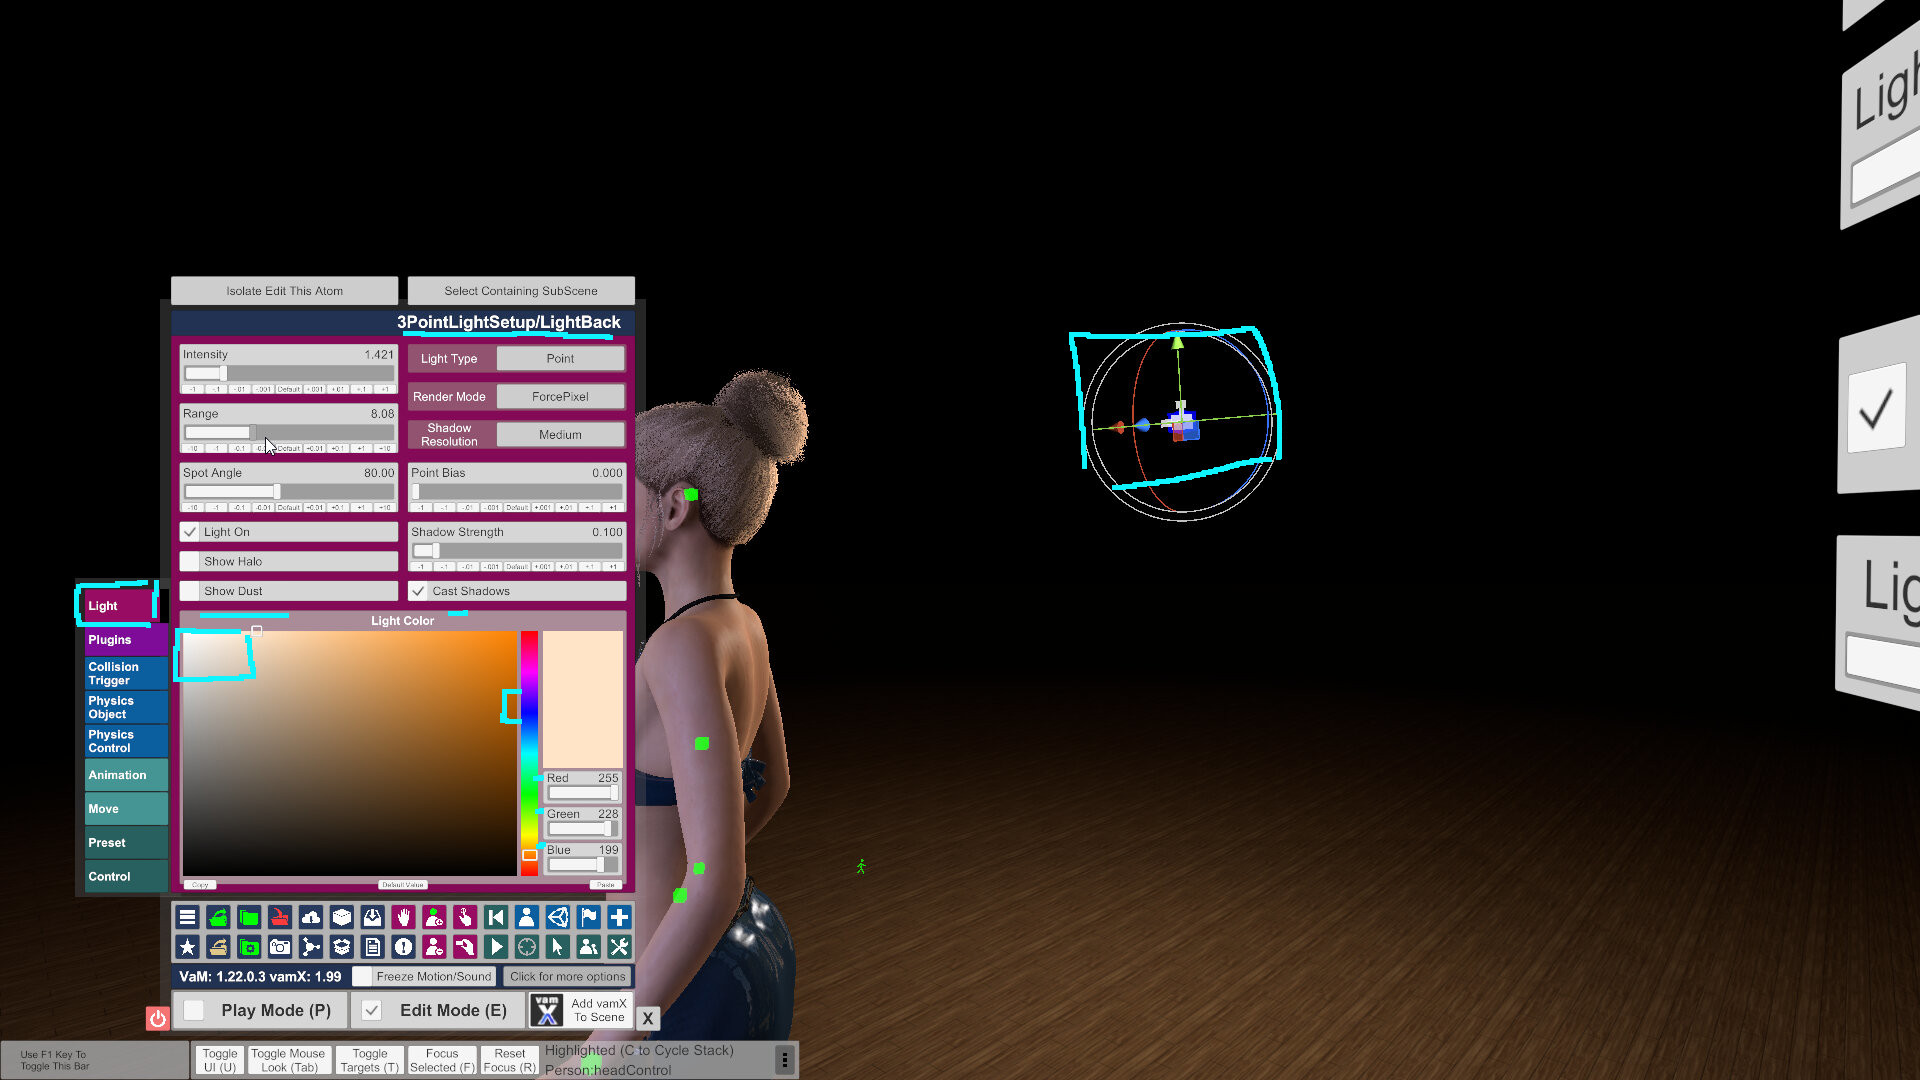
You can drag through the color panel, or manually type into the fields for red green and blue. Here, I'm choosing R 235, G 235, and B 240. That's a balanced light with slightly more blue than the other colors, so it's a cool light. We can change each light to this value, or your own value.
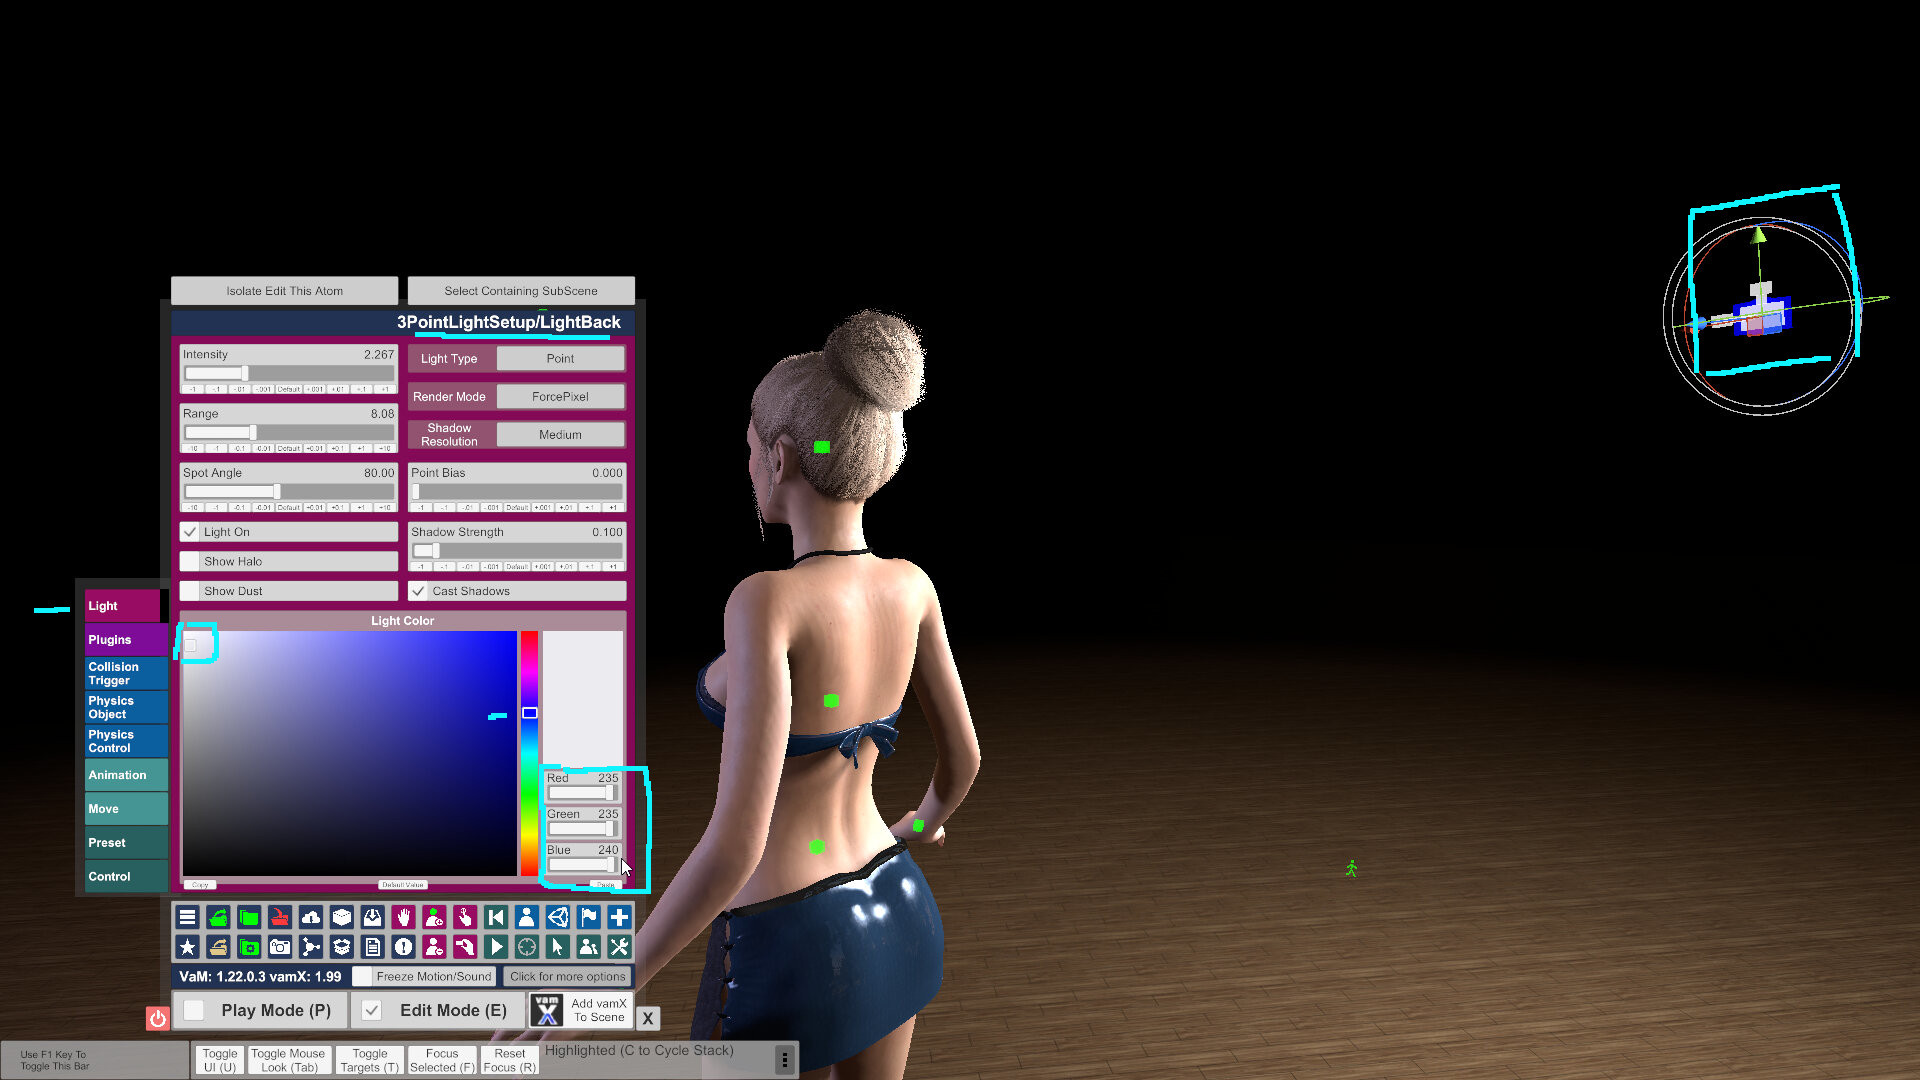
I've adjusted all my lights, so now I see this. Good.
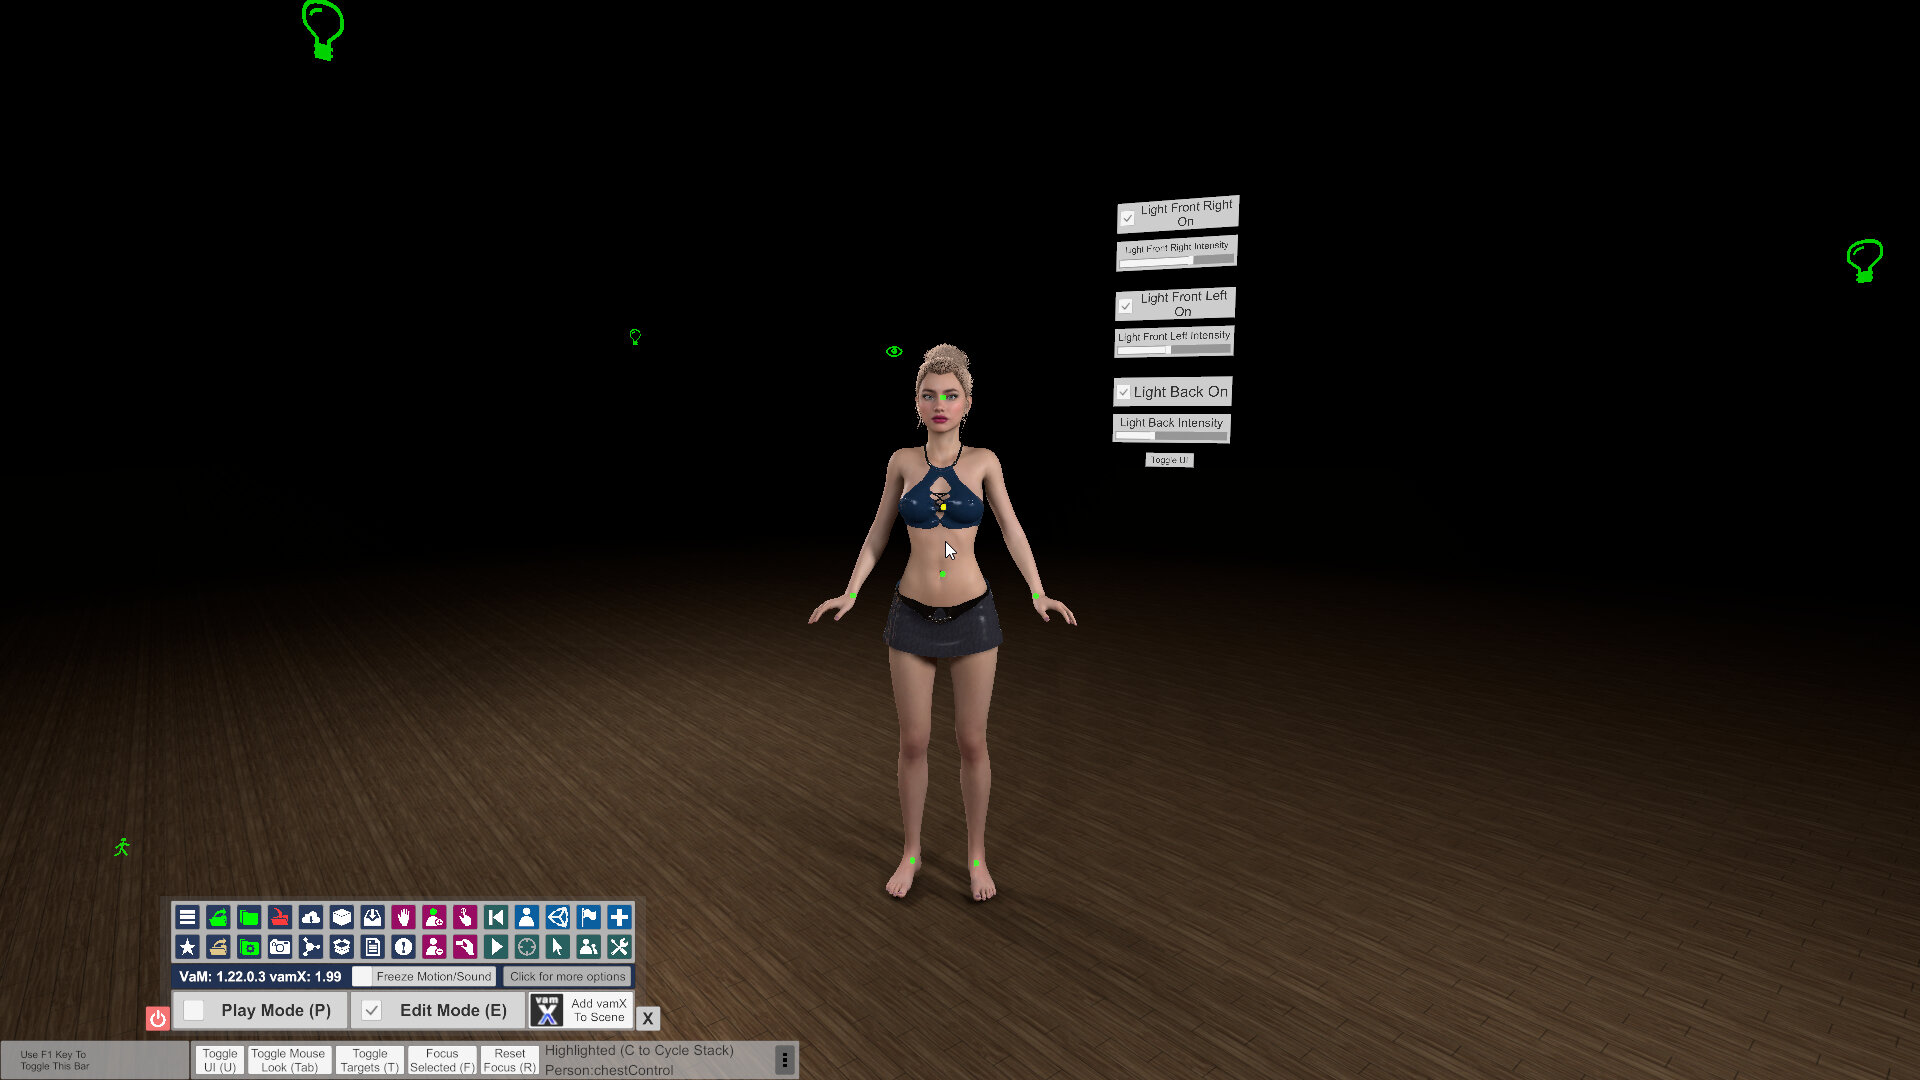
Now, here's a pro tip which you can skip if you want. If I have my lights exactly where I want them, I don't want them to move. So we can hide them like we did before, or perhaps better, lock their movement in the move tab. But we're not going to lock it fully.
For this tip we will need the rotation of each light zeroed, so let's do that now.
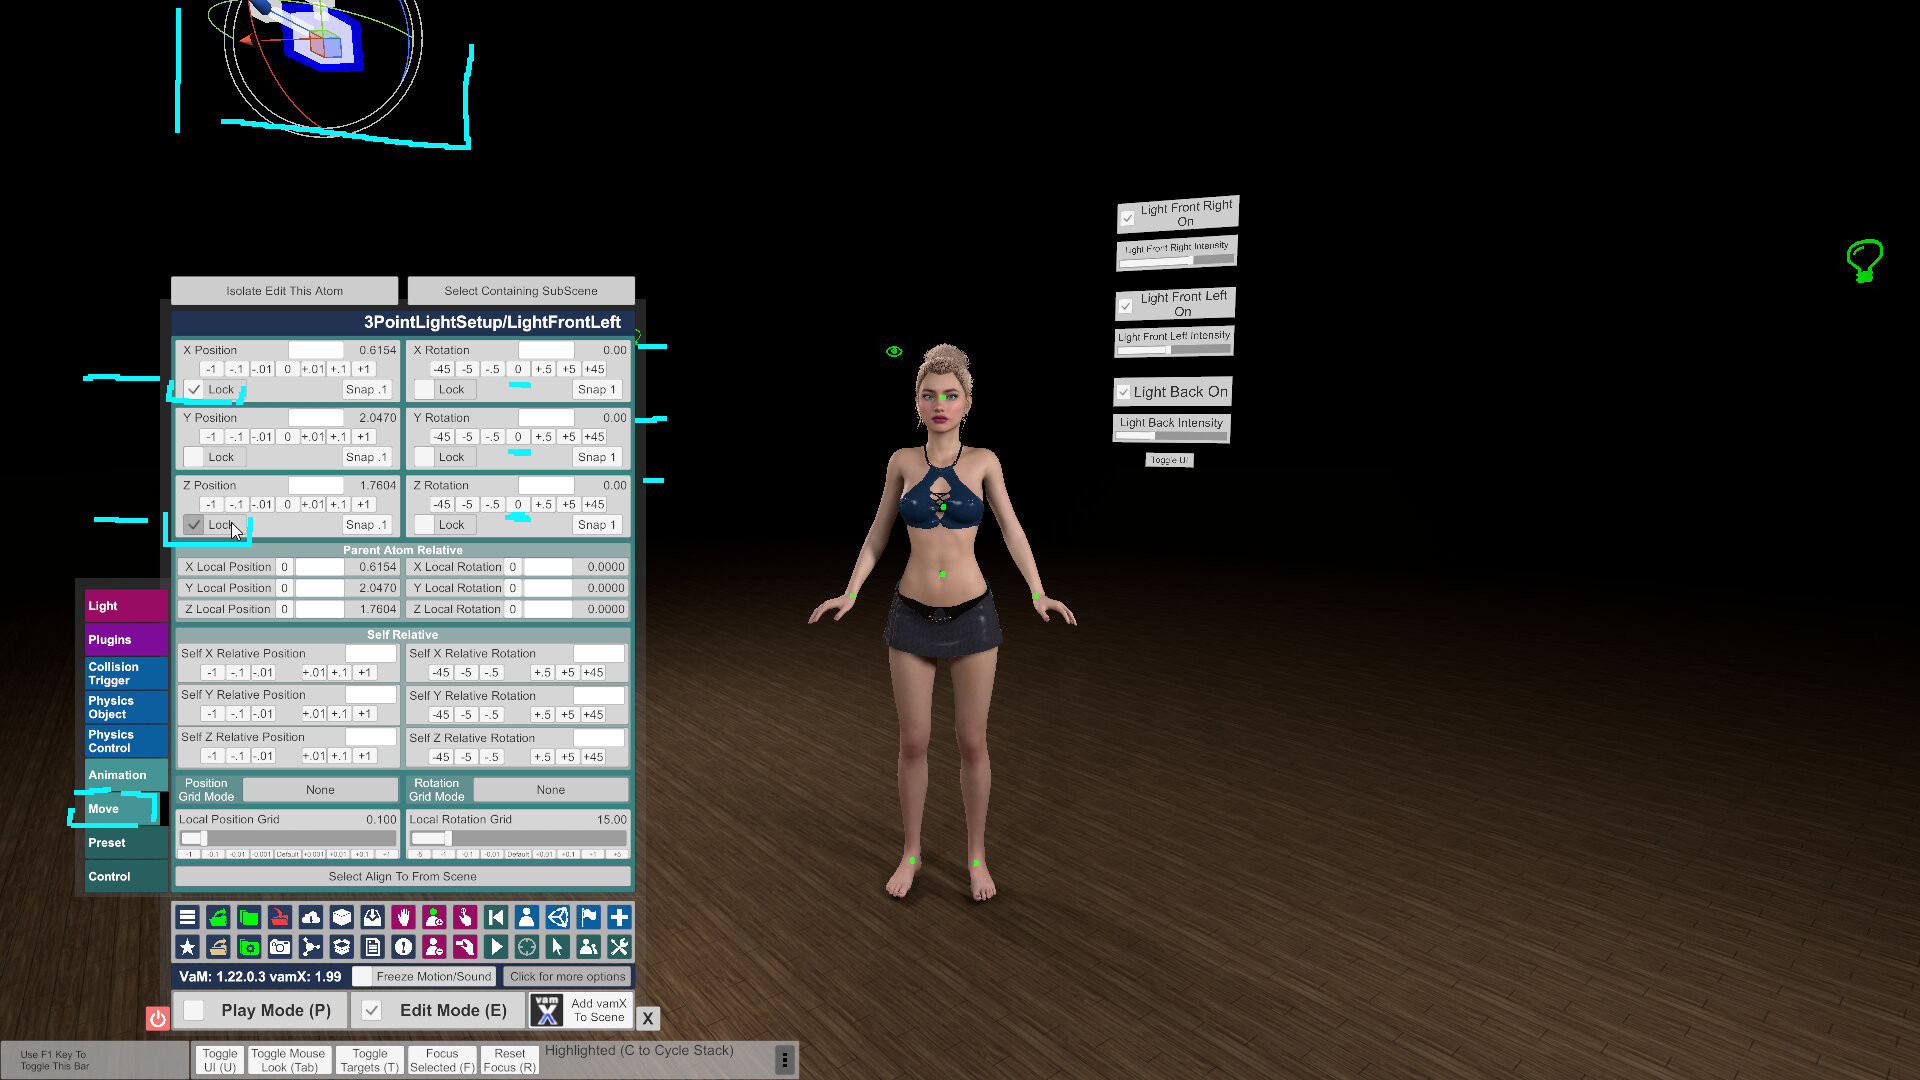
Once each rotation is zeroed, go back to their move tabs and click Lock on their X position and Z position. This will make it so that we can still grab them, but only move them up and down. Very cool! This will help a lot when looking at higher and lower parts of the body from time to time. Your lights are still visible, still accessible, and if you accidentally drag one, it's really no big deal.
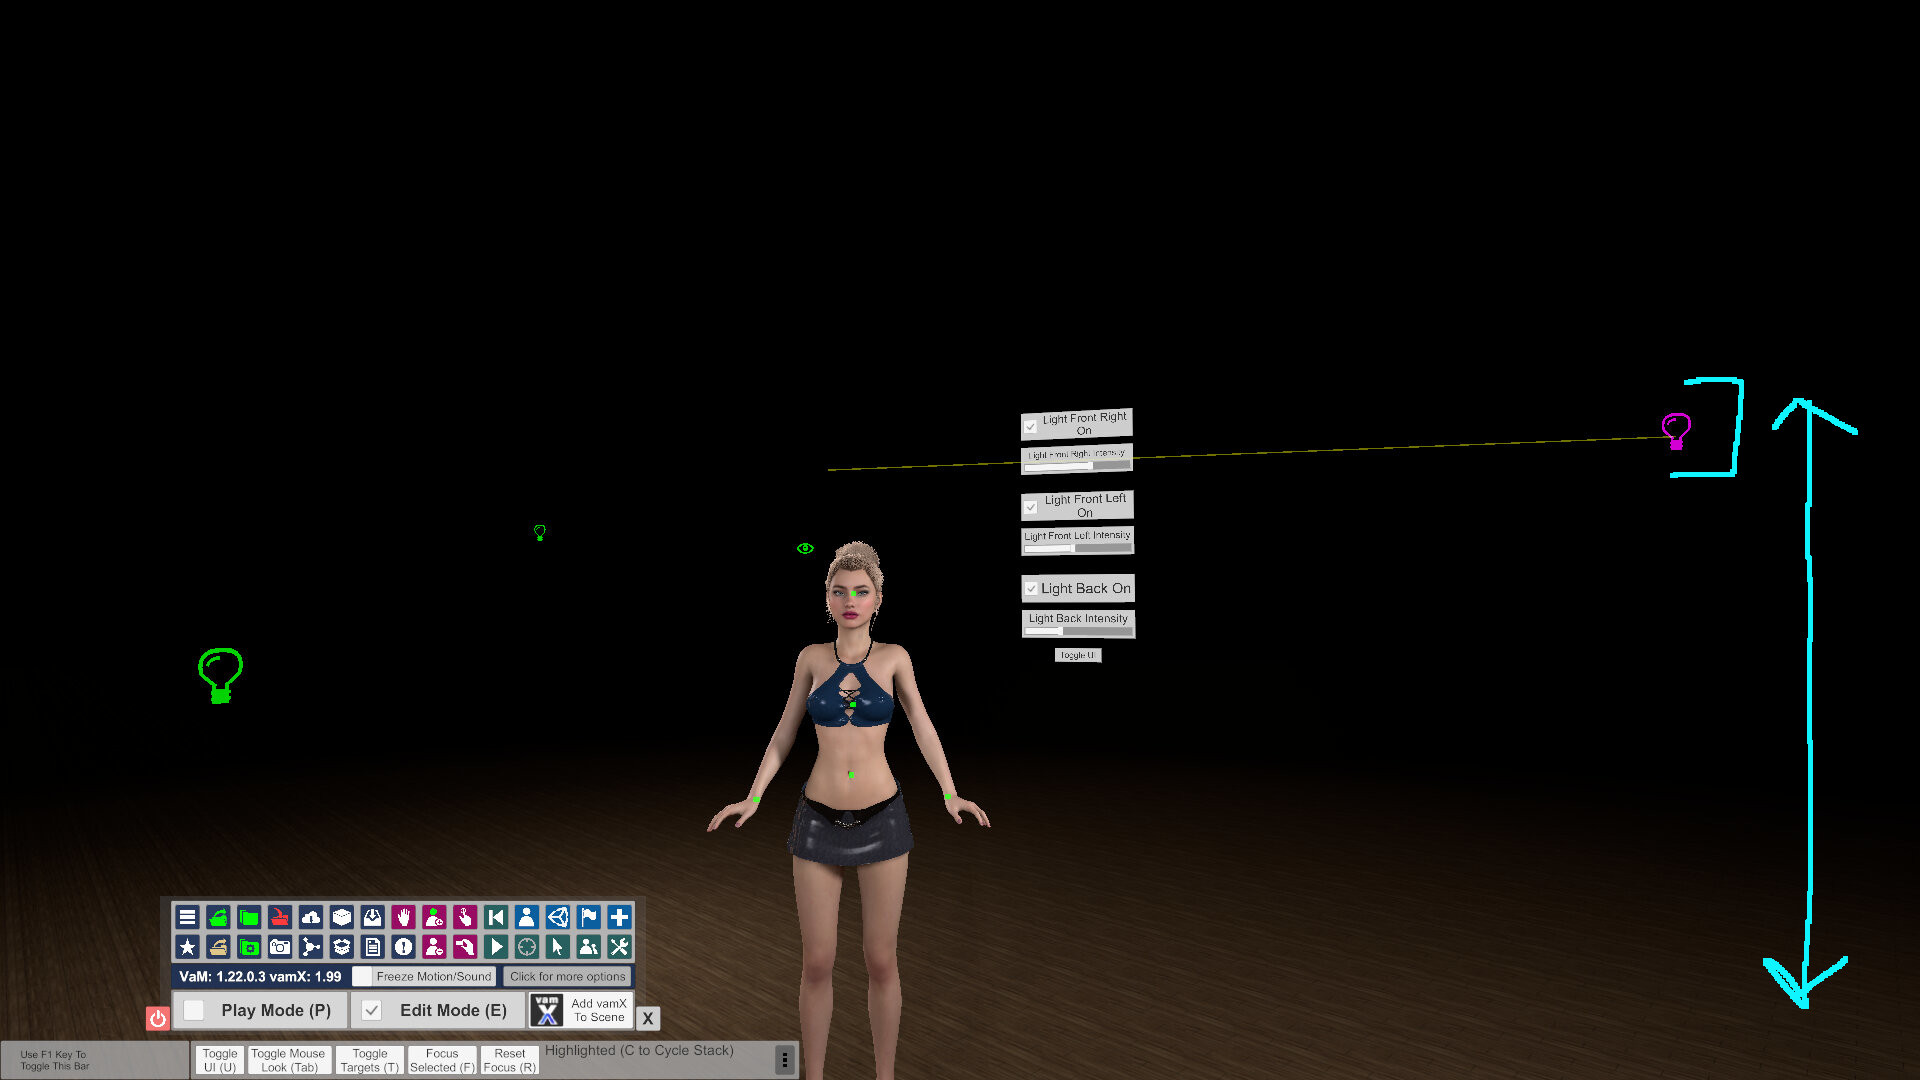
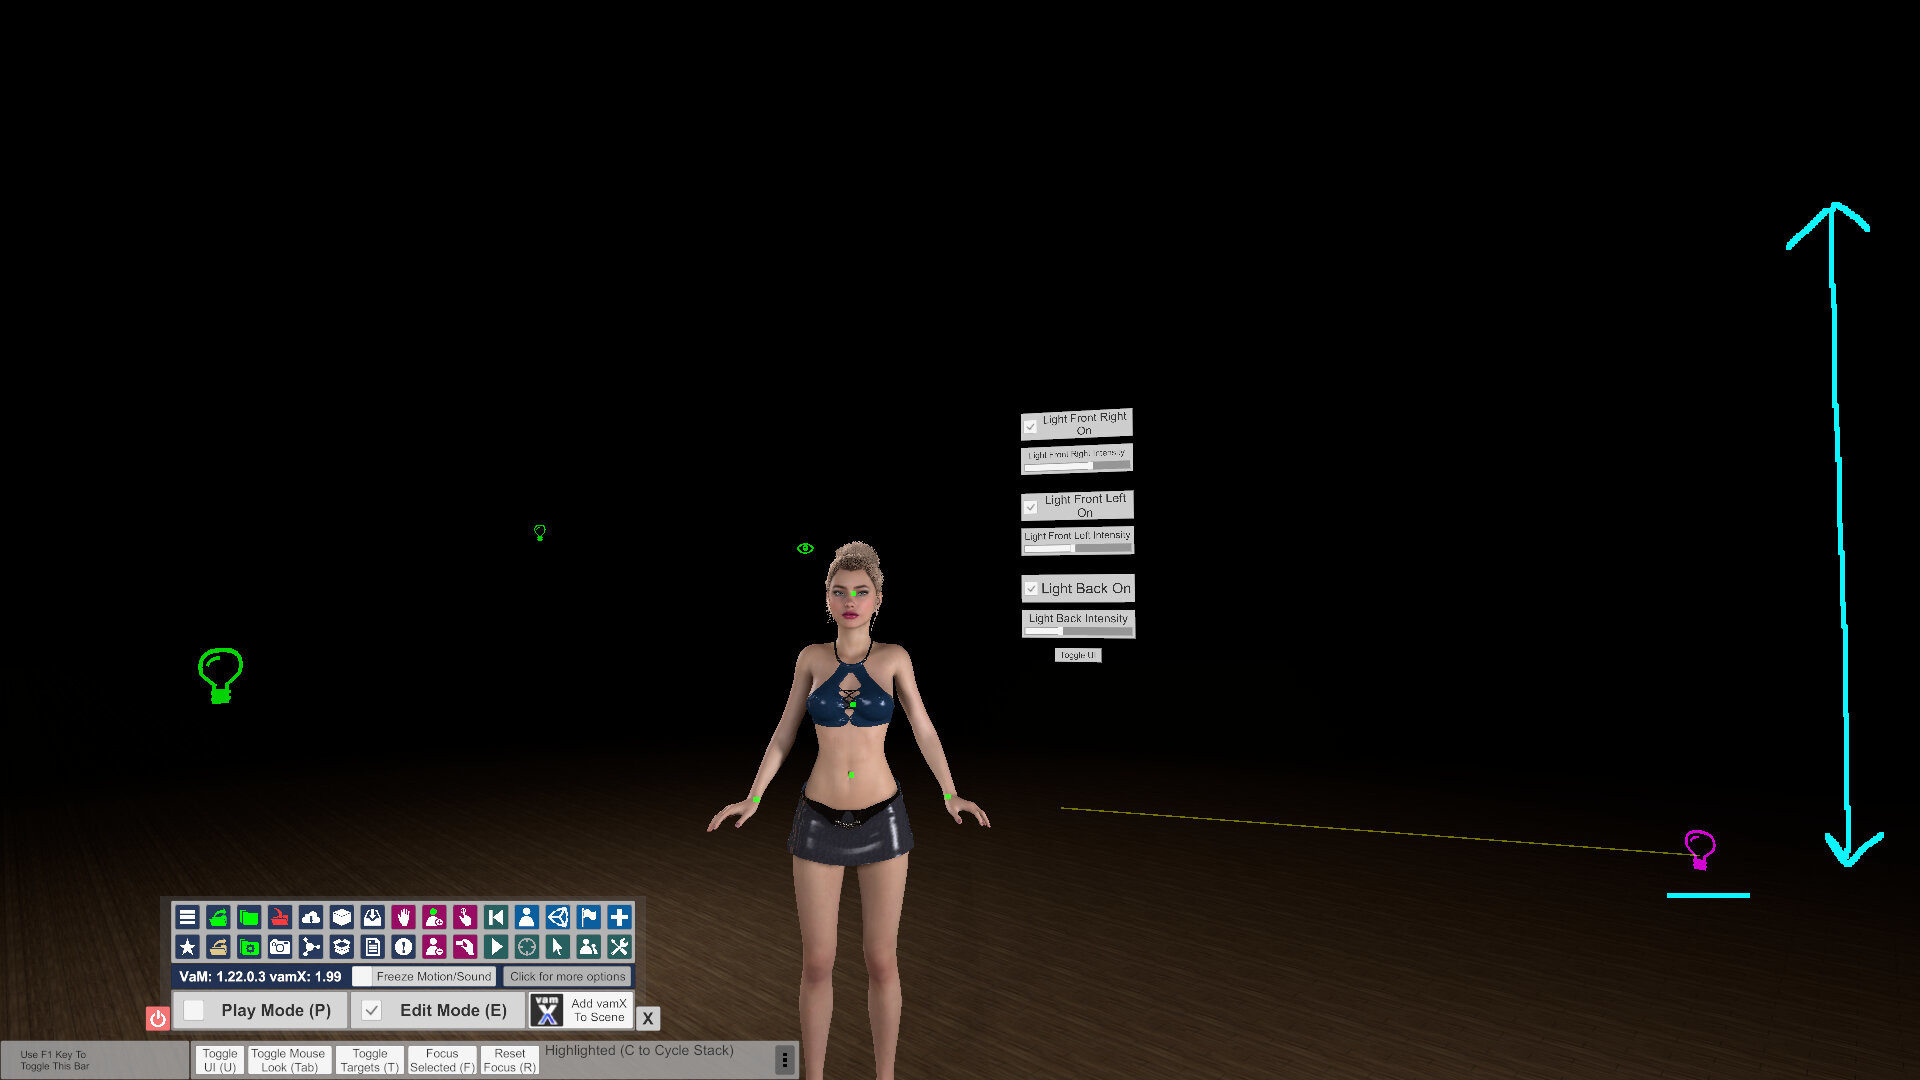
Great, now you're a novice light rigger, and you've got most of it automated. You just built your own rudimentary light rig that's set up for a wide variety of uses, and it's stable so that it will save you a lot of time. Want to turn them to spot lights? You can. And you can point them with an easy possess.
4) Wall
Now I'll do a short section on adding a wall, but you can skip it if you want.
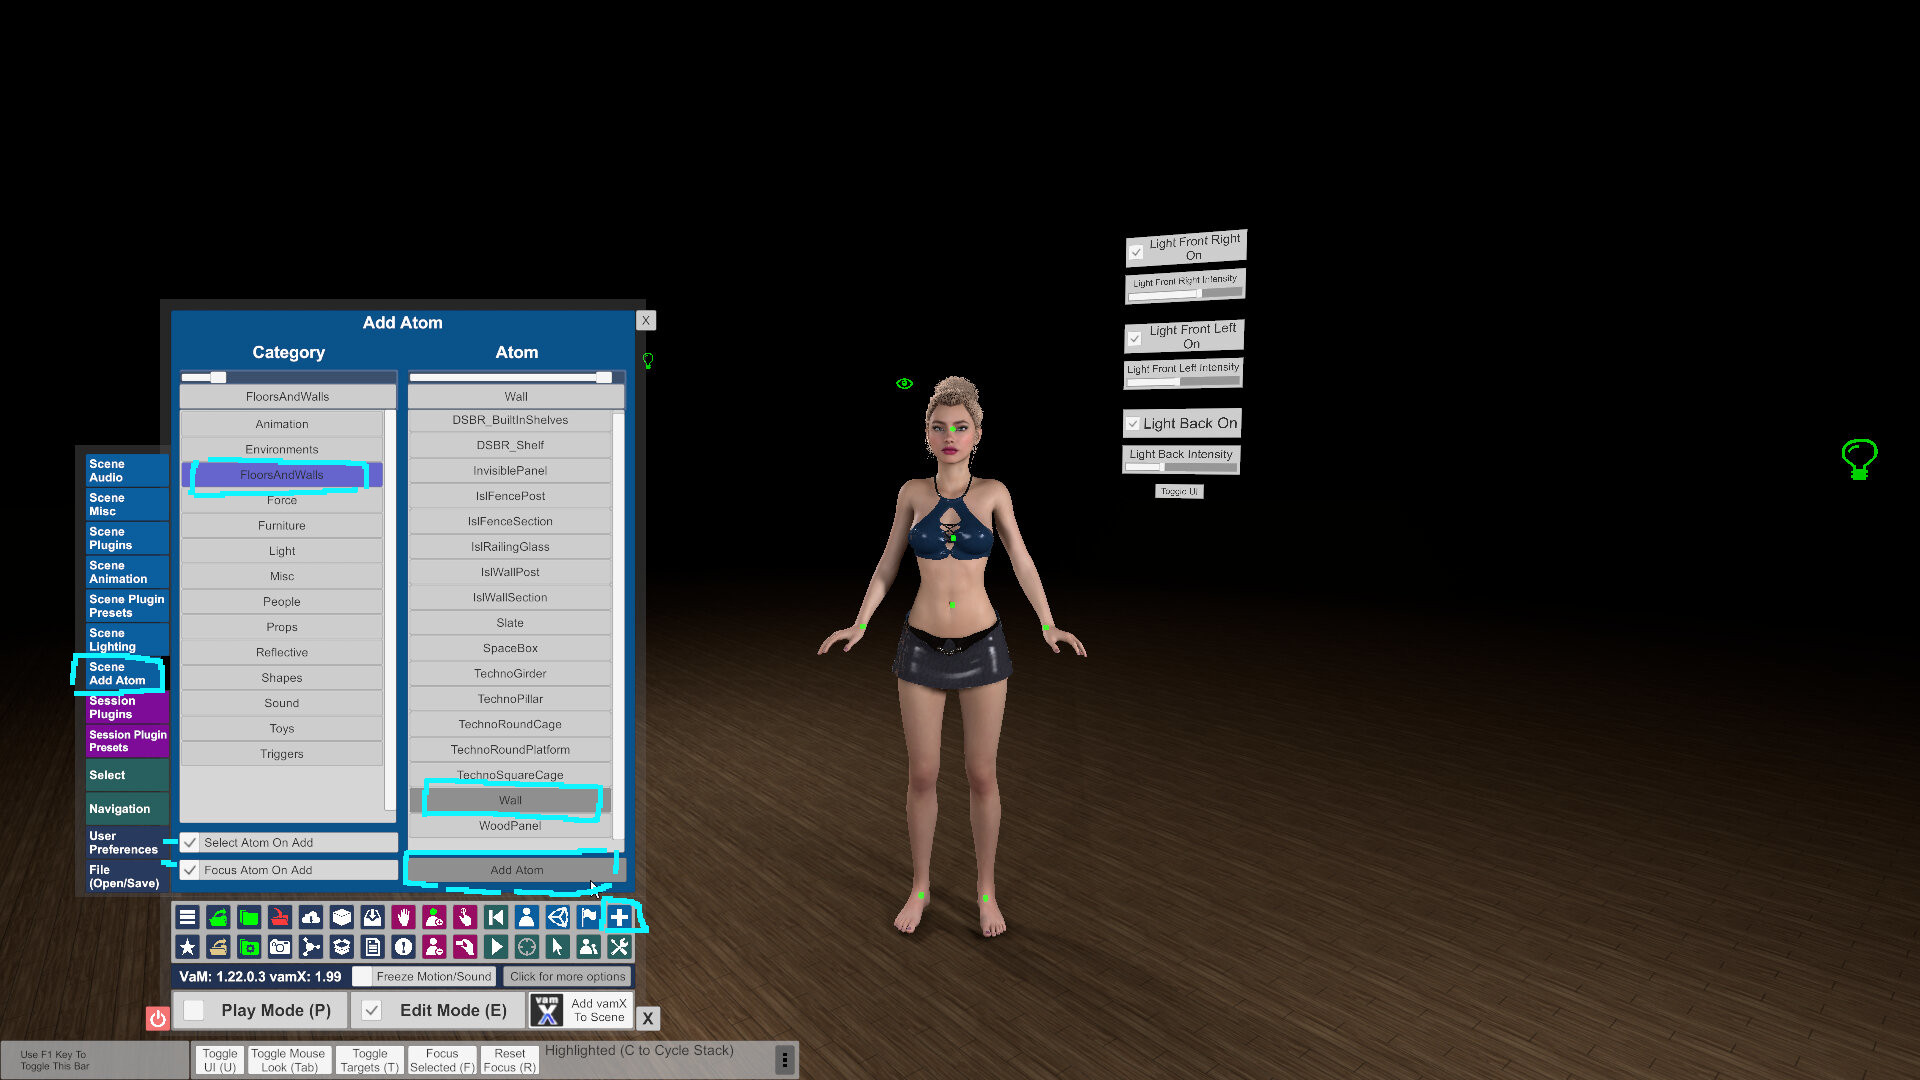
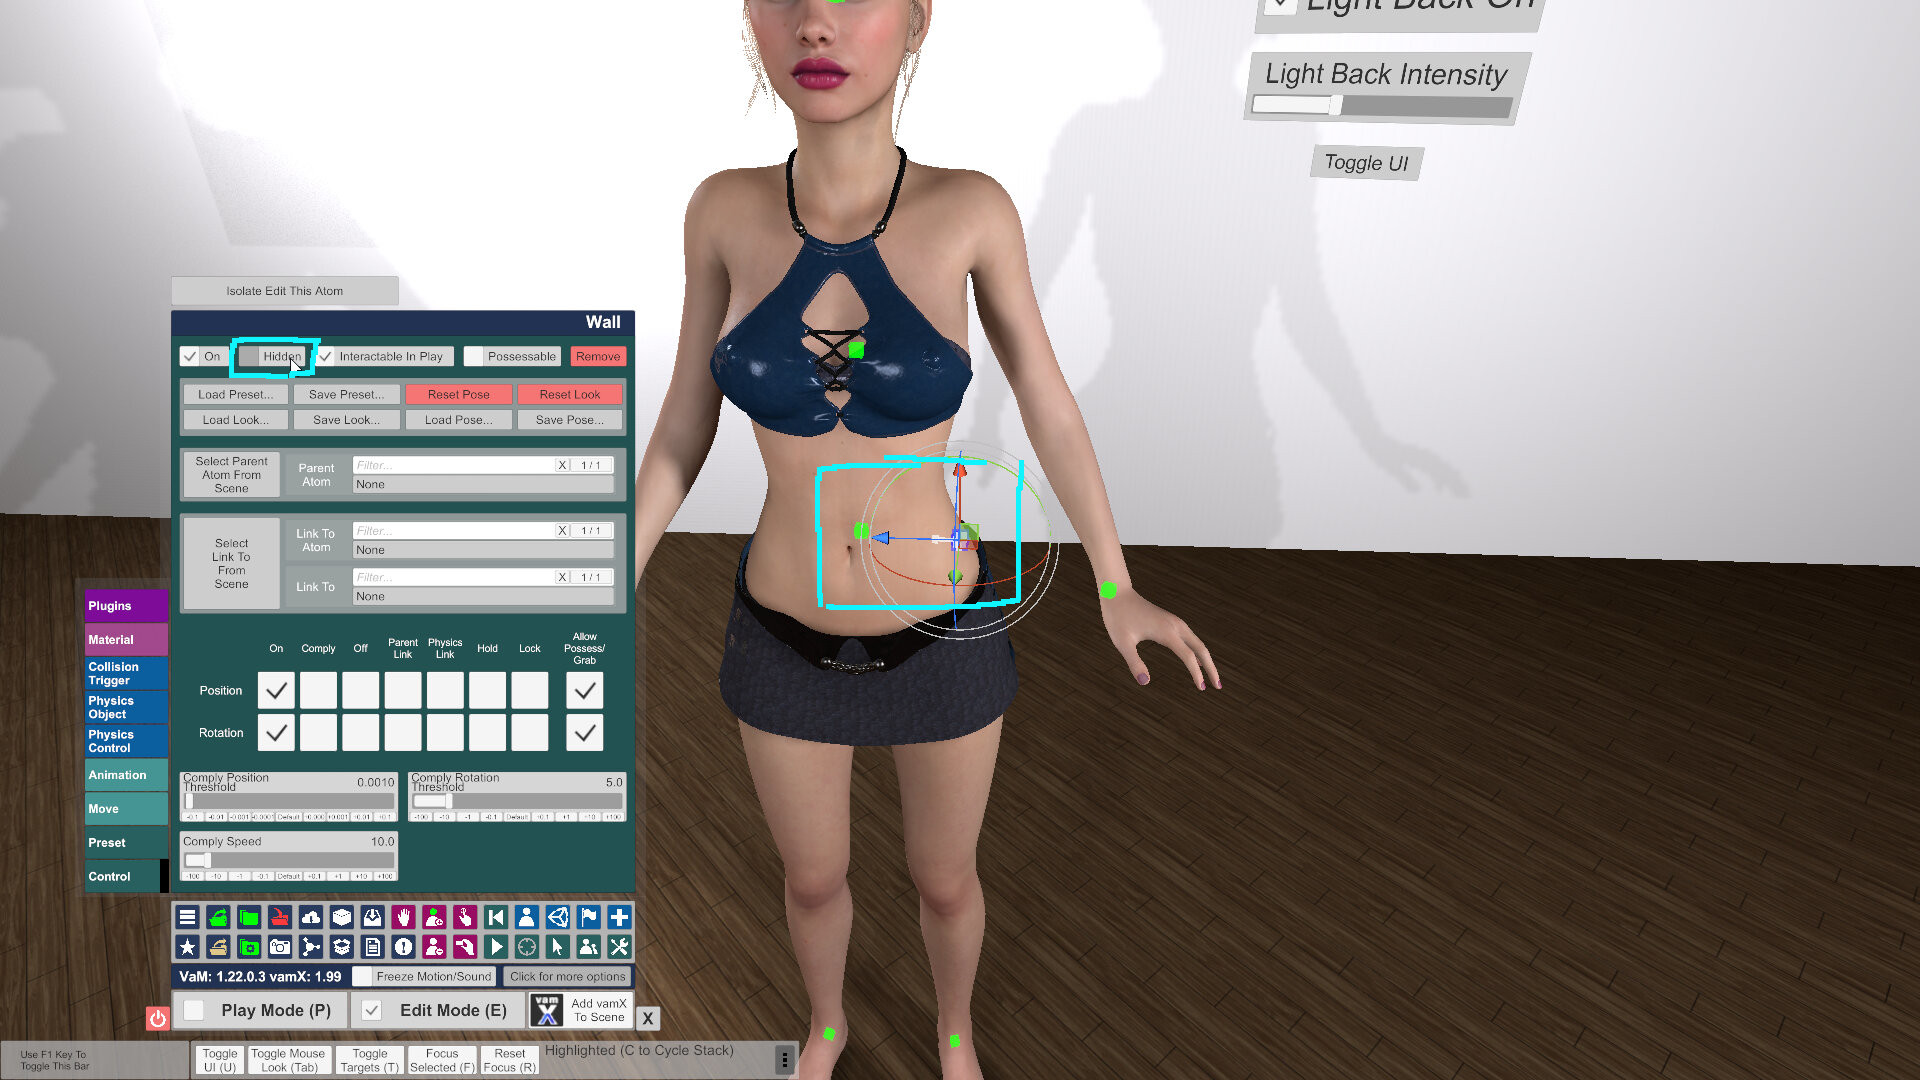
Here's our wall, let's get it hidden, so no one will be dragging or rotating it accidentally.
Ok, the wall is too damn bright. We'll fix that in the material tab. Pro Tip - We can drop out its specular intensity, pull downward (darker) on its diffuse color, or drag down its diffuse texture offset for a quick change.
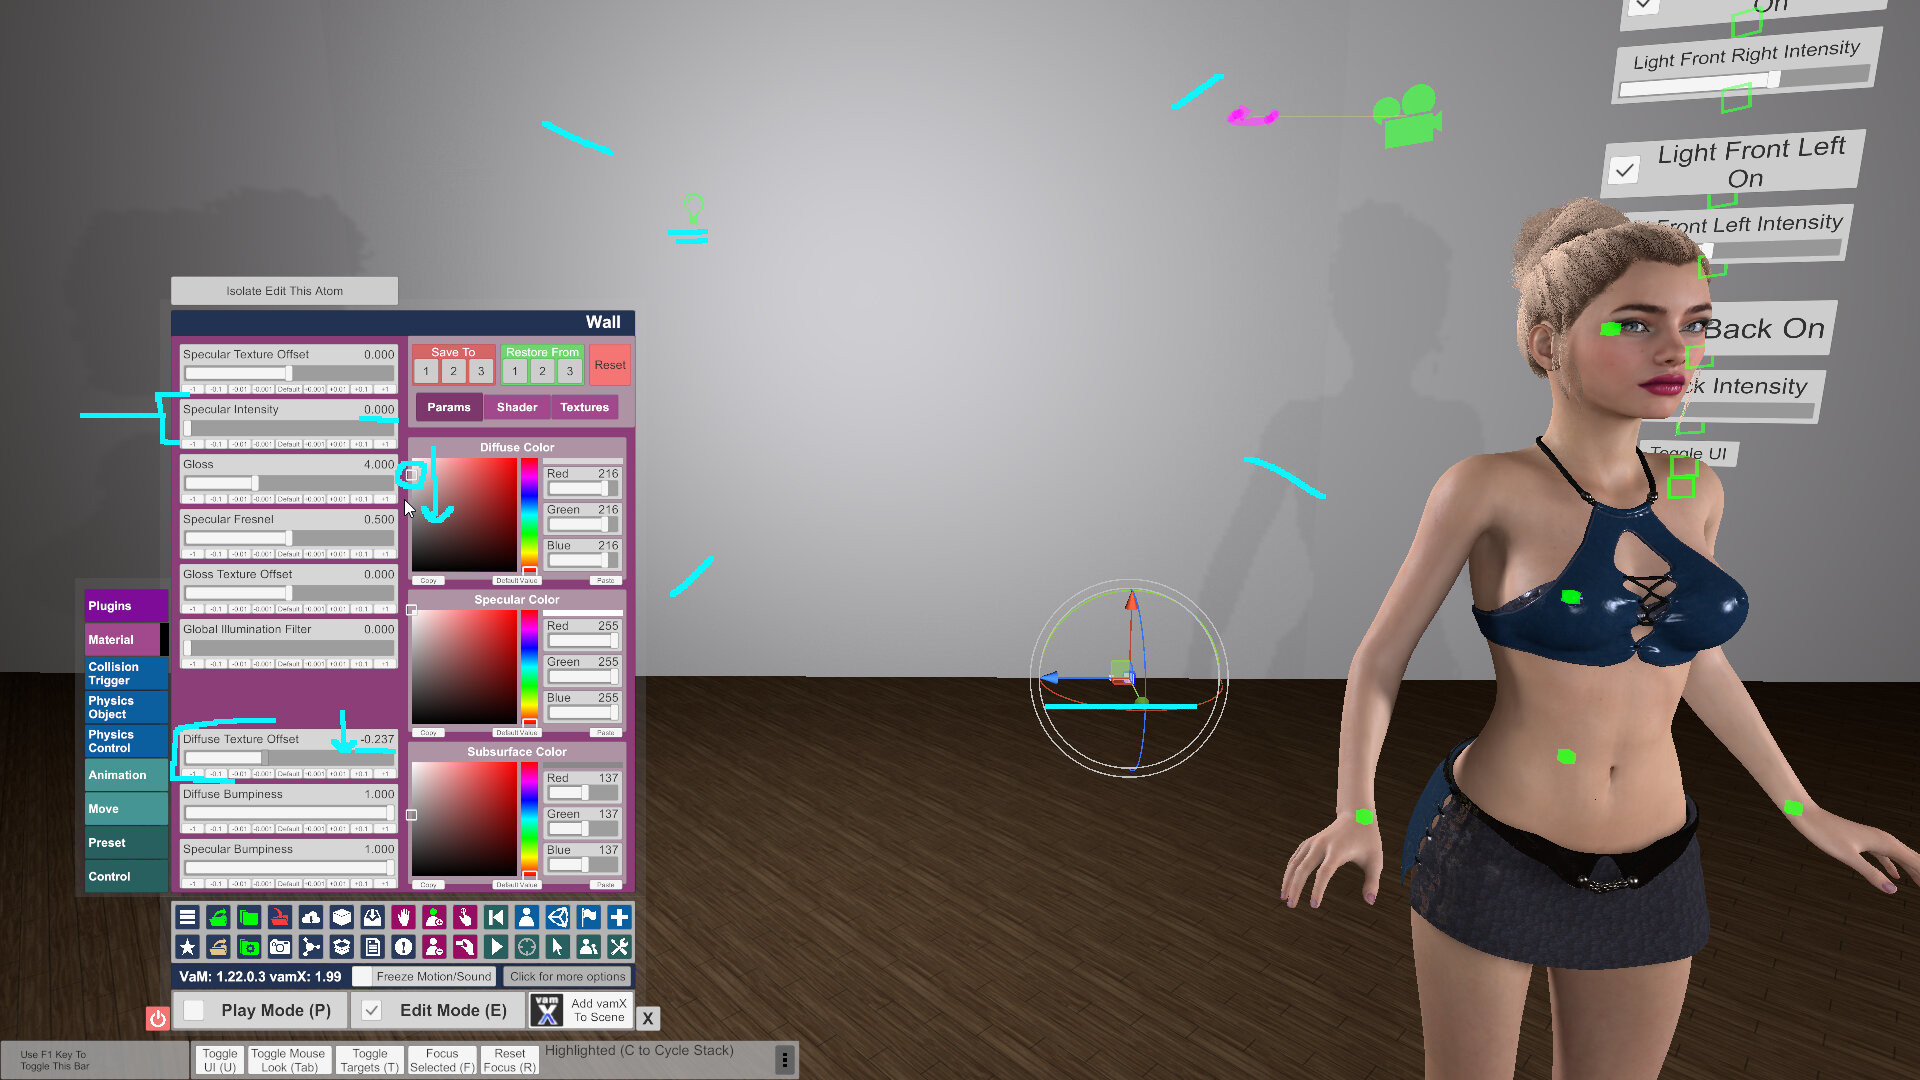
Now there's less glare. But set the wall to anything you want, or drag it back from your rear light, or reposition your rear light.
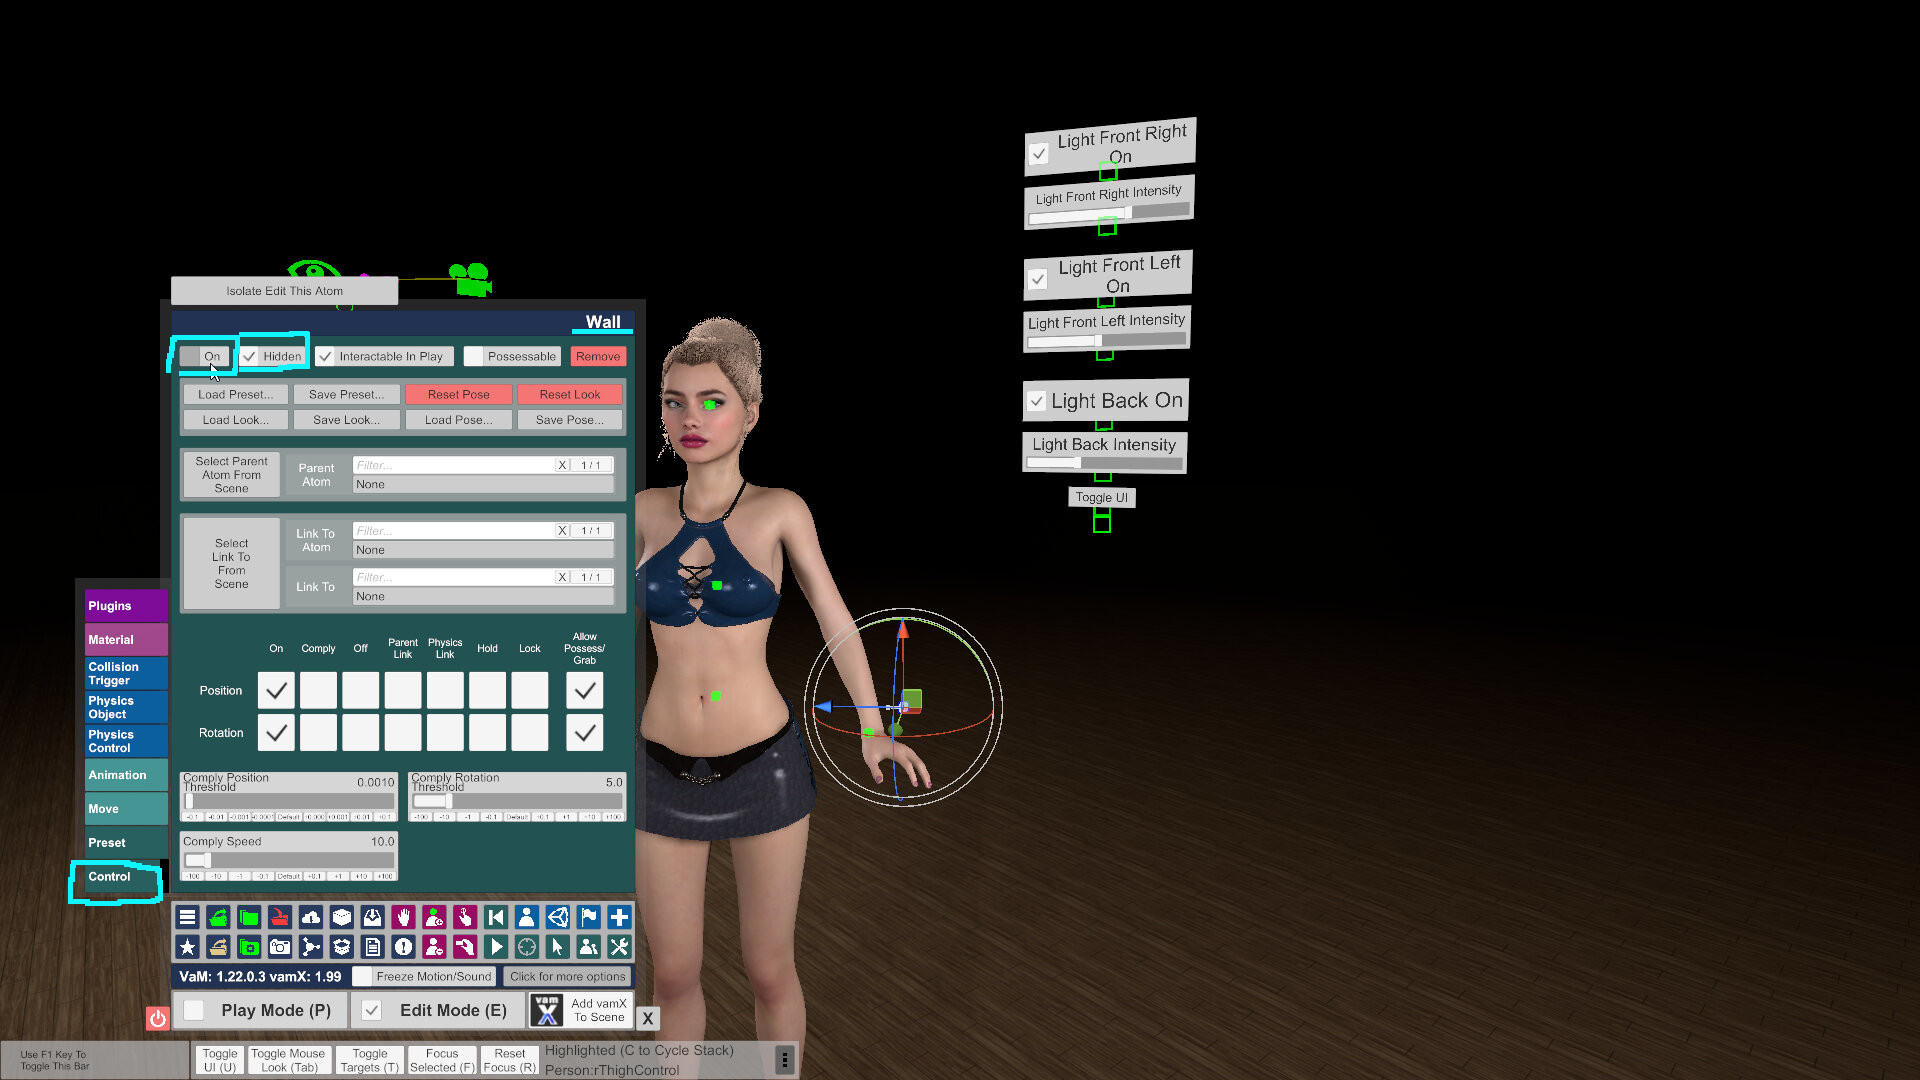
Anyway, I personally don't want the wall right now, so I'll turn it to off. It's still there, it's just off. You can find it again by using show hidden, or H, reselecting it, and simply clicking it back on.
5) Save, Template, Default
Ultra pro tips time.
Great. You have your nice and stable scene. But how do we quicken our access to this scene and save ourselves even more time? Well, go ahead and save your scene as something like New Character Creator via the red save scene button on the top row of the menu.
Now once you've saved it, find it again in Open Scene (you can search for its name in the upper right), and click the little gear icon on it. Then check "Use as Template."
Now, we can find it super quickly by clicking this icon, All Templates Browser.
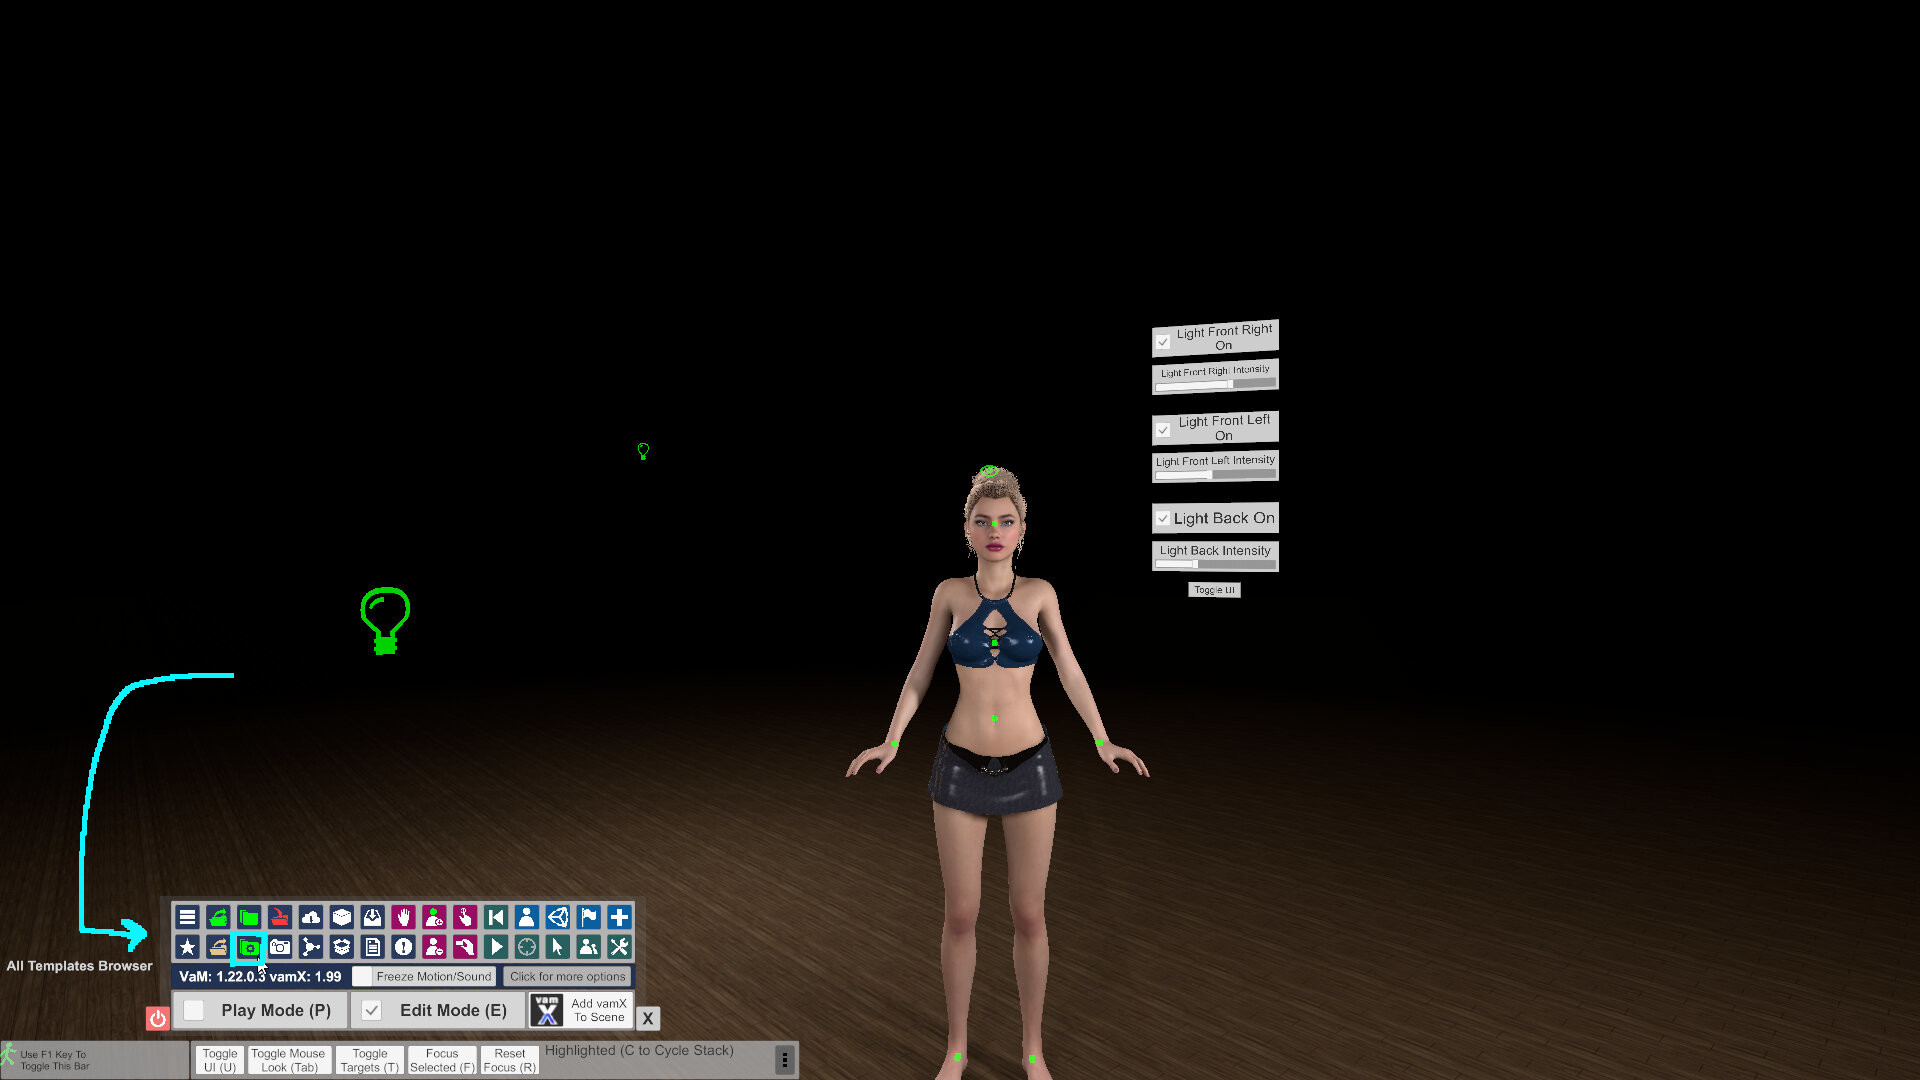
Mine opens to this.
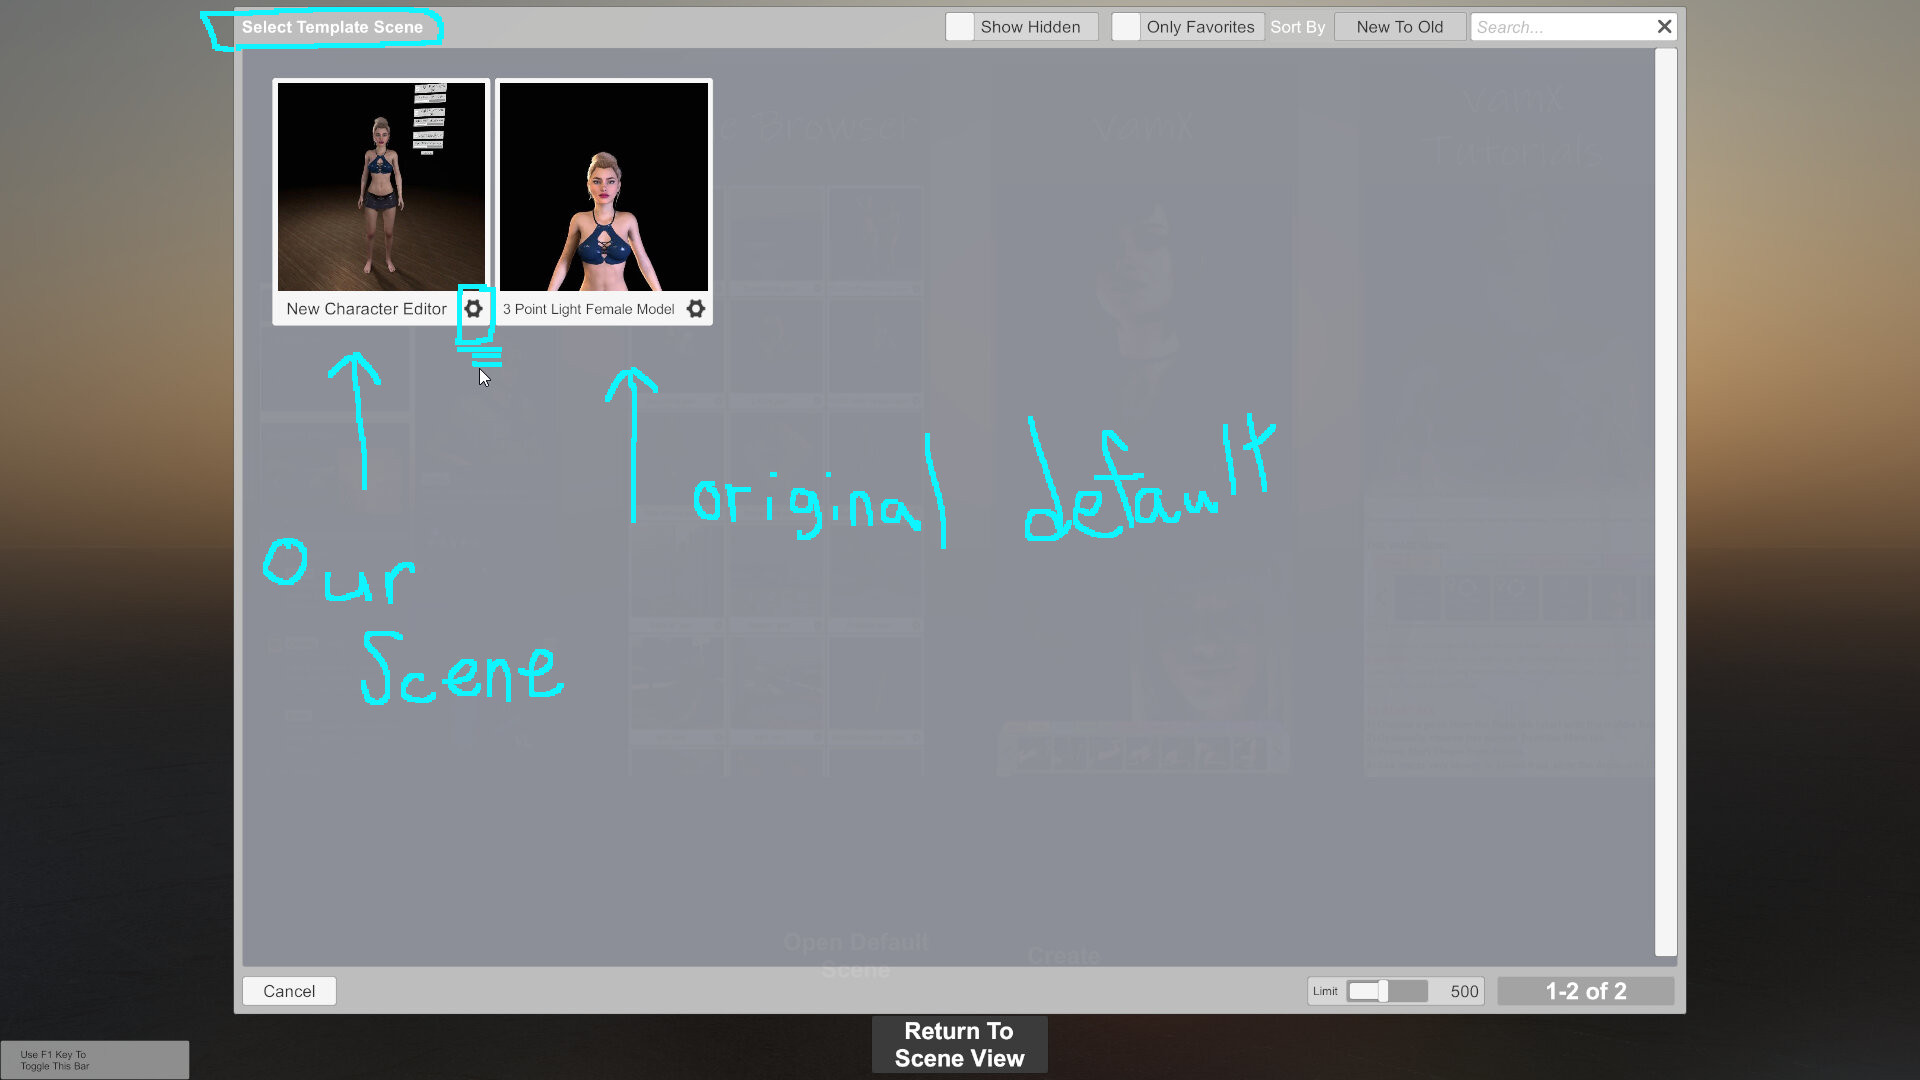
Now for the uber pro tip for the master creator. If you want this scene to be your default scene for vam and override the "3 point light female model" scene, we can do that. Then it will open by default right when you load vam.
Go to your Vam installation folder -> saves -> scene. Find your scene.
New Character Creator.json is the scene, and New Character Creator.jpg is the icon image. Copy-paste those to duplicate them.
Now, rename New Character Creator (1).json to Default.json, and New Character Creator (1).jpg to Default.jpg. This way we still have our original scene labeled as a fallback.
Now VaM will automatically load in on Default.json as an override. You want that gone? Just delete Default.json and Default.jpg and VaM should return to 3 point light female model, and you'll still have a copy of your customized scene.
Well, that's it, that's the guide. I hope it helps you. Make a stable environment, create faster, save yourself and others time, and enjoy yourself!
Perfect and easy for beginners, but intermediate players can learn something too. Some of these very simple options took me forever to figure out that they even existed.
I know everyone has experienced the frustration of dragging something in their scene when they least intended to, and everyone's experienced the frustration of playing a scene and watching it break horribly due to an accidental mouse click that the creator could have prevented for you. Oh no, they left the wood panel floor accessible! Now it's stuck through my model's chest and I'm in explosion city! Help!
(More stable vam) + (more time saved) x (number of vam players) = Net increase of vam creation and scenes for everyone. Simple as.
This guide contains step-by-step instructions with pictures. You can read it for overlooked tips you can make use of. Also, any intimidated beginner can use this guide. You can follow it step by step to make your own stable, risk-free character creator sandbox scene off of VaM's default scene. And at the end, you can save it and change it to be your VaM's default scene that loads in when VaM opens. You will save yourself a lot of time with these easy tips, and create many things, much faster. You will also prevent your players from breaking your scenes and save them aggravation and time.
Searchable Table
1) Orient, Stabilize, Add Atoms
2) Hide and Move Atoms
3) Lights
4) Wall
5) Save, Template, Default
Some Pro Tips will be tagged in orange, if you want to skim and find them. But I think this whole guide is a pro tip, or I wouldn't have taken the time to write it and illustrate it. I know how much time and frustration it's saved me, so I know it can help you too.
Let's get started.
1) Orient, Stabilize, Add Atoms
Let's create a stable scene with virt a mate. Open your default scene, or go to Create. We're looking for the scene "3 point light female model." Let's change the view to at least 60.
Hit u (menu), e (edit mode), and t (show atoms) and you should see this.
What's that square on the right? Pro Tip - It's the hidden controller for the 3 point light setup! I didn't know about this for the longest time. It's in its off state right now. Let's make use of it.
Click here to turn it on. Now we can control the lights with a UI.
Now let's get our model stable. Get her selected by hitting N to cycle to her, or click a body part, and hit Select Root.
Click her plugins tab. Mine has nothing because I've changed some things, but if yours has MacGruber plugins like breathing and gaze, just click to remove them all. They're great plugins, but if we want a completely stable character for editing, we're going to turn them off.
Next, we'll go to her auto behaviors tab, and turn auto blink off. Now she will not blink. This will help us when we edit the eyes.
Next. Being spatially oriented can help with creation more than you realize. Let's get a floor in the scene quickly. We'll choose a wood panel.
Go to the add atom menu.
Pro Tip - For the next handy trick, click Select atom on add and Focus atom on add. This will target and focus on our atoms when we add them. That way we will not lose track of our atoms when we spawn them, and we will save ourselves time.
Go to floors and walls, wood panel, and click add atom.
Our wood panel is here, and it has spawned in selected.
2) Hide and Move Atoms
Next, we will do something we're going to do a lot. This is what's going to prevent accidents and visual distraction for you. We will "hide" the atoms. This makes their icon disappear so that they can't get randomly dragged around or selected, by you, or more importantly, your players, yet they will still be on.
How many minutes of your time have been wasted by dragging something you didn't intend to drag and messing up your scene? In some scenes, one simple mouse click can move a piece of furniture, leading to a physics explosion between the characters. Let's end that once and for all.
Don't worry, this doesn't disable them or make them permanently disappear. It's very easy to get them back. This will come later.
At the top of the wood panel atom's tab, check "Hidden." (If you've lost your wood panel, it's between your person's feet. Hit C to cycle through atoms while hovering there until you can select it.)
This will leave the atom on, but hide its control from view. This way we are not going to pull on it, shift it, move it, anything, when we are dragging things around in the scene, or manipulating our person's feet. Has that ever happened to you? A floor doesnt need to move, and we're preventing that from happening now.
So let's go through what else we can hide to prevent unintended operation or accidental movement when we least want it to happen. It will also minimize visual clutter so you can think and make decisions more quickly. Don't underestimate this tip, it will speed up your creation and save your players hassle.
This thing is the player navigation panel. I know it can be used to move the player and do some nifty stuff like teleporting. But I don't use it. If you do, leave it alone. But I will hide it, as I don't need it and don't need the distraction.
Next, the window camera. This can be used for many things- it's a camera feed. But we don't need it right now.
Don't worry, there is an easy way to see everything we've hidden and we can easily turn it back on. You can go to the select button which will show the hierarchy of all atoms in the scene, and click show hidden.
Pro Tip - OR, you can also just hit H on your keyboard! It took me the longest time to figure that out. So, to get these items back, just hit H, manipulate them, then hit H again to hide them.
Next, the container for the 3 point light setup is an option. I will leave mine on but you can hide it if you really hate accidentally dragging things around.
Pro Tip - This object happens to be snapped to a grid (check its Move tab), and partially rotation locked, so when it does move, it moves in a more stable way and is harder to mess up. But I will leave mine un-hidden for now.
Next, the biggest culprits- the things between our person's feet! Like the wood panel was. If you reach down here and can't target something close to other atoms, leave your cursor there and hit C to cycle between atoms near your cursor. When the flag icon is yellow, click it.
Oh wow! It's the subscene container for our 3 point light setup!
It's a subscene- basically a master object that contains a bunch of other objects. Go to the control tab so we can manipulate it, and just hide it.
Now it will stay in our scene, but we won't be moving it around. Our lights are important, and I assume we want them to be where we put them.
We don't need this happening, right? The entire lighting setup moving because of an accidental drag? If this happens to you with something, just go to the move tab and click 0 for the x, y and z positions, and rotations if necessary. That can wrangle a rogue atom (or you can always lock all 6 position and rotation options in advance).
(Pro tip coming!) Next, what about this, the cause of everyone's woes? Has this ever happened to you?
All you're trying to do is move your person's feet, and you end up sending her flying off somewhere. I'll zero her back out with the move tab, changing her rotation first to avoid collisions. If you're really scared, you can turn her collisions off in control and physics before zeroing her, then turn them back on. And you can always load the default pose via the pose presets tab.
Pro Tip - Ok, go to control and physics 1, and check Detach person root control.
Her little man icon atom is her master atom that contains all her body parts. Now, dragging it around will not move her body parts, because the master atom has been "detached." If you need to quickly move her again, you can always re-attach the atom. Pro Tip - I recommend using my BioRigs resources if you want to be able to move your model faster without worrying as much about this master atom.
Now, let's slide the atom off to the side so we can see clearly when we sculpt our model.
To quickly access its tabs, we can always hit the N key, which cycles through people in the scene. Manipulate it with an arrow here and just slide it out to the left, or somewhere. If you've lost it, find it with N or the select button, go to its move tab, and zero out its position to return it to the scene's center.
3) Lights
Great, now we're going to do the lights. The position they are in is just fine. But if you want to really move them easily, Pro Tip - click each one and change it to possessable in its control tab. We can then move each one easily by using possess. While in possess, use tab for mouselook. I have it bound to my thumb mouse button.
I will possess each light and drag them out a little further, to where I want them.
Oh yeah, that back light is always super duper bright, I always turn it down. Let's do that now.
Great, no more glare on the back. But is it too dark? We'll edit the lights. Click the back light, or any other light, go to "Light," and simply raise its range if it's further away (not shown).
Pro Tip - Now, let's change each light to a cooler, whiter color. This will help you when seeing your model's true skin tone so you can have a neutral perspective when you adjust it. If you don't want to mess with this step, just move on.
You can drag through the color panel, or manually type into the fields for red green and blue. Here, I'm choosing R 235, G 235, and B 240. That's a balanced light with slightly more blue than the other colors, so it's a cool light. We can change each light to this value, or your own value.
I've adjusted all my lights, so now I see this. Good.
Now, here's a pro tip which you can skip if you want. If I have my lights exactly where I want them, I don't want them to move. So we can hide them like we did before, or perhaps better, lock their movement in the move tab. But we're not going to lock it fully.
For this tip we will need the rotation of each light zeroed, so let's do that now.
Once each rotation is zeroed, go back to their move tabs and click Lock on their X position and Z position. This will make it so that we can still grab them, but only move them up and down. Very cool! This will help a lot when looking at higher and lower parts of the body from time to time. Your lights are still visible, still accessible, and if you accidentally drag one, it's really no big deal.
Great, now you're a novice light rigger, and you've got most of it automated. You just built your own rudimentary light rig that's set up for a wide variety of uses, and it's stable so that it will save you a lot of time. Want to turn them to spot lights? You can. And you can point them with an easy possess.
4) Wall
Now I'll do a short section on adding a wall, but you can skip it if you want.
Here's our wall, let's get it hidden, so no one will be dragging or rotating it accidentally.
Ok, the wall is too damn bright. We'll fix that in the material tab. Pro Tip - We can drop out its specular intensity, pull downward (darker) on its diffuse color, or drag down its diffuse texture offset for a quick change.
Now there's less glare. But set the wall to anything you want, or drag it back from your rear light, or reposition your rear light.
Anyway, I personally don't want the wall right now, so I'll turn it to off. It's still there, it's just off. You can find it again by using show hidden, or H, reselecting it, and simply clicking it back on.
5) Save, Template, Default
Ultra pro tips time.
Great. You have your nice and stable scene. But how do we quicken our access to this scene and save ourselves even more time? Well, go ahead and save your scene as something like New Character Creator via the red save scene button on the top row of the menu.
Now once you've saved it, find it again in Open Scene (you can search for its name in the upper right), and click the little gear icon on it. Then check "Use as Template."
Now, we can find it super quickly by clicking this icon, All Templates Browser.
Mine opens to this.
Now for the uber pro tip for the master creator. If you want this scene to be your default scene for vam and override the "3 point light female model" scene, we can do that. Then it will open by default right when you load vam.
Go to your Vam installation folder -> saves -> scene. Find your scene.
New Character Creator.json is the scene, and New Character Creator.jpg is the icon image. Copy-paste those to duplicate them.
Now, rename New Character Creator (1).json to Default.json, and New Character Creator (1).jpg to Default.jpg. This way we still have our original scene labeled as a fallback.
Now VaM will automatically load in on Default.json as an override. You want that gone? Just delete Default.json and Default.jpg and VaM should return to 3 point light female model, and you'll still have a copy of your customized scene.
Well, that's it, that's the guide. I hope it helps you. Make a stable environment, create faster, save yourself and others time, and enjoy yourself!


