YameteOuji Clothing Creation Process
I am fairly new to VaM clothing creation so hopefully this guide will help others since a lot of the problems I had are still fresh on my mind. I’ll be detailing certain processes that are specific to my work flow. Your process may be different depending on which software you enjoy using the most. And I’m still new so you might find some things I am doing wrong or understand incorrectly.
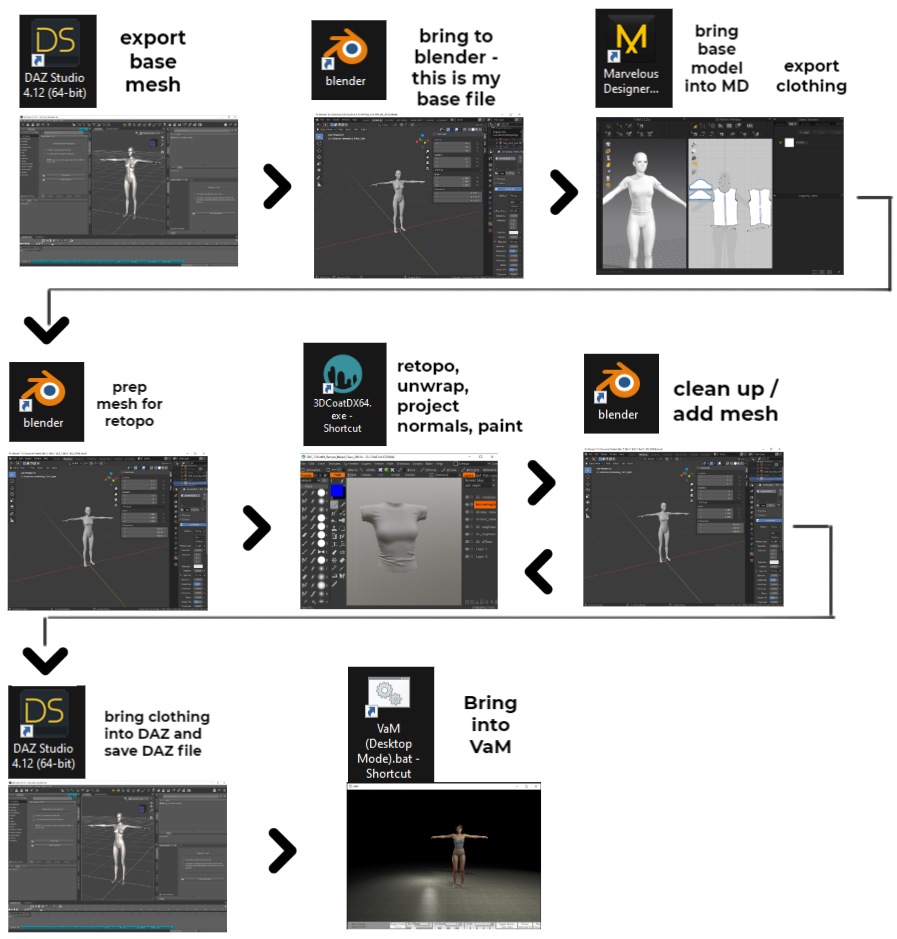
Let's start with a view of my process from a distance.
It starts in DAZ studio. VaM uses the Gen2 base female mesh as the basis for its avatar. It IS the Gen2 base mesh. I use this mesh to start creation in Blender.
I use Blender as my “home base” file. Blender is where I make small mesh edits and prep meshes for next steps. Any 3D Software could be used as your base file as long as it is able to edit the mesh on a per pixel basis. Like welding 2 specific vertices together.
*Before jumping around in software, make sure your dev process can import and export meshes at the same scale. Once you choose consistent scale settings you won’t need to worry about this later.
From Blender it goes to Marvelous Designer. I make the high poly clothing mesh in MD and export it out.
The high poly clothing mesh is imported back into Blender. Because MD does not generate good topology, I need to retopologize in other software. Topology is quite important for how mesh imports into VaM. Bad topology I have found will distort more in VaM. In Blender, I will prep the high poly mesh so that I can export it to 3DCoat. Sometimes at this stage I will also use Blender sculpt tools to add detail to the high poly mesh.
High poly mesh is imported to 3DCoat. A large part of the work (in my process) is done in 3DCoat. This is where I retopologize the mesh, unwrap, project normals, add materials, and paint the final mesh. 3DCoat may not be the best software compared to other apps that specialize in certain things such as ZBrush or Substance, but I found it is quite the workhorse for game assets. It does almost everything. And I prefer it’s painting features over Substance. The final export out of 3DCoat gets me to a 90% finished asset. 3DCoat export is customizable to give you all the maps you need such as specular, normal, gloss, diffuse. You can also export out a layered psd file!
Finally the asset will go back into Blender. In Blender I will make final fit adjustments and mesh tweaks as necessary. Depending on the asset, I may go back and forth from 3DCoat and Blender a few times.
Then to DaZ. This step was quite mysterious to me at first. I had thought that DaZ was doing something special to the mesh but this is NOT the case. The only purpose DaZ serves at this point is to reformat your mesh file to a DaZ *.duf file. VaM reads *.duf files to import clothing. At one time someone wrote a duf exporter for Blender but that plugin is now out of date with 2.8+ Blender releases. I wish I could cut DaZ out of this process.
Then finally the *.duf file gets imported into VaM. It is here where you can expect the unexpected. Depending on your topology, your mesh will distort. But don’t worry, later in this guide I will share some tips to avoid some of the problems you might encounter.
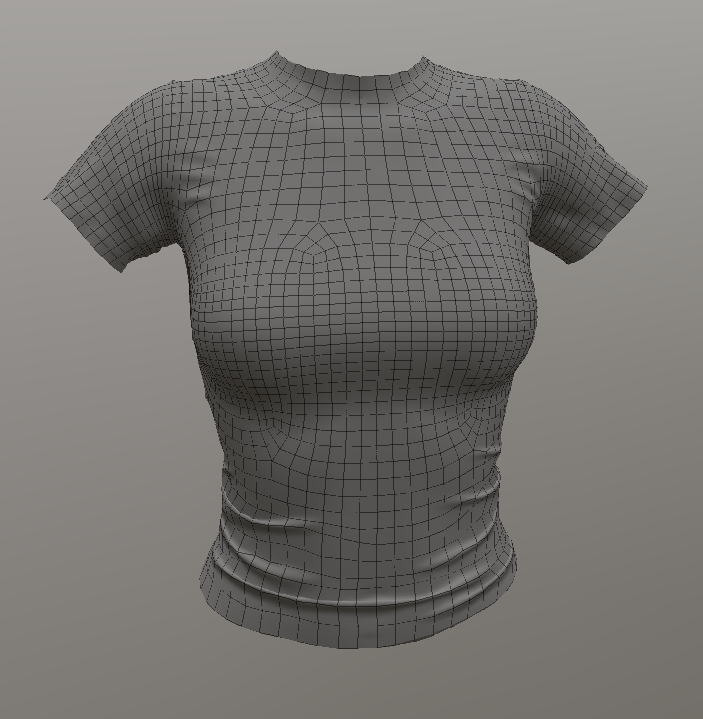
Let’s make an asset
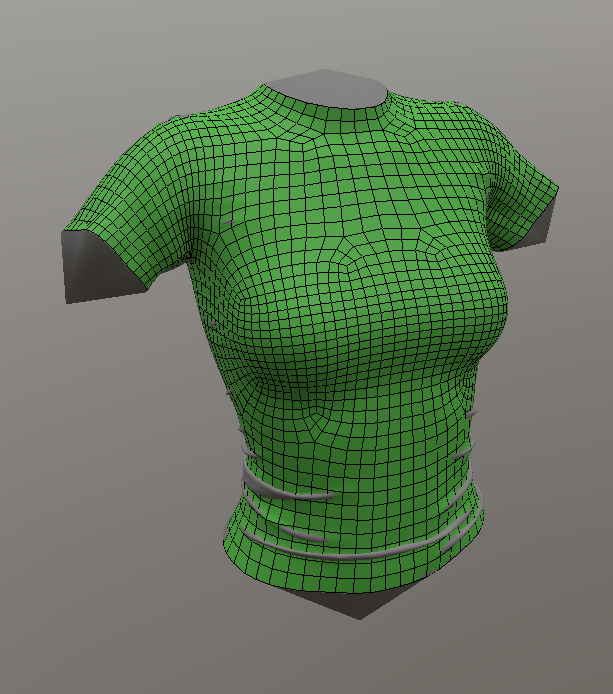
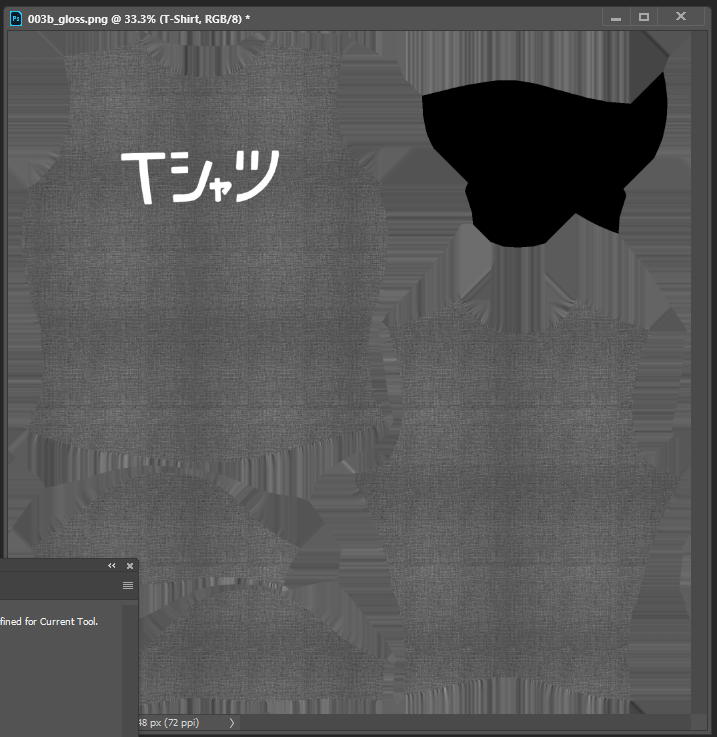
My very first VaM asset was a T-Shirt, it is only fitting that I use this asset for this demo. I made a few mistakes with that asset so I will use this opportunity to fix those. Lets begin!
*I won’t cover how to do general asset creation operations in this guide. That would be a waste of your time and there are many YouTube videos that better show you how to do those sorts of things.
Let skip ahead a bit and assume you already have your Gen2 female base mesh ready to go. I usually have a Blender file with Gen2 already in there.

The default T-Pose you get out of DaZ is VERY important. If you want your life to be easier, don’t change this pose. (I use an A pose in my process but I’ll explain later why I do that). Long story short, I dislike T-Pose. So why a T-Pose? VaM import assumes you have authored your asset for use on this exact pose, mathematically vertex for vertex. On import, VaM skins your asset mesh to this pose/mesh/skeleton. I think.. I could be wrong.
Lets get Gen3 into Marvelous Designer.
MD is not mandatory, I have seen many amazing artists not use MD. The main reason most artists will use MD is to help make clothing folds look more natural and possibly speed up that process. But if used for wrong purposes, it could also slow down your process.
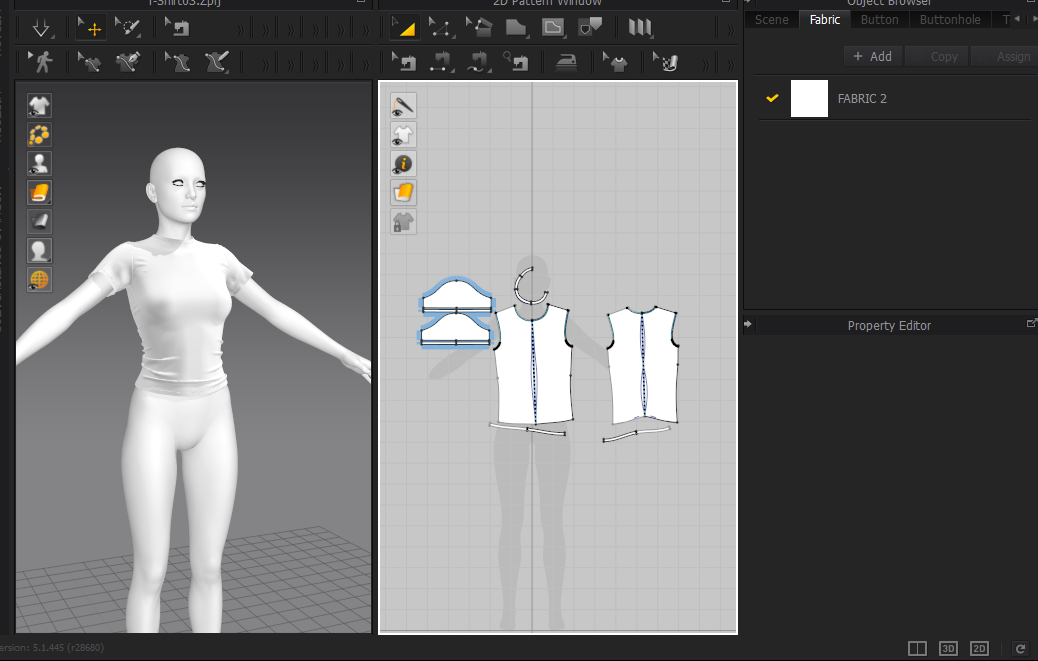
Above you can see my first ever asset in MD. Here are some of the mistakes I made.
Mistake 1 - I wasted time separating out the collar and sleeve ends - making “sew seams” in MD.


This turned out to be a waste of time because it is faster to do this step in other software later such as Zbrush or 3DCoat.
Mistake 2 - I tried to put seams in realistic places based on how I would sew in real life. Don’t worry about where you put seams because when the mesh is exported, you won’t be able to see them. You will export the entire thing as one smooth mesh. I have found this to be the fastest and easiest.

If this side seam was too far forward or back doesn’t matter. As long as the overall clothing looks like it fits correctly.
Mistake 3 - She’s not in T-Pose. I had to correct the sleeves rotation to fit in a T-Pose later.

Mistake 4 - As a final last step, I should have remeshed while in MD before exporting out.
Before remesh:

After remesh:


Looks a little smoother.
Export your mesh out of MD
These are my export settings. I don’t use “Thick” but rather I use “Thin”. Thin means your mesh will only be one sided. And that is what I need because I will be retopologizing the mesh. I have seen some tuts say to use “Thick” but I don’t because that makes my process more complicated for the way I like to do things.

From MD to Blender
Here we are with the high poly mesh in Blender. As I said before you want a T-Pose so we’ll fix that later.
First lets look at how this mesh imported.
If you look closely down the side you can see where my seam was. This is because I had done extra steps in MD to expose the seam. But if you do a simple “stitch” operation, the seams will mostly be invisible which is what you want.
There’s a strange artifact near collar. I’ll try to fix this now.

This is why you cannot use mesh straight out of MD. It’s a hot mess. These seams are welded but look at how MD does that. I will be retopologizing this mesh but I still need the artifacts cleaned up because this mesh will be the basis for my normal map projection.
Lets just collapse these.


Mostly cleaned up now. I don’t worry about imperfections like you see below. A real clothing article has many more imperfections so this will only make the clothing look more realistic.

Now to get it back into a T-Pose you might have some trouble depending on the software. This is due to the high vertex count. Blender I have found is lacking in this regard. But Zbrush has some nice options for posing. I tried to pose the sleeves back using a rig in Blender but because of the high vertex count, Blender had difficulty weighting the skinned mesh. So I will do this step after i have a low poly mesh instead. I just need to make sure there are enough edge loops at the armpit area. And I’m too lazy to do it in Zbrush.
Why I prefer A-Pose
Here is a real person in T-Pose. Take a look at how the sleeves are hanging. Marvelous Designer will do this same thing to your sleeves!
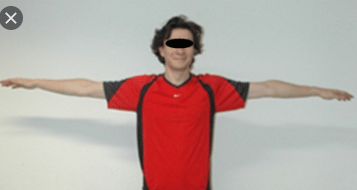

An A-Pose will mitigate the hanging effect and the sleeves look more natural for when a person is standing.

Wrong fold direction

Correct fold direction

That is why I go through extra trouble of using A-Pose.
Prepare the mesh for retopology using Blender
Here is the cleaned up mesh. If there were certain details I wanted to sculpt into this mesh I would do it now. But the only details left to do are adding seams so I will do that in 3DCoat instead.

And here is the prepped mesh ready for retopology. Notice I have capped the ends and collapsed into a cone shape. I do this to make retopologizing easier in 3DCoat. Now it’s ready to export .obj file. All of my imports and exports are done with .obj.

Time to bring the high poly mesh into 3DCoat
*A note about the 3DCoat software creators: I’m pretty sure they would not approve of using their software for VR Waifu games. So I wouldn’t go sending them messages about how great it is for making VaM clothing. :)
Here is the high poly in 3DCoat.
The first thing I will do is retopologize using the Retopo tools. 3DCoat has different workspace modes you can enter by clicking on them.

If you take the time to learn your shortcuts and how to use the different tools in here, you can retopologize relatively quickly. There are tools in other software like Zbrush that will auto retopologize a mesh but I choose to do it by hand for more control. Good topology is quite important when authoring for VaM.

Before we begin, let me show you my old topology.
Old topology:

There are some problems here that I have since learned not to do.
Some of this may not make sense now but will later when I show you a better way to topologize for VaM. And yes, VaM seems to like topology to be a certain way.
Don’t do this: Making topology edge flow to follow your folds. In normal game art creation you would follow silhouette features like this. But in VaM, you don’t want to do this. What you really want is evenly distributed vertices.

I know this looks pretty bad but please forgive me. I was intentionally trying not to spend too much time with retopo because it was my first asset for VaM and I was simply trying to get through the whole asset creation workflow. I recommend you do the same if you are new to VaM asset creation. You will learn lots of things along the way that you will want/need to change.
The lesson in this picture is this: Don’t try to optimize your edge loops and vertex count too much. As I said, what is important is evenly distributed vertices.

This area is especially bad. Having weird edge flow near the ends of your mesh will visibly distort the ends. I have since learned to keep at least 2 clean edge loops near the ends of your mesh.

Lets retopologize this mesh and try to do a better job this time.
I usually start out in the chest area. I make my quads double the size of the final quad size. When I’m done, I will subdivide the whole mesh. Also I have symmetry enabled so I only need to do one side.

There are some really nice tools in 3DCoat. I use draw mode a lot. This for example will make one long quad. Hitting enter on keyboard will make the quad.


Now I will use subdivide tool..


You can also do this..


Very recently I have learned a lesson about how important it is to have proper edge flow on breasts. So I now do this area first.


We want more edge loops on breasts than anywhere else. Why is that? It’s because you all like to equip your waifu with huge breasts. So we need more edge loops here for that reason.
So just in this area I have doubled edges. Keep in mind that this will double again when I subdivide the entire mesh.

Now I need to evenly distribute vertices. See how I slid edge loops to try to even them out while still concentrating more at center of breast.

Now to get the rest of our quads to the larger size we started with. I usually make a diamond shape like below to change my quad size.
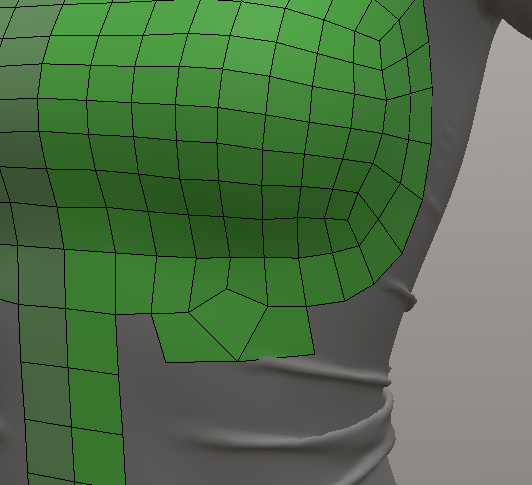

Maybe you have seen topology that follows muscle groups.. But keep in mind we are not doing that here. We are trying to get back to evenly distribute vertices and a grid looking pattern. The breasts are an example of when we do want to break that rule and follow form because of how much morphing happens to them. Poor breasts..

Remember how I capped all the ends into a cone shape? I did that because when you are topologizing near edges you might have a vertice slip off the edge into nowhere. So the cone shape is there for me to slide the vertice back into position if I need to.


Front chest done.

Back done

Sleeve done.

Now lets relax it. You can select vertices and run a relax operation a few times. I stay away from edges because it will mess up edge.

Apply symmetry

Fix edges on other side now..

Very easy with slide tool.
Run another relax. This also will snap verts on other side to surface of hp mesh.

And subdivide
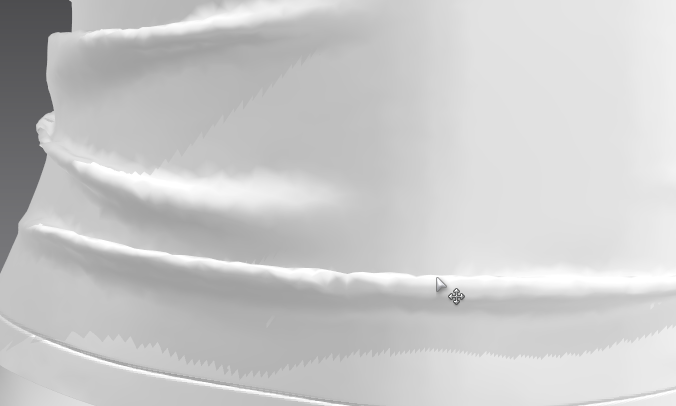
In some cases the verts don’t know where to go.. They get lost under the folds.

I had to break my own rule here and follow some folds. This is because the folds protrude out so much. Anway, it is not always possible to get even looking quads. Life goes on..

Ok mostly got all the folds covered.

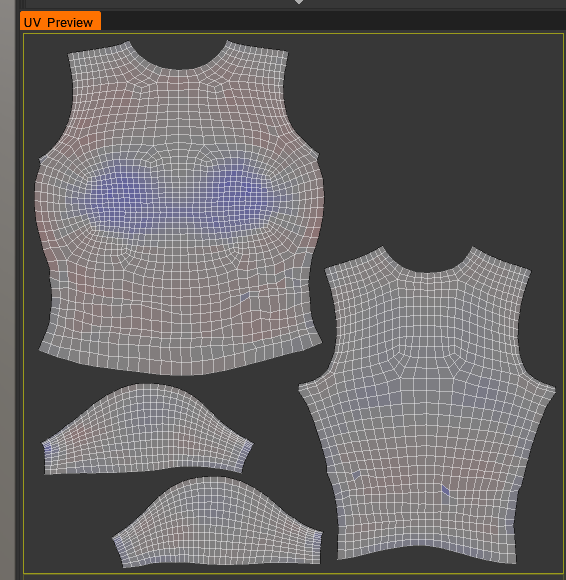
Time to unwrap
In 3DCoat we will do this while still in Retopo workspace.
Tools on left let you do that. I usually mark seams where real clothing seams would be.
Unwrap with push of button in same workspace.

I will try to pack uv a little tighter if possible. Not great but it will do.
*It’s good to have less UV islands. Every time you split a uv edge, you are adding vertex count. Most 3D software will not show you an accurate vertex count because it doesn’t count verts in UV. But Unity knows! And will tell you the actual count if you click on the mesh inside Unity project view. This count will almost always be higher than your 3D software is telling you.

Another note - every edge you make sharp instead of smooth edge will also add to your vertex count. To show you I turned import normals to none in Unity.

Now the mesh is 38 verts! Essentially all edges are smooth now. You wouldn’t want to turn off normals but just to illustrate my point.

Ok back on topic!
Lets bake normals!
Again, we do this from the Retopo workspace in 3DCoat.
Here are my bake settings but this will change depending on your HP mesh.
Scan Depth inside and outside will need to be adjusted every time. Because I have so many folds protruding, I have “Snap to Outer Surface” set.

After you run this operation, you can now switch to Paint workspace.

On right panel you can toggle visibility of the HP and low poly mesh. I can never remember which is which. So just toggle and look to see what happens.

In this case, HP is FABRIC_2*. I’ll save a new iteration of my 3DCoat file and then delete this Surface Material.

Now I am just left with my LP mesh that has a normal map.

Now we are ready to paint. And yup, I do that in 3DCoat too.
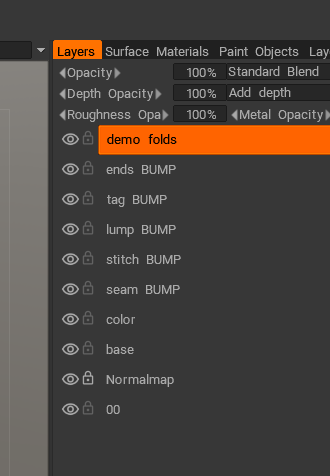
Painting, Adding bump detail, and Surface materials
I start by painting a fabric smart material. 3DCoat has built in materials but you can also make your own. This is a T-Shirt material that I made at the time when I made my first asset.

Painting this material will also paint specular, gloss, and bump at the same time. Note how I said Bump and not Normal. 3DCoat lets you paint down bump but not normals. When you export the asset it will convert all information into a single normal map.
Another process I use now is: I always paint in greyscale 50% grey if I plan to color with presets in VaM. For this T-Shirt I will do that.
The texture is a bit harsh so I will fill and set opacity to the layer to soften it.
This feels like the right amount of bump, spec, and diffuse texture.

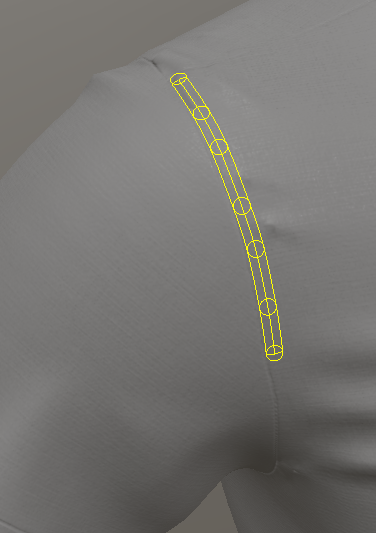
Now I’ll add a seam with a bump brush. I have created my own bump seam preset that uses a line nurbs tool. Kind of hard to explain but it is more or less a line tool that lets you place points and it will show you a nurbs preview. When you hit Enter, the brush will be applied.
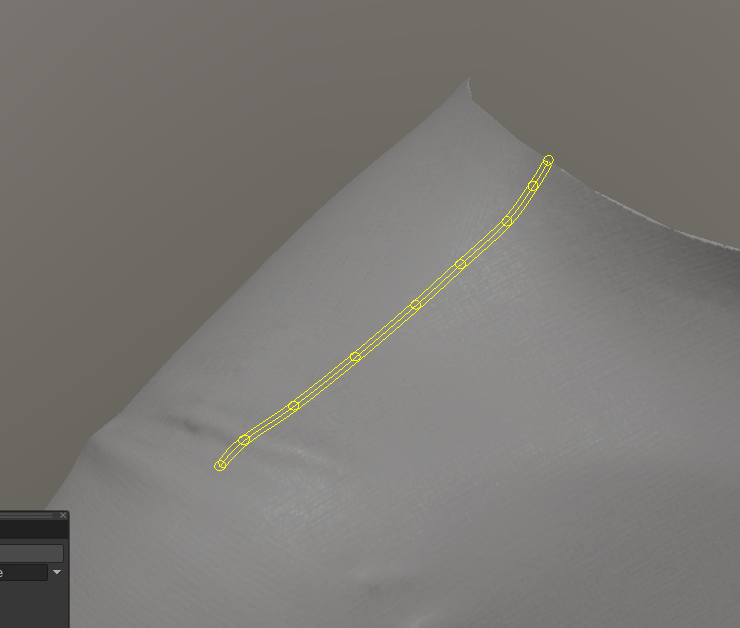

This seam feels too thick so I’ll do it again with thinner line.
That is better. I’ll do all the seams this way.

Seams added.

You can look at a T-Shirt and examine the seams to figure out what will make it look more realistic. I usually add a “lump” beside the seam. Real fabric seams have an edge of sewn folded fabric under the seam.

And I usually paint in a bump for the tag under the fabric just to give it that little bit of extra realism.

Now I’ll do the edges to give them the feeling of thickness.
This is without.

Lets add it.


I’ll fix the very ends where you can see the bump end and artifacts. I’ll fix this in Blender by sliding the edges in.


Demonstration - you can also paint in folds! I do this sometimes if I feel the garment needs more..
This was just a stroke of a brush. Remember its not sculpting, its simply a bump being painted.

You can erase to soften and stack another bump on there. I did this in about 5 seconds. Very fast way to add folds.

But I’ll get rid of these because they’re not needed. And that’s a weird place to have folds.
It’s on a layer, all I need to do is delete the layer. You can see here I have all my different types of bump details on different layers. This is a nice non destructive way to work. I can go back anytime and adjust or add or delete.
Additional note about actually painting the normal map
It is possible. And it can be useful if artifacts need to be painted out. Here’s how..
After normals have been baked, there will be a layer called Normalmap. You can paint this layer directly by changing the map type to Standard Blend. Unlock the layer by clicking the lock icon so it can be edited.


Now normal map colors are visible. Painting directly on this layer is now possible. Just remember to change it back to Normalmap blend mode after edits.

Ok done with adding bump details!

Lets add some text.
I get my viewport in the correct camera angle. I will project in Photoshop because 3DCoat lets me do that.

I have a hotkey but here it is in the menu..
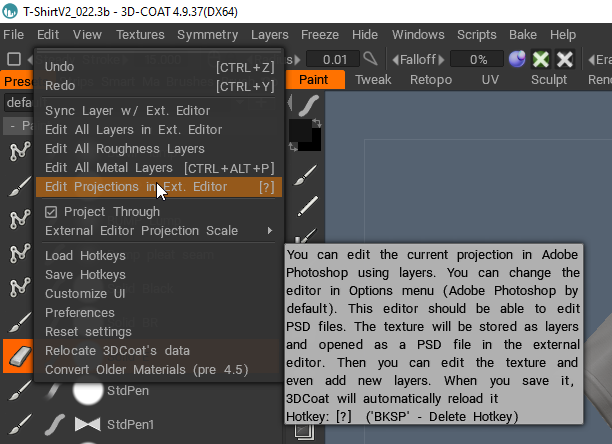
By selecting this in menu, it opens up PS and opens an image.

You can paste anything on to this image above and save the image. When you tab back into 3DCoat, whatever you pasted on there will be on its own layer!
I can’t find the source image of the “T-Shirt” text I had used. I’ll need to find it..
This T-Shirt is from My Hero Academia.

Midori wears this shirt in one of the episodes. I’m glad I need to re-do this because the original text was not quite the same style.
Ok, I put it on a layer.

And here it is pasted into its own layer on that document that 3DCoat sent to PS. I didn’t use 100% black color. Art tip - nothing in the real world is 100% black. So I will never use 100% black when I color things black. It’s more like 80% black.

Another tip - You can see that when 3DCoat sent the image to PS, it sent all the layers along with it. DON’T, I repeat, DON’T mess with those layers!!. You are free to add layers but do not mess with the layers that are already there. If you do, 3DCoat will interpret them as projections and totally jack up your layers in 3DCoat.
Ok this looks good. Let’s save the image and tab back to 3DCoat.
Too easy..

It’s on the back too..

This happened because “project through” was check on in option.

We’ll just erase the one on the back.
We’re basically done in 3DCoat.
Lets export out all our maps and the mesh.
Before export (of after if things don’t quite look right) You may want to change your Preferences.
I change my “Normal Map Software Preset” to Blender. And “Normal Maps Export” to Maya, Blender. I had to change this setting because the normal maps before I changed settings looked wrong. So if you have weird looking normal maps, try messing around in here.
Below are the settings I use.

Ok NOW lets export.

There’s a bunch of different export profiles. Just find the one that has the maps you need. You want Diffuse (Albedo), Specular, Normal, Gloss. You can remove the ones you don’t need by hitting X button. And you can add by hitting “Add texture”. Looks like we need to add Gloss.
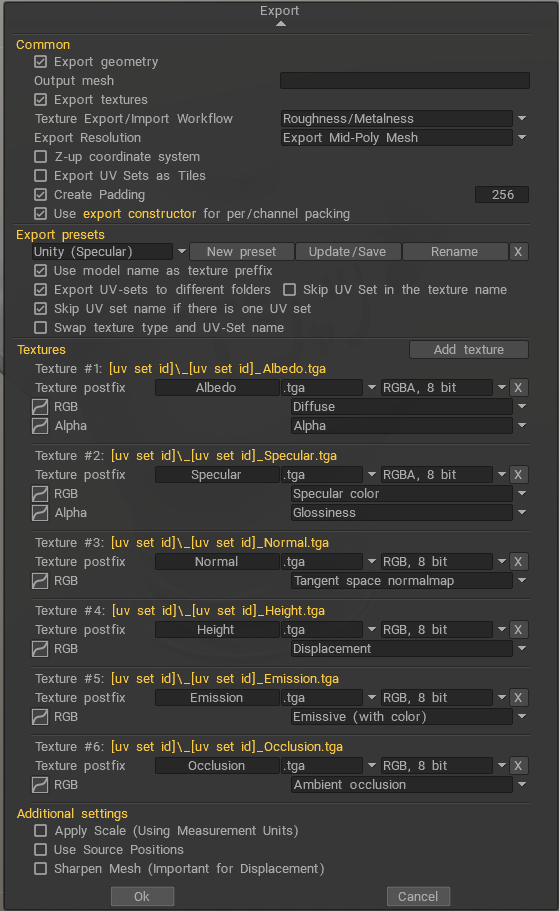
I already had a custom profile setup. Here is what it looks like. Before hitting Ok, make sure to specify what folder to export to in this same dialog.

Here’s my export folder and there’s all my maps along with teh obj.

There’s just one more step before I close 3DCoat. I will export out a psd layered file too. I will use this to setup 3 texture variations - white, grey and black. This is because if you try to custom color a grey texture to black, you will lose some detail along the way. And same is true for grey to white. So I like to give users the option of starting from a color value that is already close to the color they want to customize.
Textures > Export > All Layers Color.

This will export a layered psd.
Weird thing happened!
This never happened to me before but it seems that you don’t want Sharpen Mesh turned on. For some reason, only on this mesh I had to turn it off.

Because with it on, it made my mesh look like this upon import to Blender.
So turn that off if you have similar problems.
Here it is turned off. Back to normal.

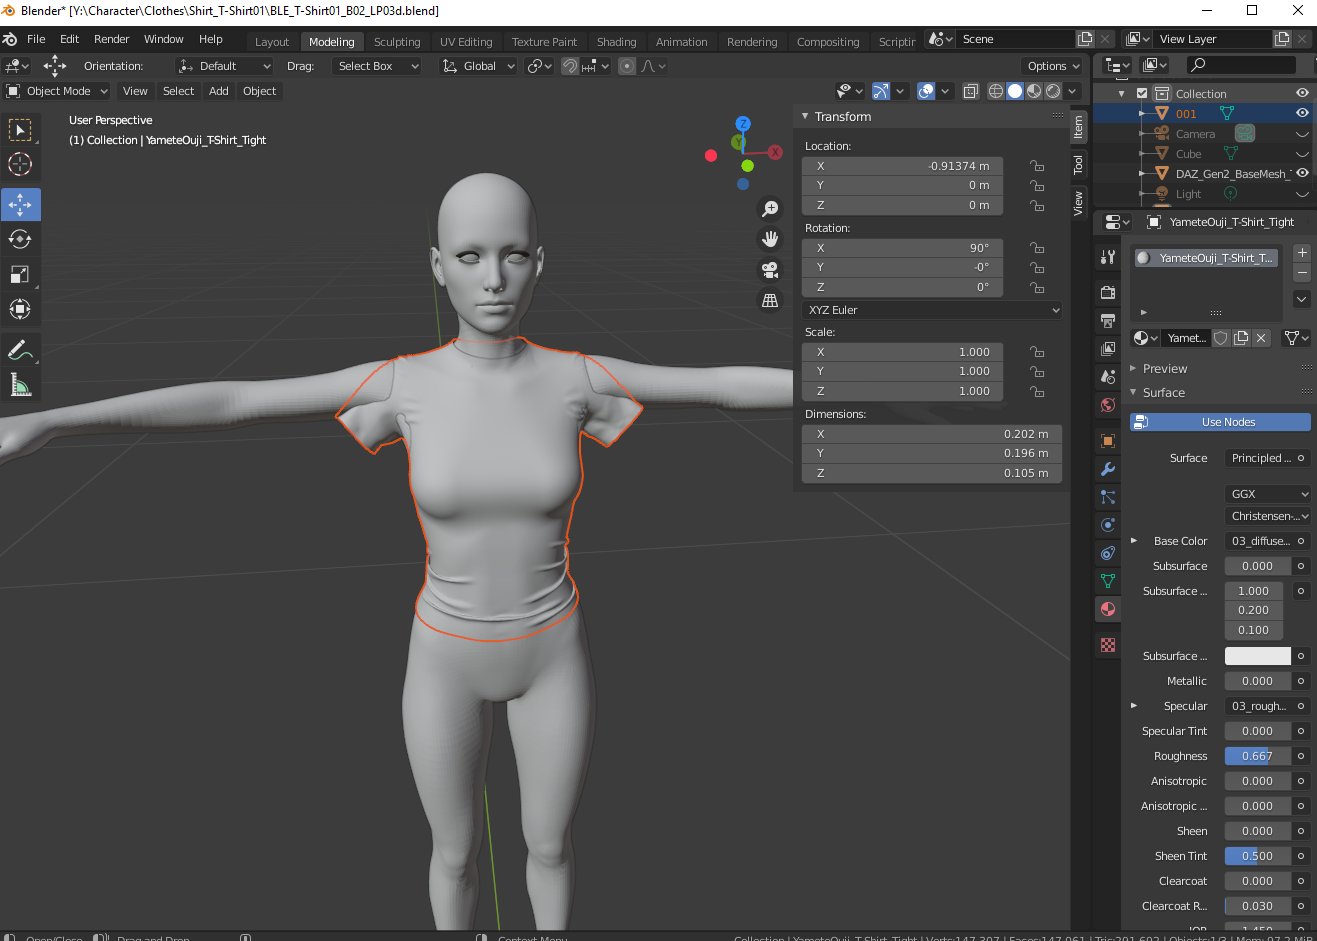
Back in Blender
Ok here we are with the mesh back in Blender.

I’ll fix the arms now.
I setup a quick armature in Blender just for the purpose of rotating the sleeves back to a T-Pose. I’ve tried other methods such as soft selection but using a quick skeleton seems to be the fastest way.

Mostly back to normal.

I’ll adjust the rest with smooth select vertex move.
Adjust back into T-Pose has made some space on chest sides. I’ll need to fix this. Not using T-Pose is a lot of work!

Back to T-Pose!

Fix the shirt edges.

A simple edge slide will do the job. Blender edge slide tool preserves UV (uv won’t distort).

Ok, It’s pretty much ready for next steps.
*There’s a few more things I do specific to my workflow in order to make my clothing compatible with my other clothing assets. Things like offsetting the mesh out from Gen3 so that my bra assets or underwear will fit underneath without having to use VaM offset values. I like to get the mesh surface offsets as close to possible before import to VaM.
Once the mesh is ready, I export it out as .obj.
Import asset to Daz
Import the asset into Daz. You don’t need Gen3 mesh in there. In fact, make sure its not in there. Only your clothing should be in there for saving.

Save as scene duf file.

Done in Daz.
Prep textures
Before importing to VaM I’ll prep textures first.
The spec map has no information aside from a grey value. So I have the option of not using it and relying on VaM’s specular number value instead of using a map. It saves user disk space.

But it looks like the gloss map has texture information so it will be used.

I’ll make one small change to the gloss map.. I have it open in PS along with my layers psd texture that was exported from 3DCoat.

I’ll transfer the text to the gloss map and make the text white. This will give the text a little bit of shiny surface and hopefully that will appear like a real life screen printed shirt.
Save the texture.
Import to VaM
I use a slightly modified default scene.

I added one more light and positioned them differently. A light in back and a light in front.
I always use this default character to import clothing because afaik she has no morphs (or very few). Don’t use a morphed character to test your clothing.
Choose Clothing Creator and Customize.

Select duf file

Find your .duf file and import.

The first time I created clothing, I was surprised at how different it looked after import.
It looks like a stuffed sausage. This is because by default, VaM will apply an offset to the mesh.

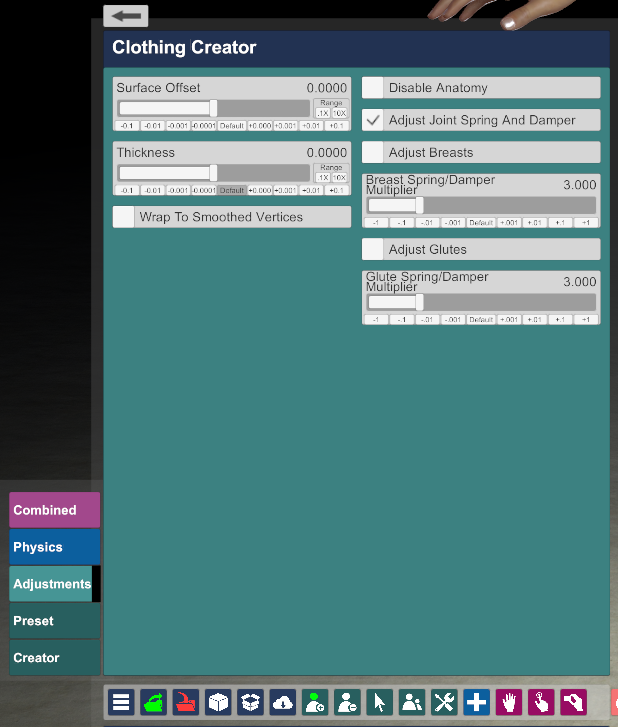
Let's set the offset to off.. Lets turn off the offset. Lets off with the offset. Offset to off. Set it off!
Change Surface Offset to 0.0
Change Thickness to 0.0.
I do this to all my clothing so they are as close to the original mesh as possible.
Apparently its a bit cold in that room. Don’t worry about this for now. We’ll turn up the heat later.

Tab into Combined > Textures. Let’s add textures now.

It’s empty. It’s because VaM just created this folder. You need to copy your textures here. Back out, copy, and go back in.

There they are.

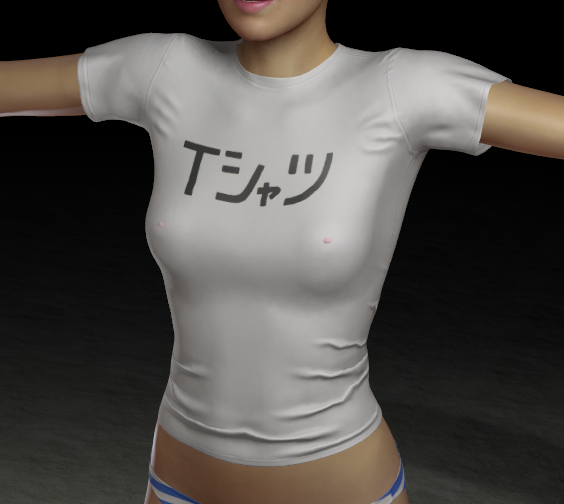
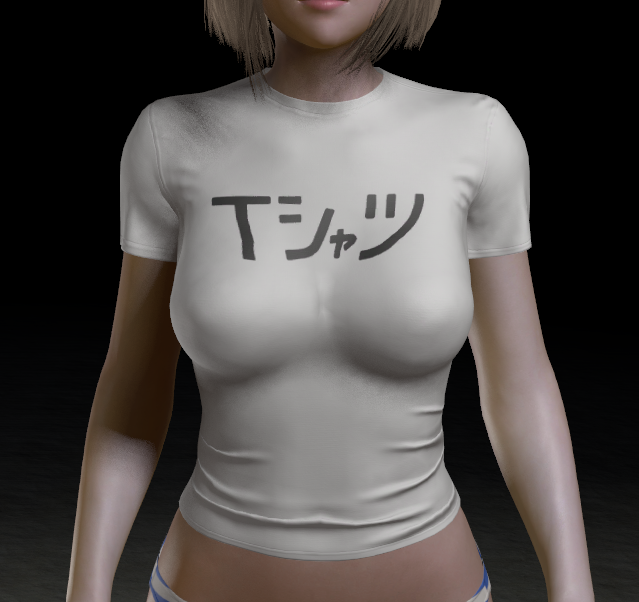
Texture applied.
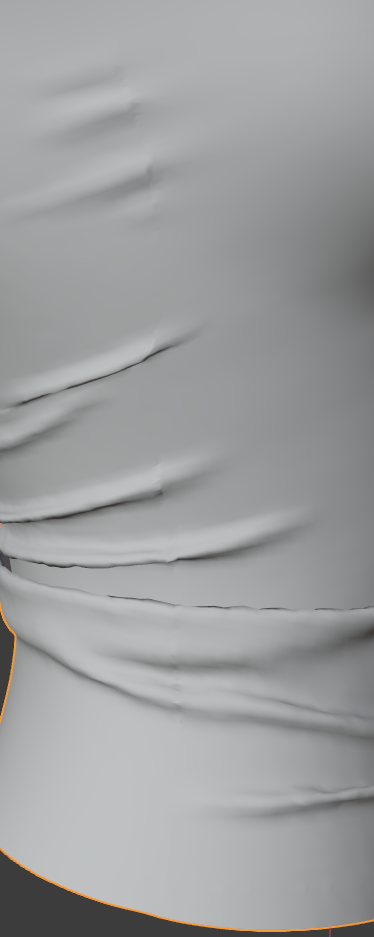
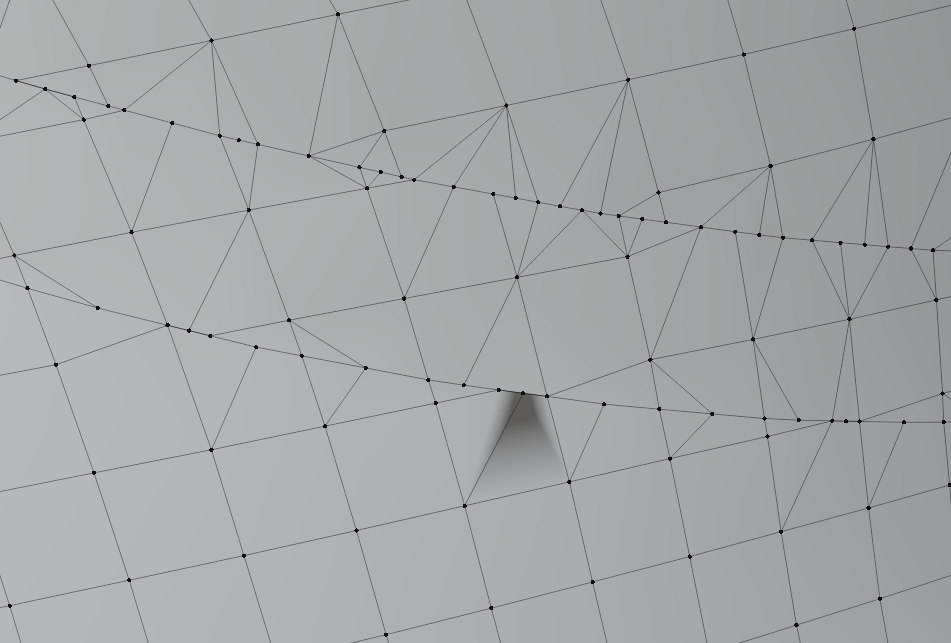
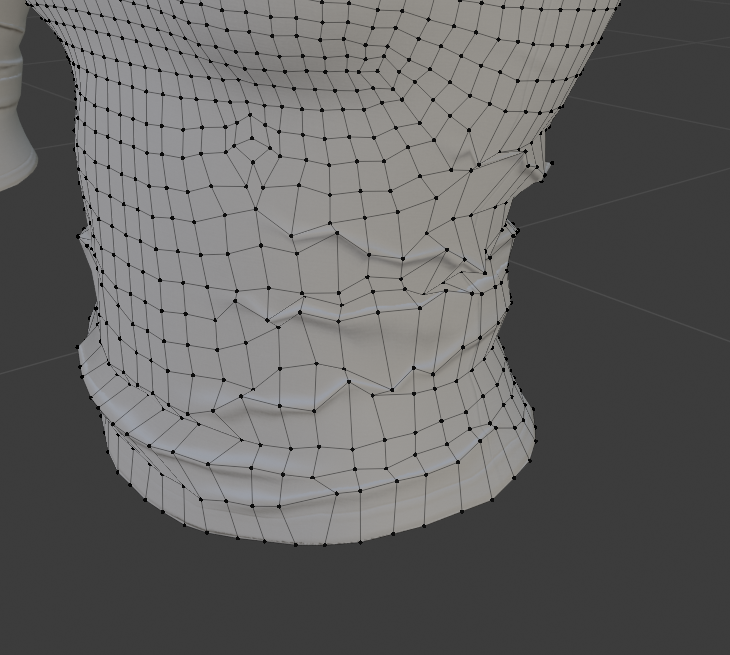
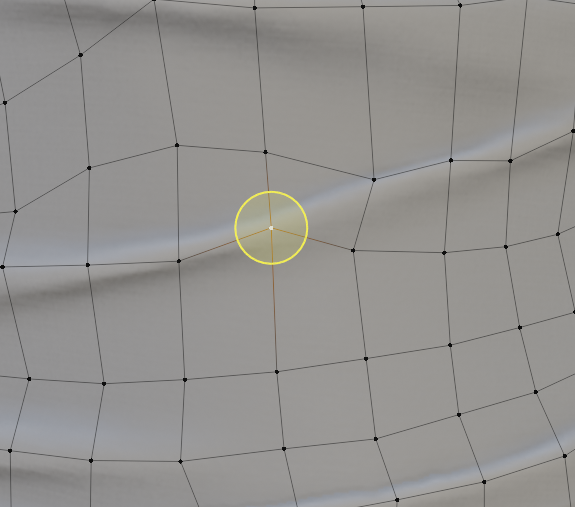
I had a feeling this would be a problem! Remember what I said about evenly distributed vertex. VaM likes even quads.

It would be nice if VaM had a diagnostic tool to let us see the mesh. So that I can show you what VaM is doing to this mesh, I will overlay the wireframe on the texture.
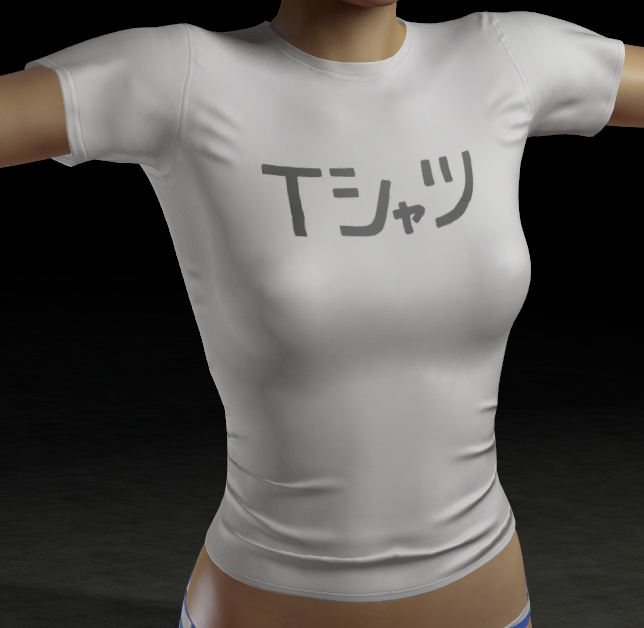
Here it is in VaM.

Here it is in Blender. This is why you don’t want to follow folds or optimize too much if it means uneven looking quads.

As you can see, VaM is trying really hard to ‘fix’ my mesh. It’s evenly distributing vertices for me. So if you have issues with wildly distorted clothing, try to get your quads as even as possible before import to VaM.
I’ll attempt to even the quads in Blender and re-import mesh.
In Blender I’ll slide all of these verts by hand to try and even out the quads.

VaM you’re a tough old bird! I will try to please you.
Vertex slid and tried to even out quads in Blender.

Reimport adjusted mesh to VaM.
Better! It will never be exactly as you had it but this will do.

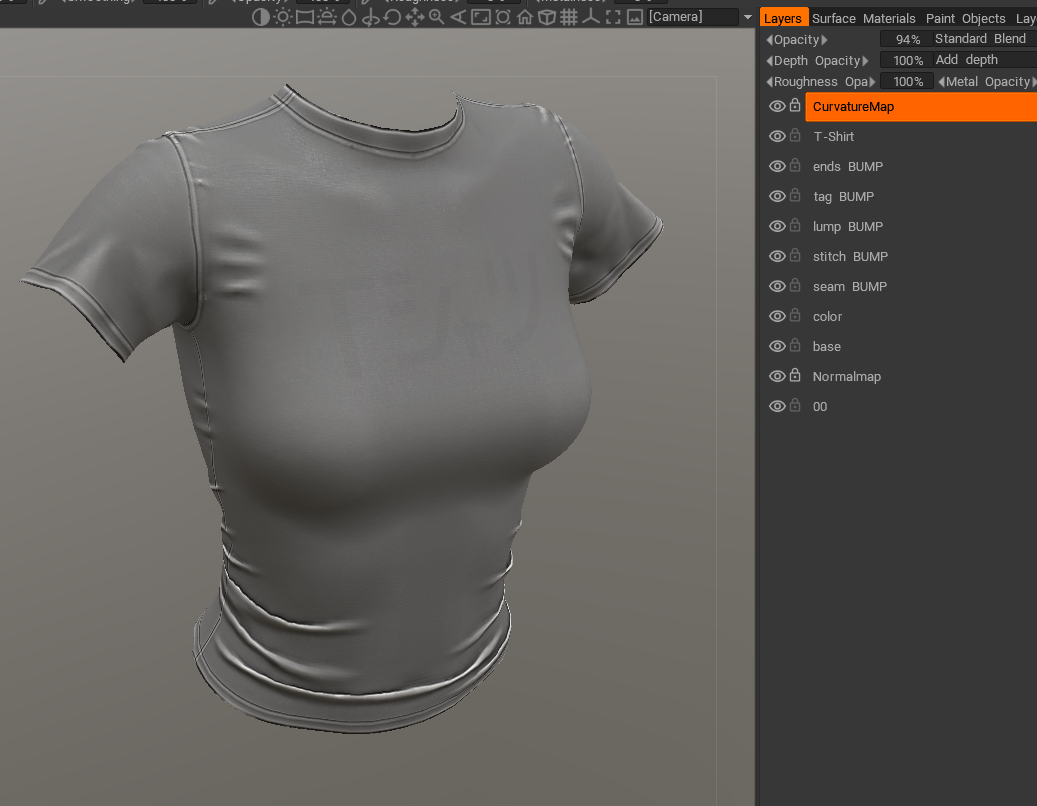
As I’m working I will notice some things that need adjustment. For example: I went too heavy with a curvature map in 3DCoat. 3DCoat will let you easily generate a curvature map. The map is set to Overlay.

Here is what a curvature map looks like in regular blend mode at near 100% opacity. I’ll turn down the opacity and re-export my diffuse map. I’m using the curvature map in this case just to emphasize darks and light areas. But I had it too strong. To much will make your asset look like a game asset from the year 2000.
It's time to make a sim texture
Getting different breast sizes to fit a shirt can be tricky.

VaM has a Set Uniform Sim Texture button which will “fill” your sim texture with a value of red specified by the slider below. This can be used to quickly setup clothes for sim. But I rarely use this method because I like to have more control over what parts sim and what parts do not.

Let's make a custom sim texture.
I create my sim textures in 3DCoat. Using a paint package that will let you paint directly on the mesh really speeds things up.
I open an existing file and save as “*_sim”. I remove all the layers and add a layer filled with 100% Red value.

Vam uses Red 0 to 255 to determine what vertices will or will not sim.
Red 255 will not sim.
While Red 0 or lack of Red will sim.

I hope some day the creators of VaM will utilize the other channels like green for things like spring effect. But that’s not important right now.
I’ll use the color Blue to paint an area that I want to sim. I use blue because it’s near the opposite end of the color wheel and that makes it easier to see what is not red. But you can use black too, as long as it is not red.
*3DCoat tip - You can choose what to paint in 3DCoat. Sometimes you only want to paint diffuse. Like for this sim, I only want diffuse. So on the menu bar you’ll see these little material balls. I will X toggle off the one’s I don’t want but keep diffuse on.


You can also paint in symmetry mode

Here I have added some sim to the nipple area.

Lets try this out to see what happens. Export it out as png from 3DCoat.
In VaM select sim and load up your texture.

Hit generate sim data.

Check on sim enabled.

Looks like we turned up the heat. (sorry). The area that is painted blue is now simming. It is slightly offset (pushed out) because when VaM sims, it will always offset your clothing.
I will at this stage save a version of the clothing in VaM.

I do this because I now want to load up other morphs to test other breast types and see what the sim does. If you don’t save your clothing and load up another look, then you will lose your clothing and need to re-import it again.
Here is the same shirt on VamJapan female morph. You can put her arms down at this stage as well to see how that looks. It looks pretty good but the one area I like to also sim is the cleavage (between bewbs) area. Because real shirts don’t stick like shrink wrap.
I add sim between bewbs.

You’ll need to open the existing clothing in creator to update the sim texture.
You don’t need to generate sim again. Vertices already have calculations on them, at this stage all the vertices use is the Red value to determine how much sim to calculate.
Haha this does not look right. On the base female it would probably look ok but this character has larger breasts.

In physics tab adjust distance scale. Turn it down. This will ‘shrink’ the mesh. Now you can go back and forth to fine tune your sim with these methods.
*I only change Distance Scale for sim. I have messed around with the other settings and sometimes I use them but 90% of the time I just change Distance Scale.

Here is the sim I ended up with.

I like to load up a few other female looks just to make sure the sim works good enough for them. There will always be morphs that don’t look good with your clothing and there’s not much you can do about it sometimes.
As final step I loop back around and load up the default female just to make sure she still looks ok.

And it’s done.
I hope this will help you make many wonderful clothing items for your waifu! Have a nice day and be excellent to each other!
